

Begin with a twilight stroll along the riverbank to frame that backdrop till dusk; this approach keeps visitors calmer and focused.
Across avenues and quiet side lanes, this list highlights blocks where each complex keeps a distinct mood; thoughtful framing reveals how the façades that sits long on the street interact with the road from different angles. The façades catch the light at different hours, inviting visitors to linger.
From the Kremlin complex to Stalinist towers along the broad road network, the list presents long façades that keep their own cadence as day shifts to evening. Each site earns a place in the lineup, begin a careful comparison of scale, ornament, and the way materials weather over time.
To capture the shift from rosy dawn to deep dusk, plan routes that allow you to move along the complex corridors without backtracking; start that morning light and proceed along blocks to catch the cooler dusk tones. A calmer, quieter approach on weekdays helps preserve the mood and keep composition clean. Locals and visitors in moscow alike will notice how the same road and avenues carry different stories across hours.
In every image the city’s layers form a complex dialogue: blocks, arches, quiet courtyards, and the way the light reveals texture on façades; that dialogue sits long on the viewer’s memory, making this list a lasting backdrop for your images.
Building-Focused Shoot Priority List: 20 Moscow Facades to Feature in Your Album
Plan early and afternoon sessions, using a polarizer to tame bright times, water reflections, and glass, then move to street-level angles to reveal contrasts and textures across architectural surfaces.
Priority List by Site and Time
| Facade | Site | Best Time | Key Features | Shooting Notes |
|---|---|---|---|---|
| Cathedral of Christ the Saviour | Central riverfront, Kremlin Hill | early | massive stone, river glow, monumental scale | exposures around 1/320; use a polarizer to control sky and water; show visitors in scale; keep routines simple and steady |
| GUM arcade facade | Red Square core | afternoon | glass canopy, brick contrasts, numerous arches | capture glass against brick; avoid lens flare with a polarizer; shoot from street level to emphasize depth |
| Bolshoi Theatre | Theatre Square | early | ornate sculptural details, pillar lines | frame from an angle that shows texture on stone; long exposures at dusk can show glow on façade |
| State Historical Museum | Red Square | afternoon | deep red brick, towers, decorative patterns | contrast between brick and sky; vary height by stepping back; include pedestrians to show life |
| Metropol Hotel | Manezhnaya Square | evening | historic silhouette, ornate cornices, glass windows | use reflections on wet pavement; plan for bright times against dark stone; keep a tight crew rotation to avoid crowds |
| Tretyakov Gallery | Zubovskaya area | afternoon | brick mass, column rhythm | textures of brick and stone; shoot with a wider lens to capture scale; be mindful of visitors |
| Pashkov House | Kropotkinskaya, Moscow River | afternoon | white marble, classic columns | balance light across facades; include water foreground for glow; expose for stone details |
| Lomonosov Moscow State University (Main Building) | Vorobyovy Hills | bright times | vertical silhouette, spire, brick accents | emphasize architectural height with a wide angle; expose for blue sky contrasts |
| Kotelnicheskaya Embankment Building | Yauza riverfront | afternoon | seven sisters style, strong verticals | show contrasts between stone and glass; plan several exposures to capture depth |
| Hotel Ukraina | Kudrinskaya Square | evening | bricked tower, streamlined flanks | glow from sunset; use street lights for balance; avoid crowd clutter |
| Ministry of Foreign Affairs | Kutuzovskiy Prospekt | late afternoon | brick mass, decorative facets | long exposures to smooth traffic; portray the liaison between massive forms and sky |
| Moscow Conservatory | Tchaikovsky Square | afternoon | ornate facade, tall windows | texture of stonework; capture reflections in courtyard windows; include children strolling for scale |
| Red Gate Administrative Building | Red Gate Square | early | decorative brickwork, sculptural elements | highlight architectural contrasts; use a polarizer to manage glare; keep site tidy |
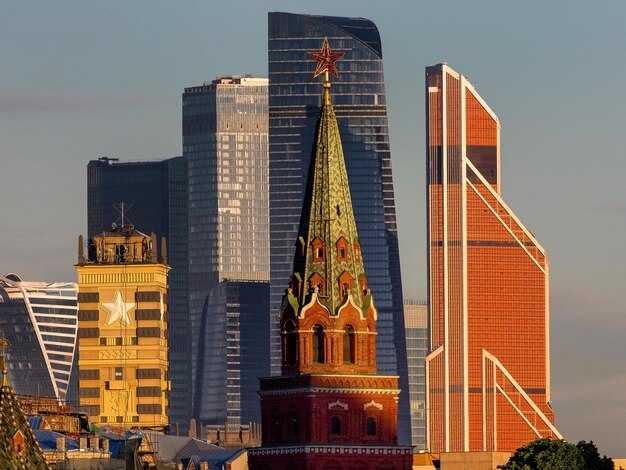
| Spasskaya Tower | Kremlin, Red Square | sunset | clock tower, red star, brick and stone tones | glow from golden hour; frame against soft sky; ensure safe distances |
| Kremlin walls | Red Square perimeter | blue hour | fortress lines, long façades | show the length of the site; vary vantage points; avoid crowd focal points |
| Arbat Street facades | Arbat Street | autumn afternoon | historic plaster, balconies, street life | textures against daylight; include passers-by to show scale; plan a few frames with children in frame |
| Historic bank building on Tverskaya | Tverskaya Street | afternoon | ornaments, cornices, bold design | avoid repetitive shots; use a low angle to emphasize height; shoot multiple exposures |
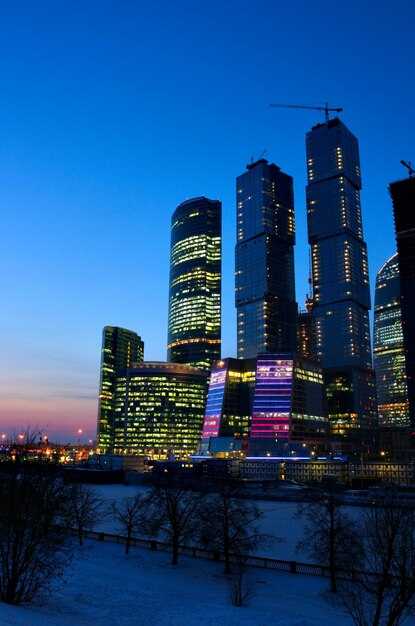
| Mercury City Tower | Presnensky District | late afternoon | glass curtain walls, facets | numerous reflections; contrast against blue sky; use a polarizer for glare control |
| Federation Tower | Moscow City International | golden hour | sharp geometry, glass surfaces | pair with neighboring towers for contrast; keep to daylight to retain color; vary encoding of lines |
| Izmailovo Kremlin | Izmailovo Park | autumn days | timber tones, rustic stone | family activity scenes; long shadows; show texture of wood and stone |
Gear, Routines, and Workflow
Set a routine: arrive sites early to secure clear sightlines, then shift to crowd-friendly afternoons. Work with a small crew to manage visitors and keep frames clean. Use a polarizer to tame glare on glass against bright skies, and protect detail using controlled exposures. Plan for multiple frames per site, alternating wide and tight compositions to vary the design and story of each shot.
Weather, Seasons, and Lighting: Optimal Conditions by Month and Building
-
January
- Best light window: the hour before sunset in the late afternoon; dusk typically falls around 16:40–17:10; cloud cover will enhance textures on façades, and reflections will bloom on numerous windows.
- Where to shoot: adjacent avenues and wide squares near the main façades; a guided tour will unlock restricted viewpoints and elevate perspective.
- Guidelines: keep a concise setup with a wide lens; wind can blur reflections on glass, so shoot with a stable stance; dates for daylight changes vary, plan around them; the light will showcase brick tones and cool sky between the structures.
-
February
- Best light window: 16:00–16:45 toward dusk; cloudier days will reveal richer textures on façades and help control glare on windows.
- Where to shoot: use nearby pedestrian crossings and wide sidewalks to include multiple façades; numerous windows provide rhythm for a tour-friendly sequence.
- Guidelines: check dates for any time changes; use a polarizer to tame reflections; aim for a concise, contemporary look by balancing warm and cool tones in the composition.
-
March
- Best light window: 17:00–19:00; dusk can extend into early evening as days lengthen; cloud-free patches will add a crisp edge to façades.
- Where to shoot: stand near adjacent corners of a block to compress the façade rhythm; a tour can grant access to elevated angles with wide views.
- Guidelines: vary between one or two shots per building to keep the tour concise; watch wind on loose banners; dates of time changes may shift the hour you target.
-
April
- Best light window: 18:30–20:00; blue hour begins earlier than in mid-spring, so plan for dusk blue reflections on façades.
- Where to shoot: use wide streets to include adjacent structures and their textures; numerous window lines will help illustrate rhythm across surfaces.
- Guidelines: balance between warm sunset light and cool sky; restricted zones may apply at some entrances, so book a tour for access; dates are steadily shifting toward longer days.
-
May
- Best light window: 19:00–21:15; sunset extends late, enabling long exposures that reveal reflections on glass and subtle cloud movement.
- Where to shoot: aim for wide-angle compositions that include adjacent façades and their textures; a tour helps reach elevated vantages for listings of many windows.
- Guidelines: shoot both brick and glass surfaces to show contrast; wind is less disruptive in calmer evenings; plan around dates with events that affect crowds near the sites.
-
June
- Best light window: 21:00–22:30; dusk lingers and blue hour offers strong reflections on contemporary façades.
- Where to shoot: use wide streets to capture numerous façades in a single frame; adjacent plazas yield broad context for a tour.
- Guidelines: keep shots concise by limiting to two or three angles per site; restricted areas may still apply after dark, so verify access; dates peak with lively city light.
-
July
- Best light window: 20:40–22:00; long evenings allow extended shoots near glassy façades with warm-to-cool transitions.
- Where to shoot: choose near wide avenues and elevated podiums to emphasize windows and textures; a tour will reveal restricted diagonals and adjacent corners.
- Guidelines: use the hour after sunset for dramatic reflections; wind tends to ease, but check for gusts that shift cloud movement; dates are long, so plan a two-part tour if needed.
-
August
- Best light window: 19:30–21:30; dusk values stay strong, allowing bold reflections on façades and creamy light on stone surfaces.
- Where to shoot: frame contemporary façades with adjacent structures to highlight textures; numerous windows create a rhythmic pattern across wide compositions.
- Guidelines: stay mindful of restricted access after dark; bring a compact tripod for longer shoots; check dates for festival closures that could affect your tour route.
-
September
- Best light window: 18:00–20:00; golden-to-dusk transition provides warm highlights on façades and crisp reflections on glass.
- Where to shoot: position near the edge of wide streets to include both the foreground and adjacent façades; a guided tour yields additional elevated angles and vantage points.
- Guidelines: aim for concise framing with two to four windows or patterns per shot; be prepared for variable wind that can lift banners or pull reflections off surfaces.
-
October
- Best light window: 17:00–19:00; sunset occurs earlier, so plan for a brisk dusk shoot to capture warm light transitioning over façades.
- Where to shoot: use wide corners to incorporate adjacent façades and textures; numerous windows will contribute to a strong geometric read.
- Guidelines: check restricted areas and schedule a tour to access elevated viewpoints; dates of daylight changes are noticeable, so adjust the hour you target accordingly.
-
November
- Best light window: 15:30–16:45; late-afternoon light provides gentle warm tones on brick and creates soft reflections on glass during early dusk.
- Where to shoot: pick wide streets to frame adjacent façades and their textures; a tour helps reach vantage points with minimal obstruction.
- Guidelines: prepare for early dusk; restricted access may apply on some sites, so confirm with guides; dates influence shadow length and color balance.
-
December
- Best light window: the hour before sunset in late afternoon; dusk can arrive around 16:20–17:00; overcast skies often yield rich textures on façades.
- Where to shoot: near wide plazas and adjacent façades to capture repeated patterns and reflections; a tour will unlock restricted perches for dramatic shots.
- Guidelines: keep a concise, wide-angle approach to cover multiple windows; bring lens cloth for moisture and snow; check dates to anticipate shorter days and adjust your hour accordingly.
Composition Techniques: Framing Iconic Facades, Landmarks, and Urban Context
Framing plan: place the main facade along the upper two-thirds of the frame, keep nearby street activity in the lower third to add layers, and shoot during blue hour, sunset, or twilight for glass reflections of cloud textures. Expect a light breeze to move banners or tree leaves, adding natural motion without compromising crisp subject edges. Capture quick frames from nearby vantage points to compare rhythm and balance.
In moscow’s urban context, balance the monumental frontage with nearby towers to reveal rhythm between the historic massing and modern silhouettes. Let the backdrop include a cloud and a distant skyline; keep traffic as a restrained texture between the subject and the horizon, avoiding clutter. Use a shallow to moderate depth of field to emphasize the lines of the building from a clear vantage.
Framing patterns and backdrop choices
Test different frames by shifting the eyeline from the lower third to the upper two-thirds, aligning architectural verticals with the horizon to create a strong rhythm. Use layers created by foreground street elements, mid-ground facades, and distant towers; the glass on the front, a cloud, and wind-touched banners add texture that invites visitors to linger on the image.
Workflow for timing and publication
Plan around twilight and optimize for a quick turn: shoot several frames, pick the best, and schedule updates on the website. When preparing captions, explain the backdrop and nearby structures to help visitors understand context. Publish a focused set of frames and a longer gallery too; the interplay between traffic and the landmark reveals the city rhythm near the subject.
Practical notes: use a telephoto lens to compress distances from a sheltered vantage, look for blue hour reflections on glass, and frame from a position that minimizes wind blur on banners. If access is limited, shoot from permitted viewpoints and choose routes that cross near the landmark; this keeps the frame tight and legible for visitors who expect a quick, informative impression.
Access, Permits, Gear, and On-Site Shoot Guidelines
Begin with formal authorization from the city government or venue manager. Submit a written request 10–14 days ahead, detailing the scope (still frames), crew size, and the exact time window. If a guard sits at the entrance, plan for escorted access; carry a printed permit and a digital copy on your device. For sites that host a public tour on the first Tuesday, align your schedule to reduce crowds and optimize clean backdrops for the initial exposures. This will prevent delays.
Documentation and compliance: bring government-issued IDs and proof of insurance; the government keeps records of approved activities and required permits. Confirm if tripods, drones, or special stabilizers are allowed; if not, adjust with handheld approaches and lightweight supports. Ensure your permit specifies distance to surfaces and protected elements; never touch surfaces, and use protective mats or cloths as needed. If the venue operates within a restricted arcade or corridor, request a clear route and a designated meeting point for crew. reinforcing the rule: keep a tidy footprint and respect signage. For safety, instruct your team to sit in stable positions and maintain mobility; respect signage and maintain a clean footprint.
Gear, Framing, and On-Site Protocols
Gear checklist: camera bodies, a fast 24–70 and a wide 16–35 for interiors, plus a tele 70–200 for distant façades; bring spare batteries, memory, chargers, microfiber cloth; polarizer to control reflections on glass; a lightweight tripod or monopod depending on permit; clips to secure cables and cords; lens hood; a compact step ladder to gain a frame above crowds; carry backups for lenses. Plan two or more frames with different exposures; vary exposures to capture clouded skies and shaded surfaces; keep a small bag with a few essential tools for quick field tweaks. This approach will support a consistent look across a tour of structures and arcades.
On-site guidelines: begin by coordinating with site staff to avoid disruption; move slowly and mindfully, honoring nearby moments for passersby; capture through nearby windows to add depth; frame the composition to present a strong backdrop and clear foreground elements; follow a single strategy to maintain visual coherence across the tour of exteriors and arcade interiors; keep noise to a minimum, and respect restricted zones; reflections can be mitigated by changing angle or using a hood; if you meet a window, time the shot when cloud cover softens glare; bracket where possible to secure even exposures, and use clips to secure weather or wind-prone gear; after a session, review clips and stills on-site to adjust your approach for the next site visit or renewal.
Nearby Viewpoints and Context: Where to Stand for Dynamic Shots
Stand on the moscow riverfront near the Bolshoy Kamenny Bridge, a place where the frames of the historic center align through water reflections and glass façades; this spot delivers depth and layers that stay consistent when the wind shifts and sunset colors deepen. When you shoot, switch between a wide angle to capture the overall geometry and a 70–200 mm frame for tighter capture; a tripod may be needed for stable long exposures. Nearby, numerous access points are indicated on the english-language signage and the official website, and you should mind the restricted zones to keep a safe distance for the crew and models. They prefer this angle for a cohesive sequence that spans water, stone, and glass.
Recommended Spots
Spot 1 – Bolshoy Kamenny Bridge overlook: approach from the eastern sidewalk after late afternoon light; you’ll get river reflections, the Kremlin silhouette, and a clean line of sky. Spot 2 – Zaryadye Park observation deck: a contemporary twist that places historic corners in the frame against glass and metal; use a 16–35 mm range to keep the geometry readable. Spot 3 – Embankment by Cathedral Square: stand near the pedestrian path where water blends with stone, capturing multiple layers as sunset radiance washes the façades; watch for restricted sections and crowd flow; a guide may point out safe corners for a close, consistent sequence.
Practical Tips for Dynamic Shots
Coordinate with the crew to assign roles: they handle a lens kit, filters, and a basic high-low bracket so you can cycle through frames quickly. For depth and mood, shoot with foreground lines in view and let the glass catch the sky; this produces vibrant frames that balance old and new. Always check the english-language notices and the website for current access rules; permissions can be limited near some ramps or terraces. If you tour on foot, time your steps with the sunset for color-rich skies, and factor wind into tripod stability. Keep mindful of where you stand and avoid blocking pedestrian routes; they will appreciate clear sightlines and you’ll gain more dramatic, near-limit shots.


