

One-pan planning begins with a protein, a starch, and a vegetable, plus a bright acid and a fat. That simple balance travels across types of dishes, going from prep to plate in a compact stretch. Always keep portions modest to preserve texture and speed.
Space in the plan is precious; use root vegetables cut thin to speed roasting, or sauté sliced onions on the same sheet. This keeps everything inside one dish and reduces waste. summer ideas shine with fresh greens and lemony notes, like лимонная zest, which adds brightness without extra steps. A dash of wort or beer can deepen the flavor, especially when finishing with a quick glaze.
Whether you are a home cook or a baker exploring pantry ideas, the approach yields a great rotation of meals, producing steady results. Kvass or квасах on the side complements the plate, and online resources make it easy to stock the staples somewhere near you. Enjoying these quick plates after a long day becomes a routine, even if you’re not in the mood for heavy cooking–drunk on flavor is not the aim, just the taste.
Inside the kitchen, you can go from fridge to table without drama: the core concept is to assemble fast combos and keep repeating with new twists. For example, garlic, herbs, and a squeeze of lemon work with chicken, chickpeas, or shrimp; rotate starches like rice, pasta, or potatoes to keep things fresh, and you’ll arrive at a great result each time.
Fast-Prep Dishes & Kvass Essentials For Home Crafters
Recommendation: start with a 3-ingredient skillet that comes together quickly, paired with a kvass starter built from закваска and брожение techniques that you can repeat weekly. This approach is practical for every home kitchen.
- Stocking basics: chicken thighs or eggs, leafy greens, a starch (rice or flatbread), aromatics, a jar of закваска, and a small can of boza or coca. Those essentials cover most quick combos for home cooks. If attempts at improvisation arise, keep a few backup items aside to preserve speed and offer options for others who want variety.
- Two-pan workflow: brown protein first, steam greens second, then finish with a glaze. Keep ingredients lined up above the stove so you can take them in sequence; this tight setup reduces time spent searching and taking actions.
- Kvass path: брожение with закваска adds depth and tart notes. In moscow markets you can find ready-to-start kits, который ускоряет fermentation process, bringing you a steady flow of jars for later use. Aside from flavor, this path keeps things practical.
- Beverage pairings: boza provides a tangy, grainy note; coca offers a sweet contrast. Those options give you reliable sipping choices without extra prep.
- Flavor boosters: garlic-ginger soy glaze, lemon zest with pepper, paprika oil. Making these adjustments in the pan yields bright results without long cooking.
- Market timing and planning: visit the market early for freshest produce; neither them nor the stallholders will steer you wrong if you ask for quick cuts and sturdy textures. If youre focused on speed, you could build a small rotation so every evening stays simple.
When youre pressed for time, start with the simplest 2-pot approach and scale up later. Early steps show that even with a small plan you can hit the goal times. If youve decided to streamline, this approach helps you save effort while keeping flavors intact. Hope these tips help you stay inspired.
Fermentation notes and study: early study of quick fermentation can shorten your overall workflow, and брожение could be restarted weekly. The закваска path is practical, and a simple string tied to a bottle helps you track progress across days; this string method makes it easy to audit progress at a glance and avoid issues.
Implementation tips: mise en place on the counter, rinse greens, chop aromatics, and set up jars. Those small actions cut down on taking time later. If youre new to fermentation, a закваска starter kit can be a good starting point; this study can help you stay consistent in your home routine, bringing along a few jars to the market to test different herbs and textures.
In summary, this approach is practical for every home kitchen. Those who try it report that even busy days can yield a delicious, balanced meal with a kvass accompaniment. Those attempts at improvisation aside, you can rely on a steady rhythm, bringing together a few base ingredients and a small fermentation step to deliver meals with confidence. Thanks for reading, and I hope these tips help you stay inspired.
20-Minute Weeknight Dinners: 5 Fast Templates You Can Start Tonight
Start tonight with a 20-min one-pan chicken bowl: take 450 g chicken from the home market, sear until browned, add 1 cup quick-cook rice and 2 cups water, toss in frozen veg, fold in raisins for a fascinating sweet-savory note, finish with lemon and a pinch of salt to boost flavour. This approach takes a clear win on busy days and sets a dependable base for future meals, taking the guesswork out of weeknights.
Template 2: Tuna-Pasta Fast Toss – boil 200 g pasta about 8-min, reserve 1/4 cup pasta water, whisk canned tuna with olive oil, lemon zest, and a dash of water to emulsify, fold in spinach and cherry tomatoes, top with grated cheese; total around 20-min. For ongoing efficiency, keep a national online stock of cans and pasta, plus a string of dried herbs in bottles to preserve flavour clear and consistent.
Template 3: Veg-Scramble with Eggs – sauté a mix of peppers, onions, and mushrooms for 5-min, whisk 3 eggs and pour in, scramble until just set, finish with a spoon of молочная yogurt and a squeeze of acids (lemon) to brighten; serve with chilled cucumber and toast; you can make this while the kids are brushing teeth, yielding a fast, satisfying meal. The qualitative texture and crisp vegetables keep the meal interesting.
Template 4: Sheet-pan Salmon & Greens – arrange salmon fillets with broccoli and peppers on a sheet; drizzle with oil, salt, pepper, and lemon; roast 12-15 min at 425°F; meanwhile prepare a quick batch of rice or quinoa; finish with a drizzle of herb oil from a bottle, a tight and reliable flavour that fits national tastes and currently trending market patterns. For changing toppings, try a squeeze of soy and a handful of chopped herbs; you’re set for a family-friendly, standard weeknight option, with национальный palate in mind.
Template 5: Black Bean & Cheese Tortilla Skillet – sauté onions, peppers, and corn; stir in black beans and a pinch of cumin; topple with shredded cheese until melted; lay tortillas over and simmer until crisp; top with fruit like diced pineapple or mango for a bright note; change toppings once a week to keep flavour clear; keep a tight number of batches in the freezer for days when time is tight; you’re ready to serve in a flash, and the national flavour profile stays cohesive, with молочная accents balancing heat. This plan scales across дней, so two or three batches can be waiting for rushed evenings.
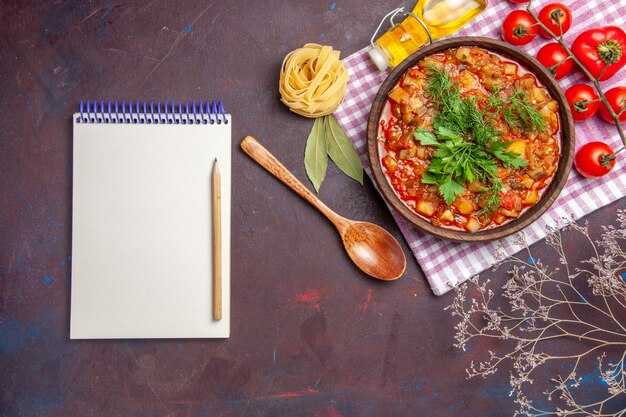
One-Pan Skillet Dinners: 25-Minute Meals That Require Minimal Cleanup
Begin with a dependable 12-inch skillet; heat 1-2 tablespoons oil until shimmering, pat protein dry, season, and sear 3-4 minutes per side. Remove and rest, then in the same pan sauté garlic and onion for 1-2 minutes while you deglaze with 1/2 cup broth or water, loosening the fond. Add 1 cup chopped root vegetables or a frozen mix, and simmer 6-8 minutes until nearly tender. Return protein, add greens or tomatoes, cook 4-6 minutes more until sauce thickens and flavors hold together. Total time stays around 25 minutes with little cleanup and no need to switch pans.
Common issues are overcrowding or uneven chopping; to avoid bland results, keep ingredients uniform in size, sear first, then finish with a gentle simmer. If the pan seems dry, splash in a bit more broth and let it cook while you clean another surface; the one-pan design supports a tidy workflow. Even when weeks are taken from a busy calendar, leftovers store well in a bowl in the fridge for a couple of days, and the single-container approach makes clean-up easier for others. Adapt the method to chicken, shrimp, or sausage without changing the core steps.
Flavor boosters and variations: for brightness, finish with lemon zest and a squeeze of juice; for savoriness, stir in a small amount of закваска starter, boza, or a splash of квас. A quick deglaze with vodka adds gloss and warmth, while fruit accents such as orange segments or pineapple chunks can lift the profile without complicating processes. Real-world notes from podcaster friends emphasize that the gost of a sauce can rise quickly when a touch of acidity stays balanced; the flavors remained vibrant even after a brief rest on the plate. Learn to hold back salt until the end to avoid overwhelming the dish and to keep the sauce from becoming bland.
Starting from this framework, you can build a rotating lineup: garlic-herb chicken with cherry tomatoes; sausage with peppers; shrimp with spinach; all designed for a single skillet and roughly 25 minutes. The ancient approach of crisp sear followed by quick braise still works, and former cooks have found the method forgiving enough to teach themselves in a few sessions. The key is to keep the timeline tight and to use the pan for both searing and simmering so flavors transfer and the real texture stays juicy.
Storage and notes: after cooling, portion into bowls for fridge storage; leftovers can be kept for months in the freezer if sealed well, easily thawed and reheated in the same skillet. When reheating, add a splash of broth to re-emulsify the sauce and prevent it from drying. This production cycle–starting with mise, to sear, to finish, to serve–supports busy cooks and makes weeknight meals repeatable with little effort.
Make-Ahead Components: Prep Tricks To Cut Dinner Time In Half
Recommendation: Batch-cook a base of wholegrain blends with a knob of ginger and a splash of kefir, then divide into four portions and label each with litre1 for quick grab-and-heat finishes. A cucumber quencher set aside keeps the palate refreshed and clean between bites.
Aside from the base, assemble a small sauce station using квасом or kefir and herbs to add depth without extra simmer. Review each batch after chilling to ensure the tang and creaminess are balanced; if not, adjust with a splash of distillers water and a pinch of salt. For longevity, add a light stir of greens just before serving to brighten color and texture.
Years of home-prep show that a cohesive flavor band across bowls reduces decision time at service. The following components and steps create a flexible system: each piece can stand alone or pair with any protein, and they store neatly for rapid assembly.
| Component | Ahead Prep | Storage & Reheat | Notes |
|---|---|---|---|
| Base grain blend (wholegrain) | Rinse 1 cup quinoa + 1/2 cup barley. Simmer in 2 cups water with a small ginger knob; off heat, stir in 2 tbsp kefir for enhanced creaminess; cool and divide into four portions. Label with litre1. | Refrigerate up to 4 days. Reheat 60–90s in microwave or 1–2 mins in skillet, stirring to distribute heat. | Pair with greens; can form the backbone for bowls or soups. |
| Protein packs (chicken or firm tofu) | Marinate in lemon, garlic, and pepper; portion into four bags. Freeze. | Thaw overnight in fridge; sear 60–120s per side or bake 6–8 mins, depending on size. | Use a thermometer to reach safe internal temperature; for tofu, press well before marinading. |
| Vegetables & greens (cucumber, carrot ribbons) | Thin-slice cucumber; shave carrots into ribbons. Store in water with a pinch of salt; hold 2–3 days. Include a few black pepper flakes for zing. | Drain before serving; toss with a vinaigrette or a dash of квасом for acidity. | Fresh crunch boosts texture and brightness in bowls. |
| Sauces & quencher (kefir-based dressing, herb vinaigrette) | Whisk 1 cup kefir with herbs, garlic, lemon; keep in a labeled jar. This layer adds depth across meals. | Keeps in fridge up to 4 days; shake before using. | Foam is normal on top when fresh; mix gently to reincorporate. |
| Stock base (veg or beet for borscht element) | Simmer beets, onion, and distillers’ water to concentrate; cool and portion into four small containers. Add ginger for warmth. | Refrigerate; use within 3–4 days or freeze for longer storage. | Beets impart color and aroma; layer into bowls for a robust finish. |
| Acidic finish & aromatics (cucumber water, lemon) | Prepare a small batch of cucumber-water with lemon; keep aside as a quencher for serving. | Chilled; refresh bowls as needed. | Review flavor balance; if too tart, add a touch of kefir sweetness or extra cucumber slice. |
Adding a simple note: using квасом in dressings and a light foam from kefir can create a nuanced, tangy backdrop without extra cooking.
Kvass 101: What It Is, How It’s Made, Key Fermentation Terms
Recommendation: Start with a simple kvass brew: stale black rye bread, 2 L water, 60 g sugar, and a splash of lemon or mint; cover the jar with a clean cloth; ferment at 20–22°C for 24–48 часов to yield a bubbly, low‑alcohol drink that can be strained and cooled before serving.
Kvass is a traditional, lightly fermented beverage built from bread mash. The main flavor comes from toasted wholegrain rye, with optional additions like beets for color or mint for aroma; some bakers also experiment with other bread types. The fermentation relies on wild yeasts and bacteria from the crumb, which using natural activity convert sugars into alcohol and lactic acid. The result is a mouthfeel that can be crisp or lightly creamy, and a bubbly profile that grows during the main stage. A slimy krausen on the surface during peak activity is normal, not harmful. If you drop in a couple of beets, the liquid gains a yellow‑tinged hue and a subtle sweetness; during warmer weather, carbonation builds faster, so keep a close eye on the bottle. There are recipes sold in shops that emphasize black rye and wholegrain blends, while others rely on homemade bread for a stronger, richer base. The aroma often benefits from fresh mint, citrus zest, or a dollop of news from seasoned makers who share tips and tweaks; certainly, keeping the vessel cover clean helps prevent off flavors. If you saved a small portion of the liquid to start the next batch, you could shorten startup time for the next round. Nikola’s notes often remind that patience and clean equipment matter, and that a cooled, bottled kvass will stay refreshing during hot summer days.
Key fermentation terms: Ferment refers to the biological transformation where yeast and bacteria convert sugars into alcohol and acids. The main or primary fermentation is the bulk phase, followed by optional secondary steps to mature flavor. Krausen is the slimy foam that forms on the surface during active fermentation. Carbonation is the dissolved CO2 that makes the beverage bubbly; it can develop naturally in the bulk or be boosted by bottle conditioning. Lactic fermentation adds молочная acidity, contributing tang and brightness. Wholegrain ingredients, like black rye bread, influence mouthfeel and aroma, while using beets or mint can alter color and scent. Time ranges like 24–48 часов indicate the window for peak activity, after which cooling slows or halts fermentation. Their main goal is a clean, stable product with a gentle effervescence and a pleasant, bread‑derived profile that could be described as rustic, comforting, and slightly sour. The airflow, cover, and cleanliness all affect the outcome, and the knowledge shared by nikola and other makers helps refine technique. If you taste it and notice wallpaper‑thin slime or off notes, adjust temp, reduce exposure to air, and resume with a fresh starter to maintain consistent carbonation.
Kvass Taste & Buy Guide: Bottled vs. DIY, Flavors, Sweetness & Packaging
Choose bottled kvass for consistency and safe handling; DIY batches offer flavor control, but whether you opt for bottled or home-brewed, start with clean water and a ready starter to speed up the fermentation processes.
Packaging options center on standard glass 330 ml bottles or 500 ml PET, with a primary filling method and caps designed to hold fizz. Fancy labels may signal added flavors, yet plain bottles often deliver steadier carbonation. On online sites, you can compare brands, note the number of SKUs, and read shipping notes; several labels discuss color notes such as yellow hints in malt bases and the deeper tones of rye or black bread styles.
Flavors range from traditional bread-forward to enhanced blends like lemon-ginger, berry, honey, or smoky rye. Eurasian profiles anchored in rye or barley malts tend toward a fuller, earthy note, sometimes with a pale yellow tint; for a crisper finish, bottled options lean toward lower sweetness, while DIY adds sugar or honey to reach your preferred level. A member of your household can sample a bowl of kvass and judge sweetness without bias, or you can run a side-by-side with a colander at the edge of the sink; the filling of the glass matters for aroma and perception.
DIY steps start with boiled water, sanitize containers, and cool before adding a starter. Strain ingredients with a colander, mix in a bowl, and keep the batch in a warm zone around 20–28 C to support fermentation processes. Monitor bubbles and note any off odors; if you detect black spots or problematic bacteria, discard. Use a notebook to keep recorded notes on sweetness and aroma for repeatable filling next time.
Studies from Moscow and several online sites show patterns: bottled kvass delivers standard sweetness and stable fizz, while DIY yields enhanced aroma when the base ferments longer. alison notes that warmth accelerates ester formation; whether rye or wheat malts, the color leans toward yellow-brown. Recorded data across the number of batches indicate added sugar raises sweetness, yet perceptible sweetness can be controlled with shorter fermentation. A seasoned member notes that careful sanitation reduces bacteria risk and keeps the filling clean after opening.
For most households, start with bottled kvass to map baseline sweetness; then try a DIY trial to compare aromas and mouthfeel, using the same base and adjusting sweetness gradually. Reference sources from Moscow and eurasian works help calibrate expectations and packaging standards.


