 11 Συμβουλές για Δημιουργία Εκθαμβωτικών Αστικών Φωτογραφιών την Αυγή">

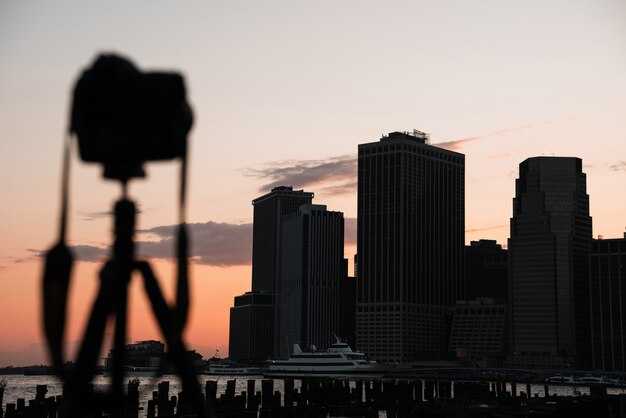
Set a sturdy tripod at street level, spread the legs, and align the horizon on the lower third. Empty avenues wake slowly as mist drifts between towers, softening reflections and giving you a clean plate to work. This handy advice stays relevant during the hours just before sunrise.
Shoot RAW, keep ISO 100–200, and stop down to f/8–f/11 to reveal architectural texture. Use shutter speeds in the 1/8–1/2 s range, then bracket by ±1 to ±2 stops to protect highlights in glass and neon. If your camera supports interval shooting or a remote release, use it to avoid touch shake during the first burst.
Behind reflections on glass facades, compose lines that lead toward the vanishing point, and seek space between objects to let the mist breathe. Include a touch of motion to show personality; a lone figure or passing vehicle can become a focal point. a local shooter, tomas, notes that a small gesture can transform a shot; whats in the air sometimes decides the mood, theyve found.
Technique and discipline: keep the limit on ISO and shutter; start with a wide lens to establish context, then switch to a longer focal length once light rises to compress lines. The moment streets awaken is unexpected, so stay ready to adjust settings and seize what appears without overthinking.
After the shoot, optimize in RAW processing: warm white balance to enhance sunrise hues, reduce haze from mist, and apply gentle sharpening to preserve glassy textures. This workflow uses selective adjustments to salvage shadows while keeping neon tones authentic. Talk with fellow shooters to capture additional angles that reveal street mood; explore a few options without committing to a single path. Export at high resolution if you plan large prints.
Plan: Dawn City Photography
Set tripod on stable ground, mount camera, and arrive 30 minutes before civil light. Shoot RAW with white balance around 5500K, ISO 100–200, aperture near f/8, shutter 10–25 seconds. Enable exposure bracketing from -1 to +1 stops and collect a single sequence; keep these settings across angles to simplify blending later, thats the baseline. theres no guesswork needed.
Look for distinctive silhouettes: bridges spanning a river, a church spire catching the first rays shining on its facade; after rain, the pavement gleams, reflecting the skyline and boosting texture. Keep an eye on composition with horizon level, looking for balance between light and shadow.
Use a filter to tame high contrast: a low-ND or soft-grad filter reveals smoother sky detail while preserving shadow texture. Align the horizon to a grid and keep lines straight.
Post-process with restraint: keep white balance consistent with the set, avoid over-sharpening; use selective adjustments to recover highlights and deepen shadows, add a sense of place onto the final result. If you blend multiple frames, the same base can be used to carry mood into the final image.
Plan checklist: arrive early, attach a wide-angle lens, shoot a single wide frame plus several tight crops, bracket, verify histograms, back up files, keep rain on glass from soaking lenses, and choose the best result to publish. theres a rhythm here that reveals the urban mood; lets you filter distractions and follow the list.
Tip 1–3: Pre-Dawn Planning and Location Scouting
Choose three available viewpoints, such as a rooftop overlook, a tower edge, and a street canyon. If a venices canal view is accessible, include it as a candidate. Inspect the light path 60–90 minutes before early light to ensure golden rays hit the setting you favor. The single position with clean framing of the tower and rain-washed streets that lead to the horizon becomes your favorite.
Check weather and micro-mood: rain creates vivid contrasts, while clear skies reveal window lights and silhouettes. If rain is likely, note reflections that heighten texture; if skies open, use the mood to emphasize sparse lines and afterglow on facades. Availability of light in the afternoon offers a reference when calibrating early shots.
Create a two-variant plan: broad framing that captures the skyline and a tight frame of a single street and a tower. Directly compare both during early light to select the image that feels most painterly.
| Vantage points | Rooftop overlook, tower edge, street canyon; test light path 60–90 minutes before early light |
| Gear | Tripod, wide-angle lens, remote, polarizer; bring spare battery |
| Light strategy | Note available light, use setting to accent contrasts; if rain, look for reflections |
| Time plan | Identify window: pre-sunrise to first glow; keep watch for crowd shifts |
Tip 4–6: Gear, Camera Settings, and Stability
Begin with a sturdy tripod, a quiet ball head, and a reliable quick-release plate. Set ISO to 100–200, switch to manual exposure, and choose a 2–6 s shutter setting as the first light appears. Use a remote release or the camera’s timer to prevent shake, and lower the center column when possible to maximize stability.
Capture in RAW; set white balance to about 3500–4200K to keep warm tone while clouds rise. Use exposure bracketing of +/- 1–2 stops if the scene presents a broad dynamic range; shoot three frames and blend later to retain detail in shadows and highlights.
Stability tactics: place the tripod on firm ground, add a weight bag to the hook, and extend legs only as needed. Enable mirror lock‑up on DSLRs or use a silent shutter mode on mirrorless bodies. A compact remote helps keep the view steady during long exposures. If wind arrives, you can find a way to shield the head using a bag or rigid panel. If you shoot earlier in the season, wind is calmer and results are better.
Locations planning: arrive earlier at spots with a rise over water or a tower, letting those vantage points become the visual scene. Think about the mood the light will create; beauty often rests in calm mornings and glassy reflections. Vendors or tomas at local shops can share access notes and the next angles. Note the источник света as colors shift; the scene grows more dramatic in minutes. Given those signals, choose next locations and set a course toward better images.
Tip 7–9: Composition and Timing at First Light
Beginning your session, set a stable stance and compose with a clear foreground element that anchors the frame; use a wide view to reveal depth and introduce a strong line toward the horizon. In the beginning, align the element and space to guide the eye.
Waiting until the right moment, shooting when highlights pop without blowing the shadows; use a polarizer to control glare at storefronts and windows, then finding the angle that sings to maximize contrasts.
Include everyday life; it elevates your frame in an urban area: vendors setting up stalls, a bus turn, snow on sidewalks, a lamp down the street, and a church that adds vertical rhythm.
Create a bold foreground by using a sturdy tripod and a careful focal choice; set ISO 100–200, aperture f/8, shutter 1/125 s as a baseline, then test +/-1/3 stop to capture tone; if the light seems fancy, bracket three exposures over the course of the session to capture the range and keep highlights under control.
Right after shooting, evaluate the frame’s organization and balance; in post, preserve natural contrasts and achieve the best color accuracy; a little touch of clarity can lift textures without breaking the mood. This photzys vibe translates well when you keep everyday scenes authentic.
Turn attention to color warmth in the sky and on the street; such elements give the story a coherent feel, and the resulting composition tends to be worth keeping.
Tip 10–11: Post-Processing and Finishing Touches
Begin with a RAW-based, non-destructive workflow. Set white balance to neutral and adjust exposure to protect lamp highlights, while shadows read with texture on walls and streets. thats the core step to keep a consistent look across scenes.
- Baseline and neutral settings: shoot RAW, apply a neutral color profile, and confirm WB near daylight – this setup keeps skin tones natural and ensures the final image reads with the scene’s mood. The result, which reveals texture in lamps and wall surfaces, becomes the reference for edits.
- Local adjustments to keep depth: brush shadows on subjects and walls, preserve detail in windows, and maintain edge separation on lamps. This helps finding depth within the frame and avoids flat urban looks.
- Color and skin tone: use a gentle grade to balance warm lamp colors with cooler ambient tones; aim for a unique look that preserves beauty on faces and subjects without oversaturation.
- Texture and micro-contrast: boost brick and pavement texture with careful micro-contrast, but restrain to avoid halos around lamps and signage. This brings three-dimensionality to flat areas.
- Noise reduction and grain: apply luminance NR to deepen shadows while preserving fine detail in walls; keep a slight film-like texture if it enhances mood during reading of the scene.
- Dynamic range controls: apply gradient masks to hold highlights in windows and sky; consider exposure stacking if needed to balance extremes; this setting ensures visible detail from park edges to distant facades.
- Perspective and geometry: correct verticals in walls and lamps; align street lines to create a natural rhythm; this keeps streets looking credible and guides the eye along leading lines.
- Color harmony: refine hues so streets, walls, and signage feel cohesive; a small lean toward warm tones in lamps can enhance mood without breaking realism, which supports the overall beauty of the capture.
- Sharpening and output: apply modest sharpening with a narrow radius; mask aggressively on smooth sky to avoid halos; balance edge clarity on faces and signage for a crisp yet natural look.
- Export strategy: save a 16-bit TIFF master; generate a web JPEG at suitable resolution and a print-ready file with an accurate profile; keep the master intact so edits can be revisited in future sessions.
- Final review: view on a calibrated monitor; compare highlight detail in lamps with midtones on walls; adjust if needed so the result arrive at a refined and unique beauty that readers experience; experiencing growth with each session builds ongoing experience.
 Sip by Design – The World’s Most Beautiful Wine Bars">
 Evolution Tower – Moscow City’s Spiral Architectural Landmark">
 Exclusive Tours in Moscow – Private & VIP Experiences">
 10 Most Beautiful Squares in Moscow – Stunning Photos">
 Genatsvale Restaurant – Authentic Georgian Cuisine, Traditional Dishes & Fine Wine">
 Christmas in Moscow 2025 – Vibrant and Unique Experiences You Must Try">
 Moscow, Russia – Where History Starts and Culture Thrives">
 Mystical Places of Moscow – Legends, Ghosts, and Hidden Corners">
 Best Restaurants with a View in Moscow – Rooftop & Skyline Dining">
 The Secret to Minimalist Street Photography – Learn Negative Space">