

Suosittelen aloittaa järvirannan taustalla syksyn väreissä, mikä antaa kuvan vahvan perustan. Tämän vaihtoehdon vahvuudet ovat puhdas näkymä ja riittävä parkkipaikka, sekä joustavat luvat maksujen osalta.
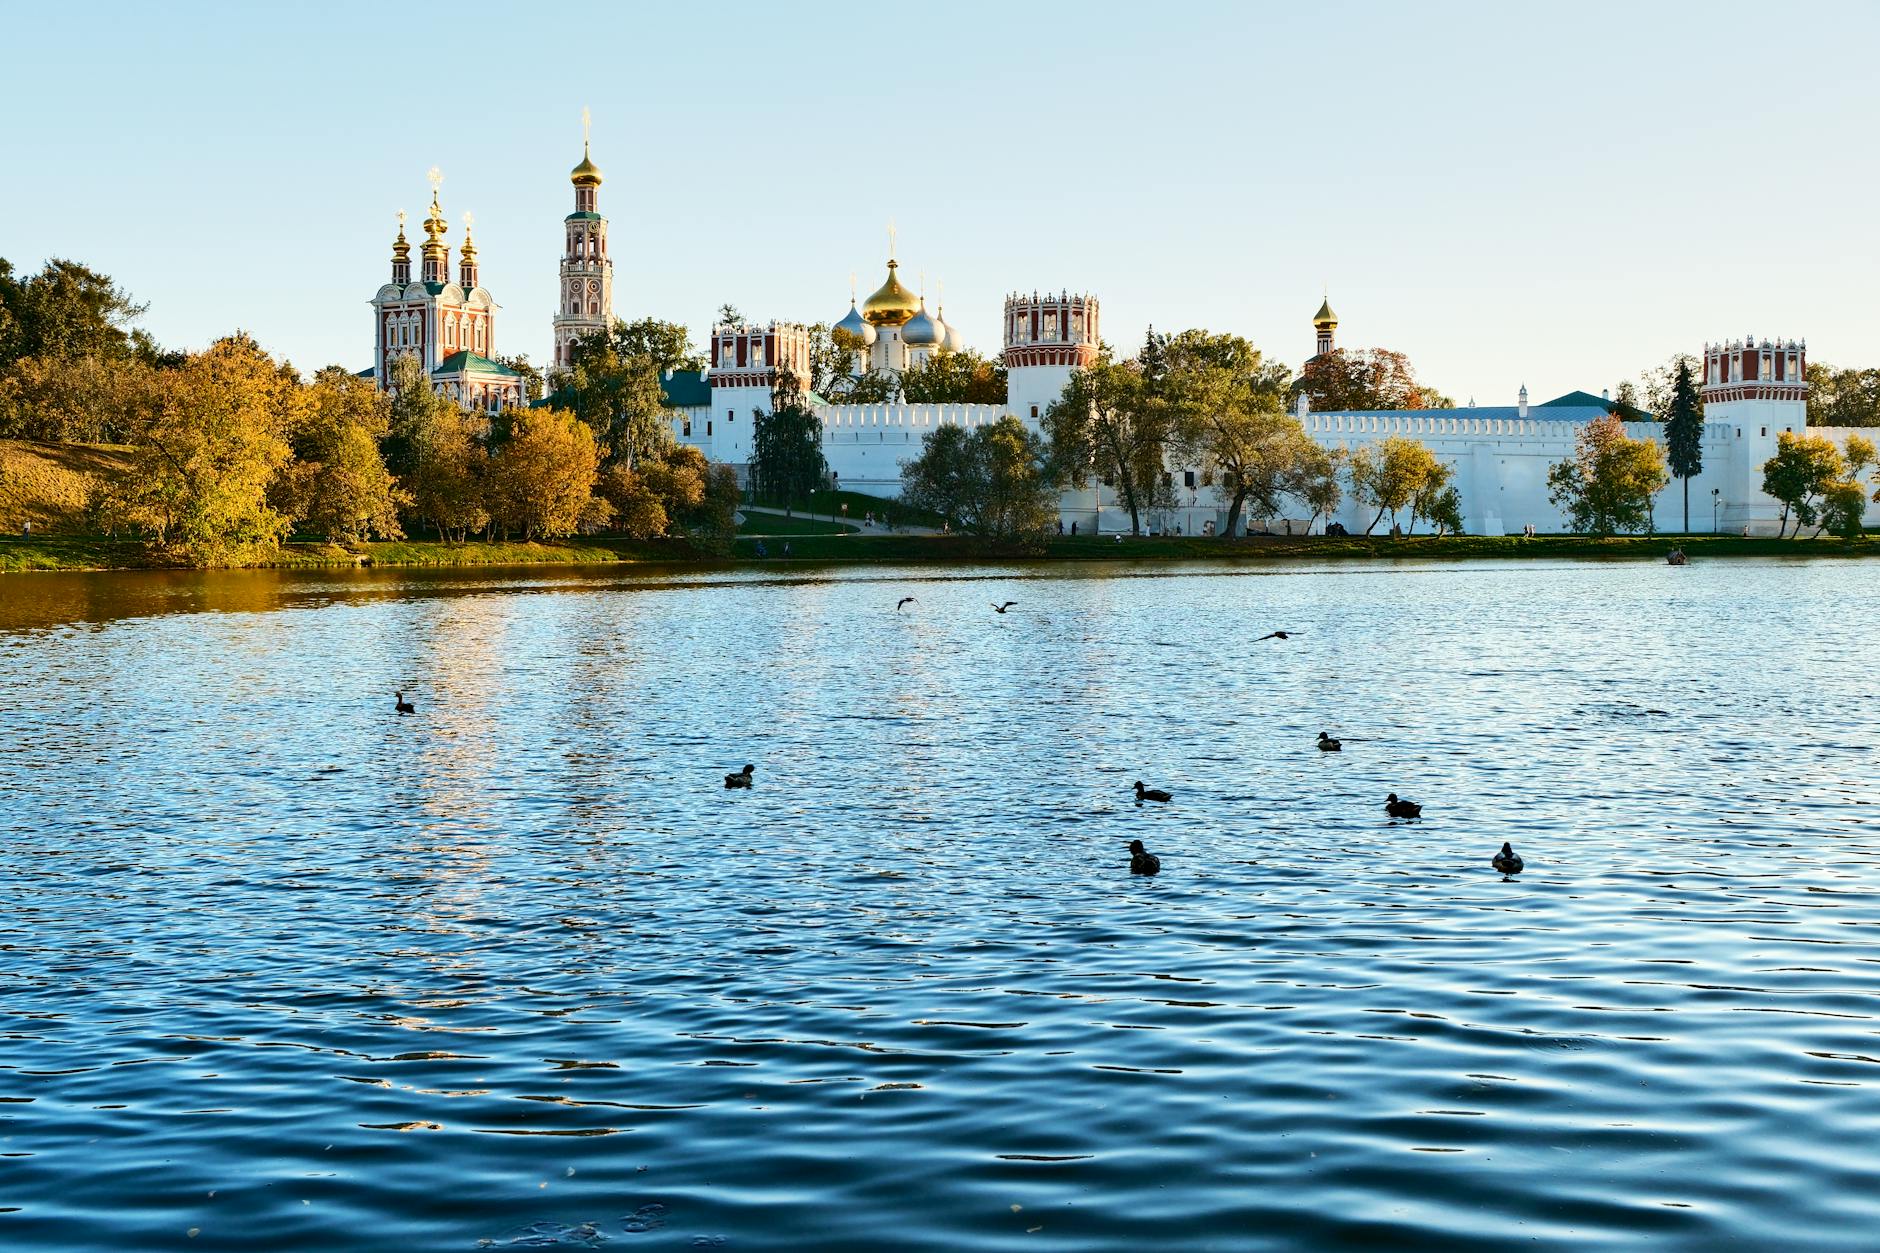
Spot 1 - Järviranne tarjoaa ruohojen värejä, avoimia tiloja ja puhtaan taustan valokuvausmahdollisuuksille; saapuessasi aamunkoitteessa hyödynnä pehmeää valoa, tarkista parkkipaikat sisäänkäynnin läheisyydessä ja seuraa saarien varjoja kaukaisella rannalla.
Spot 2 - Kaupunkiranta yhdistää tiilirakenteisia kaupunkiteemoja veden heijastuksiin; läheisen rannan puhdas näkymä luo dynaamisia kehyksiä. Etsi paikkoja kuuluisien sillojen läheltä tai seinämaalauksen vierestä kontrastia varten; tarkista kadunlupamaksut ja varaa pysäköintipaikka muutaman lohkon päästä.
Spot 3 - Saaren reunalla sijaitsee pienen järvensaaren pienellä valkoisella hiekkarannalla ja kiveytetyllä polulla; rauhallinen vesi tarjoaa taustan läheisille valokuvakuville. Ota nopea yhteys kiinteistön omistajaan vahvistaaksesi maksut ja parkkipaikan lähellä laituria.
Spot 4 - Syksyn värit kenttä virtaa laajalle niitylle, jossa on ambraa ja kultaa. Rinteessä on luonnollinen paikka kahden henkilön poseille ja laaja näkymä ympäröiville alueille. Ikoninen syksyn väripaletti tekee kuvasta elävän; tuo mukanaan peitto tekstuuria varten ja tarkista parkkipaikka reunalla.
Spot 5 - Valkojärven rannalla on rauhallinen, hiekanen tausta pehmeillä aalloilla; lähisaaren loisto, erityisesti syksyn valossa, tuottaa luonnollisia sävyjä ja vahvan valokuvaushetken. Tarkista parkkipaikkojen saatavuus ja harkitse kompakti kamera-asetusta nopeaan asennukseen.
Spot 6 - Kaupunginpuiston reunalla sijaitsee tiiviin keskustan lähellä, siellä on hoidettu nurmikko ja klassinen tausta; parkkipaikka on yleensä helppo löytää, ja näkymä ulottuu satamaan tai järvenrantaan; pidä värit neutraaleina, jotta parin värit erottuvat.
Spot 7 - Piilossa oleva lahti tarjoaa suojaavan taustan kallioisilla rinteillä ja saarimaisilla vihjeillä rannikolla; saapuessasi ennen auringonlaskua, nauti hunajankeltaisesta valosta ja rikkaista syksyn väreistä, hiljaisesta valokuvaushetkestä. Tarkista maksut ja suunnittele parkkipaikka lähellä polun alkupäästä; viimeisen valon hetket tarjoavat draamallisen näkymän.
Ulkoilmakuvausten paikat -opas
Rustikot tiilikaiteet, vesiputoukset tai auringonvalossa loistavat pellot; tarkista lupasäännöt ja pääsyvaatimukset, sillä joissakin puistoissa tarvitaan lippuja tai lyhyt lomake. Suunnittele reitit kuhunkin paikkoihin, jotta vältytään turhalta odottelulta ja hyödynnetään parhaiten lämpimää valoa ennen auringonlaskua; tämä auttaa sinua olemaan tehokas paikalla.
Kennet-käytävän puutarha, joka sijaitsee veistoksellisen portin ja matalan tiilimuurin lähellä. Portti kehyttää muotokuvia ja tihkuvaa murattia, kun taas lämmin valo tiilillä lisää loistoa jokaiseen hetkeen. Pääsyä koskevat säännöt vaihtelevat; jos lupia tarvitaan, hanki ne etukäteen ja ota liput mukaan, jos niitä vaaditaan.
Järviäristön laidun, joka on sijoittunut alueellisiin puistoalueisiin. Etsi hellä kaarevuus, ruokokasvit ja pieni puinen laituri. Puiden väliin upotettu paikka tarjoaa luonnollisia heijastuksia; suunnittele ottamaan kuvia sinisen tunnin tai myöhäisen iltapäivän aikana pehmeämpien varjojen vuoksi. Tuo peili tai kompakti valo tarvittaessa, ja ole tarkkana muista, jotka käyttävät aluetta.
Kiven portaat ja tiilinen portaat, joita lehtikuuset varjostavat. Kerrokselliset portaat luovat luonnollisia poseja; saapuessasi aamunkoitteessa tai kultaisessa valossa saat lämpimät ihonvärit. Tarkista tarvittavat lupat ja välttää suuret väkijoukot säilyttääksesi tunnelman intiimiksi.
Järvenrantokenttä, jossa on korkeaa ruohoa ja rauhallinen järvenranta. Monipuoliset taustat mahdollistavat kuvien vaihtamisen nopeasti muutamalla askelilla; kun olet päättänyt tunnelman, siirry muutaman askeleen päässä vaihtamaan kulmaa. Tuo pieni peitto spontaanien hetkien varalle ja suunnittele pääsy; joitakin rannan paikkoja on rajoitettu ja niihin saattaa tarvita lupia tai lippuja.
Historiallinen myllyn muuri, jossa on paljastettu tiilipinta ja kapea kanava. Tiilitekstuurin ansiosta kuvista tulee syvempiä; etsi pehmeämpää valoa auringonlaskun aikaan ja jaa kulmat yhteistyökumppanisi kanssa. Jos olet historiallisella alueella, varmista lupien saaminen etukäteen ja pidä vaikutuksesi pieninä häirinnän välttämiseksi.
Kaupunkipuutarha, jossa on kankirautainen portti, tiilipolku ja lämmin pensasaita taustalla. Tila sijaitsee lähellä keskustaa ja tarjoaa kompakti värivalikoiman sekä suunnittelijoiden suosikkeja; nämä toimivat hyvin varjossa ja luonnollisessa kontrastissa. Tuo pieni peili tai akkupohjainen valo varjoon, ja varmista, tarvitaanko pääsylupia tai lippuja.
Seitsemäs paikka: joenrantapuisto, jossa on puurivistö ja viehättävä silta. Se sijaitsee Kennet-joen lähellä, tarjoten peilimäistä vettä ja pehmeitä taivaita. Suunnittele pieni ohjelma: aloita lähikuvilla, siirry sitten polkua pitkin laajakuvan luo ja ota mukanaan kompaktinen tuoli tai peitto levähdystä varten; jaa ohjeita parille pitääkseen liikkeessä ja välttääkseen pysähtymisiä. Tarvittaessa hanki lupia; muuten voit vain kävellä sisään ja aloittaa hiljaisella ensimmäisellä katsauksella ja hymyllä.
Valintasi: Vihreä, rannikko ja kaupungin taustat
Alkaa vihreydestä, joka toimii ankkurina: järvenrantaan vierekkäinen mänty metsä tai piilossa oleva puuvalkea tarjoaa oikean varjon ja saa valon muuttumaan kultaiseksi ensimmäisen päivän tunnin aikana, luoden todella erityisen loisteen, joka toimii ympäri vuoden. Jokainen kuva hyötyy läheisestä varjosta ja elävästä kontrastista, joka tulee pehmeistä vihreistä; tämä tunnelma kannattaa tavoitella, koska se tarjoaa monia paikkoja testata kulmia.
Rannikon tunnelma: niemet, ranta ja säässä kulumattoman puun värikkäät tekstuurit luovat dynaamisen taustan. Koska tuuli muovaa vaatteita ja hiuksia, voit saada todella elokuvallisia hetkiä, kun aurinko siirtyy. Rannikon lähellä piilossa olevat lahdensuut ja paholaisen niemet lisäävät karuutta; valokuvaa rannikkoa pitkin saadaksesi kiinni suolaveden valoa ja elävää loistoa. Jaa tulokset muiden kanssa näyttääksesi, mitä tämä paikka tarjoaa, sillä se elää, kun tutkit muutamia paikkoja veden lähellä.
Urban tausta tarjoaa tiilimuurit, ranskalaisen katuosuuden ja piilossa olevan autotallin Kennet Streetin puolella; studiot sijaitsevat piilossa olevalla sisäpihalla, tarjoten valmiita tunnelmia läheisille kohtauksille. Löydettynä monien paikkojen joukosta tämä sekoitus luo elävän, modernin tunnelman ja kohottaa kokonaiskokemuksen. Koska voit vaihtaa tiilitekstuurit, metallit ja betonin väripaleteiksi, tämä puoli tuo vuosikohtaisia tunnelmia; oikea valaistus auttaa jokaista kuvaa pysymään yhtenäisenä, sillä tavoitteena on jakaa yksi, yhteinen tarina.
Valonleikki: Kultainen hetki, sumu ja taustavaloinen varjo
Suunnittele kultaisen tunnin istunto metsän reunalla tai tiilikaaren vieressä valkoisessa mekossa, valmiina liikkeelle, kun valo muuttuu; ota yhteyttä pariin vahvistaaksesi yksinkertaisen suunnitelman ja kerää heidän suosikkipaikkansa, heidän tulisi tuoda muutama aksessuari kiinnittämään loisto. Jos sumu ilmestyy, aseta heitä niin, että valo virtaa puiden läpi luoden luonnollisen halon, joka näyttää todella romanttiselta valokuvissa; käytä heijastinta nostamaan varjostuneet kasvot ja pitääksesi ihon sävyjä lämpiminä jokaisessa kuvassa.
Kameran ohjeet: tavoittele ISO 100-400, aukko f/2.8-f/4 ja suljinnopeus noin 1/200-1/500s, kun päivänvalo on vakaa; kun sumu tiivistyy, laajenna hieman f/4-f/5.6 ja laske valotus noin yhden askeleen, jotta säilytetään kultainen sävy, kun samalla säilytetään siluettien terävyys; tämä lähestymistapa antaa puhtaat reunat ilman, että kuva tahrataan valotuksen aikana.
Paikkavinkkejä ovat esimerkiksi Crissy, metsäpolku tai tiilimuuri, jossa on kutsuva portti; ne yhdistyvät kauniisti pehmeään tuuleen ja taustavaloon, jolloin varjot pyörivät parin ympärillä heidän liikkuessa. Pidä vain keskityttyä luonnolliseen vuorovaikutukseen, sillä hetki, jolloin he vaihtavat katseita tai hengitystä, tekee maisemasta todellisen läheisyyden tilan, jonka fani haluaa saada kiinni ja katsella uudelleen lopullisissa kuvissa.
| Spot | Valaistus | Asetukset | Tips |
|---|---|---|---|
| Metsänreuna | Auringon läpi lehtien, kevyt sumu | ISO 200, f/2.8, 1/200 s | Käytä reflektorin avulla kasvojen nostamiseen |
| Tiilimuurin porttien kanssa | Taustavalotettu, jopa ympäristönvalotettu | ISO 100, f/4, 1/250s | Kehyksen varjo tekstuuria vasten |
| Crissy Field vedessä | Kultainen hetki lähellä taivaanrantaa | ISO 100, f/5.6, 1/320s | Vakauta tarvittaessa kolmijalalla |
Luvat, parkkipaikat ja pääsy: Mitä tarkistaa ennen kuvauksia
Hanki lupat vahvistettua etukäteen ja kuljeta dokumentteja vierailun aikana. Ota yhteyttä tapahtumapaikkaan tai puiston viranomaisiin useita viikkoja etukäteen selvittääksesi, tarvitaanko kaupalliseen käyttöön lupaa, mitkä ajat ovat sallittuja, ja sovelleeko sivulle edustaja, vakuutus tai muut rajoitukset. Jos suunnittelet valokuvausistuntoa Longwoodin lähellä tai Kennet Properties -kiinteistöillä, tarkista virallinen politiikka ja hanki kaikki tarvittavat kirjeet tai lupanumerot; epäsuoritus voi keskeyttää istunnon. Siellä yksityisomistuksen säännöt voivat vaihdella, joten selvitä, ketä on pyydettävä pääsyn myöntämiseen ja mitä lupaa sisältää.
Parkkipaikan suunnittelu: tarkista paikalliset parkkipaikat, mukaan lukien parkkihalli tai varatut pihat, ja huomioi mahdolliset lupavaatimukset tai maksut. Jos paikallisia paikkoja on vähän, kysy, voitko varata paikan tai saapua matalammalla kysynnällä olevalla ajankohdalla. Lumessa tai syksyllä parkkipaikat voivat olla harvinaisia suosittujen näköalapaikkojen lähellä; tarkista katuilmoitukset ja liput, ja ole valmis vaihtoehtoisella suunnitelmalla, kuten ajoneuvopalvelulla, tarvittaessa. Valokuvaajille, jotka suosivat nurmikoita ja vaellusreittejä, tarkista, liittyykö pääpysäköintialue alueeseen, jossa haluat työskennellä; suunnittele lyhyt kävelymatka sinne.
Pääsy ja päivän logistiikka: tarkista rajoitetut alueet, aidatut sivukäynnit tai palvelukäytävät; varmista, tarvitaanko porttiasia, saattaja tai lupaa päästä haluttuihin alueisiin. Pitkille kävelylle suunnittele rullava vaunu varusteiden kuljettamiseksi ilman maata häiritsevää; käytä sopivia kenkiä ja tarkista etäisyydet autosta näköalapaikkoihin väsymyksen välttämiseksi. Nämä tilat usein tarjoavat draamallisia näkymää; ota mukaan tarpeelliset varusteet ja kameralaukku; plus varasuunnitelma, jos sää muuttuu, mukaan lukien lumi- tai syysolosuhteet. Valokuvaaja pitää koordinoida henkilökunnan kanssa välttääkseen pullonkauloja; kokonaiskokemus riippuu ajoituksesta, ihanteellisten kulmien etsimisestä ja onnesta. Sitten tulee hetki, jolloin nämä suunnitelmat elävät ja istunto päättyy sujuvasti.
Posing and Composition: Ideas that Suit Each Location Type
Mitä tärkeää on eri paikoissa, on vahva keskipiste, nopea, luonnollinen vuorovaikutus, rentoutuneet hymyt ja silmäyksien vaihtuminen maisemien mukaan. Valokuvaaja voi ohjata sinua kolmella valmiilla poseella jokaisessa paikassa, jotta kuva pysyy puhtaana ja taustat vaihtelevat koko matkan ajan.
- Metsäiset ja metsäiset polut Kehystä puiden rivi luomaan pystysuorat opastimet; pidä pari riittävän kaukana hengitystilan vuoksi, mutta anna käsien kosketus sulkea luonnollisen yhteyden.
- Asema kaatuneen puun tai sammalisen pöydän lähellä; toinen kumppani istuu, toinen kallistuu lähemmäksi pehmeällä pääntaittolla alaspäin, luoden lempeän S-käyrän kokoonpanoon.
- Käytä täplikkäästä säätä luonnollisena suodattimena; altista hieman, jotta ihon sävyjä säilyy lämpiminä, mutta samalla anna vihreät ja ruskeat taustat loistaa.
- Kolme kohtaa: leveä kuvakulma näyttämään katoksen leveyttä, keskikulma vuorovaikutuksen kuvaamiseen, läheltä yksityiskohtia kuten käsiä ja koruja; koko istunnon ajan säätä kulmaa välttääksesi karkeita varjoja.
- ebeys-promptteja: nopeat, ilmaisukykyiset eleet, yhteinen nauru, hellä otsan kosketus - pitääkseen energian yllä pysyden samalla paikallaan.
- Puistot ja avoimet viheralueet Käytä puiston penkkejä, kiviseiniä tai puiden kaaria luonnollisina kehyksinä; anna yhdelle kumppanista nojautua toiseen rentoutuneen ja yhteisen tunnelman luomiseksi.
- Liiku käyrien polkujen varrella luomaan dynaamista liikettä; anna parille kävellä hitaasti kohti objektiivia, pysähtyä ja vaihtaa katseita käyrän keskellä.
- Sääolosuhteet: kirkas aurinko, jossa pää on hieman kallistettu, vähentää sokeutta; pilviset päivät antavat tasaisen, suotuisan valon, joka pehmentää taustalla olevia kasvoja.
- Kolme kulmaa kohteesta: laaja aloituskuvaus, keskikokoinen vuorovaikutustilanne, ja tiukka käsien ja kasvojen lähikuva; plus suunnitelma spontaanille hetkelle kävellessä.
- tips: ota mukanaan kevyt peitto istumiseen ja pieni kukkaseppele, joka tuo värikkäitä akenteita vihreän taustan vastaisesti.
- Studiot ja hallitut sisätilat Hyödynnä yhtenäisiä taustoja eristääksesi parin; kokeile kahden valon asetuksia muotoilemaan poskiluita ja leukaosia.
- Työskentele teksturoituneiden pintojen, kuten tiilen, puun tai kankaan kanssa, lisätäksesi syvyyttä ilman tarpeetonta kasaantumista; saattaa kumppani nojautumaan seinään vaihteeksi asennossa.
- Sääneutraalit asetukset antavat harjoitella tarkkoja kasvoilmeitä; harjoittele rentoutunutta hymyä, luottamuksellista katsekuvion ja leikkisää katseilua välähdyksien välillä.
- Kolmen vaiheen lähestymistapa: laaja kuva koko keholla, keskikuva yläruumiin, lähekuva käsistä ja ilmeistä; rakentaa pieni prop-varustus tarvittaessa.
- antaa tilan puhtaille taustoille säilyttäen lämpöä; käytä yksinkertaista taustaa, joka täydentää ihon sävyjä.
- Marin ja rannikon nurkat Käytä alameriä tai kallioisia rantoja kuvan kehyksenä; sijoita pari epäkeskisesti korostaakseen etäisyyttä ja tunnelmaa.
- Hyödynnä luonnon tekstuureja - merusumua, vanhentunutta puuta ja kaiteita - luodaksesi kerroksellisia taustoja ja paikan tunteen.
- Valmis tuuleen: pidä hiukset ja vaatteet liikkeessä hienolla tuulenpuuskalla; nopea asennonmuutos säilyttää tasapainon ja yhteyden.
- Kolmen osan sekvenssi: laaja merinäkymä, keskellä parin vuorovaikutus ja läheinen hetki, jossa sormet ovat toisiinsa kietoutuneet; käytä rannikon viivoja ohjeina.
- Kun valitset linssit, keskikaukokulma pehmentää kasvoja säilyttäen samalla tilan maisemalle; harkitse laajempaa kulmaa, jotta marina tai kaukaiset kukkulat mahtuvat kuvan sisään.
- Kaupunkialueet ja rakennusten julkisivut Tiilipinnat ja metallikaiteet luovat vahvoja linjoja, jotka ohjaavat katseen; vaihda poseja niin, että toinen kumppani astuu korkeammalle portaille, kun toinen katsoo hetkellisesti ylös.
- Käytä oviaukkoja ja käytäväkehyksiä luomaan luonnollisia rajoja; tee nopea käännös toisiaan kohti spontaanin, spontaanin hetken aikaan.
- Taustat ovat tärkeitä: puhdas seinä pehmeällä varjolla lisää syvyyttä; ohita kiireiset liikkeiden julkisivut, jotka häiritsevät paria.
- Kolmen kuvan suunnitelma: laaja kadunäkymä, läheinen vuorovaikutus oviaukon edessä ja tiukka käsissä pitäminen hetki; harkitse mustavalkoista testiä ikuistavaa tunnelmaa varten.
- Lisäksi nopea auto tai scooter voi toimia propana, joka vaihtelee rytmiä ja lisää sarjaan leikkisyyttä.
- Lancaster ja muut maisemalliset pysähdyspaikat Historiallisissa paikoissa aseta kuvakkeet rakennusten arkkitehtonisten linjojen, pylväiden, portaan tasanteiden ja kaarikaarien viereen korostaakseen rakennetta ja tasapainoa.
- Käännä asentoja välillä asennetusta asennosta luonnolliseen vuorovaikutukseen; nopea käännös maisemakohtaan luo uuden näkökulman.
- Taustat: valitse kohteet, joissa on vähän visuaalista melua; yksinkertainen taivas tai kaukainen maisema pitää keskittymisen parissa.
- Suunniteltaessa, luo lyhyt lista viidestä kohteesta ja kolmesta poseesta kohteelta, jotta saadaan mahdollisimman laaja kattavuus ilman kiirettä.
- Kuvaisiko otos, jossa henkilö kävelee kohti kameraa katusuojan varrella, voimakkaasti liikettä? Kyllä - tee se, sitten vaihda istumaan kiveen muurille.
- Tienvarsin ja moottoritien vierustan kuvat Valitse turvalliset pysäköintipaikat ja käytä kaiteen tai tien reunan viivaa kuvan kehyksenä; pidä turvallinen etäisyys liikenteestä.
- Kuvitella hetki, kun kävelet kädessä katujuoksun varrella; nopea katse toisiaan kohti luo aidon yhteyden.
- Taustat eteesi voivat olla kaukainen taivaanranta tai maalaistila; vaihtele syvyyttä luomaan eroa.
- Kolme asetusta: laaja maisemakuva taustalla, keskikokoinen vuorovaikutuskohta ja tiukka poseeraus ajoneuvon tai merkkin lähellä.
- tarvitset nopean tarkistuslistan: heijastimet häikäisylle, sääkestävä pussi ja juomaveden suunnitelma - nämä pienet osat pitävät päivän tehokkaana.
Sää ja kausivaihtelut: Varavoimatoimet Bay Area -ulkoilmakuvausten varalle
Valitse kolme suunnitelmaa: pääpäivä, sisätiloissa oleva valoisa tila luonnonvalolla ja sadevarmuuspaikka autotallissa tai tiilitalossa. Varmista lupat etukäteen Marinin piirikunnalta, osavaltiolta ja kaupungilta; varaa kaksi vaihtoehtoista paikkaa - näköalapaikat rannikolla tai aukio kaupungissa. Ole valmis vaihtamaan nopeasti varapaikoille ja pitämään kuvaukset liikkeessä millä säällä hyvänsä.
Sääolosuhteet ovat tärkeitä: seuraa ennusteita kahden viikon päähän ja varaa ensimmäinen valoikkuna, sitten toinen varikkuna sumuun tai tihkuvaan sateeseen. Jos tuuli leikkaa rannikkopaikan, siirry sisätiloihin, joissa on ranskalaiset ikkunat, tai rakennukseen, jossa on tiiliseinät, valon hallitsemiseksi; käytä ikkunoita luonnonvalon keräämiseen ja pitää kuvat terävinä.
Kausistrategia: kuivina kuukausina suosittele sisämaiden järviä ja lampien heijastuksia; myrskyisille jaksoille valitse suojainen paikka ja harkitse saaren lähestymistapaa (esimerkiksi Angel Island tai satama) saadaksesi dramaattisia taustoja; kesän kuumuuden aikana sijoita suunnitelma varjostettuun aukioon tai rannikon näköalapaikkaan aamutunneilla. Liput tai puiston lupakirjat saattavat olla tarpeen - päättäkää asia varhain, jotta niitä voi varata.
Asetukset ja logistiikka: koosta kolme päätaustaa - rannan näköalapaikat, tiilipintainen aukio kauppoineen ja järven- tai lampiranta. Varmista moottoritieyhteys ja pysäköintimahdollisuus; jos haluat vaihtelevia taustoja, lisää lähellä oleva parkkitalo ja vihreillä alueilla oleva valtiotalo; kiireessä vaihda studioon, jossa on ranskalaiset ikkunat säilyttääksesi tunnelman.
Luvat, liput ja lupakirjat: tarkista lupavaatimukset puistoille tai rannikkoalueille; monissa San Francisco -alueen kohteissa tarvitaan lupa tai lippu; suunnittele kaksi viikkoa etukäteen; pidä mukana sekä digitaalinen kopio että tulostettu varakopio.
Pikakatsaus: mitä tarvitset - kaksi varmuuskopiota, luvat varmistettu, sää-sovellus, tiimin yhteystietoluettelo, suunnitelma viheraluevaihtoehdoista ja valmiina oleva valokuvausaikataulu. Päätä, mitä haluat kuvata kussakin paikassa, ja valmista lista varalajeista ja paikoista, mukaan lukien saari- tai järvivaihtoehdot; ole valmis lähettämään viestin parille.

