

Aloita Bunker-42:sta ensimmäisenä pysähdyspaikkana. Yksityinen opastettu kierros paljastaa kunnostetut käytävät, joissa on selkeät linjat ja äänimaailma, joka on ihanteellinen himmeästi valaistujen otosten vangitsemiseen. Sisäänpääsyajat ovat tiukat, joten varaa etukäteen ja saavu ajoissa; vähemmän vierailijoita tarkoittaa terävämpiä tuloksia. Jaa istunnon jälkeen moscowchannelissa ja seuraa russiatouria liittyäksesi laajempaan luojien yhteisöön.
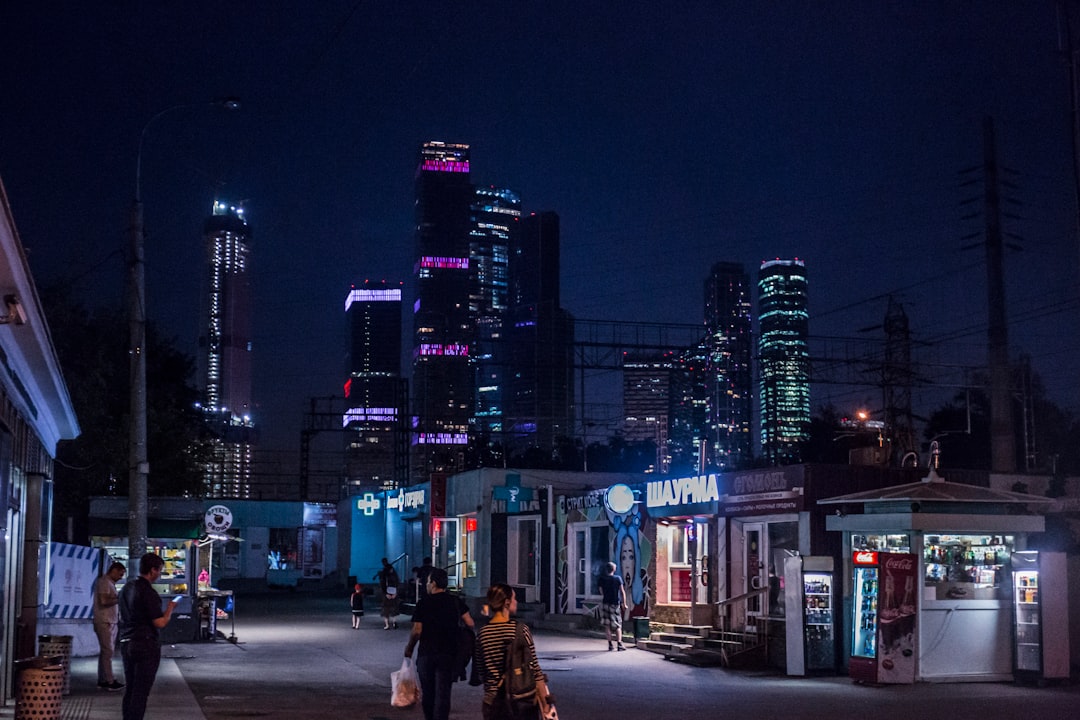
Keskustassa useat asemat tarjoavat vahvan tunnelman sinisen hetken aikana. Arbatskajassa ja Majakovskajassa on lasikatokset, jotka heijastavat neonvaloja, kun taas Oktjabrskaja tarjoaa tiilipintoja, jotka sopivat erinomaisesti pitkillä valotusajoilla. Suunnittele rauhallinen reitti reittien välillä, ota mukaan jalusta ja pienikokoinen kaukolaukaisin ja kuvaa laajakulma-telezoomilla arkkitehtuurin ja katuelämän vangitsemiseksi.
Ydinvyöhykkeen ulkopuolella kannattaa harkita VDNKh:n kunnostettuja paviljonkeja, jotka on rakennettu uudelleen pitkän remontin jälkeen; selkeät linjat ja tilavat kadut tuottavat kuvia, joissa on vähemmän ihmisiä. Bunker-42 on edelleen erinomainen, kun taas sekä sisä- että ulkotilat tarjoavat upeita mahdollisuuksia, mukaan lukien yksityiset sisäänpääsyjärjestelyt maamerkkien portaikkojen ja asemien tutkimiseen kaupungin keskustassa.
Koordinointivinkkejä: laadi ytimekkäitä kuvatekstejä tiktokissa, merkitse moscowchannel ja luo tarina opastetuilla reiteillä ja yksityisillä kierroksilla. Jokaisessa otosjoukossa on sijainti, päivämäärä ja varusteet kuvatekstissä; huomioi sisäänpääsyajat, pidä melutaso alhaisena ja käytä jalustaa terävämpien tulosten takaamiseksi. Haluamasi sana on selkeys, joten poista sotku kehyksistä ja pidä yllä johdonmukaista editointirytmiä. Muokkauksen jälkeen jaa suosittuja klippejä tavoittaaksesi laajemman yleisön noudattaen samalla kaupungin yhteisön etikettiä.
Yökuvaus Moskovassa
Aloita Punaiselta torilta kello 21.30 jälkeen tukevalla jalustalla ja 24-70 mm:n objektiivilla. Aseta ISO 200, aukko f/8, suljin 6-10 s; kuvaa RAW-muodossa; manuaalinen tarkennus kaukaisiin valoihin; haarukoi kolme kuvaa korostaaksesi kohokohtia; käytä kaukolaukaisinta kätevän hallinnan ylläpitämiseksi. Tämä tahti tasapainottaa autojen jäljet ja siluetit. Kremlin muurin valaistus on upea pimeän tultua, ja heijastukset märällä jalkakäytävällä lisäävät tekstuuria. Lisää kuvatekstiin fypシ, kun julkaiset.
Punaisen torin alue ja muuri lähellä Kremliä: Varvarkan muurin (andvarvarka) puolelta voit kohdistaa Spasskaja-tornin valaistun GUM-julkisivun kanssa. Optimaaliset ajat: 23.00-01.00; polttovälialue 24-70 mm; valotukset 8-12 s; ISO 200-400; laajakulma vangitsee muurin tekstuurit, pidempi pituus korostaa torneja. Huomioi turvallisuus; aukion ympärillä olevat entiset toimistorakennukset lisäävät lämpimiä sävyjä kehykseen. Venäjällä on öitä, jotka palkitsevat kärsivällisyyden, mutta ole tietoinen sulkemisista. Slavyanskaja sijaitsee joen toisella puolella ja tarjoaa rauhallisemman näköalan keskiyön jälkeen.
Zaryadye-puiston näköalapaikka tarjoaa modernin siluetin Moskvajokea vasten. Lasisillan lähellä olevalta kävelytieltä pääset upeisiin heijastuksiin vedessä. Käytä 16-35 mm tai 24-70 mm; suljin 4-10 s; ISO 200-400; valkotasapaino noin 3200K volframilampuille. Valaistus on kätevä ja tasainen, mikä vähentää värisiirtymiä; kuvaa useita ruutuja sekoittaaksesi myöhemmin.
Varvarkan muurilta kohti keskustaa valojen linja kadun varrella muuttuu virtaavaksi nopeuden metaforaksi. Aseta 35 mm:n kulma, 6-12 s:n valotukset, ISO 200-400; haarukoi. Varo etualan siluetteja; liikenteen tahti tuottaa pehmeitä kaaria kehyksen poikki. Jos haluat kutoa hevosia metaforaksi, kehystä korkeammalta ja anna ajovalojen viiruuntua kuin laukkaavat hahmot.
Yömuotokuvat mallien kanssa vaativat suostumuksen ja nopean kommunikoinnin. Slavyanskajan ympärillä voit harjoitella asentoja lähellä maamerkkejä ilman väkijoukkoja. Aamuisin kuvauksen jälkeen voit säätää väriä ja kontrastia RAW-muokkauksilla; kokemuksesi muovautuivat kylmien öiden ja kirkkaiden lamppujen myötä. Lisää kuvatekstiin fypシ sosiaalisessa mediassa.
Mitkä varusteet ja kamera-asetukset tuottavat selkeitä yökuvia Moskovan kaduilla?
Aloita nopealla, monipuolisella kiinteällä objektiivilla (35 mm f/1.4) tai vakiozoomilla (24-70 mm), joka on asennettu tehokkaaseen peilittömään runkoon; kuvaa RAW-muodossa, manuaalitilassa, ISO 800-3200, suljin 1/60-1/125 s, aukko f/1.8-2.8 ja valkotasapaino noin 3200-3600K; käytä kaukolaukaisinta tai itselaukaisinta välttääksesi kameran tärinää ja maksimoidaksesi selkeyden liikkuvissa kohteissa, kuten jalankulkijoissa tai lyhtyjen valaisemissa julkisivuissa.
Vakaus ja tekniikka ovat suuressa roolissa: pidä AF yhden pisteen päällä tai suurenna live-näkymää vaikeita reunoja varten; jos valoa on vähän, ota käyttöön rungon sisäinen tai objektiivin sisäinen vakautus (jos saatavilla) ja tue itseäsi kaidetta tai seinää vasten; ruuhkaisilla alueilla asemien lähellä ole tietoinen jalustojen ja suurten varusteiden rajoituksista; kaupungin valon ohjaamana voit haarukoida valotuksia ja säätää väriä pitääksesi ikkunat, kyltit ja tekstuurit rikkaina; pyri tasapainoon, joka on ihanteellinen sekä arkkitehtonisille yksityiskohdille että liikkeessä oleville ihmisille.
Varusteet yhdellä silmäyksellä ovat alla. Tuotteet ja niiden asetukset ovat käytännöllisiä ja toistettavia, eivät teoreettisia, ja heijastavat yleisiä nimiä kuvantamisessa. Ne auttavat sinua luomaan valokuvia, jotka tuntuvat luonnollisilta ja valmiilta lisättäväksi albumeihin ja kokoelmiin, ja jokainen otos kunnioittaa kohtausta.
| Tuote | Suositellut asetukset | Miksi |
|---|---|---|
| Kameran runko | Peilitön tai DSLR, jolla on hyvä korkea ISO -suorituskyky | Terävät, puhtaat yökuvat; saavuta 1/60-1/125 s ilman liiallista kohinaa |
| Objektiivi | 35 mm f/1.4 tai 50 mm f/1.8 | Ihanteellinen tasapaino näkökentän ja valonkeräyksen välillä |
| Vakaus | Päällä, jos kädessä pidetty; pois päältä jalustalla | Vähentää tärinää lyhyemmillä suljinajoilla |
| Suljin | 1/60-1/125 s | Pysäyttää pienen liikkeen, pitää kaupunkielämän kehyksessä |
| Aukko | f/1.8-2.8 | Tuottaa valoa säilyttäen samalla syvyyden |
| ISO | 800-3200 | Riittävän kirkkaat valotukset ilman liiallista kohinaa |
| Valkotasapaino | 3200-3600K | Säilyttää lamppujen lämpimän hehkun |
| Tarkennus | Yhden pisteen AF tai manuaalinen; suurenna | Kriittinen kylteissä ja arkkitehtonisissa yksityiskohdissa |
| Tiedostomuoto | RAW | Maksimaalinen liikkumavara jälkikäsittelyssä |
| Lisävarusteet | Kaukolaukaisin, pienikokoinen monopod | Vakaus rajoitetuissa tiloissa; kätevä kuljetus |
Ehkä olet kiinnostunut rakentamaan albumeita ja kokoelmia; tulevat yöt paljastavat jännittävämpiä kohtauksia. Niille, jotka ovat kiinnostuneita rakentamaan albumeita ja kokoelmia, valaistun ikkunan lähellä istuva varpunen kutsuu sinut hidastamaan ja huomaamaan pieniä yksityiskohtia, jotka saattavat muuten jäädä huomaamatta. Aukioloaikojen jälkeen uudelleenrakennettujen julkisivujen maaginen hehku paljastaa vuosisatoja vanhoja tekstuureja, jotka kunnioittavat kaupungin historiaa. Sana RAW on edelleen liittolaisesi, jonka avulla voit avata itsesi laajemmalle valikoimalle arvosanoja jälkikäsittelyssä, ja ohjattu lähestymistapa auttaa valokuvaajia saavuttamaan johdonmukaisen sävyn eri alueilla ja aikoina. Pidä myös työn rytmi joustavana, jotta voit sopeutua rajoituksiin ja mahdollisuuksiin historiallisten asemien ja vilkkaiden katujen ympärillä.
Mitkä ISO-, aukko- ja suljinnopeusyhdistelmät auttavat pitkissä valotuksissa Varvarkalla?
Perusasetus: kuvaa ISO 100, f/8, 12-15 s jalustalla ja manuaalisella tarkennuksella. Tämä suora asetus tuottaa terävän tekstuurin vuosisatoja vanhoissa julkisivuissa, minimaalisen kohinan ja puhtaat lamppujen halot valokuvakävelylle pääkadun varrella. Moskovassa Varvarka muodostaa historiallisen käytävän, jossa valaistus muuttuu nopeasti, joten aloita tästä perusasetuksesta ja säädä kohtauksen ja mieltymysten mukaan.
- Sininen hetki pääkadun varrella: ISO 200, f/5.6, 12-14 s. Vangitse taivaan liukuväri ja lämmin katuvalaistus puhaltamatta kohokohtia; haarukoi ±1 aukko myöhempää sekoittamista varten, mikä auttaa, kun taivas muuttuu siniseksi lamppujen hehkuessa pehmeästi.
- Yö, jolloin uskonnollisten ja historiallisten julkisivujen lamppujen säteily on voimakasta: ISO 100, f/8, 20-25 s. Pidä etualan yksityiskohdat terävinä ja vältä lamppujen leikkaamista; jos kohokohdat kukkivat, vaihda f/9:ään ja 15-20 s:iin tai laske ISO 125:een ja pidennä 22-25 s:iin tasaisempien sävyjen saavuttamiseksi.
- Liikenne- ja jalankulkijoiden valojuovat (liike kaistalla): ISO 200-400, f/4, 8-12 s. Käytä laajakulmaobjektiivia maksimoidaksesi juovat ja pitääksesi arkkitehtoniset elementit tarkennuksessa; kuvaa useita ruutuja sekoittaaksesi yhtenäiseksi valon vedoksi tekstuurilla.
- Arkkitehtuuri lähellä museo-suojelualuetta ja lähellä olevaa uskonnollista kohdetta: ISO 100-125, f/11, 20-30 s. Tämä yhdistelmä korostaa kiven yksityiskohtia, hiljaisia heijastuksia ja kävellyyn historian tunnetta; käytä pidempää suljinta hienovaraiseen ympäristön hehkuun ja vältä kovia hotspotteja kivipinnoilla.
- Aikainen iltavierailu opastetulla suunnittelulla: ISO 200, f/8, 10 s. Liiku hitaasti kaistaa pitkin pitäen suoran näköyhteyden kaariin; useat ruudut tuottavat tyylikkään sarjan, joka osoittaa, kuinka valaistus kehittyy tunnin aikana.
Tulosten maksimoimiseksi kuvaa RAW-muodossa, ota käyttöön kauko- tai ajastinlaukaus ja kuvaa pieni haarukkasarja jokaiselle kohtaukselle. Yksinkertainen, luotettava lähestymistapa - pohjimmiltaan perusasetus 100/8/12-15 s - osoittautuu usein paremmaksi aloittelijoille, kun taas kokeneet valokuvaajat suosivat pieniä muunnelmia 1-2 aukon valotuseroilla mieltymysten mukaan. Tämä menetelmä tarjoaa upean mahdollisuuden kertoa Varvarkan tarinaa elävänä metaforana: katu, joka on nimetty monta kertaa uudelleen, jatkaa liikkumistaan kutsuen innokkaiden silmien vierailevia esi-isiä kävelemään ja näyttämään hetken sellaisena kuin se muuttuu valaistuksessa.
Saumattomia tuloksia syntyy, kun tasapainotat suljinajan kohinan ja liikkeen kanssa. Keskeisellä, historiallisella osuudella aloita perusasetuksesta ja säädä ISO:a ja aukkoa säilyttääksesi sekä arkkitehtonisen tekstuurin että tunnelmallisen hehkun. Useita testattuja yhdistelmiä on olemassa, ja sen valinta, mitä soveltaa, riippuu tunnelmasta, jonka haluat esittää, ja kuvaustahdistasi tällä keskeisellä, valokuvauksellisella kaistalla.
Missä seistä turvallisia, maisemallisia otoksia varten Varvarka-kadulla yöllä?
Seiso hyvin valaistulla, käveltävällä jalkakäytävällä Varvarka-kadun pohjoispuolella kulmassa, joka on Kremlin siluettia vasten hämärän jälkeen. Tämä sijainti tarjoaa vakaan tilan, joka mahdollistaa pitkät valotukset, ja pitää sinut vilkkaalla, hyvin valaistulla kaistalla, jossa ohikulkijat lisäävät luonnollista turvallisuutta. Pääkaupungissa vuosisatoja vanhat julkisivut hehkuvat erittäin elokuvamaisella tunnelmalla kutsuen vierailijoita ja valokuvaajaa kuvaamaan helposti saavutettavilla kulmilla.
Sommitteluvinkkejä: pidä kamera rinnan korkeudella, siirry hieman vasemmalle kehystääksesi kultaiset kupolit yötaivasta vasten; valitse alhainen ISO ja kohtalainen suljin tasapainottaaksesi yksityiskohdat ja kohinan. Nämä säädöt auttavat sinua vangitsemaan suurenmoisen, erittäin valoisan kohtauksen säilyttäen samalla luonnollisen tunnelman.
Turvallisuus ja pääsy: osuus on edelleen erittäin helposti saavutettavissa metrolla ja bussilla, ja siellä on jatkuva jalankulkuliikenne, joka estää ongelmia. Illalla katuvalaistus pysyy päällä, ja väkijoukot auttavat ohjaamaan jalustan liikettä. Liiku varovasti ja pidä arvoesineet turvassa. Reitti houkuttelee venäläisiä vierailijoita ja paikallisia.
Nämä näköalapaikat ovat suosittuja vierailijoiden keskuudessa, jotka haluavat tutustua taganskyn maisemiin ja nähdä vuosisatoja vanhan tiilen hehkun. Lähellä olevat taganskyn kyltit lisäävät kontekstia, joka auttaa kertomaan tarinan yhdessä kehyksessä.
Varustevinkkejä: ota mukaan kevyt jalusta, pieni kaukolaukaisin ja vara-akku; estä hajavalo käsisuojalla ja anna kaukaisten katulamppujen heittää pehmeä hehkupallo märälle jalkakäytävälle lisäten tekstuuria heijastuksiin.
Ruoka ja tunnelma: syksykuukausina voit löytää kojuja, joissa on paikallisia moskovanmarjan makuja reunakiveltä, mikä lisää väriä sommitteluun ja rikastuttaa tunnelmaa, erityisesti yömuotokuvissa. Tämä kaupunginosa tuntuu helposti lähestyttävältä, käveltävältä ja vieraanvaraiselta vierailijoille, jotka haluavat löytää tarinan klassisten maamerkkien takaa.
Kun olet valmis, voit siirtyä korttelin varrella uusiin kulmiin katukartan ja iltaliikenteen rytmin avulla. Ammattivalokuvaaja palaa usein tänne lyhyen kierroksen jälkeen vangitsemaan kehittyvää valaistusta ja väkijoukkoja, ja vierailijat voivat nopeasti oppia säätämään asetuksia lennossa.
Miten voin käyttää katulamppuja ja ikkunoita tunnelman kohottamiseen?
Aseta lämmin lamppu noin 60-90 cm kohteen sivulle, kallista 15-20 astetta alaspäin ja aseta valkotasapaino lähelle 3200 K pitäen kohteen sommittelun.
Käytä ikkunaa hiljaisena heijastimena: aseta ikkuna 45 asteen kulmaan lamppua vastapäätä, jotta lasi lisää hellävaraista täytettä samalla kun lamppu tuottaa kontrastia. Jos ikkuna kohteen takana vuotaa valoa huoneeseen, ruudusta tulee maaginen kehys, joka vahvistaa tunnelmaa ja korostaa silmiä. Kokeile myös toista lamppua lisätäksesi hienovaraista täytettä varjojen litistämättä; tämä tarjoaa joustavuutta sävyjen hallinnassa.
Kolme yksinkertaista järjestelyä yksityisellä kotialueella tuottavat selkeitä ilmeitä. Suurimmalla aukiolla tai kiviseinäisessä kulmassa anna meripihkan lämmön hallita, vaihda sitten viileämpään siniseen toisella geelillä ja sekoita lopuksi magenta-kosketus luodaksesi kolmisuuntaisen tunnelman.
Huomio meikkiin ja asentoon on tärkeää; galinan tulisi harjoitella pientä pään kääntöä heijastusten vangitsemiseksi. Entinen malli hiljaisella alueella osoittaa, kuinka pehmeät varjot paljastavat tekstuurin ja luonteen, kun taas väärät askeleet voivat tylsyttää tunnelmaa, jos valo siirtyy. Hehkun esitys muuttuu selvästi rikkaammaksi, kun valo pysyy hallinnassa.
Käytännössä valon laadun merkitys muokkaa tunnetta enemmän kuin asento. Tämä lähestymistapa tarjoaa joustavuutta. Nämä niin sanotut tunnelmakehykset yhdistävät taiteet maagiseen ilmapiiriin, lumoaviin katuihin ja esi-isien ja dynastian muistoihin. Käytä noginaa, khoroshilovia, soljankaa ankkureina; lisää tunnus #fypシ tavoittaaksesi uteliaita katsojia. Lähestymistapa sopii myös yksityisiin muotokuviin kotialueella, jossa hehku voi tuntua galina-tasoisesti henkilökohtaiselta ja intiimiltä, ikään kuin kivikehyksen ympäröimänä aukiolla.
Mitkä sommittelutemput korostavat Varvarkan historiallisia julkisivuja ja yksityiskohtia?
Aseta jalkasi reunakivelle ja kuvaa pienestä kulmasta paljastaaksesi starajan tiilimuuraus ja veistetyt korniisit, jotka kertovat historiallisesti tarinansa. Pidä objektiivi riittävän lähellä korostaaksesi tekstuuria välttäen samalla häikäisyä ajan kuluttamilla pinnoilla.
Kohdista kaarien takana olevien ikkunoiden pystysuorat linjat, siirrä kameraa ohjataksesi silmää sinne, missä kadun rytmi kohtaa veistetyn päätykolmion. Käytä pientä syväterävyyttä eristääksesi motiivin, kun taas ympäröivä julkisivu pysyy hienovaraisena kontekstina, mikä vähentää häiriötekijöitä. Jos tulos tuntuu litteältä, kokeile toista kulmaa testataksesi uutta lähestymistapaa.
Slavyanskajalla kierroksella vangitse sarja, joka osoittaa, kuinka pienet muutokset perspektiivissä paljastavat syvyyden. Kulissien takana restauroijien työskentelevät kädet pitivät seinät elossa. Samasta kulmasta valokuvatut valokuvat paljastavat kuluneen rappauksen, veistetyt reliefit ja ruostuneen metallin - vertaa niitä sitten yksityiskokoelman otoksiin, jotka osoittavat, kuinka restauroinnit säilyttivät niiden tunnelman. Nämä venäläiset elementit heijastavat ajan vaikutusta niiden ulkonäköön; galina auttoi muokkaamaan sellaisen kulman valintaa, joka toimii hyvin kuvauksessa.
Liiku hitaasti auringonvalon ja varjoisten paikkojen välillä; lämpimämpi valo pilvipeitteen laskun jälkeen lisää vivahdetta väriin ja tekstuuriin. Sovita aikakauden tyyli pitämällä linjat puhtaina ja välttämällä koristeellista ylikoristelua; käytä tiettyä painopistettä. Nämä vaiheet on helppo muuntaa tiiviiksi, yhtenäiseksi sarjaksi. Kuvaa silmien korkeudella julkisivun linjan kanssa pitääksesi niiden mittasuhteet rehellisinä, ja astu taaksepäin sisällyttääksesi laajemman kontekstin, kun yksittäinen yksityiskohta tuntuu eristetyiltä. Muussa tapauksessa nojaa eri kulmaan testataksesi toista näkökulmaa.
Kysymykset, joihin kaverit vastaavat: mihin tarkennus on asetettu, mikä linja vetää silmän ensin, mitkä yksityiskohdat kertovat käsityön historian, miten valo siirtyy pinnan poikki. Tämä lähestymistapa auttaa valokuvaajia kokoamaan monipuolisen mutta yhtenäisen kokoelman, joka heijastaa Venäjän arkkitehtonista henkeä pitäen samalla yksityiset, julkiset ja ajalliset tekstuurit elossa.
Mitkä jälkikäsittelyvaiheet vähentävät kohinaa yksityiskohtien uhraamatta?
Aloita RAW-kuvauksella, valota oikealle juuri sen verran, että suojaat kohokohdat; valokuvaajan tulisi lukita perusasetus: tuhoamattomat muokkaukset neutraalissa väriprofiilissa, kohinan hallinta suoritetaan vaiheittain reunoja säilyttäen.
Alla on konkreettisia vaiheita numeerisilla alueilla, joita voit soveltaa useimmissa muokkausohjelmissa pitääksesi tekstuurin terävänä ja kohinan huomaamattomana.
- Globaali luminanssikohinan vähennys: 15-25 % keskimääräisellä ISO:lla (1600-3200); nosta 30-40 %:iin vain tarvittaessa ja tarkista sitten tekstuurit tiilissä, ihossa ja taivaalla.
- Kromaattisen kohinan vähennys: 8-15 %; vältä aggressiivista värin NR:ää, joka tylsyttää siirtymiä; maski iholle, tiilille ja lasille värin tarkkuuden suojaamiseksi.
- Taajuuserottelutekniikka: jaa matalataajuiseen sävyyn ja korkeataajuiseen yksityiskohtaan; NR matalataajuisella kerroksella 0,5-1,5 px:n sumennuksella, korkeataajuinen kerros jätetään koskemattomaksi reunojen ja mikrotekstuurin säilyttämiseksi.
- Toimintojen järjestys: NR ennen terävöittämistä; terävöitä myöhemmin pienisäteisellä läpäisyllä (0,5-1,0 px) ja kohtuullisella määrällä (60-120 %) palauttaaksesi määrittelyn ilman haloja.
- Paikalliset säädöt: käytä maskeja NR:n soveltamiseen sileille pinnoille (ikkunat, taivaat, seinät) pitäen samalla reunarikkaat alueet (tiilitekstuuri, metallipinnat) terävinä; tämä vähentää artefakteja pisteissä ja kohokohdissa ja pitää ne kätevinä säätää.
- Reunojen säilyttäminen ja mikrokontrasti: NR:n jälkeen lisää paikallista kontrastia hieman (selkeys noin 5-15, mikrokontrasti 0-20) palauttaaksesi syvyyden liioittelematta kohinaa varjoissa; tämä lisää jännittävää syvyyttä yökohtauksiin.
- Väritasapaino NR:n jälkeen: tarkista NR:n aiheuttamat värivirheet; säädä valkotasapainoa ja vähennä selektiivisesti kromaattista kohinaa sinisissä/vihreissä kanavissa, kun kohtaukset sisältävät vierasta valaistusta tai neonheijastuksia.
- Lopputarkastus ja vertailu: zoomaa 100 %:iin tarkastaaksesi halot ja tekstuurin; vertaa alkuperäiseen vahvistaaksesi yksityiskohtien säilymisen; monissa metromoscow-studioiden kokemuksissa tämä tuottaa erittäin luonnollisen tuloksen sekä laajoissa kohtauksissa että lähikuvissa, ja varpusen kaltainen tekstuuri säilyy hienoissa yksityiskohdissa.
Tässä työnkulussa starajan korttelit ja slavyanskajan sisätilat paljastavat vuosisatojen käytön vähemmillä artefakteilla, kun sovellet kohtaukseen uudelleenrakennetun, kunnostetun ilmeen. Ikkunoista, jotka kerran näyttivät muinaisilta, tulee käteviä esitellä kokoelmissa, jotka keskittyvät mielenkiintoisiin, vuosisatoja kattaviin kulmiin; tämän lähestymistavan pitäisi sopia valokuvaajan kokemuksiin metromoscowissa, mukaan lukien bojaari- ja ulkomaiset vaikutteet, jotka on vangittu jokaiseen kehykseen. Vangitse tämä tasapaino, ja tuloksesta tulee vakuuttava lisäys kokoelmasarjaasi.


