 Lammikkopuutarha – Luo elinympäristöjä linnuille, sammakkoeläimille &">

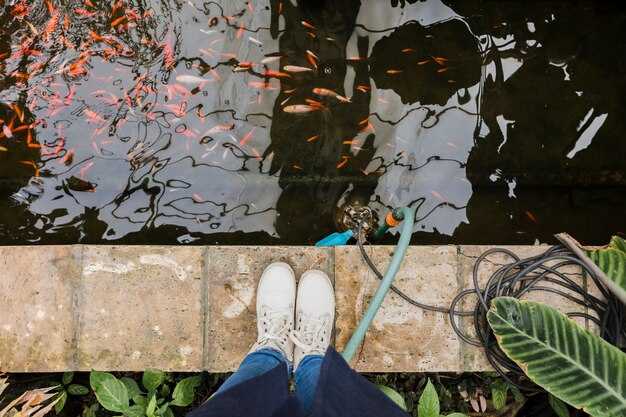
Asenna matala vesiaihe, jossa on asteittain syvenevät kohdat ja epäsäännölliset reunat tukemaan lintujen ja sammakkoeläinten elämää. Sisällytä grillit sijoitettu reunan varteen orsia varten ja ohjaamaan veden virtausta, ja sora sängyn pohjalle salaojitusta varten. Suunnittele alueita, jotka mahdollistavat smaller altaat tasot vettä, skaalaamalla koko sivustoasetteluista säilyttäen samalla reunavyöhykkeet.
Suunnitelmalla tulisi olla tuki tiedot paikallisesta arviointi data ja road käytävähuomioita; arvio tasot vettä ja koko kunkin vesialueiden ominaisuuksia, jotta ne hyödyttäisivät mahdollisimman paljon lintu- ja sammakkoeläinlajeja. Koordinointi puistot ja yhteisöryhmien linjaamiseksi läheisten kanssa road verkot ja julkinen pääsy, varmistaen, että sivustot on suunniteltu mahdollistamaan nopea huom käyttöönotto ja jatkuva arviointi, sekä tunnustaa lähistöllä vierailevat ihmiset. Uusimpien asennusten soveltuvuus ja turvallisuus on arvioitava.
benningin kenttäharjoittelumuistiinpanot korostavat reunojen monimuotoisuuden arvoa; zuckermanin havainnot ovat linjassa näiden mallien kanssa osoittaen, että monipuoliset reunavyöhykkeet lisäävät petojen suojapaikkoja ja saaliin saatavuutta. Tämä tarkoittaa konkreettista victory palauttaessa populaatioiden kiertoa kaupunkien viheralueilla. Säilytä marginaalit puhdas, sisältää sora vuoteet ja varmista laakeri pankkien kyky kestää valumia ja jalankulkuliikennettä.
Uusimmassa huom, arvioi näiden vesiaiheiden toimivuutta: seuraa lintujen ja sammakkoeläinten uusintakäyntejä, tarkkaile tiedot kutupaikualueista ja säädä resurssi kohdista vastaavasti. Lyhyt arviointi voin vahvistaa, ovatko uusimmat elinympäristöt käytössä ja miten läheinen liikenteen melu tai puistotoiminta vaikuttaa käyttöasteeseen, ja jakaa tulokset yhteisön kanssa puistot raportit.
rakennusmiehille ja vapaaehtoisille käytännöllinen tarkistuslista: määritä koko ja tasot vettä, aseta sora ja turve marginaalit, varmista puhdas vettä ja dokumentoi edistyminen yksinkertaisella huom jokaisen kauden jälkeen; jaa havainnot puistot johtajat ja paikalliset resurssi koordinaattorit rakentamaan laajempaa arviointi kehys ja säilytä projekti Toki onnistuu. jatkuvan tuen.
Opas luonnonvaraisten eläinten lammen suunnitteluun
Valitse paikka vesistöjen läheltä, jossa on loiva rinne tulvariskin vähentämiseksi. Arvioi tässä maaperät, kuivatus ja toiminta lähellä olevilla alueilla, kuten leirintäalueella ja leikkikentällä, häiriöiden arvioimiseksi. Pyri ominaisuuden ja ympäröivän alueen väliseen harmoniaan ja aseta samalla etusijalle ihmisten ja koirien turvallisuus.
Suunnittelutapa: käytä keinotekoista allasta, jos luonnollinen muodostuma on riittämätön; käytä myrkytöntä vuorausta tai paljaan maan kaivausta. Luo porrastettuja reunoja mataline hyllyineen, 5–20 cm syviä reunan ympärille, jotka yhdistyvät keskisyvempään alueeseen, 60–90 cm, tukemaan useita lajeja.
Kastelustrategia: asenna säädelty sisäänvirtaus sadeveden keräyksestä tai puhtaasta lähteestä, ja ohjaa ylivuoto kasvillisuuden suuntaan. Varmista, että alue saa aurinkoa päivän parhaana aikana ja tarjoa varjoa tärkeinä aikoina veden laadun ylläpitämiseksi. Sisällytä kostea reuna-alue ylläpitämään kosteudesta riippuvaista elämää täällä.
Yhteydet: yhdistä vesialue läheisiin pensasaitoihin tai metsiin eläimistön liikkumisen mahdollistamiseksi. Ylläpidä puskurivyöhykettä vesistöjen varrella suodattamaan valumia. Koordinoi tämä suunnitelma viereisten alueiden käytön, kuten Pattonin leirintäalueen toiminnan, kanssa; ota huomioon uchee-yhteisön huomiot paikallisten arvojen ja turvallisuusstandardien mukaisesti.
Esteettömyys ja turvallisuus: reitit, jotka kulkevat lähellä katua; asenna tarvittaessa matalat aidat. Jos lähellä on par 3 -kenttä tai golfkenttä, koordinoi johdon kanssa ristiriitojen välttämiseksi. Tarjoa vasemmanpuoleinen esteetön reitti reunan luo osana polkua. Pidä koirat kytkettyinä; aseta selkeät säännöt portille; tämä huomautus auttaa ihmisiä käyttämään aluetta turvallisesti.
Maintenance and monitoring: schedule monthly checks during the first year; inspect liners, edges, and slopes for erosion; remove debris; track water depth and vegetation growth. Use a post at the gate to remind visitors about rules. Best results come from routine checks, community input, and timely adjustments.
Wildlife Ponds: Create Habitats for Birds, Amphibians & More
Install an excavated basin with a gentle slope and a robust liners, add a shallow shelf near the edge, and connect to a nearby watercourse when possible. This makes the feature usable across seasons and water levels while keeping maintenance straightforward. Use good equipment rated for outdoor use, and ensure the installation has been planned with safety and ecological value in mind. For information across regions, check local guidelines and permitted practices.
Design the cross-section with three identifiable levels: a 5–15 cm margin for moisture-loving groundcover; a 20–50 cm shallow zone for warm, sunlit water; and a deeper core (60–100 cm) that provides cool refuges and a range of habitat states. The layout onto the landscape should be considered; ensure the structure sits firmly on firm soil and avoid overloading the bearing capacity of the site. This arrangement allows diverse use by species at different times of year and weather conditions.
Water quality depends on inputs and surrounding land use; integrate a simple overflow or gravity-fed drain to keep levels stable. Often, a minimal circulation system is sufficient to preserve invertebrates and plant life. Please review information from local environmental bodies; the plan includes buffers to filter runoff and maintain steady moisture without harsh chemicals.
Alternative builds include rigid tanks, pre-formed basins, or reinforced concrete shells. Check soil bearing and site requirements before digging to ensure the foundation can support the weight when full. When using liners, keep edges smooth and well-seated to prevent punctures. This approach is popular in compact plots where space is limited and where a straightforward build helps beginners get started.
Beginners can start with a popular, ready-made tank setup or a shallow excavation followed by a simple lining. Confirm state or municipal requirements before digging and obtain any needed permissions. Please plan the installation to minimize disruption to the yard and utilities, and to maximize opportunities for wildlife to interact with the water feature.
Maintenance practices focus on stability and safety: inspect edging and liners monthly, top up during dry spells, and monitor algae growth and wildlife activity. Establish a schedule with seasonal events such as spring replenishment and autumn vegetation management. Use non-toxic cleaners and avoid chemical treatments that can harm the ecosystem; keep stress on the system low for long-term success.
| Komponentti | Purpose | Specifications |
|---|---|---|
| Excavated basin | Foundation for cross-section with stable levels | Shallow margins 5–15 cm; deeper core 60–100 cm; ensure smooth sides |
| Liners | Containment and water retention | Durable, UV-stable; edge protection; consider one-piece or roll material |
| Tank option | Alternative for small plots | Prefabricated, sturdy, easy to install; verify bearing state |
| Water input | Controlled replenishment | Rainfall capture, gravity feed, spill path to drain; keep sediment out |
| Vegetation margins | Habitat and filtering | Low-growing perennials at the edge; damp-tolerant options |
| Monitoring equipment | Information gathering | Water tester, level gauge, debris screen; simple, non-toxic |
Site Selection: Sunlight, Water Access, Soil Drainage, and Surroundings
Start with a sun-rich patch offering 6–8 hours of direct daylight during the warm season, aligned on a bearing that maximizes light while allowing shade windows in the hottest hours.
Ensure water access from nearby watercourses or reliable catchment; install liners to curb seepage and maintain a stable water level; use a straight inlet path to deliver inflows from the source and minimize turbulence around adjacent edges.
Assess soil drainage and texture; if heavy clay or compacted zones exist, apply modification such as a gravel underlayer and geotextile, then set the feature on a gentle slope of about 1–2% away from the center to promote drainage and reduce pooling around edges.
Surroundings matter: position adjacent to open areas with low sediment input; keep sides clear for maintenance, straight access routes, parking, and potential play areas for visitors; if a campground is nearby, place the feature away from main circulation and ensure a safe buffer. If marchant services are available nearby, align supply access to avoid crossing pedestrian paths.
Permits and review: review the proposed layout with authorities, obtain required permits, confirm safety around edges and paths, and check bearing and drainage requirements; assess changes that may be needed in response to site conditions.
Operation and adjustments: once installed, monitor activity levels, water quality, and edge stability; reasons for changes should be documented; if performance lags, consider an alternative configuration near the same water source; maintain straight access to the facility and good parking and signage; this approach can be perfect to serve campers visiting the site.
Container Ponds: Sizing, Liner Type, Drainage, and Safety for Families
First, size for family use: target 700–1,200 gallons depending on space, with a depth of 18–24 inches. In practice, an 8×6 ft footprint at 2 ft depth yields about 720 gallons; a 10×8 ft footprint at 2 ft depth yields about 1,190 gallons. Choose based on available area and intended use, keeping in mind proximity to a floodway or other water channel.
Liner options should prioritize long life and reliable seams. Use EPDM flexible liner (0.75–1.0 mm) for durability under sun and UV exposure; a thicker 1.0–1.5 mm version adds resilience for high-traffic areas. If budget is tighter, heavy-duty PVC is acceptable but may require more frequent inspection for shrinkage or puncture. Layer the liner on a non-woven geotextile underlayment to protect against sediment and sharp bottom edges; ensure all seams are heat-welded or solvent-welded with proper overlap (at least 12 inches) to minimize leaks. For a ready-made option, consider a preformed basin with integrated edging, but confirm supports are rated for outdoor use and safe for wildlife-friendly design.
Drainage must include a controlled flow path. Install a buried bottom drain connected to a valve, with an overflow that empties into a channel or floodway designed to handle runoff. The discharge path should be regulatory-compliant: obtain a permit when required, and verify local rules before any installation. If the site sits near a campground entrance, boating dock, or a church property along an avenue, expect additional inspections or stipulations from the regulatory body; this is where here guidance and a click-through permit checklist can help you stay compliant.
Maintenance planning should address sediment and bottom cleanliness. Schedule sediment removal at least twice per year, or as needed after heavy rains; use a gentle siphon or pump to avoid disturbing aquatic shelves that benefit wildlife-friendly habitat features. A sturdy, low-profile bottom design reduces debris buildup and makes cleaning easier for caregivers and visiting carpenters who may assist with covers or edging. A well-placed discharge valve on the left side eases access for seasonal shutdowns and winterization, reducing risk of staining or damage at the bottom.
- Safety first: install a lockable lid or a sturdy fence enclosure; ensure a stable, smooth surface around the rim to minimize trips.
- Access and visibility: keep maintenance access water-tight and clearly labeled; provide a shallow shelf around the edge to reduce the chance of slips.
- Access aids: a small ladder or stepping stones can help families supervise children safely by the water; avoid steep drops into the main basin.
Implementation steps and suppliers should consider local guidelines and available market options. When purchasing materials, obtain quotes from a local marchant or supplier, and verify warranty terms for liners and valves. If a custom lid is needed, a carpenter can craft a frame and cover that remains secure under strong sun and weather. For owners near shared spaces–campground avenues or community properties–coordinate with the property manager to align with scheduled maintenance windows and safety signage; this reduces conflicts and ensures consistent upkeep.
Habitat Features: Native Plants, Shelters, Varied Depths, and Perimeter Edges
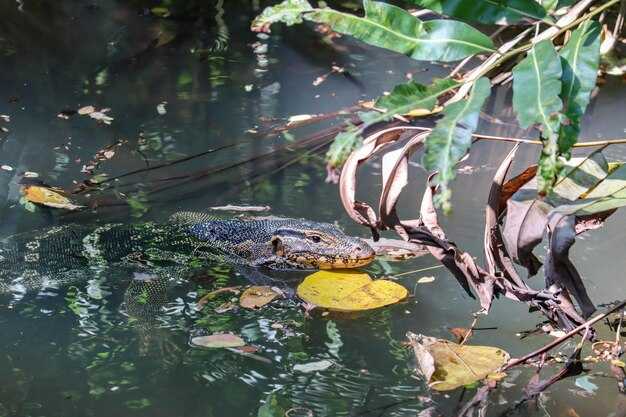
Plant a layered border of native stock along the shoreline to attract avian guests and support diverse life. Include tall shrubs that provide cover, mid-height perennials that supply nectar, and low groundcovers that stabilize the margin and create access paths along the water’s edge.
Install natural shelters: log piles, rock clusters, and brush piles at the damp margins. Position them to catch prevailing winds and to produce shaded zones that welcome small mammals, reptiles, and wandering invertebrates.
Establish varied water depths by shaping the margin with gradual shelves from a few centimeters to around 20–30 cm, a mid-depth zone of 60–90 cm, and a small deeper pocket that remains cooler during hot periods. Consider a low-profile tank or container to store seasonal rain and sustain the margin during droughts.
Edge features: mix reeds, sedges, and flowering grasses along the margin; shape moderate slopes and shallow shelves to encourage edge-dwelling creatures while filtering runoff from nearby terrain. Use rock or log barriers to slow water and provide shelter during storms. Plenty of microhabitats around the perimeter improve resilience across the site.
Please verify local permits where required; purchase native stock from reputable sources; prepare a waiver if needed; implement a simple annual post-change assessment; monitor shifts in watercourses across the property and adjust plantings, shelters, and depths accordingly.
Permits & Legalities: Jurisdictional Dams, Non-Jurisdictional Dams, and Paperwork
Ota välittömästi yhteyttä paikalliseen vesiviranomaiseen varmistaaksesi, laukaiseeko suunniteltu patoamisallas lainsäädännöllisiä patosääntöjä. Jos korkeus, varastointi tai virtavesien tukkeutuminen täyttävät kriteerit, hanki virallinen arviointi ja lupa ennen rakentamis- tai muutostöiden aloittamista. Esimerkkeinä Zuckerman, Ingersoll ja Kings havainnollistavat tyypillisiä kynnysarvoja ja arkistointivaiheita, joita aloittelijat voivat noudattaa asiakirjoja valmistellessaan.
- Määritä tila
- Aiheuttaako suunnitelma patoamisen, joka vaikuttaa virtavesiin; jos näin on, se saattaa olla lainkäyttövaltaan kuuluva. Lainkäyttövaltaan kuuluva määritys käynnistää muodollisen arvioinnin ja luvan ennen minkään rakentamista tai muuttamista.
- Merkitse muistiin mahdollisen esteen korkeus, alkuperäinen pohjan korkeus ja poikkileikkaus arvioidaksesi, sovelletaanko kynnysarvoja.
- Valmistele paperityöt
- Laadi asemapiirros ylhäältä ja poikkileikkaus; sisällytä pohjakontuurit, luiskan sijainti, ylivuotoreitti, sedimentinhallintatoimenpiteet ja huomautuksia siitä, miten ominaisuus integroidaan maisemaan.
- Sisällytä riski- ja kuntokartoitus, turvallisuussuunnitelma, hätätoimenpiteet ja ulkoilualueiden käytön huomioiminen; jos puistoalueella on piknikalueita, huomioi koordinointi puiston henkilökunnan kanssa.
- Liitä omistusoikeuden todiste; suunnitellut tarkastukset; mahdolliset vaadittavat maksut; määrittele vastuullinen osapuoli.
- Lähetä ja tarkista
- Toimita asianmukaiselle viranomaiselle; liitä mukaan kaikki piirustukset; toimita tarvittaessa naapureiden tai puistonhoitajien kirjeet; varaudu mahdollisiin lisäselvityspyyntöihin.
- Toteutus ja seuranta
- Etene vasta hyväksynnän jälkeen; säilytä alkuperäinen jalanjälki mahdollisuuksien mukaan; varmista poikkileikkaus ja pohjakorkeudet; seuraa sedimentin liikettä ja mahdollisia esteitä virtauksille; toimita sitten edistymispäivityksiä ja rakentamisen jälkeisiä arviointeja.
Huomioita ulkoilutoiminnan suunnittelijoille: valitkaa paikat, joissa on mahdollisimman vähän häiriötä viereisille palveluille; asettakaa paikalle ilmoituksia tiedottamaan vierailijoita; varmistakaa, että luiska, pohja ja ylivuoto noudattavat turvallisuusstandardeja eivätkä haittaa yleistä käyttöä, erityisesti lähellä piknikalueita.
Huolto ja pikatiedot: Kausiluonteiset tehtävät, valvonta ja yleiset sudenkuopat
Aloita pohjustamalla keväällä: tarkasta altaan reuna, luiska ja sivumarginaalit, korjaa raot ja tiukenna viemäriliitokset pitääksesi sisäänpääsyn turvallisena ja mahdollistaaksesi eläinten pääsyn tähän paikkaan. Tämän vaiheen pitäisi kehittää kuntoa ja luoda luotettava perusta täällä.
Kevään tehtäviin alueella kuuluu sedimentin poisto, kasvillisuuden siistiminen ja sen varmistaminen, että yhdeksän reiän salaojitusjärjestelmä toimii edelleen. Varmista, että koko ja uusimmat osat vastaavat pohjapiirrosta, ja varmista, että kulkureitit täyttävät turvallisuuskriteerit; omistajien tulee asettaa selkeät opasteet ohjaamaan käyttöä.
Kesäaikainen seuranta keskittyy veden kirkkauteen, levämerkkeihin ja sisääntulokyltin kuntoon. Seuraa sedimentin kertymistä rannoille tukosten estämiseksi; tämä vähentää tapahtumia ja pitää kalat ja muut vesieliöt terveinä ja aktiivisina.
Syksyisin on tarkistettava, että luiskat pysyvät vakaina, tarkastettava kaivettujen taskujen eroosio ja tarkasteltava seuraavia omistajien ehdotuksia vaatimusten mukauttamiseksi. Jos eroosio on todennäköistä, tasoitetaan uudelleen kadun varrella ja reunan yli turvallisuuden säilyttämiseksi.
Talvitehtävät: varmista, että sisäänkäynti pysyy käytettävänä jäätymisen jälkeen; päivitä pylväs ja kyltti ja varmista, että koko, asettelu ja kriteerit täyttävät turvallisuusstandardit. Uusimpia komponentteja tulee käyttää ja niiden on kestettävä kylmiä olosuhteita; koko alue vaatii huomiota turvallisuuteen tässä, ja on huolehdittava, ettei sedimentti pääse leviämään.
Yleisiä sudenkuoppia ovat muun muassa kausiluonteisen sedimentinhallinnan laiminlyönti, joka heikentää kuntoa ja vaikuttaa koko paikkaan; huono kulkureittien suunnittelu ja epäselvät opasteet heikentävät turvallisuutta ja houkuttelevat väärinkäyttöön – omistajien tulisi tarkistaa nämä kohdat ja välttää tällaisia virheitä. Vältä myös kaivettujen alueiden käyttöä kaatopaikkoina, mikä voi siirtää sedimenttiä ja uhata opasteita tai sisääntuloväyliä. Varmista, että kaikki ehdotukset ovat linjassa seuraavien kriteerien ja vaatimusten kanssa vesielementin turvallisen käytön varmistamiseksi alueella.
 Moskovan 28 parasta makeispaikkaa – parhaat jälkiruoat ja piilotetut helmet">
 12 vinkkiä upeiden kaupunkimaisemien kuvaamiseen – Olennainen opas">
 Moskovan matkailun turvallisuusvinkit 2025 – Tärkeä opas">
 USA:n ja Euroopan johtavat teknologiakaupungit – keskukset, trendit ja mahdollisuudet">
 20 Moskovan kauneinta rakennusta – Upeita valokuvia">
 Moskovan 5 parasta ruokatoria vuonna 2020 – Olennainen opas">
 Matka Venäjälle, päivä 3 – Moskova, pohjoiseen kohti neuvostoajan näyteikkunoita ja Kehäbulevardia">
 5 Pariisin museota, jotka ovat harvoin täynnä ja aina merkittäviä">
 Tekemistä Moskovassa joulu- ja uudenvuoden aikaan – Parhaat suunnitelmat">
 Kristus Vapahtajan katedraalin opastettu kierros – Liput, aikataulut ja kohokohdat">