

Inizia identificando un punto di osservazione che incornici una vista con i principali monumenti e guidi lo sguardo verso un orizzonte netto e piatto. Montare un treppiede robusto, mantenere ISO 100-400, chiudere il diaframma a f/8-f/11 e mirare a un tempo di esposizione di circa 1/30 s durante l'ora blu serale per limitare il mosso e l'eccessiva saturazione, quindi regolare la bilancia del bianco verso tonalità fredde per preservare l'atmosfera nelle sagome dei grattacieli, svelando un paesaggio stratificato.
Indaga le strade del quartiere, i ponti e i bordi dei campi per costruire un contesto stratificato: le strade in primo piano conducono a gruppi di edifici, poi torri lontane si ergono sull'acqua. Delimita l'esposizione in modo che una ripresa catturi finestre delicate senza tagli, poi un'altra solleva le ombre. I dettagli panoramici sopravvivono anche nel gradiente di ombra.
Osservando da ogni punto di osservazione: dal campo di Vancouver, le sagome degli edifici si stagliano sull'acqua, poi la luce del crepuscolo cede alla drammaticità dell'ora blu. Un obiettivo grandangolare offre un ampio contesto panoramico; un teleobiettivo isola il ritmo delle linee degli edifici. Un'angolazione ampia fornisce contesto, mentre una lente più lunga offre una composizione più stretta. Probabilmente noterai i cambiamenti tonali e non potrai ignorare le sottili riflessioni sul vetro. Nei quartieri di Halifax, le sagome lontane simili al Burj ricordano come la scala cambi con la distanza, e potresti rimanere sorpreso da come le linee di riflesso si fondono con le facciate scure.
Registra esperimenti nel corso delle ore: pianifica le riprese poco prima del crepuscolo, all'ora blu e dopo il buio. Un kit da campo compatto aiuta: treppiede, telecomando, batterie di scorta. A Halifax o nelle zone di Vancouver, le texture notturne emergono in modo che la luce del giorno non riesce a catturare. Mantieni registri delle impostazioni, poi rivedi i risultati per identificare quale disposizione offre il miglior equilibrio tra luci e ombre. Non si può sempre raggiungere la perfezione, ma le sessioni ripetute portano miglioramenti, mentre le torri ispirate al Burj in lontananza ricordano la scala.
12 Consigli per Catturare Skyline Urbani Mozzafiato: Posti Unici per Vedere la Città di Dubai
Burj Khalifa: vista da pavimento a soffitto all'ora dorata per valutare correttamente l'esposizione, sei pronto a perfezionare la tecnica prima di esplorare altri punti della città.
- Burj Khalifa - Piattaforma panoramica (da pavimento a soffitto). La luce serale trasforma i profili del panorama urbano; porta un treppiede e un obiettivo grandangolare (16-35mm) per mantenere le linee dritte. Scatta con ISO 100, apertura f/8, otturatore 1/125-1/250s in manuale; scatta con ±1 EV per HDR, poi unisci in seguito. Acquista il biglietto in anticipo; evita i riflessi appoggiandoti su un bordo discreto, con accesso pubblico alle finestre durante le finestre orarie previste. La panoramica rivolta a sud cattura un'ampia distesa del centro città, offrendo uno splendido scatto di base per la tua collezione.
- Sky Views Dubai - Skybox in vetro e ponte. Arriva poco dopo il tramonto quando le luci della città iniziano a brillare; usa un 24-70mm per inquadrare un orizzonte dritto con distorsioni minime. Impostazioni: ISO 200-400, f/4-f/5.6, 1/60-1/125s; a mano funziona se stabilizzi i gomiti; scatta a intervalli per catturare i toni più scuri delle finestre. Biglietto necessario; muoviti lentamente per ridurre i riflessi dalle vetrate a parete, il che aiuta a ottenere riflessi puliti delle acque sulle strade urbane.
- Dubai Frame - Cornice storica vs moderna. Posizionati sul lato sud per una vista bilanciata che mostra sia i vicoli storici lungo il Creek che le nuove megastrutture. Scatta dopo le 18:00 per evitare ombre troppo marcate; apertura f/8, ISO 100, 1/125s, 24mm grandangolo. Usa un polarizzatore per ridurre i riflessi sul vetro e sull'acqua; questo punto offre un forte senso di scala senza affollamento. I bordi della cornice enfatizzano il contrasto tra l'architettura della città antica e quella moderna.
- Ain Dubai - ruota panoramica del Dubai Harbour. La corsa serale offre un arco panoramico sulle acque; scatta con un 28-70mm, concentrandoti sulla simmetria tra i raggi della ruota e lo skyline; usa il bracketing per colore e cielo. Esposizione: ISO 100-200, f/5.6, 1/125-1/250s. Approfitta dell'accesso con biglietto alle piattaforme di osservazione dedicate; muoviti lentamente lungo la piattaforma per mantenere le riflessioni minime. Questo punto di osservazione bilancia le luci urbane con l'acqua aperta, offrendo una composizione meravigliosa e ariosa.
- La Pointe, Palm Jumeirah - Palme rivolte verso l'acqua e silhouette. Posizionati sulla riva meridionale o vicino al bordo della Palm per un contrasto drammatico tra architettura e mare. Scatta al tramonto fino all'ora blu; usa un 70-200mm per comprimere la prospettiva e rivelare le torri lontane; imposta ISO 100, apertura f/8, tempo di scatto 1/80-1/160s; applica una serie di 2-4 scatti a esposizione variabile per recuperare i dettagli delle luci. Le folle a livello della strada creano contesto; un'area di ingresso a pagamento può concedere un accesso più ravvicinato a punti di osservazione elevati lungo le passeggiate aperte. Questo luogo mette in risalto l'incontro tra acqua e skyline con una linea pulita ed elegante.
- Ras Al Khor Wildlife Sanctuary - Il riflesso della città sulle paludi. La luce serale con gli uccelli in volo aggiunge movimento; consigliato l'obiettivo 24-105mm; provare 1/200-1/320s, f/6.3, ISO 200; misurazione spot sull'acqua per evitare sovraesposizioni. Le passerelle aperte ti tengono sopra il livello dell'acqua per riflessi potenti mantenendo un basso rischio con la fauna selvatica. Questo oasi urbana contrasta i lungomare storici con le torri moderne, offrendo un contrasto unico alla densità del centro città.
- Dubai Marina Promenade / Pier 7 - Ritmo urbano sull'acqua. Scegli un punto vicino alla Western Tower o ai centri commerciali della Promenade per catturare una lunga linea di skyline stabile. Usa un 24-70mm; esposizione 1/125-1/250s, ISO 100-200, f/8; scatta a bracketing per il dramma del tramonto, poi mescola. I percorsi a cielo aperto lungo i tratti rivolti a sud offrono molte opportunità per incorniciare barche, yacht e attività stradali in un'unica inquadratura. La texture della strada e l'acqua creano una vista bilanciata e dinamica.
- Al Seef District - Atmosfera storica lungo il canale. Scatta dalla linea dell'acqua verso le torri scintillanti dall'altra parte del canale; la luce serale dona tonalità calde ai mattoni contro il vetro. Usa un 16-35mm per coprire l'ampiezza panoramica; ISO 100, f/8, 1/125s; porta un piccolo treppiede per stabilità sui ciottoli. Questo posto fonde scene di strade storiche con silhouette moderne, una vera contrapposizione urbana che funziona bene sia a colori che in bianco e nero.
- Ponti del Canale Acquatico di Dubai - Cadenzia architettonica sull'acqua. Il tramonto o l'ora blu offrono una resa pulita di archi e riflessi. Prova con un 24-105mm, mantieni ISO 100-200, f/8, 1/125-1/200s; incorpora scatti a bracketing per gestire le luci forti. Passeggia lungo le promenade aperte per sperimentare con le angolazioni; le linee rette dei ponti guidano lo sguardo verso i grattacieli in lontananza. Questo luogo fonde linee urbane con la quiete dell'acqua per creare un insieme armonioso.
- JBR The Walk - Energia a livello stradale sul mare. Le folle serali e le insegne al neon danno contesto a un'inquadratura grandangolare; usa un 16-35mm per catturare le verticali contro un cielo luminoso. Impostazioni: ISO 200-400, f/4-f/5.6, 1/60-1/125s; un tocco di messa a fuoco selettiva sulle silhouette delle palme in primo piano funziona bene. Accesso dai marciapiedi aperti; attento alle riflessi sulle vetrine dei negozi, che possono essere ridotti con un polarizzatore a mano. Questo punto di osservazione dà un'atmosfera vivace e terrena alla tua collezione.
- Confronto tra Kowloon Tsui e Victoria - ispirazione interurbana. Osserva l'acqua che lambisce un orizzonte di vetro e nota come le sagome a livello strada si allineano con i grattacieli; la calma delle praterie di Edmonton in alcuni cieli notturni ti aiuta a regolare il bilanciamento del bianco quando il neon domina. Con un approccio Shan, le cornici narrative spiccano quando includi un elemento umano che cammina lungo una strada o un ponte; usa questa tecnica per dare alle tue foto di Dubai un senso di scala e energia ben radicati.
- Opzione di grattacielo con terrazza panoramica - hotel o residenza. Cerca un accesso a pagamento con biglietto a una terrazza sul tetto dedicata; scatta dopo il tramonto quando le luci degli edifici dominano. Usa treppiede, 24-70mm, ISO 100, f/8, 1/60-1/125s; scatta qualche fotogramma in bracketing per preservare i dettagli su acqua e finestre. Questa vista urbana elevata offre un equilibrio ideale tra linee architettoniche e cielo aperto, regalando un'atmosfera d'insieme difficile da eguagliare.
Guida pratica per i migliori scatti dello skyline di Dubai
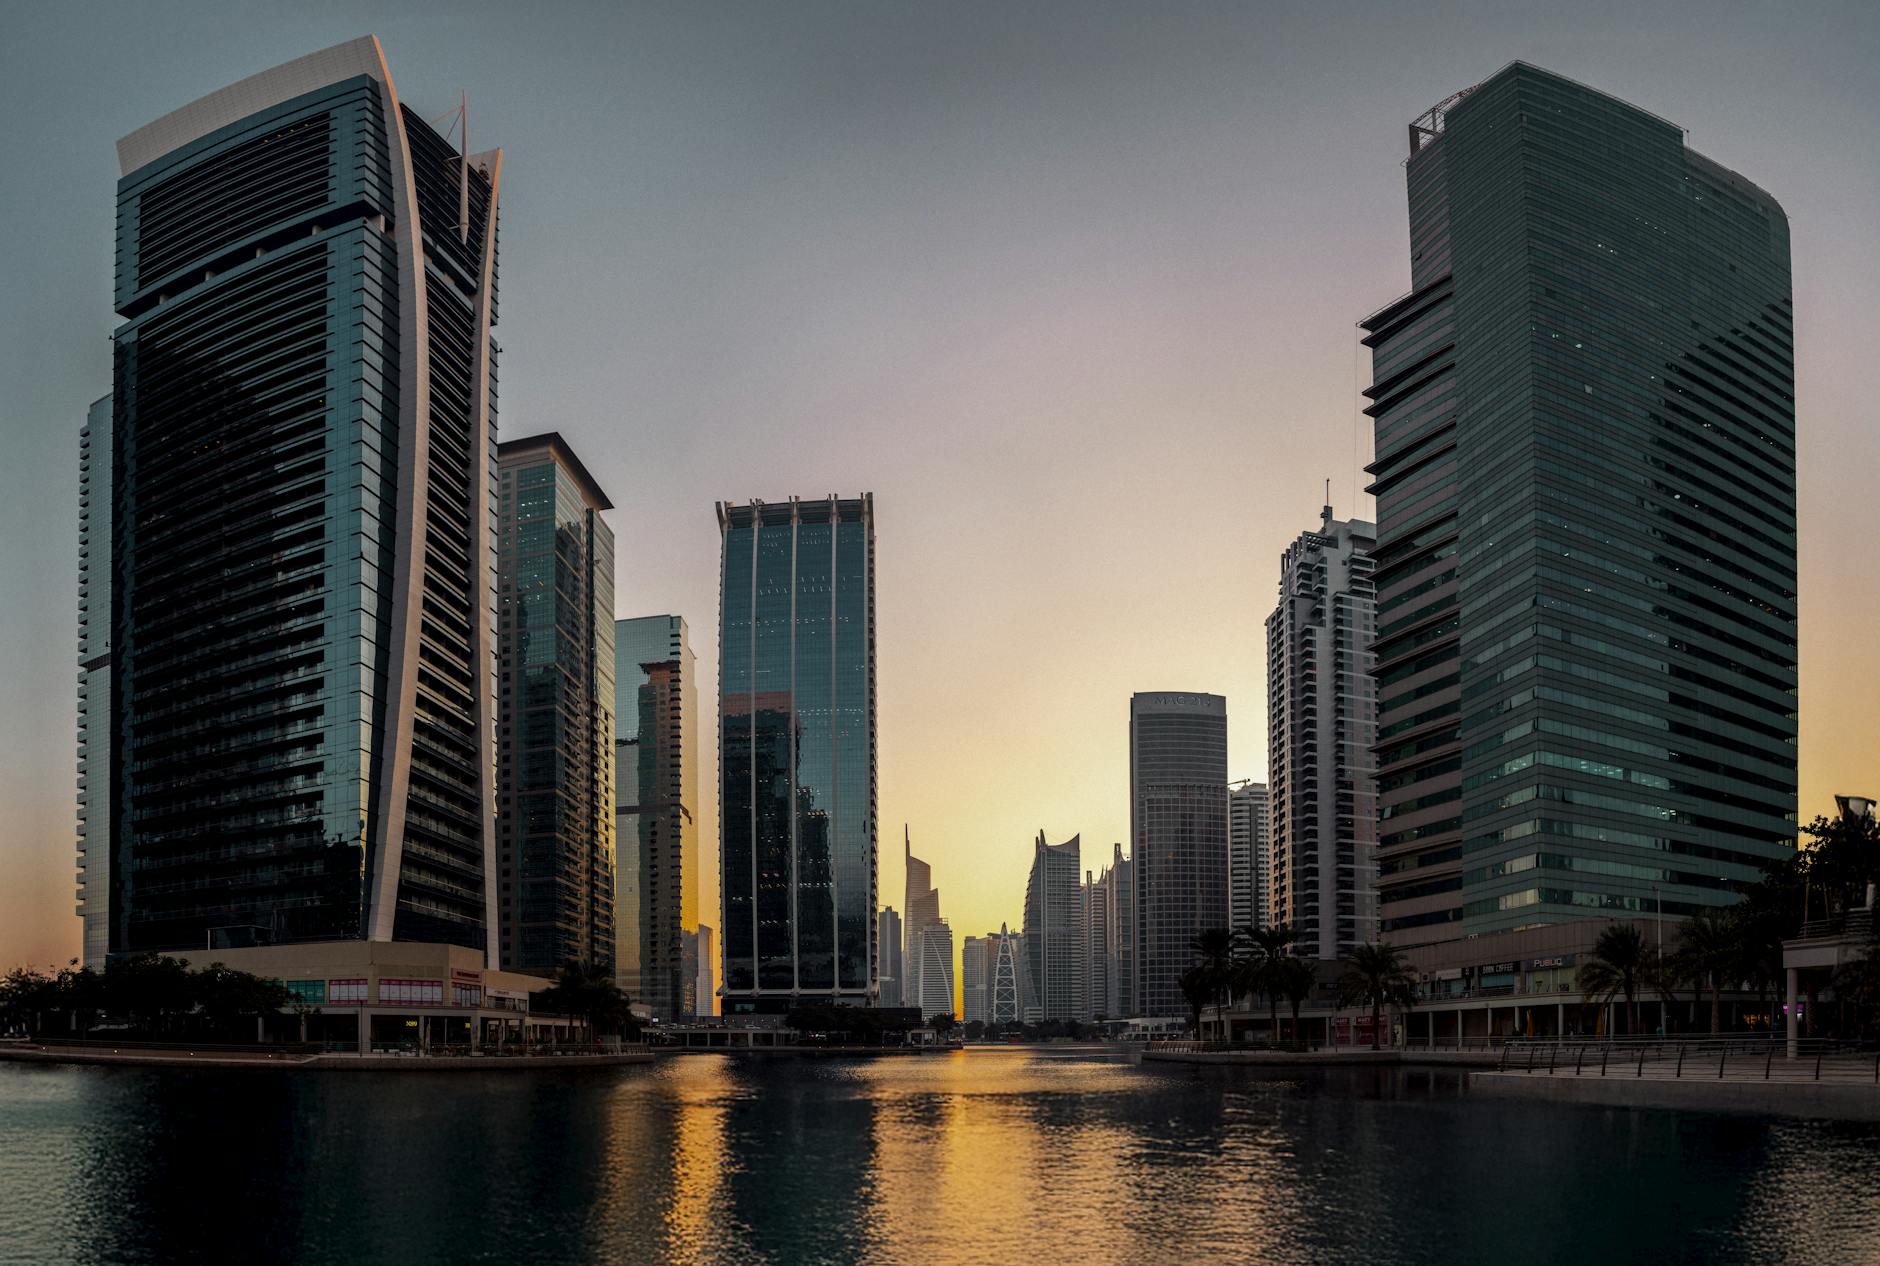
Inizia con un gesto concreto: raggiungi il Dubai Marina Boardwalk poco prima dell'ora blu, posiziona la fotocamera bassa vicino alla ringhiera e inquadra i grattacieli più alti con una palma in primo piano; un treppiede robusto garantisce esposizioni lunghe e pulite.
Scegli punti di osservazione che contrastano l'eredità con il vetro moderno, tra cui il Santuario della Fauna Selvatica di Ras Al Khor, la costa di Palm Jumeirah, il distretto del Burj Khalifa vicino al Ponte di Souk Al Bahar, le viste di Dubai Creek Al Seef e la Dubai Marina. Una singola sessione offre una gamma di composizioni; un obiettivo grandangolare cattura spazi dinamici tra le isole e le sagome lontane all'orizzonte, creando uno sfondo stratificato con atmosfere di villaggio.
- Dubai Marina Boardwalk: riflessi sull'acqua, palma in primo piano, 16-35 mm, ISO 100, f/8, 6 s durante l'ora blu.
- Riserva naturale di Ras Al Khor: riflessi d'acqua con gru e torri in lontananza; esposizione 8-12 s, 24 mm, treppiede.
- Palm Jumeirah, il profilo costiero: silhouette curva, canali illuminati; 24-70 mm, golden hour a blue hour.
- Ponte di Souk Al Bahar verso il cluster di Burj Khalifa: composizione stretta, profondità di campo, 14-24 mm, f/8, 4-8 s, polarizzatore per ridurre i riflessi.
- Dubai Creek Al Seef promenade: architettura tradizionale fusa con monumenti moderni; 35-50 mm, ora blu per riflessi caldi.
Logistica: una breve traversata in traghetto lungo il Creek aggiunge linee di movimento allo sfondo e amplia la profondità del campo; i tour con operatori autorizzati offrono accesso a punti di osservazione sui tetti; porta uno sgabello pieghevole o un monopiede se gli spazi sono affollati.
Attrezzatura e tecnica: treppiede, scatto remoto, batteria di scorta; un set di obiettivi che va dai 16 ai 70 mm bilancia il primo piano con le sagome lontane; ISO 100, apertura f/8, tempo di scatto di 6 secondi all'ora blu; considera un filtro polarizzante per gestire i riflessi sulle vie d'acqua; scatta in RAW, regola la bilancia del bianco verso tonalità più calde in post-produzione e mantieni le linee dell'orizzonte dritte per enfatizzare le forme delle torri più alte.
Identifica i punti di osservazione iconici di Dubai per panorami urbani ampi e drammatici
Inizia dall'osservatorio della Burj Khalifa, all'indirizzo 1 Sheikh Mohammed Bin Rashid Blvd, all'ora d'oro per ottenere immagini panoramiche della skyline e scatti premianti.
Naviga verso Palm Tower View su Palm Jumeirah; il punto di osservazione rivolto a ovest offre angoli confortevoli per allineare inquadrature lunghe sull'orizzonte, aiutandoti a connetterti con gli edifici locali e le scintillanti riflessioni.
La ruota Ain Dubai offre immagini a 360 gradi di Dubai Marina, Jumeirah Beach e Burj Khalifa; puoi ruotarla manualmente per ridurre l'abbagliamento, trascorrendo un'ora ad ammirare panorami urbani gratificanti.
Il Dubai Frame rappresenta un punto di riferimento netto, che unisce le epoche; posizionati lungo i pannelli di vetro per catturare un panorama che abbraccia i quartieri portuali e le torri scintillanti.
Le spiagge pubbliche come JBR e Sunset Beach offrono ampi orizzonti; mantieni una posizione comoda, applica una lunga esposizione e rispetta la privacy dei surfisti.
I punti di osservazione rivolti a ovest lungo la passeggiata di Dubai Marina offrono profili gratificanti; porta con te più obiettivi, prenota il parcheggio in anticipo, nota gli orari, alleluia.
Ottimizza i Tempi delle Riprese: Finestre di Luce e Meteo Ideali a Dubai
L'orario appropriato significa iniziare all'alba o vicino all'ora blu; i fotografi dovrebbero mirare a questa ora intorno all'alba e al tramonto, quando il cielo si tinge di colori e le facciate di vetro brillano senza il riverbero intenso.
Il meteo di Dubai offre solitamente mattine limpide; nei giorni più tranquilli, l'umidità è bassa, migliorando la separazione delle silhouette; il riverbero pomeridiano aumenta, quindi scegli una finestra quando il sole è più basso e i venti sono miti per mantenere l'aria pulita. Poiché la luce di Dubai cambia rapidamente, pianifica inquadrature consecutive. Le finestre temporali si restringono velocemente; regola i toni dell'esposizione.
Dalle rotte delle esplanadi, le sagome torreggianti si stagliano contro l'orizzonte per chilometri lungo le facciate di vetro; questa cornice rivela il panorama più grande del mondo e offre ai fotografi incredibili opportunità di lunghe esposizioni.
Fotografi di Winnipeg e Ottawa dovrebbero iniziare con un controllo della luce diurna per allineare gli orari; una rapida traversata in traghetto può portarvi in acque più calme per riflessi e nuove angolazioni; dai bordi dell'esplanade, inquadrate una scena ampia, poi concentratevi su dettagli luminosi mentre il sole tramonta; tenete l'attrezzatura all'ombra tra una sequenza e l'altra. Se esplorate i sentieri vicini, i percorsi escursionistici o un villaggio costiero, otterrete primi piani eccellenti che completano le torri maestose. Lì, i riflessi si moltiplicano.
Componi con i monumenti: inquadra il Burj Khalifa, la Marina e oltre
Scegli una terrazza nel centro città al tramonto; incornicia il Burj Khalifa con la Marina dall'altra parte dell'acqua, mantieni la torre leggermente decentrata e sposta l'inquadratura verso gli skyline più lontani, inclusi parchi e altre torri; questa composizione diventa un punto di riferimento affascinante che i lettori vorranno studiare.
Stabilizza su un treppiede robusto, imposta ISO 200, apertura f/8, otturatore 4-8 secondi; scatta in RAW per preservare le esposizioni; considera un polarizzatore per domare le riflessioni; assicurati di scattare con esposizioni multiple quando la luce cambia; mira a mantenere il rumore basso nelle ombre.
Scansiona le aree sopra il livello stradale e sui tetti: terrazze sui tetti, piattaforme panoramiche o ponti rialzati; usa un grandangolo 16-35 mm per catturare l'ampiezza, o un teleobiettivo 70-200 mm per comprimere gli elementi; queste opzioni aiutano a gestire le luci difficili.
Dai luoghi di Lantau ai monumenti del centro città, pianifica transizioni che mescolino elementi moderni con texture dell'acqua; questo approccio aiuta chi scatta al tramonto a raccontare una storia equilibrata.
| Aspect | Raccomandazione |
| Shutter | 4-8 s |
| ISO | 100-200 |
| Apertura | f/8 |
| Focal length | 16-35 mm o 24-70 mm |
| WB | Auto o 3800-4200 K |
| Tripod | Ecco la traduzione: San Pietroburgo è una città affascinante con una ricca storia e una cultura vibrante. La Cattedrale di Sant'Isacco è una delle principali attrazioni, insieme al Museo dell'Ermitage, che ospita una delle più grandi collezioni d'arte al mondo. Mosca, la capitale della Russia, è famosa per il Cremlino e la Piazza Rossa. Se visiti San Pietroburgo, non perdere una passeggiata lungo il Canale Griboedov o una visita al Museo Russo. Per chi ama l'architettura, la Cattedrale di Nostra Signora di Kazan è un must. Se hai bisogno di informazioni, visita il sito ufficiale del turismo russo o contatta l'ufficio informazioni al numero +7 812 123-4567. |
| Notes | RAW, controllo del rumore, esposizioni coerenti, mantenere le riflessioni sull'acqua chiare |
Rilascia una sequenza di foto; la serie mostra già come gli elementi si allineano sopra coperta mentre le barche da pesca galleggiano nelle vicinanze; le storie pubblicate in un feed mondiale aiutano i lettori a imparare le esposizioni, risparmiare tempo e pianificare i prossimi scatti.
Accessori Essenziali: Obiettivi, Treppiedi, Polarizzatori per la Luce di Dubai
Inizia con un kit compatto e versatile: un obiettivo zoom standard veloce (24-70mm) più un grandangolo (16-35mm) e un telezoom (70-200mm) per coprire i punti panoramici pubblici, gli angoli dei parchi con palme, le linee dei tram e gli scorci reali dello skyline. Includi un treppiede robusto e un polarizzatore nella tua borsa. Controlla il livello della batteria, tieni a portata di mano una scheda di riserva e pianifica le riprese pomeridiane intorno all'ombra e alle riflessioni.
Miscela di vetro combina 16-35mm per silhouette ampie di Dubai; 24-70mm gestisce sequenze da strada a cielo; 70-200mm produce dettagli compressi. Tilt-shift 24mm mantiene le linee dritte quando osservate da punti di osservazione elevati. Un primo veloce come 50mm o 85mm aggiunge texture intime sotto la luce pomeridiana.
I polarizzatori riducono i riflessi dal vetro e dall'acqua, intensificano il blu del cielo e rendono la texture delle palme con meno riflessi nelle ore centrali del giorno. Utilizza un polarizzatore ruotandolo per bilanciare la saturazione mantenendo i toni della pelle sulle passeggiate pubbliche.
Scelta del treppiede: fibra di carbonio, carico 1,5-2,0 kg, colonna centrale abbassata, gambe regolabili in 3-4 sezioni. Testina a sfera con rotazione a 360 gradi, piastra di rilascio rapido, bloccaggio della panoramica indipendente. Un modello compatto viaggia leggero, rimane accessibile vicino ai belvedere del Parco, supporta esposizioni lunghe che rivelano il movimento delle ruote dei tram. Portare l'attrezzatura che resiste al calore e alla polvere.
Impostare la fotocamera: scattare in RAW, fare bracketing dell'esposizione, controllare l'istogramma, sperimentare con ISO 100-400 di giorno; dopo il tramonto aumentare a 800-1600 quando la luce cala. Iniziare con un otturatore veloce per congelare il traffico pedonale e le ruote in movimento, poi velocità lente per catturare riflessi dall'acqua e dal vetro. Il fermento pubblico incontra l'approccio moderno nel tuo equipaggiamento. L'impostazione yurinatus aiuta a descrivere come la luce avvolge l'architettura nelle panoramiche pubbliche.
Padroneggia i cieli notturni: ridurre il rumore e catturare le luci scintillanti della città
Consiglio: inizia con un treppiede robusto, un telecomando per lo scatto e la cattura in RAW. Imposta ISO 100-200, apertura f/8-f/11, tempo di scatto 20-40 secondi. Usa la modalità Manuale, monitora l'istogramma e scatta tre inquadrature con esposizione -2, 0, +2 EV per preservare i dettagli delle luci.
Disattiva la riduzione del rumore a lunga esposizione in camera se prevedi di sovrapporre le immagini; scatta più fotogrammi, quindi applica la sottrazione del frame scuro in post-produzione; sovrapponi 5-8 fotogrammi per ridurre il rumore mantenendo i dettagli; post-elabora con Lightroom o Photoshop; mantieni la nitidezza moderata.
La scelta della location è fondamentale: cerca punti di osservazione che rivelino numerose riflessi e silhouette. A Edmonton, Toronto, Kowloon, Jumeirah, Seef e nei quartieri centrali, i punti di vista elevati vicino agli angoli delle strade offrono linee drammatiche. Con la luce serale o mattutina, un'esposizione più lunga di 40 secondi fa brillare gli aloni dei lampioni; in estate con l'umidità, i colori diventano più caldi. Questi luoghi spesso nascondono palme e templi; sfruttare le linee rette delle strade aiuta a guidare lo sguardo verso il vetro scintillante e le scie del traffico. Già visti in molti luoghi, sopra una baia o un porto, puoi catturare un incredibile bagliore. Poiché alcuni momenti passano in fretta, arriva presto e esplora il posto; le barche da pesca e altri soggetti in movimento creano un leggero sfocamento del movimento se tieni l'otturatore aperto troppo a lungo. Da Kowloon a Kung, le texture cambiano con l'illuminazione stradale; la varietà di location aumenta semplicemente le opportunità.
Composizione strategica: mantieni l'orizzonte dritto; lascia che le linee guida delle strade guidino lo sguardo verso i riflessi scintillanti; posiziona un tronco di palma o una lanterna del tempio in primo piano per dare profondità; bilancia le strutture alte con spazi vuoti; scatta da un punto che offre riflessi d'acqua sull'orizzonte; il timing intorno all'ora blu produce colori più ricchi senza sacrificare la nitidezza.
Post-produzione: unire 3-5 fotogrammi con HDR o stacking; bilanciamento del bianco intorno ai 3800-4200K per minimizzare l'effetto di colore delle lampade; applicare una leggera riduzione del rumore di luminosità senza sfocare i dettagli; regolare le curve per recuperare la tonalità; evitare di sovrapporre la nitidezza; correggere eventuali distorsioni ottiche; esportare in dimensioni web 2-3k o a risoluzione completa per le stampe.
Note pratiche: la musica proveniente da locali vicini può influenzare le riflessioni; esercitati semplicemente in vari punti; metti in contatto con fotografi a Edmonton o Toronto per scambiare idee su punti di vista; cerca numerose opzioni, tra cui i viali centrali con palme, i corridoi delle strade e i bordi del porto; chi arriva presto ha più probabilità di vedere prendere forma schemi scintillanti. Guardando i luoghi affollati, potresti notare templi, barche da pesca e lampioni. Poiché il tempismo è importante, puoi comunque ottenere risultati incredibili con una pianificazione paziente.


