

Begin by identifying a single viewpoint that frames major landmarks and guides eye toward a clean, level horizon. Mount a sturdy tripod, keep ISO 100-400, stop down to f/8-f/11, and target a near 1/30 s exposure during evening blue hour to keep motion blur in check and clipping at bay, then adjust white balance toward cool tones to preserve mood in high-rise silhouettes, revealing a layered landscape.
Survey neighbourhood streets, bridges, and field edges to build layered context: foreground streets lead into clusters of buildings, then distant towers rise over water. Bracket exposure so one shot captures delicate windows without clipping, then another lifts shadows. Panorama details survive even in shadow gradient.
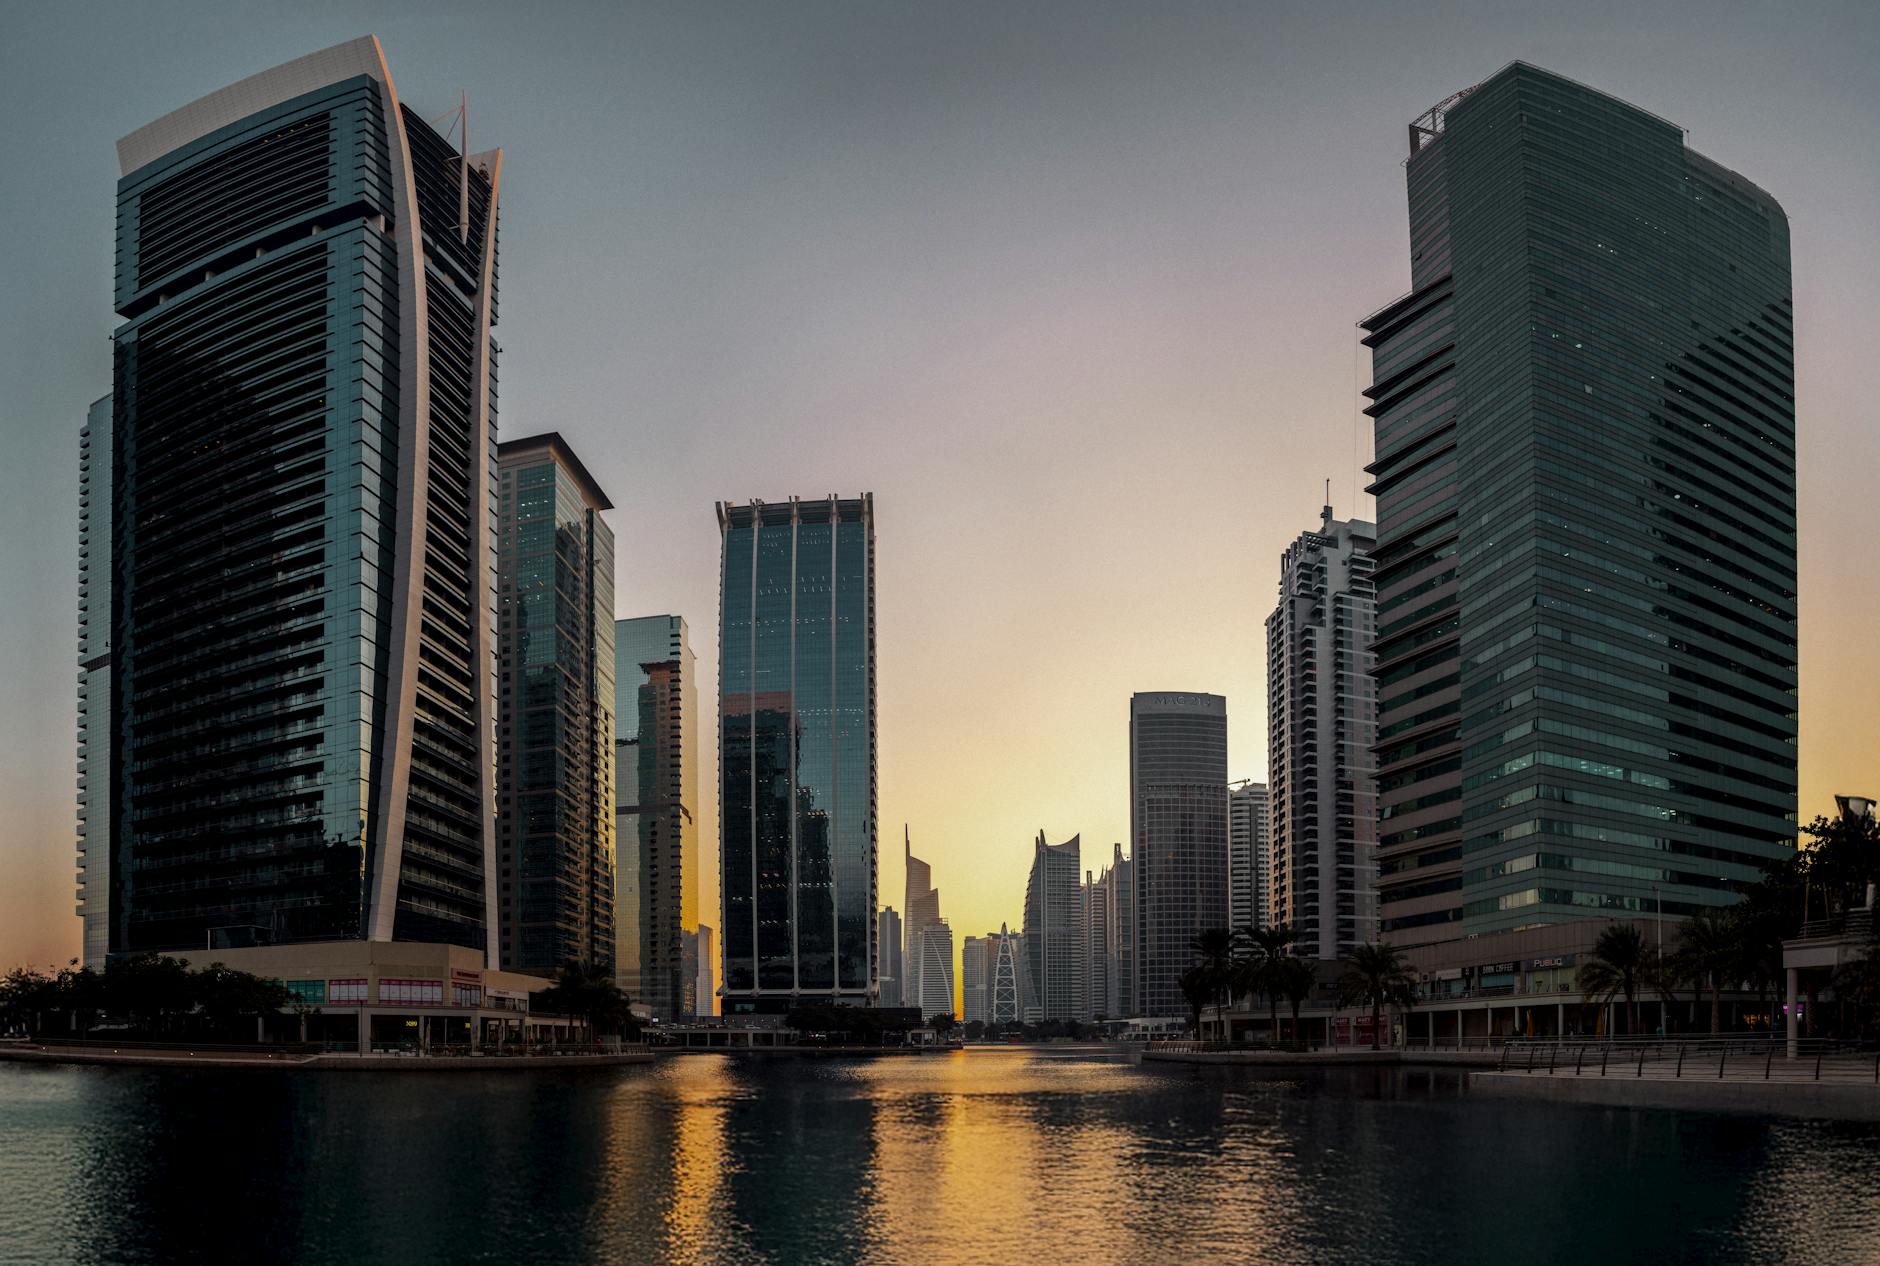
Observe across each viewpoint variant: from vancouvers field vantage, high-rise silhouettes roll over water, then dusk light yields blue hour drama. A wide lens offers broad panorama context; a telephoto isolates rhythm in building lines. An offer from a wide angle yields context, while a longer lens offers tighter composition. You probably notice tonal shifts, and cannot miss subtle reflections on glass. In halifax neighbourhoods, distant burj-like silhouettes remind how scale shifts with distance, and you may be surprised by how glare lines merge with dark facades.
Record experiments across hours: plan shoots just before twilight, at blue hour, and after dark. A compact field kit helps-tripod, remote, spare batteries. In halifax or vancouvers zones, night textures emerge that daylight misses. Maintain logs of settings, then review results to identify which arrangement brings strongest balance between lights and shadows. cannot always reach perfection, but repeated sessions bring improvement, while burj-inspired towers in distance remind scale.
12 Tips for Capturing Stunning City Skylines: Unique Dubai City View Spots
Start with Burj Khalifa: floor-to-ceiling vista at golden hour to properly gauge exposure, youre set to refine technique before exploring further citys spots.
- Burj Khalifa - Observation deck (Floor-to-ceiling). Evening light transforms skyline silhouettes; bring a tripod and a wide lens (16-35mm) to keep lines straight. Shoot ISO 100, aperture f/8, shutter 1/125-1/250s in manual; bracket ±1 EV for HDR, then merge later. Purchase ticket in advance; avoid glare by resting on a discreet edge, open to public access windows during scheduled windows. South-facing panorama captures a broad expanse across downtown, providing a wonderful baseline shot for your collection.
- Sky Views Dubai - Glass skybox and bridge. Arrive just after sunset when city lights begin to glow; use a 24-70mm to frame a straight horizon with minimal distortion. Settings: ISO 200-400, f/4-f/5.6, 1/60-1/125s; handheld works if you stabilise elbows; bracket to cover darker tones of windows. Ticket needed; keep movements slow to reduce reflections from floor-to-ceiling glazing, which helps to release clean reflections of waters across urban streets.
- Dubai Frame - Historic vs modern frame. Position yourself on south side for a balanced view that shows both historic Creekside alleys and new megastructures. Shoot after 18:00 to avoid harsh shadows; aperture f/8, ISO 100, 1/125s, 24mm wide angle. Use a polariser to cut glare off glass and water; this spot gives a strong sense of scale without crowd clutter. Edges along the frame emphasize contrast between old and new citys architecture.
- Ain Dubai - Dubai Harbour wheel. Evening ride offers a panoramic arc over waters; shoot with a 28-70mm, focusing on symmetry between wheel spokes and skyline; bracket for color and sky. Exposure: ISO 100-200, f/5.6, 1/125-1/250s. Take advantage of ticketed access to dedicated observation decks; move slowly along the platform to keep reflections minimal. This vantage balances urban lights with open water, yielding a wonderful, airy composition.
- The Pointe, Palm Jumeirah - Water-facing palms and silhouettes. Stand on southern shoreline or near The Palm's edge for a dramatic juxtaposition of architecture and sea. Shoot at sunset into blue hour; use 70-200mm to compress perspective and reveal distant towers; set ISO 100, aperture f/8, shutter 1/80-1/160s; apply a 2-4 bracket series for highlight recovery. Street-level crowds create context; a ticketed entry area can grant closer access to elevated viewpoints along open promenades. This spot highlights waters meeting skyline with a clean, elegant line.
- Ras Al Khor Wildlife Sanctuary - Citys reflection over wetlands. Evening light with birds in flight adds motion; 24-105mm lens recommended; try 1/200-1/320s, f/6.3, ISO 200; spot metering on water to avoid blown highlights. Open boardwalks keep you above water level for strong reflections while staying low-risk around wildlife. This urban oasis contrasts historic waterfronts with modern towers, offering a unique counterpoint to downtown's density.
- Dubai Marina Promenade / Pier 7 - Urban rhythm by the water. Choose a spot near Western Tower or Promenade outlet centers to capture a long, steady skyline line. Use 24-70mm; exposure 1/125-1/250s, ISO 100-200, f/8; bracket for sunset drama, then blend. Open-air paths along south-facing segments give ample opportunities to frame boats, yachts, and street activity in one frame. The street texture and waters create a balanced, dynamic view.
- Al Seef District - Historic Creekside vibe. Shoot from the waterline toward the gleaming towers across the canal; early evening renders warm brick tones against glass. Use 16-35mm to cover panoramic width; ISO 100, f/8, 1/125s; bring a small tripod for stability on cobblestones. This spot blends heritage street scenes with modern silhouettes, a true citys juxtaposition that reads well in both color and monochrome.
- Dubai Water Canal Bridges - Architectural cadence over water. Sunset or blue hour offers a clean render of arches and reflections. Try 24-105mm, keep ISO 100-200, f/8, 1/125-1/200s; incorporate bracketed shots for highlight management. Walk along open promenades to experiment with angles; the straight lines of bridges lead the eye toward high-rise clusters beyond. This spot merges urban lines with watery calm to create a cohesive whole.
- JBR The Walk - Street-level energy by the sea. Evening crowds and neon signs add context to a wide-angle frame; use 16-35mm to capture verticals against a glowing sky. Settings: ISO 200-400, f/4-f/5.6, 1/60-1/125s; a touch of selective focus on foreground palm silhouettes works well. Access from open sidewalks; watch for reflections on storefront glass, which can be dialed down with a hand-held polariser. This vantage brings a lively, down-to-earth feel to your collection.
- Kowloon Tsui / Victoria comparison cue - cross-city inspiration. Observe the waters washing a glassy skyline and note how street-level silhouettes align with tall towers; Edmonton-inspired prairie calm in some night skies helps you calibrate white balance when neon dominates. Shan-style, narrative frames pop when you include a human element walking along a street or bridge; use that approach to give your Dubai shots a grounded sense of scale and energy.
- Rooftop high-rise option - hotel or residence vantage. Look for a paid, ticketed access to a dedicated rooftop terrace; shoot after dusk when building lights dominate. Use tripod, 24-70mm, ISO 100, f/8, 1/60-1/125s; bracket a couple of frames to preserve highlights on water and windows. This elevated, urban view yields an ideal balance between architectural lines and open sky, delivering a whole-picture mood that's hard to beat.
Practical Guide for Dubai's Best Skyline Shots
Begin with a concrete move: reach Dubai Marina Boardwalk just before blue hour, set camera low near the railing, and frame the highest towers with a palm-streak foreground; a sturdy tripod ensures clean, long exposures.
Select vantage spots that contrast heritage with modern glass, including Ras Al Khor Wildlife Sanctuary, Palm Jumeirah coastline, Burj Khalifa district near Souk Al Bahar Bridge, Dubai Creek Al Seef, and Dubai Marina views. A single session yields a range of compositions; a wide lens captures dynamic spaces across islands and distant silhouettes on the horizon, building a layered background with village vibes.
- Dubai Marina Boardwalk: reflections on water, foreground palm, 16-35 mm, ISO 100, f/8, 6 s during blue hour.
- Ras Al Khor Wildlife Sanctuary: water reflections with cranes and distant towers; 8-12 s exposure, 24 mm, tripod.
- Palm Jumeirah coastal edge: curved silhouette, lit waterways; 24-70 mm, golden hour to blue hour.
- Souk Al Bahar Bridge toward Burj Khalifa cluster: tight composition, background depth, 14-24 mm, f/8, 4-8 s, polarizer to tame glare.
- Dubai Creek Al Seef promenade: heritage architecture blended with modern monuments; 35-50 mm, blue hour for warm reflections.
Logistics: a short ferry ride along the Creek adds motion lines to the foreground and expands field depth; tours with licensed operators provide access to rooftop viewpoints; bring a compact stool or monopod if spaces are crowded.
Gear and technique: tripod, remote shutter, spare battery; lens set spanning 16-70 mm balances foreground with distant silhouettes; ISO 100, aperture f/8, shutter 6 s at blue hour; consider a polarizing filter to manage glare on waterways; shoot in RAW, adjust white balance toward warmer tones in post, and keep horizon lines straight to emphasize the highest tower forms.
Identify Iconic Dubai Vantage Points for Wide, Dramatic Cityscapes
Begin atop Burj Khalifa's observation deck, address 1 Sheikh Mohammed Bin Rashid Blvd, at golden hour to gain long, sweeping skyline images and rewarding shots.
Navigate to Palm Tower View on Palm Jumeirah; west-facing viewpoint offers comfortable corners to align long shots across skyline, helping you connect with local buildings and shimmering reflections.
Ain Dubai wheel delivers 360-degree images of Dubai Marina, Jumeirah Beach, and Burj Khalifa; you can manually rotate to minimize glare, spending an hour savoring rewarding cityscapes.
Dubai Frame stands as a crisp anchor, bridging eras; stand along glass panels to capture a panorama spanning port neighborhoods and gleaming towers.
Public beaches such as JBR and Sunset Beach yield wide horizons; maintain a comfortable stance, apply long exposure, and respect privacy of surfers.
West-facing vantage points along Dubai Marina promenade deliver rewarding silhouettes; carry multiple lenses, pre-book parking, note hour windows, hallelujah.
Time Your Shoot: Optimal Light and Weather Windows in Dubai
Appropriate timing means starting at first light or near blue hour; photographers should target this hour around dawn and dusk when sky blooms with color and glass facades glow without intense glare.
Dubai weather usually delivers clear mornings; on calmer days, humidity sits low, improving silhouette separation; afternoon glare grows, so pick a window when sun sits lower and winds stay mild to keep air clean. Because Dubai's light shifts quickly, plan back-to-back angles. Time windows narrow quickly; adjust exposure tones.
From esplanade routes, towering silhouettes against horizon stretch kilometres along glassy fronts; this framing reveals world's largest panorama and gives photographers incredibly long opportunities to pace exposure changes.
Photographers from winnipeg and ottawa should start with daylight check to align schedules; a quick ferry crossing can bring you to calmer water for reflections and new angles; from esplanade edges, stage a broad frame, then narrow in on luminous details as sun sinks; Leave gear in shade between sequences. If you explore nearby trails or hiking routes or a coastal village, you gain great foregrounds that complement towering towers. There, reflections multiply.
Compose with Landmarks: Framing Burj Khalifa, Marina, and Beyond
Choose a downtown deck at evening; frame Burj Khalifa with Marina across water, keep tower slightly off-center, sweep toward farther skylines including parks and other towers; this composition becomes a fascinating anchor readers want to study.
Stabilize on a sturdy tripod, set ISO 200, aperture f/8, shutter 4-8 seconds; shoot RAW to preserve exposures; consider a polarizer to tame reflections; be sure bracket exposures when light shifts; aim to keep noise low in shadows.
Scan spots above street level and on rooftops: rooftop decks, observation platforms, or elevated bridges; use a wide 16-35 mm to capture breadth, or a longer 70-200 mm to compress elements; those options help tackle difficult lighting.
From lantau spots to downtown landmarks, plan transitions that blend modern elements with water textures; this approach helps those shooting evenings to tell a balanced story.
| Aspect | Recommendation |
| Shutter | 4-8 s |
| ISO | 100-200 |
| Aperture | f/8 |
| Focal length | 16-35 mm or 24-70 mm |
| WB | Auto or 3800-4200 K |
| Tripod | required |
| Notes | RAW, noise control, consistent exposures, keep above water reflections clear |
Release a sequence of photos; the set already demonstrates how elements align above deck while fishing boats drift nearby; published stories in a world-wide feed help readers learn exposures, save time, plan future shoots.
Gear Essentials: Lenses, Tripods, Polarizers for Dubai Light
Start with a compact, versatile kit: a fast standard zoom (24-70mm) plus a wide zoom (16-35mm) and a long zoom (70-200mm) to cover public lookouts, palm-lined parc corners, tram lines, and royal skyline angles. Include sturdy tripod and polarizer in your bag. Check battery level, spare card ready, plan afternoon shoots around shade and reflection.
Glass mix combines 16-35mm for expansive Dubai silhouettes; 24-70mm handles street-to-sky sequences; 70-200mm yields compressed details. Tilt-shift 24mm keeps lines straight when looked at from elevated lookouts. A fast prime such as 50mm or 85mm adds intimate textures under afternoon light.
Polarizers cut glare from glass and water, deepen blue sky, and render palm texture with reduced glare in mid-day glare. Use a polarizer by rotating to balance saturation while preserving skin tones on public promenades.
Tripod choice: carbon fiber, 1.5-2.0 kg load, center column down, legs adjustable in 3-4 sections. Ball head with 360-degree rotation, quick-release plate, independent pan lock. A compact model travels light, remains accessible near Parc lookouts, supports long exposures that reveal tram wheel motion. Carry equipment that resists heat and dust.
Camera setting: shoot RAW, exposure bracket, check histogram, experiment with ISO 100-400 in daylight; after dusk raise to 800-1600 when light drops. Start with a fast shutter to freeze foot traffic and wheels in motion, then slow speeds to pull reflections from water and glass. public hustle meets modern approach in your gear. yurinatus setting helps describe how light wraps architecture at public panoramas.
Master Night Skies: Reducing Noise and Capturing Sparkling City Lights
Recommendation: Start with a sturdy tripod, a remote shutter, and RAW capture. Set ISO 100-200, aperture f/8-f/11, shutter 20-40 seconds. Use Manual mode, monitor histogram, and bracket three frames -2, 0, +2 EV to preserve highlights.
Disable in-camera long exposure NR if you plan on stacking; shoot multiple frames then apply dark-frame subtraction in post; stack 5-8 frames to tame noise while retaining detail; post-process with Lightroom or Photoshop; keep sharpening modest.
Location choice matters: look for vantage points that reveal numerous reflections and silhouettes. In edmonton, toronto, kowloon, jumeirah, seef, and centre districts, high viewpoints near street corners yield dramatic lines. In evening or early morning light, a longer exposure than 40 seconds makes halos from lamps glow; in summer humidity, colors shift warmer. Those spots often hide palm trees and temples; taking advantage of straight lines of streets helps guide eyes toward shimmering glass and traffic trails. Already seen at many spots, over a bay or harbour, you can capture incredible glow. Because some moments pass quickly, arrive early and scope the spot; fishing boats and other moving subjects create subtle motion blur if you keep shutter open too long. From kowloon to kung, textures shift with street lighting; location variety simply increases opportunities.
Composition strategy: keep horizon straight; let leading lines from streets guide gaze toward shimmering highlights; place a palm trunk or temple lantern in foreground for depth; balance tall structures with negative space; shoot from a spot offering water reflection across horizon; timing around blue hour yields richer color without sacrificing sharpness.
Post-processing plan: merge 3-5 frames with HDR or stacking; WB around 3800-4200K to minimize color cast from lamps; apply light luminance noise reduction without blurring texture; adjust curves to recover tonality; avoid over-sharpening; correct any noticeable lens distortion; export in 2-3k web size or full-resolution for prints.
Practical notes: music from nearby venues can color reflections; simply practice on various spots; connect with photographers in edmonton or toronto to exchange vantage ideas; look for numerous options, including palm-lined centre promenades, street corridors, and harbour edges; those who arrive early are more likely to see sparkling patterns take shape. Looking over crowded spots, you may spot temples, fishing boats, and street lights. Because timing matters, you can still pull incredible results with patient planning.


