 9 Lovely Walks to Explore Los Angeles’ Most Beautiful Bridges">

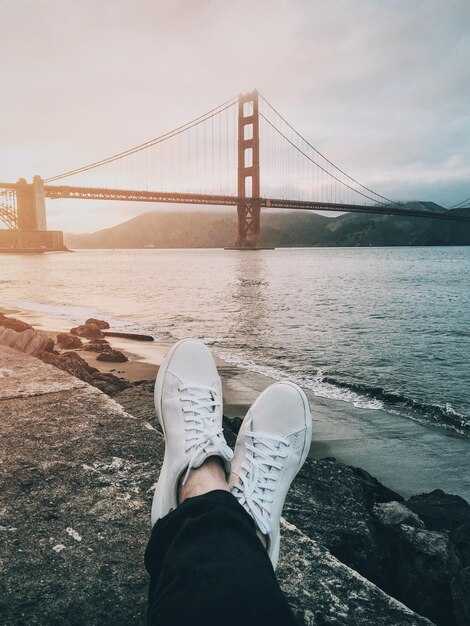
권장 사항: 시작. bixby Creek span at dawn for a round trip introduction to the coast’s crossings. The ocean unfurls below the cliffs, and a maintenance-friendly, paved lane keeps accessibility high for family members and visitors. This first move yields a nice balance of light, air, and surroundings that invites further planning.
From there, the routes sweep along varied landscapes: cliffside promenades with ocean views, harbor-channel overlooks, and parkland connectors where the 랜드마크 carry special 의미. Some overlooks feature minutemen captions as a nod to local history, while others reveal islands just off the coast and frame the surroundings with green canopies. The map highlights crossed routes and the less crowded pockets that reward patient observers; a 보너스 vantage point is well worth a short detour for sunset silhouettes.
Accessibility and practicalities: plan a round trip across the nine routes, or pick three to fit a 가족 half-day into the morning. The channel routes offer harbor views with the islands in sight; you’ll notice 유지보수 updates seasonally, so check before you go. The street lanes vary; one option mirrors a cityscape stroll with a clear, flat lane suitable for strollers and bicycles.
Tips for pacing: start early, frequently pause at vantage points to let the view sink in, and let the channel breezes carry the scent of the ocean; keep an eye on crossed streets where traffic signals guide cross-traffic. If you’re sharing with a 가족, aim for shorter legs between stops and use the less crowded segments to let kids explore safely. The best updates often appear in local signage and on community boards that highlight 랜드마크 그리고 surroundings that matter most. It 도움 to check a weekly map refresh for new routes or improvements.
As a guide, the nine experiences weave a narrative of urban and coastal life: you’ll cross urban canyons, ride along airy spans, and stand at overlooks where the islands shimmer on the horizon. Each route carries a distinct vibe, yet all share the same 의미: they connect people and places, offer accessible options, and present a continuous channel between the city’s energy and the sea. A final 보너스 tip is to map a round end that returns to the starting point through a different lane, letting you compare the surroundings 그리고 랜드마크 from a new angle.
Bridge Walk Planner: Practical Routes and Tips for LA
Begin with the riverfront walkway from Union Station to the eastern riverbank, a 3.2-mile loop that takes about 75 minutes at a relaxed pace. This conventional route keeps pedestrians on a steady walkway, offers shade through the afternoon, and delivers an incredible vantage on the water and skyline along both sides of the river.
Route option one (Section: riverfront crossing to peninsula lookout): cross the earliest span toward the riverfront promenade, then follow a colorful, easy path along the peninsula. Distance about 2.8 miles round trip; terrain is flat concrete with occasional ramps. Great for a group sharing a low-stress outing; stroller and wheelchair access is good in central segments.
Tips for groups: coordinate a single car pool from Union Station or nearby transit points, assign a meeting point, and plan a 15-minute break at a shaded kiosk. Keep the pace comfortable so it takes everyone in the group less than 90 minutes of walking, then stop for photos and hydration.
Safety and surface notes: watch for a hole in the pavement on older sections; wear slip-resistant shoes and check footing at access ramps after rain. Stay on the marked walkway, obey pedestrian signals, and rely on signage from local firms that maintain the routes.
Alternate route two (less conventional): depart from the southern cross toward the marine district, then loop back along a quieter riverfront stretch. This option adds a second crossing and a long, colorful promenade, totaling about 4.1 miles if you finish back at Union Station.
Timing and accessibility: best windows are early morning or late afternoon; bring water and a compact camera for quick sharing. A segment-focused plan helps if a section needs maintenance or weather interrupts the loop; the answer is to switch to the other segment and keep moving.
источник: local planning offices and neighborhood groups publish updates on closures, repairs, and time-sensitive advisories for riverfront routes and pedestrian crossings.
For a practical mindset, consider fayetteville-inspired planning ideas–low-cost, easy-to-implement alterations to improve shade, signage, and seating along the riverfront. The overall plan can be adapted to a small group or a larger gathering, with each section offering a distinct vantage for photography and social sharing.
In summary, start with a straightforward anchor crossing and build optional detours to suit energy levels, weather, and crowd size. The method is simple: choose a good anchor, respect the sides of the river, and let the walk take you through vivid viewpoints and marine settings. The takeaway: a flexible schedule takes your plan from good to excellent, with steady progress and minimal risk of fatigue.
Choose a start point and plan transit between each bridge
Begin at a capital district along a central axis and pick a starting bridge with a clear vantage toward the coast. This leading, national plan keeps the route compact and minimizes backtracking.
Plan a loop that connects five bridge spans named hangzhou, kolkata, virginia, millau, and anahulu along a channel-aligned corridor.
Distances between consecutive spans can be kept precise: about 1,150 feet from hangzhou to anahulu, 980 feet to kolkata, 1,600 feet to virginia, and 1,200 feet to millau. If needed, you can trim one leg to finish within a half-day; the loop still works with enough daylight and energy.
Transit options mix on-foot segments along lampposts-lit promenades, short bus hops, and a railroad-linked link where available. The coast-facing portions reward steady pedestrians, while the channel-adjacent sections support quick moves for groups seeking momentum.
Two alternatives exist: charlie route favors a steeper ascent and a higher vantage; the other stays flatter and sticks closer to the coastline. The channel connects both routes to a single transfer point to simplify regrouping. If a segment wasnt ready, it doesnt block the loop; you can swap in an adjacent leg.
Note: some segments opened gradually; the anahulu-area spine wasnt fully complete at launch, yet the overall framework remains practical. The route provides navigational cues and a scalable template for a multi-bridge itinerary, with optional add-ons tied to cities such as hangzhou or kolkata.
Prioritize bridges by neighborhood to minimize backtracking
Start downtown with a single, clockwise loop that covers every crossing in that district before moving to the next. This approach is crucial to minimize backtracking, keep steps efficient, and ensure that a 필수 shot is captured as tourists move down the boulevard.
Plan neighborhood-to-neighborhood order: downtown, then the oceanside corridor with beaches and a wavy trail along the coast, followed by hillside routes that offer the highest vantage points. The course should avoid retracing the same segment and preserve daylight for the shot since timing matters.
Within each area, create a list of landmarks and photo targets: a station clock, an Indian façade, a stone arch, a flower bed at a corner, and a standout mural. If you arent precise about timing, light can shift and you lose the strength of the image. Stick to that sequence to keep momentum.
Inaugurated routes and involved volunteers shaped the route design, so lean into that style and keep the cadence steady. The plan took shape after field tests, using an example like a Japan-inspired plaza, a gorge overlook, and a seaside flower garden to anchor your vantage points against the ocean. This keeps you moving in a single flow, not a zigzag, and the plan avoids backtracking since the course circles major landmarks.
Finally, lock in the must-do photo sequence at the highest vantage points, with a practical list of steps to shoot: early morning colors, mid-day reflections, and late sun glow. Since light shifts rapidly, perhaps you’ll want to revisit a site if the crowd thins and the light returns. Perhaps you can also shoot a different angle to capture that shot from a fresh angle.
If you arent sure which way to begin, rely on the downtown cluster’s grid and lock in the first two crossings before expanding outward. This approach reduces backtracking and keeps the pace steady for both locals and tourists who crave kinetic urban scenery.
Estimate total distance and time for a comfortable outing
Recommendation: plan a 5.0-mile loop at a very relaxed pace of 2.2–2.5 mph, allowing 2.5–3 hours including breaks. This course keeps pedestrians steady while offering views of the ocean, beaches, and a capital skyline, with smooth, citys-friendly surfaces and two gentle crossings.
- Distance and moving time: about 5.0 miles (8.0 km) total. At 2.2–2.5 mph, expect 2.0–2.3 hours of continuous walking. Add 0.5–1.0 hours for breaks, photos, and watching the moment unfold along the water; total your outing to 2.5–3.0 hours.
- Route design and terrain: start in a lively neighborhood, then follow a long, exposed promenade, cross two light-filled crossings, and finish near a park structure. The designs prioritize flat grades, wide sidewalks, and ample seating. The completed segments include shaded arcs and a gorge-like green corridor that enhances the sense of space along the coast.
- Season, audience, and pacing: October mornings are mild; if you’re joining with a grandparent or young children, slow to 1.8–2.0 mph and insert more rests. If you’re solo or with a friend, you can push toward 2.5 mph and enjoy longer pauses for observation and conversation.
- Interests and options: for added interest, loop can be extended by 1–2 miles if you want more time watching boats and surfers. Thats the moment to bring a small snack, then resume with renewed energy.
- Food stop and pauses: consider a haleiwa-inspired snack break near the mid-route; it adds 15–20 minutes without breaking the flow. You can also plan a quick coffee at a courtyard before you continue.
- Variations and alternatives: to shorten, trim the loop to about 3.0 miles (4.8 km) by skipping one coastline segment and one crossing; to lengthen, add a loop around a second shoreline block that runs along calm beaches and a shallow gorge overlook.
- Practical tips: bring 1.0 liter of water per person, light sun protection, and comfortable shoes. Use the moment to join with a partner or a small group; always stay on pedestrian paths and watch for other travelers. If you’re familiar with Cincinnati riverfront promenades, this citys route offers a comparable rhythm and a friendly, human scale.
Gear checklist: footwear, water, sun protection, and weather layers
Start with breathable, slip-resistant trail shoes with a reinforced toe for canal bank edges and lower girder sections; for mujer hikers, choose quick-dry uppers and cushioned insoles, plus colorful socks to enjoy the photo opportunities along street corners and surrounding arches, while noting the original designs you pass.
Hydration strategy: carry 1–1.5 liters per person for most routes; on longer circuits near canals, 2 liters is safer; use a compact water bottle in a side pocket and a small bladder in the pack to stay balanced, so you can remain with pedestrians and keep moving without stopping too often.
Sun protection: sunscreen SPF 30+ on exposed skin, sunglasses with UV protection, a wide hat, and a lightweight neck gaiter; colorful options help you regain picture focus during bright midday sun; place a small bottle in the lower compartment for quick reapplication during a photo break.
Weather layers: base layer should be breathable; a light fleece or sweater as mid-layer; pack a windbreaker or rain shell for unexpected breezes along the western edge; for early starts there can be chilly air near arches, so add a compact anahulu scarf if you want extra warmth; this piece of layering is part of the entire system that adapts to humidity and shade. If you’re lucky, shade from trees appears near the bank.
Maintenance and logistics: check the maintenance of paths and railings before you go; keep a spare layer if the forecast shifts; for the longest canals segment there are no shade gaps, so plan with hydration and sun protection; there is a local market offering western-style designs inspired by sultan motifs; you can source gear from china or hungary; these local options offer reliable value while maintaining full functionality; this mixture lets you move through arches and girders with a clear visual on a photo-ready vantage.
| Gear category | Key tips | 노트 |
|---|---|---|
| Footwear | Lightweight trail runners; breathable uppers; grippy outsole | Break-in beforehand; consider ankle support |
| Water | 1–2 L per person; add 0.5–1 L backup for heat | Use BPA-free bottles; insulated sleeve helps |
| Sun protection | Sunscreen SPF 30+, UV sunglasses, hat | Reapply every 2 hours; carry neck gaiter |
| Weather layers | Base layer; mid-layer fleece; wind shell | Packable; adjust to shade and wind |
| Extras | Map, phone, small first aid, snacks | Local shops offer durable options; check path maintenance |
Photo-friendly spots: best vantage points and safety tips
Bring a compact tripod and a fast lens to ensure a sharp dusk shot from the waterworks overlook.
Position at the lower level along the entrance path, where a tyne-inspired railing traces a round plaza, delivering clean silhouettes against the city glow.
Continue walking along the marked steps, staying on official access routes; the round route minimizes risk while offering multiple angles for framing tall towers and reflective water.
Time your session for dusk, when light softens and colors shift; use longer exposures on calm water to capture motion, and bring a remote to avoid camera shake. thats the core idea for safe, productive shooting here.
Several vantage points featuring statues and replicas from designers and firms provide anchors for composition; use these elements to gauge scale and orient your shot as you move along the route.
Access signage marks entrances and sections; logging your route helps maintain safety and ensure you don’t lose track after dark. Prioritizing a calm pace keeps footing stable and lets you set up each frame with care.
Master the angle by shooting at eye level or slightly lower, then test several perspectives to find the strongest alignment between water features and the urban skyline. This level approach keeps clutter to a minimum as you walk, continuing to the next section for additional options.
For safety, keep to dry paths, watch for slick steps, and avoid leaning over any entrance or railing; protect gear from spray near waterworks and wear non-slip footwear. dusk lighting benefits from patience and awareness, so have a plan and log your notes for future sessions.
Roundup of top spots: the lower terrace adjacent to the waterworks, the elevated plaza along the round promenade, and the south entrance area. Each offers a distinct vibe while maintaining controlled access and clear sightlines. This section helps you plan a focused walking route that maintains safety as you continue exploring more viewpoints.
 절대 혼자서는 찾을 수 없는 세계 최고의 숨겨진 레스토랑 10곳">
 모스크바 트램 여행 – 색다른 시각으로 도시를 조망하세요">
 플로브디프의 고대 로마 모자이크 – 불가리아 제국 예술">
 런던에서 가장 아름다운 레스토랑 인테리어 - 런던 최고의 디자인 레스토랑 공간">
 비하인드 스토리 - 최고의 풍경 사진 촬영지를 찾고 계획하는 방법">
 겨울 모스크바 방문 – 마법 같은 크리스마스 마켓 경험">
 가을날에 완벽한 세계의 아늑한 카페 11곳">
 전 세계 어린이와 함께 즐기기 좋은 최고의 하이킹 코스 – 가족 친화적인 트레일">
 유명 러시아 작가들의 아름다운 시골집 8곳 – 사진">
 개인 정보 보호 등을 위한 최고의 윈도우 필름 테스트 – 종합 리뷰">