 Aperture Tours Blog – Seyahat Fotoğrafçılığı Rehberleri & İpuçları">

Begin with a 15mm sweep at blue hour to lock a panorama of mont-saint-michel in frame; this move sets your day with a clear direction and helps you read light before you lift the camera.
These routes have been located for a compact workflow: lisbon’s alleys, the saint market, and a garden courtyard where the sun spills along pale walls. daha önce light lets you kontrol portas and the windows of small dükkanlar; a volpi camera grip with a tiny filtre keeps the frame crisp while life today.
To translate scenes into a coherent catalog, think in sequences: switch from a close portrait to a wide panorama, using a filtre to manage highlights. The thought that light can be shaped by a window, a door, and a moving crowd makes life çok rich in the frame.
In today’s practice, you’ll pass vendors hawking postcards near mont-saint-michel, lisbon’s portas, monets prints, and other art in little dükkanlar. déak tones in dawn light ride across old stone; these moments remind you to be deliberate about exposure and composition, ensuring that what you shoot now can be seen later, as life in the garden quietly continues today.
Practical Travel Photography: Aperture, Gear, and On‑the‑Go Tips
Start with a compact, two‑lens kit and a pocket tripod; keep a fast 50mm prime for portraits and a 24–70mm zoom for architecture and street scenes, and shoot in RAW to preserve dynamic range.
Set your base exposure by the lens opening (f-number) around f/4–f/8 in daylight, and raise ISO to balance dim scenes. For moving subjects, keep shutter speeds at 1/200–1/320s; for static scenes with a tripod, 1/60–1/125s is sufficient. If your lens has stabilization, you can drop shutter by a stop. Check the histogram to avoid blown highlights on bright façades.
Gear checklist
- Camera body: mirrorless with reliable autofocus and good high‑ISO performance.
- Two lenses: a 24–70mm or 28–60 zoom for versatility, plus a 50mm prime for tighter portraits.
- Tripod or flexible Gorillapod for evenings and low light.
- Extra batteries (2–3) and fast memory cards (UHS‑II if supported).
- USB‑C charger and a compact power bank for long days.
- Filters: polarizer for river reflections; optional neutral density for motion in water or clouds.
- Remote shutter or camera app for steady, silent captures.
On‑the‑go practices
- Arrive early at a riverbank or square; Anna, a local photographer, notes these moments offer clean lines for architecture and lively street scenes.
- Move onto a hillside or take the villamos for elevated perspectives; scan lines that lead toward iconic façades with Versailles‑style symmetry.
- Frame with leading lines: doorways in Alfama, arcades at náměstí; pair with vendors and a quick coffee to show scale.
- Shoot both wide and tight: a beautiful street moment that conveys the country’s character, then zoom into a detail–tilework, a café logo, or Já szai statue cameo (jászai).
- In the afternoon, raise ISO slightly to keep shutter speeds up in crowds; otherwise motion blur distracts.
- AF mode: single‑point for portraits; wide or zone for busy scenes and architecture.
Location notes and quick ideas
- Alfama offers winding lanes and steep steps; capture street vendors, the aroma of coffee, and the rhythm of the day.
- Graça provides a lookout with a misty view over the river; shoot from the terrace as the city shifts in the light.
- Náměstí squares across europes cities provide balanced geometry; use a wide lens to exaggerate perspective.
- Kossuth tér in Budapest gives bold lines and riverbank reflections; pair a long shot with a shorter one to compress space.
- Já szai (jászai) street fonts and monuments add local flavor; place a person in frame for scale.
- Versailles‑inspired façades or palatial details appear in city centers; use a wide angle to emphasize symmetry.
Additional notes: stay organized, protect gear from weather, and keep a tiny notebook with quick exposure reminders; when you pause at a cafe for coffee, jot down how the light changes as you plan the next shot before you leave.
Aperture and Depth of Field: When to Open Up or Stop Down for Travel Scenes
Open the lens opening to about f/2.8–f/4 for intimate, single-subject frames in crowded streets; for broad scenes keep at f/8–f/11 to ensure detail from grass in the foreground to distant landmarks. This setup provides flexibility whilst shooting in places like paris-saint-ouen or beyrouth, and it gives you reasons to work with light rather than chasing post-work edits.
Use hyperfocal planning to keep most of the frame sharp in city scenes: at 24mm, f/8 yields a sharp zone from roughly 2–3 m to infinity; at 35mm, focus around 3–5 m for similar results. This right balance avoids constant refocusing while preserving texture from grass, benches, and distant domes in parks and plazas. Consider a circular polarizing filter to cut reflections on glass and water; an ND filter helps when you want longer exposures in harsh daylight to smooth crowds.
For evening scenes or cemeteryphotography moments, shoot slightly wider than daylight to retain ambient color: f/4–f/5.6 on a standard zoom often works well; use a tripod if possible. If you’re chasing that deéak, moody vibe, let lights bloom by exposing for highlights and letting shadows hold detail. This can help you discover the character of places like the citadel in beyrouth or the petrin hill, where textures in stone resemble monets-inspired palettes–monets without heavy edits.
In frame planning, place the subject on the right side to balance open space and lead the eye through arches, parks, or stairways; a small note on edges helps avoid clipping people or monuments. For public spaces, aim for natural interactions rather than staged poses; this makes cemeteryphotography and street scenes feel authentic; find moments where light wraps textures on stone and grass, then shoot continuously to capture the right expression.
You must bring fast prime or versatile zoom, a compact polarizer, and a lightweight tripod; shoot in RAW, bracket exposures when needed, and review on the spot to adjust the chosen aperture for the moment. The aim is a crisp foreground with a softly rendered background, a balance that is worth refining; practice in evenings around the citadel or in parks to develop the right rhythm for your ideas.
Lenses and Focal Lengths for Different Destinations: Urban Cores vs Open Landscapes

Başlamak 14mm for urban cores to capture tight canyons between façades, and keep a versatile 24–28mm for mid-street moments. In open terrains, switch to 70–200mm to pull distant forms forward, or stay at 24–70mm for contextual shots. Plan your ride between buses and ascensor stops to maximize light and avoid backlit corners, with streets lined by signage guiding your angles.
vicente, youre being asked to build a beş lens setup that stays light: a nikkor 14mm for drama and a standard 24–70mm for general work, plus a 50mm veya 85mm for intimate portraits. clara chases valley angles, margit tests side streets for cemeteryphotography textures, and that approach is quite robust when light is insufficient; tickets and a quick card swap let you shoot faster, taking advantage of the moment, while újezd becomes a reference point on the map. estrelaphotography style keeps colors aligned, and you definitely keep your plan tight so you can ride between locations without missing shots.
For open terrains, a longer reach helps to compress space; use 50mm veya 85mm to isolate figures in a windswept field, while the 24–70mm remains handy for environmental context. side-by-side tests with charles can reveal how 14mm exaggerates perspective on a corner, while the 24mm keeps people in frame; that balance keeps you flexible in varied scenes, and you can plan at alto viewpoints for elevated silhouettes. If youre capturing a party later, a 70–200mm lens helps isolate moments without crowding.
vicente, clara, margit, and charles often echo that approach, reinforcing how a disciplined plan unlocks better candid shots on open trips and in crowded quarters alike, even when the day pushes you toward quiet valley mornings or social gatherings at a party.
Exposure Strategies in Varying Light: Metering, ISO Controls, and Shutter Choices
Baseline exposure starts with evaluative metering as default and exposure compensation from +0.3 to +1 EV when the sky sits above the scene. Note how backlit faces can stay underexposed; check the histogram and adjust. In a street scene with yellow blossoms in full sun, bias helps hold petal detail and keep the sky from blowing out, and you can land on the right balance onto the midtones.
ISO and shutter balance: In bright daylight, keep ISO 100–200. You could enable Auto ISO with a cap around 1600 if you need faster shutter speeds; for a 60mm shot of a passerby, aim at 1/125 s minimum; for a 15mm scene with a crowd, 1/60 s helps stay steady if you brace against a wall. Also consider a sturdy setup for longer daylight sessions, and use a quick check of the histogram after each framing.
Shutter choices: For crisp actions, use 1/250–1/1000 s; for motion blur with a panning effect, 1/40–1/125 s; for night interiors, 1/8–1/2 s with a tripod and remote release. For time-lapse sequences, bracket exposures around -2, 0, +2 stops and capture at a fixed interval (2–4 seconds is a solid starting point); this gives you strong options in processing to balance highlights and shadows.
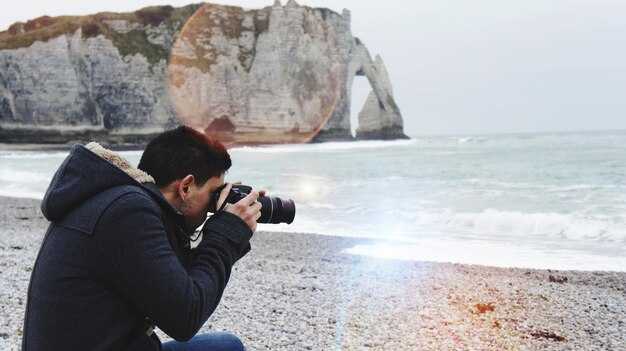
Lens decisions: A 60mm frame tightens the subject, a 15mm broadens context. In narrow streets of a bairro or on cliff edges at éretat, switch between these focal lengths to capture both detail and surroundings. The right choice often comes from quick tests: you could also shoot a short sequence with both lenses and combine in post. Always ensure a steady stance, ready to switch as light shifts; you can place a note on the housed setup to recall which hero you captured.
Field examples and roster: In Luxembourg’s old town, bias exposures balance bright façades; in malostranské streets of Prague, 60mm isolates textures while 15mm reveals context; in the cliffs near éretat, the same rules apply. founder michel gauvin, clara, and a hungarian photographer also share ready ideas for handling colour and processing. travelling photographers could use these ideas with a ticket to a city break, building a compact bracket set and a time-lapse routine before processing to craft beautiful, original images. They note that a consistent workflow housed in a small notebook keeps results aligned across conditions.
Composition Tactics for Impactful Travel Shots: Framing, Leading Lines, and Timing
Begin with a concrete recommendation: frame one subject tightly on a decisive line, anchor it with a foreground edge, and let a landmark appear in the distance. Think churches and the Charles Bridge; in malostranské lanes, compose about history and place so the shot feels true to the land in each country you explore.
Leading lines and perspective: let rails, arches, river curves, and staircases pull the eye toward the subject; the line follows the posture and balance of the frame. In royal settings or along church courtyards, tilt your perspective to keep the foreground sharp while the far wall dissolves into soft texture.
Timing and lighting: best moments come at golden light; some moments require you to wait for a rider to pass or for a Japanese storefront to catch the sun. If you purchased a compact lens, you can zoom in on faces with clean backgrounds; you must be ready, some frames reward patience, others rely on spur-of-the-moment energy.
Perspective in practice: think of the world as your field; turn often, try low angles, shoot from stair landings, and explore streets that frame a doorway or clock tower as part of a longer rhythm. Also, being mindful of line direction helps you guide the eye toward the subject.
Reference and context: study the guidebook and notes from dlabacov and Lounsbury; Kossuth statues appear in many cities, offering reliable cues for composition. Use these to capture moments around land, churches, and people; a purchased lens and patient approach can turn a good scene into the best frame.
On‑the‑Go Review and Quick Edits: RAW Capture, Mobile Apps, and Field Workflows
Always shoot HAM in the field and back up to two locations, the device and the cloud, so everything stays intact and you can turn between trains, trams, and crowds without losing edits.
In alfama or graça, pick a simple background: a white wall, a doorway, or a quiet hall, then wait for a still moment to position your subject. Compose with edges leading your eye and read the light through windows to shape contrast.
For quick edits on the go, dikkate almak mobile apps: Lightroom Mobile, Snapseed, or the vendor’s native tools to adjust exposure, color, and texture; save a first pass as written notes to capture context like reading time or background story, and keep the RAW archive intact.
stromovka and catchbudapest offer great practice: capture still frames of people, trains, and public spaces. Shoot at a location with public access; keep the ISO moderate to avoid noise, then tune the tone curve in the app for a natural look.
When you wrap, add a contact sheet with choices and a note about vendors you rely on; share with friend julia and likhitha for feedback, and olmuştur involved earlier to avoid repeating mistakes. A simple ticket plan for trains and local transit helps you stay on track without missing shots.
The written log should capture what worked, what didn’t, and what to consider next time; without a reliable note, you risk repeating mistakes; a small checklist must become a popular reference for future shoots in public spaces and festival scenes.
 Moskova'da Açık Hava Sergileri Nerede Gezilir – En İyi Mekanlar, Tarihler ve İpuçları">
 Russian Culture in Landmarks – Iconic Monuments and Heritage Across Russia">
 Where to Try Local Farm Food in Moscow – Best Farm-to-Table Spots, Markets, and Farms">
 Dünya Çapında Manzaralı 10 Patika Koşu Rotası – Koşucular İçin En İyi Parkurları Keşfedin">
 Dolaşan Rakam – Kavramı Anlamak ve Pratik Kullanımları">
 Moskova, Idaho'daki En İyi 10 Yürüyüş Parkuru – En İyi Açık Hava Rehberi">
 Bitki Dolu Botanik Mağazaları Nereye Ziyaret Edilir – Dünya Çapındaki En İyi Bitki Mağazaları">
 Gözlerden Uzak Moskova Müzeleri Favorilerimiz Bölüm 2 – Saklı Cevherler">
 Moskova'daki En İyi 21 Kahvaltı ve Brunch Mekanı">
 Kış Gündönümünü Deneyimlemek İçin Büyülü Ormanlar – Büyüleyici Kış Ormanlarına Bir Rehber">