 10 أماكن جبلية شتوية لالتقاط صور لا تُفوَّت لتصوير المناظر الطبيعية">

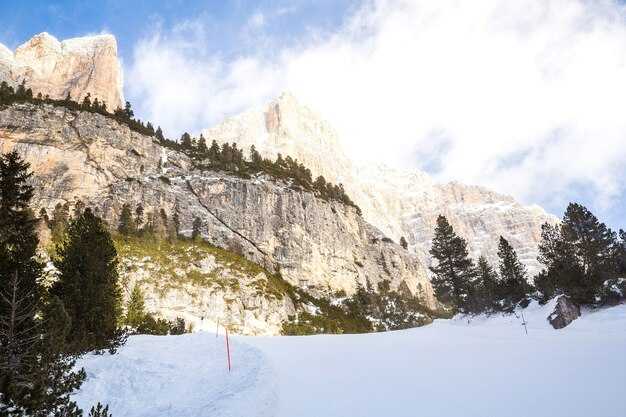
Recommendation: ابدأ عند أول ضوء فوق الوادي، على ارتفاع يتراوح بين 1800 و 2100 مترًا تقريبًا، حيث تتوهج الأسطح البودرة وتلتقي التلال البعيدة بالأفق؛ يتيح ذلك لإعدادك الفوتوغرافي التقاط مجموعة من اللحظات الحاسمة مدى الحياة بتباين واضح.
الحماية والمعدات: الحماية من العواصف والصقيع ضرورية. احزم سترة واقية من الرياح، وقفازات معزولة، ومأوى مدمج. تمنع الحامل ثلاثي القوائم المتين والبطاريات الاحتياطية الاهتزاز في التعريضات الطويلة، مما يحافظ على الملمس على الجليد والصخور وغيرها. أسطح.
في ال فانواز حوض، صخرة صخرية شبيهة بالقلعة توجه العين نحو بحيرة تنجرف فيها الجبال الجليدية على طول المياه الزجاجية؛ تصبح القلعة نفسها نقطة محورية، تدعو إلى إلقاء نظرة فاحصة. يتغير المشهد بزاوية الشمس، مما يوفر أجواء مختلفة في يوم واحد. حافظ على عدستك عند 50-85 مم لضغط المسافة والتأكيد على الحجم.
السويدية ضوء في موسم البرد يمنح دفئًا لطيفًا لـ حقول من الثلج و ال أسطح البحيرات المتجمدة؛ اخرج إلى العراء وشاهد كيف ترسخ الظلال الزرقاء الطويلة التكوين.
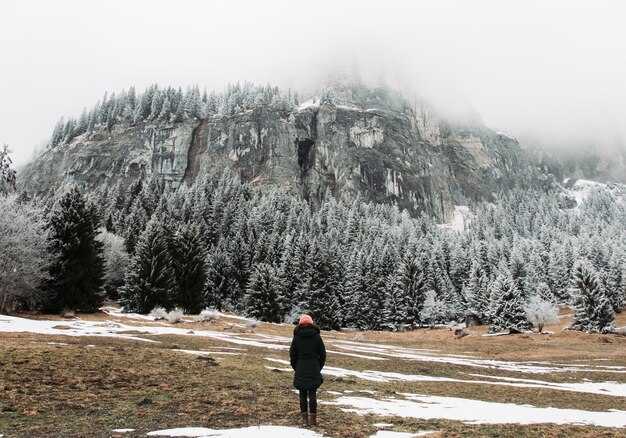
لمن يحنون إلى الماضي عيد الميلاد للحصول على أجواء مثالية، ابحث بالقرب من أكواخ الرعاة والشاليهات الخشبية حيث تتوهج الأضواء الخافتة عبر الهواء المنعش؛ فسوف تلتقط لوحة ألوان هادئة تعزز الملمس في الثلج والصقيع.
عنوان باتجاه الشرق على طول الحافة، تشير حافة ثلجية نحتتها الرياح نحو إطارك التالي؛ مما يتيح لك مطاردة صورة ظلية درامية بينما ترتفع الشمس فوق الأفق.
على طول كل طريق تصادفه ذئب عبور مسارات حقول الثلج; استخدمها كدليل خفي لتوجيه عين المشاهد عبر الإطار دون أن تطغى على المشهد.
المسافات مهمة: استهدف المناظر البانورامية حيث تقع القمم البعيدة على حافة سلسلة تلال أمامية على بعد حوالي 150-300. أمتار بعيدًا، محافظًا على صدق المقياس وثراء الملمس بالضوء والجليد.
كن أنت مهارة وجه الوجهة حيث تلتقي الخطوط في أفق نظيف؛ عندما إتقان. الأراضي، ستسمع صمت الموسم وتشعر بذاتك مدى الحياة تثبيت الذاكرة.
دع ضوء النهار يقرر الصورة النهائية: صوّر بتجربة أولية، ثم ضع تعريضات مختلفة للحفاظ على النطاق الديناميكي؛ هذه الطريقة هيا بنا أنت تصقل التقنية وتتجه نحو التوازن التصويري الحقيقي.
خطة مُنظمة لتغطية عشرة مواقع في ظل ظروف موسم البرد القارس
إعداد نافذة توجيه مضغوطة: الشفق المدني المستهدف والساعة الزرقاء، واثنين من النسخ الاحتياطية، والانتقال في تسلسل في اتجاه عقارب الساعة عبر عشرة مواقع في لابلاند بما في ذلك كيرونا. يحافظ هذا النهج على الزخم، ويقلل من التعرض، وينتج صورًا بألوان درامية وإضاءة ناعمة.
المعدات وأساسيات السلامة: حامل ثلاثي القوائم قوي بأرجل عريضة، عدسة سريعة (f/2.8 أو أسرع) للضوء الخافت، مخبأ بطاريات احتياطية، مدفئات يدوية، مرشح مانع لتسرب الماء، واقي عدسة، وحزمة تدفئة صغيرة لتثبيت الكاميرا أثناء التعريضات الطويلة. احتفظ بالبطاريات في جيب دافئ بين اللقطات؛ وتجنب التكثيف عن طريق تكييف المعدات. استخدم مرشح استقطاب للحد من الوهج على الجليد عندما يكون الوهج شديدًا. جهاز تحكم عن بعد يقلل من الاهتزاز. احزم مسامير دقيقة وحذاء معزول وملابس خارجية مقاومة للرياح وقبعة دافئة لتنعم بالراحة أثناء فترات الانتظار الطويلة للحصول على اللحظة المثالية. يظل التوقيت أمرًا بالغ الأهمية؛ يجب على المستكشفين التخطيط لأخذ فترات راحة للتحقق من تحديثات الطقس دون فقدان الضوء. حافظ على الدفء بين المواقع للحفاظ على الروح المعنوية عالية؛ وهذا يتجنب التعب تمامًا ويضمن بقاء الزوار منخرطين.
1) منتزه أبسكو الوطني وجبل نوليا توفر مناظر بانورامية مفتوحة بالكامل على البحيرات المتجمدة وبساتين الصنوبر؛ غالبًا ما يُظهر المشهد تحولات لونية مثيرة للاهتمام مع انجراف الغيوم، مما يضفي جودة حالمة على التكوينات. يميل الضوء إلى التأرجح حول الشفق المدني، لذا فإن التسلسلات المتدرجة تلتقط كلاً من الخطوط العريضة المشرقة والمظللة. يمكن لعدسة زوم 14-24 مم أو 24-70 مم التعامل مع المناظر الواسعة وتفاصيل الجليد القريبة؛ كن على دراية بصقر قد يحلق في الأعلى. التوقيت مهم في لابلاند؛ اختر نافذة هادئة لزيادة فرص الحصول على صور ظلية نظيفة مقابل السماء. توفر هذه المواقع إشارات متنوعة للحياة البرية بين الثلوج الناعمة، وتجذب الزوار الذين يأتون للحصول على صور مركبة مميزة للسماء والجليد.
٢) منطقة يوكسياري حول الفندق الثلجي تتركز على النوافذ المتجمدة والجليد المنحوت؛ تتغير لوحة الألوان بين الظلال الزرقاء والأضواء الدافئة للمباني، مما ينتج صورًا ذات تباين عالٍ ومزاج تصويري. صوّر خلال الساعة الزرقاء في المساء الباكر للتأكيد على ملمس كتل الجليد وحواف الصقيع؛ ينتج الإمالة والتحويل أو المنظور الدقيق صورًا بانورامية معمارية بطريقة ناعمة وسينمائية. أحضر عدسة تليفوتوغرافي للصور الشخصية الحميمة للنوافذ أو عدسة واسعة للاقتراب من واجهة الفندق. غالبًا ما يتردد الزوار هنا، مفتونين بالتوهج غير العادي الذي يأتي من المصابيح الداخلية التي تتخلل الجدران الجليدية.
3) ضواحي كيرونا – آفاق جليدية فوق الحقول المتجمدة تُظهر خطوطًا صارخة حيث تجتاح الرياح الباردة المتطرفة التضاريس المستوية. يُضخّم الضوء الهادئ الشاحب تدرجات الألوان في السماء وعلى الجليد. يكافئ المكان اللقطات ذات المنظور الطويل التي تلتقط اتساع لابلاند. تُضيّق العدسة الأطول إيقاع صفوف الأشجار وأعمدة الكهرباء مقابل أفق واسع. التوقيت هو المفتاح خلال الأيام الملبدة بالغيوم، عندما تكشف الصور الظلية الدرامية وزوايا الشمس المنخفضة والناعمة عن أنسجة لا تعرضها الكتب المدرسية. غالبًا ما تحمل الصور هنا جودة صارخة وجميلة يتذكرها الزوار باعتبارها شمالية بامتياز.
4) منطقة بيوركليدن تقع عند نقطة التقاء عالية التباين بين الحقول الثلجية وثنايا الغابات؛ يمكن أن يتحول الضوء من الأزرق الجليدي إلى النحاسي في دقائق، مما يجعلها مثالية للحصول على صور بانورامية درامية وغنية بالألوان. استخدم عدسة واسعة لتقديم عمق المجال عبر الوادي؛ يمكن لعدسة متوسطة التقريب أن تعزل شجرة صنوبر وحيدة أو مخروطًا جبليًا بتفاصيل واضحة. تضيف الحياة البرية - لحظات هادئة عرضية - رياح خفيفة، أرنب بري أو طيهوج بعيد - نسيجًا حيويًا إلى المشهد. يوفر التوقيت في الصباح الباكر أو في وقت متأخر بعد الظهر لونًا أكثر دفئًا، ويوفر المكان فرصًا لتكوين إطارات بسيطة بمساحة سلبية.
5) ريكسجرينسين يميل إلى الملامس الجليدية والأسطح الجليدية الشبيهة بالبحر؛ تخلق الرياح الباردة سطحًا ملموسًا يستجيب بشكل جميل للتعريضات الطويلة. يمكن أن يضيء الضوء خلال فترة ما بعد الظهر المتأخرة بدفء نادر، مما يسمح للون باختراق اللون الأزرق على الثلج. يساعد الحامل ثلاثي القوائم وغالق التحكم عن بعد على تثبيت لقطات العدسة الطويلة للشقوق والثلج المنحوت بفعل الرياح. قد تظهر الصقور أو الطيور الأخرى فوق التلال، مما يضيف عنصرًا ديناميكيًا إلى خطتك الفوتوغرافية. هذه البقعة مثالية للصور البانورامية الواسعة ولتوثيق الطابع القاسي والمفتوح للظروف المناخية القاسية.
6) حقول تورنيتراسك الجليدية توفر الصفائح الجليدية العريضة انعكاسات هادئة عندما يهدأ الريح؛ ويؤدي السكون إلى تناسق حالم ودراما سماوية. تلتقط زاوية واسعة النطاق حجم المياه المتجمدة وأشجار الصنوبر المحيطة بها؛ ويمكن لعدسة مقربة متوسطة عزل جليدة واحدة أو شق في الجليد كخط رائد. يحدث سقوط الضوء هنا بسرعة؛ اختر نافذة عندما تكون الشمس منخفضة لزيادة دفء اللون دون المساس بالتركيبة. غالبًا ما تبدو الصور من هذا الموقع هادئة وقوية في الوقت نفسه، مع إحساس بالعزلة يتردد صداه لدى الزوار الذين يستكشفون الزوايا النائية من لابلاند.
7) هضبة ياليفاره تتميز برياح تنحت الثلج وتلال بعيدة تؤطر خط أفق قوي؛ الهواء البارد يعطي تفاصيل واضحة وإحساسًا بالحدة في التكوين. مزيج من الصور البانورامية والإطارات الضيقة يعرض التباين بين حقول الثلج الملساء ووجوه الصخور الوعرة. ابحث عن الضوء الناعم في الصباح الباكر أو في وقت متأخر من بعد الظهر؛ تحول اللون يضيف مزاجًا إلى المشهد. لمحات الحياة البرية - آثار ناعمة في مسحوق الثلج الطازج أو طائر جارح بعيد - ترفع القصة فوق مجرد منظر طبيعي.
8) منطقة يوكموك توفر الشوارع المغطاة بالثلوج، والواجهات الخشبية، وإمكانية ظهور آثار النجوم في السماء ليلاً عندما تصفو السماء بعد تساقط الثلوج. استخدم حاملًا ثلاثيًا للحصول على نسيج عالي التفاصيل على المنازل وأكوام الثلج المحيطة؛ يظهر اللون من انعكاسات ضوء المصابيح على الجليد، مما يضفي جودة تصوير ساحرة على كل إطار. يتزامن التوقيت مع الساعات الزرقاء المطولة في فصل الشتاء؛ مما يزيد من فرصك في التقاط الجو الهادئ الذي يخيم على المدينة بعد تقاعد الزوار. يدعو المشهد إلى الاستكشاف وتقديم صور تتحدث عن إيقاع سويدي تقليدي يقع في لابلاند.
9) منطقة أرجبلೋಗ وبحيرة هورناڤان تكشف عن مساحات جليدية واسعة وخط ساحلي متجمد يوفر مساحة واسعة للتجارب التركيبية. يمكن للتعريض الطويل أن ينعم تموجات الرياح على البحيرة، مما ينتج سطحًا سرياليًا حالمًا يتناقض مع الصور الظلية الواضحة لأشجار الصنوبر على الشاطئ. تحولات الضوء واضحة هنا، مما يجعل الصور البانورامية جذابة بشكل خاص عند الغسق؛ يساعد المقراب في عزل الملامس في المسافة. قد تحدث زيارات للحياة البرية كصور ظلية صغيرة على حافة البحيرة، مما يساهم في إحساس بالمكان يبدو حقيقيًا وشاعريًا للمصورين الذين يستكشفون المنطقة.
10) منطقة أرفيدسياور closes the circuit with woodland trails and snow-draped meadows that invite quiet, contemplative frames. The softer light of the late afternoon enhances color in the sky and on the snow, turning the scene into something beautifully simple yet richly layered. This area offers strong chances to capture intimate landscape details–ice crystals along a twig, a frozen creek, or a single set of tracks that lead the eye toward a distant horizon. Visitors who come here often leave with a portfolio of images that feel intimate, natural, and characterful for swedish snowy scenery in lapland.
Common guidelines across all ten spots: keep packs light yet complete with layers, hand warmers, and spare batteries; shoot in RAW to maximize dynamic range when skies are variable and clouds roll in over the horizon; prioritize timing to catch the soft, color-rich moments that occur during civil twilight or blue hour; move efficiently between locations to preserve energy and maximize shooting windows; observe wildlife from a respectful distance to preserve their natural behavior while still recording compelling images; these practices increase your chances to produce a cohesive set of photographs that truly represents the region, its softer light, and its dramatic landscapes; the result is a portfolio that highlights the dreamlike color and quiet grandeur of lapland in kiruna and beyond.
Gear and personal safety for snow, wind, and changing visibility
Plan a conservative turn-back rule: if visibility falls below 300 meters or gusts exceed 60 km/h, retreat to shelter until conditions improve. This plan keeps you safe until the next window and provides a clear reason to pause when weather shifts. In europe’s alpine regions, lapland, and iceland, weather can flip quickly; near lochend, at a historic castle, or along an exposed bridge, stay prudent and ready to retreat.
- Clothing and protection: Base layer should wick moisture (merino or synthetic), mid-layer for insulation, and a windproof/waterproof outer shell. Choose a type of boot with solid grip; add gaiters to seal snow from the ankles. Pack extra gloves, a beanie or balaclava, and a neck warmer. Cold exposure degrades response time, so minimize sweating by venting layers gradually. The need to protect extremities is real; proper setup helps you stay careful in windy, cold conditions.
- Footing, terrain, and shelter: Snow formation can hide hazards; inspect the next step carefully. When wind shifts, trees become temporary shelter, so avoid open faces and ridge tops. Cross bridges with care; ice on a bridge can be slick even when it looks solid. In lochend zones, keep a safe distance from shoreline edges. If you see a castle silhouette in the distance, use it as a landmark to orient yourself, not as a target to approach on uncertain ground.
- Navigation, watch, and route planning: Carry a map, compass, and offline GPS, and mark your plan and escape routes in field notes. Check national park advisories and local forecasts; watch for sudden visibility drops or wind gusts from unexpected directions. Include a contingency plan and a reason to retreat if weather deteriorates. Until you confirm safe passage, stay on lower, more sheltered terrain and avoid cliff edges.
- Electronics, batteries, and gear protection: Cold drains batteries quickly; keep spares in inner pockets and rotate them to stay warm. Carry a small power bank, a compact hand warmer, and a protective rain cover for your main camera. In image-making, a wide-angle lens helps you capture vast, ethereal scenes without needing to toil on unstable ground. Present gear with a sturdy strap and light protection against blowing snow to protect investment.
- Image-taking technique in gusts: Use a fast shutter to freeze motion in windy conditions, and brace a tripod on rock or snow. If you’re using a tripod, keep it low to reduce sway; consider a remote release or timer to minimize movement. Bracket exposures to handle changing light, especially where magical light lingers near a calm lake or over a historic valley. The goal is to craft honest, majestic scenes that demonstrate how wind sculpts trees and cliffs, without risking gear or life. There, creative outcomes emerge as light plays with every snow formation.
- Safety mindset and group discipline: Never push into uncertain ground; maintain spacing, communicate turns, and set bail-out points. Carry a whistle, an emergency blanket, and a small shelter tarp to protect against gusts. There is a prevailing reason to stay present: a simple misstep can turn a moment of wonder into a life-threatening situation. If someone falters, retreat to a safer point and regroup.
Timing, light, and atmospheric cues for snowy mountain scenes
Begin with civil twilight–when the sun sits just below the horizon but the sky still glows–this yields soft, directional lighting that flatters snow textures. Set a stable frame with a tripod; keep ISO 100–400; shutter 1/60–1/200; if wind is calm, consider an extended exposure (2–4 s) to reveal subtle texture in the snow; bracket three frames to guard against rapid changes.
Lighting quality shifts as clouds drift. Clear, low-humidity air produces crisp shadows that deepen depth; overcast sheets the light, reducing contrast; these differences determine how looking the scene is in the frame and how good the result can be.
Atmospheric cues help you time the shot: wind sculpts covered snow into sharp cornices; a veil of haze marks colder air, sharpening depth and the scene’s qualities. Look for owls perched on a spruce or a distant wolf crossing a meadow; if wildlife appears, switch to a longer lens and extend the frame for a dreamlike composition. A hawk may silhouette over the ridge, adding scale.
Equipment and approach: keep your gloves on to adjust settings fast; backpack extra batteries and a compact weather cover; use a cenis filter if available to balance skies or rely on a polarizer for contrast; rely on extended dynamic range to preserve details in bright highlights and shaded valleys. The goal is a sharp, noise-free frame with natural gradations.
When planning, Norway provides a practical template: select roads that thread between fjords and villages located beneath crags; heading toward higher passes after dawn yields crisper air and cleaner light. Check weather bands and road closures; time your approach to avoid glare on snow-covered slopes and to keep the sky in your frame, preserving landscapes.
Post-processing guide: stack 3–5 photos into a cohesive series, but keep the colors honest; apply modest adjustments to shadows and midtones to maintain depth and authenticity; aim for optimal balance and perfection; never overdo saturation; export 16:9 frames for these landscapes and include a few video clips to accompany the final photos. For next steps, keep your originals safely stored with tags to locate scenes quickly.
Composition techniques to maximize drama in snow-season terrain
Anchor the frame with a foreground on banks of snow, then push depth by layering ridges toward the skyline. Use a versatile 24–70 mm lens to cover intimate texture and distant peaks; keep ISO 100–400, aperture around f/8–f/11, and shutter near 1/60–1/250 s depending on breeze and light; this yields crisp detail on ice and tracks in the banks.
Plan panoramas that reveal depth and atmosphere: shoot a sequence from left to right, then stitch into a single wide field. Maintain an overlap of 25–30% to ensure alignment as light shifts across the scene. Over many tries, this approach yields consistent stitching.
Watch wind along a stream or pools; use long exposures (0.5–2 s) to blur motion while keeping edges sharp; this ethereal glow heightens the sense of movement on a calm day. If wind picks up, raise ISO to 800 to preserve texture.
Choose destinations such as wengen or millarville and vary vantage points; year after year, light angles shift, and opinion among shooters may differ, thats the beauty of practice, somewhere near the overlook.
Inside the frame, maintain balance by placing a strong foreground on one side and leaving negative space on the other; this approach keeps the field grounded and visually stable. okay, look for natural frames like banks or arches to contain the view, somewhere in the middle of the scene, and add a sense of place.
| Technique | Impact | Practical tips |
|---|---|---|
| Foreground anchors | Gives banks and depth | Place snow banks or ice features in the near third; use f/8–f/11; tripod helps |
| Panorama strategy | Expands space; creates panoramas | Capture 6–9 frames with 25–30% overlap; stitch in post; choose a stable perch |
| Light and color balance | Elevates beauty; ethereal tones | Shoot during golden hour; white balance 5200–5600 K; exposure compensation +0.3–+1.0 |
| Lenses and perspective | Controls compression vs context | 26–70 mm for context; 70–200 mm for compression; verify histogram to avoid underexposure |
| Motion management | Adds life to pools and wind-swept surfaces | Long exposures 0.5–2 s on still days; use tripod, remote release |
Camera settings and protective measures for snowfall and gusty winds
Set to manual, shoot RAW, expose snow with +0.7 to +1 EV; shutter 1/500–1/1000s; aperture f/8–f/11; ISO 100–400; telephoto lens in 300–600mm range; keep a monopod or sturdy tripod, and shoot from a wind-sheltered spot to ensure tack-sharp results.
Meter with spot or center-weighted modes and verify the histogram to avoid blown highlights on light surfaces; bracket +0.3 to +1 EV for critical areas such as frozen pools or coastal terrain, then review at ground level to confirm texture retention; in snowing conditions with gusts, use bursts to capture fleeting moments while maintaining a consistent baseline and plan to revisit problematic compositions later in the sequence.
White balance should stay around 6500–7500K for neutral snow tones, or shoot RAW and adjust in post if light shifts in seasonal daylight; for destinations like Lapland or coastal Norway, the middle of the day can yield flat color, so lean toward a slight cool or warm bias to protect perceptual accuracy and overall mood; also consider a pre-set WB on cloudy for richer sky color when storms loom.
Protective measures for equipment and yourself begin with weather-sealed gear and a reliable rain/snow sleeve; use a lens hood, keep desiccant packs in bags, and prevent condensation by acclimating lenses gradually between temperatures; avoid rapid temperature swings by keeping the camera inside your jacket during breaks and swapping batteries in a warm pocket; in -20c conditions, battery life drops sharply–carry at least two spares and keep them close to your body to maintain total power.
Storage and handling strategy: completely seal the camera body when leaving the shelter, wipe with a microfiber cloth before reassembly, and store in a weather-resistant bag when not in use; also, dry hands with gloves that allow finger mobility for fine control, then reassemble promptly to avoid frost on filters; during long sessions near an island shoreline or in a village perimeter, plan to switch between a wide-angle to reveal scenery and a telephoto to isolate details, maximizing creative flexibility.
Protection protocol for the skin and fingers includes a windproof shell, insulated gloves with tactile fingertips, and frequent warm breaks; keep a small spare blanket or pack to sit on during wind-sheltered pauses, ensuring you can stay comfortable and focused as you shoot throughout the day; this approach supports skill refinement and helps you photographically capture perfection without hesitation.
Workflow note: photographers should log weather changes and location notes–total wind speed, visibility, and temperature–so you can anticipate shifts in light and terrain; plan routes that span both middle-ground vantage points and elevated prospection, and consider a mix of terrain such as rocky outcrops, glacial pools, and village edges to diversify your frames; with this knowledge, you’ll maintain momentum even when storms roll in or the light dies back, avoiding doubt and keeping momentum across a long session in places like Norway and the Lapland region.
Site scouting, access logistics, and contingency plans for all locations
Begin a two-week pre-scout: lock permits from national authorities, map access routes, and establish two contingency paths that avoid avalanche zones.
Document each site with daylight checks, track vehicle access, and note terrain features such as pine groves and blue pockets. Mark canopée-protected zones where soft light favors creating instagrammable frames with a telephoto lens while staying within safety guidelines. Never rely on a single arrival plan; create two distinct routes to adapt toward changing conditions in march storms.
الخدمات اللوجستية الميدانية: احتفظ بحقيبة سفر صغيرة بها الضروريات في متناول اليد؛ أوقف السيارة بالقرب من مداخل المسارات في المحميات الوطنية؛ تأكد من مواعيد الدخول مع الحراس؛ تحقق من حالة الطريق مسبقًا؛ رتب السفر إلى كل مكان، مع الحفاظ على التواصل المستمر مع الفريق. خطط لوقوف السيارات بالقرب من نقاط الوصول إلى laukkujarvi و lofoten؛ قم بتخزين المعدات في علب مقاومة للرطوبة واجلب بطاريات إضافية لجلسات التصوير.
تدابير احترازية: إذا كان المسار مسدودًا بالثلوج المتساقطة حديثًا، انتقل إلى التلال المنخفضة أو الوديان المحمية؛ احمل ملابس ذات طبقات وحماية المعدات من الرطوبة؛ تأكد من بقاء فحوصات السلامة ثابتة؛ نسق مع فرق الحياة البرية إذا زاد نشاط الأيائل والصقور؛ حافظ على مسافة واستخدم بعدًا بؤريًا مقربًا لالتقاط التفاصيل دون إزعاج. إذا تدهور الطقس، فارجع إلى نزل قريب أو مأوى مظلة السيارة وقم بإعادة الجدولة في نفس اليوم إن أمكن.
ملاحظات خاصة بالموقع: خطط لنوافذ النهار التي تتماشى مع ضوء شهر مارس باتجاه الساعات الزرقاء؛ في لوفوتن، توقع سواحل وعرة وقممًا درامية؛ في لاوكويارفي، توفر البحيرات الضحلة وأشجار الصنوبر انعكاسات ساحرة؛ في المتنزهات الوطنية، اتبع اللافتات والتزم بالأماكن المحددة لحماية الموائل الطبيعية. قم بتضمين الإطلالات التاريخية والزوايا المناسبة لالتقاط الصور أثناء انتقالك إلى المكان التالي.
المعدات والسلامة: استخدم عدسة مقربة لتقليل الإزعاج؛ احتفظ بمعدات السلامة، بما في ذلك حقيبة الإسعافات الأولية والمنارة؛ تفقد الطقس والرياح باستمرار؛ قم بتخزين النسخ الاحتياطية في حقيبة مقاومة للماء؛ خلال الرحلات الطويلة، قم بإنشاء روتين رائع يتضمن مراجعة سريعة للأهداف، ونشر تسلسلات الإحماء التي تساعد في الحصول على نتائج جديرة بالنشر على انستغرام. يجب أن تظل الخطة مرنة تجاه الظروف الجبلية المتغيرة ويمكن تنفيذها بشكل متكرر خلال فصل الشتاء في أماكن متنوعة مثل لوفوتين والأرياف.
 تجارب طهي راقية - دليل الطعام الفاخر">
 أفكار لجلسات تصوير رومانسية من أفضل 30 وجهة في أوروبا">
 المشي في بلاد العجائب الشتوية في موسكو - دليل مصور للشوارع الثلجية">
 أكثر تصاميم الإضاءة المعمارية إثارة للاهتمام في الليل - دليل مرئي">
 متحف تحت الأرض - اكتشف المعارض والتاريخ الخفي">
 خطط لنزهة عند الغروب ومغامرات غروب أخرى - دليل عملي">
 ورش عمل في استوديو الفنون - دروس إبداعية وعملية للفنانين من جميع المستويات">
 ما وراء الرشفة – دليل لأماكن حفلات الشاي التقليدية والحديثة في طوكيو">
 تبادل المواقع – أفضل 6 أسواق محلية في العالم للثقافة الأصيلة">
 8 حدائق سرية لرحلات مدينة هادئة – استكشف في صمت">