 겨울 산 풍경 사진 촬영을 위한 놓칠 수 없는 명소 10곳">

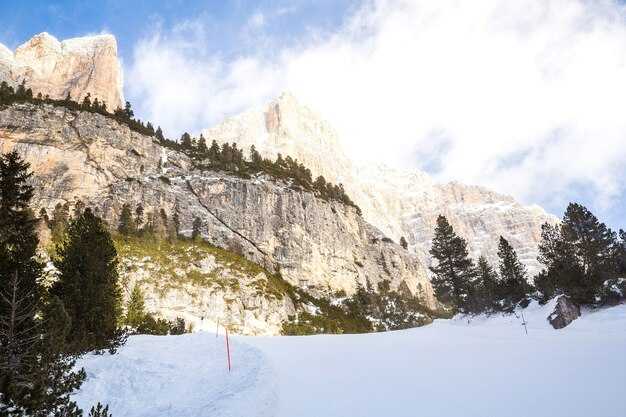
권고: 계곡 위로 새벽이 밝아올 때, 약 1800–2100미터 지점에서 시작하세요. 파우더 표면이 빛나고 멀리 떨어진 능선이 수평선과 만나는 곳입니다. 이곳에서 사진 장비는 선명한 대비로 평생의 결정적인 순간을 포착할 수 있습니다.
보호 장비: 돌풍과 추위로부터의 보호는 필수적입니다. 방풍 재킷, 단열 장갑, 휴대용 쉘터를 챙기세요. 튼튼한 삼각대와 여분의 배터리는 장시간 노출 시 흔들림을 방지하여 얼음, 바위 및 기타 표면의 질감을 보존합니다. 표면.
안에 바누아즈 분지, 성곽 같은 암석 첨탑은 시선을 얼음 조각이 유리처럼 잔잔한 물 위를 떠다니는 호수로 유도합니다. 성 자체가 초점이 되어 더 자세히 살펴보게 합니다. 태양 각도에 따라 장면이 바뀌며 하루 동안 다양한 분위기를 연출합니다. 렌즈를 50–85mm로 유지하여 거리를 압축하고 규모를 강조하십시오.
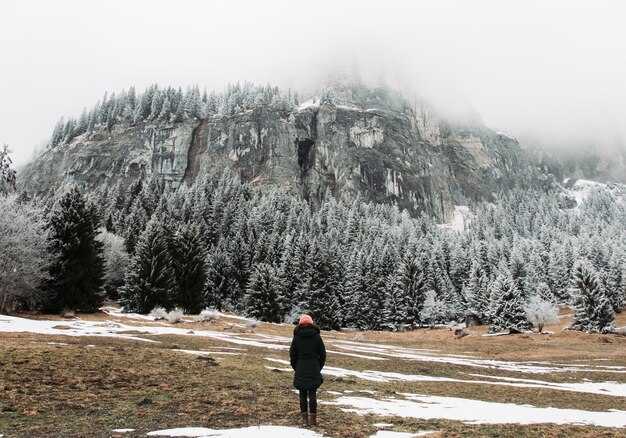
스웨덴어 차가운 계절의 빛은 부드러운 따스함을 주네. 필드 눈과 더불어 표면 얼어붙은 호수의 윤곽을 따라 거닐고, 탁 트인 공간으로 들어가 긴 푸른 그림자가 구도를 어떻게 잡아주는지 살펴보세요.
향수를 불러일으키는 christmas 나뭇가지, 모닥불 근처, 양치기 오두막과 나무 샬레 근처를 검색하세요. 그곳에서는 맑은 공기를 뚫고 스트링 조명이 빛납니다. 눈과 서리의 질감을 향상시키는 조용한 색상 팔레트를 담을 수 있습니다.
제목 능선을 따라 동쪽으로 가면, 바람이 빚어낸 처마 장식이 다음 프레임을 가리킵니다. 해가 수평선 위로 떠오르면서 극적인 실루엣을 쫓을 수 있습니다.
각 경로를 따라가다 보면 늑대 건널목 설원; 시청자를 압도하지 않으면서 프레임 안에서 시선을 은은하게 유도하는 가이드로 활용하십시오.
거리가 중요합니다. 원경의 봉우리가 약 150~300 정도의 전경 능선 끝자락에 위치하는 파노라마를 목표로 하세요. 미터 멀리 떨어져 저울의 균형을 유지하고 빛과 얼음 속 질감을 풍부하게 유지합니다.
당신의 기술 선들이 깨끗한 수평선에서 만날 때 길을 안내하세요; 언제 완벽 땅에서는 계절의 고요함을 듣고 자기 자신을 느낄 수 있을 거예요. 평생 기억 공고화.
최종 이미지는 그날의 빛에 따라 결정한다. 우선 리허설 촬영을 한 다음 노출을 브라케팅하여 다이내믹 레인지를 보존한다. 이러한 접근 방식은 자 기법을 연마하여 진정한 사진적 균형을 향해 나아갑니다.
혹한기 조건 하에서 10개 지역을 커버하기 위한 구조화된 계획
간결한 경로 계획 준비: 목표는 박명과 블루 아워, 백업 두 개를 준비하고, 키루나를 포함한 라플란드의 열 곳을 시계 방향으로 이동합니다. 이 접근 방식은 추진력을 유지하고, 노출을 최소화하며, 극적인 색감과 부드러운 빛이 담긴 이미지를 얻을 수 있도록 합니다.
장비 및 안전 필수품: 넓은 다리가 있는 튼튼한 삼각대, 어두운 조명에서 빠른 조리개(f/2.8 이상), 여분의 배터리, 손난로, 방수 필터, 렌즈 후드, 장시간 노출 시 카메라를 안정화하는 소형 히터 팩. 촬영 사이에 배터리를 따뜻한 주머니에 보관하고 장비를 적응시켜 결로를 방지합니다. 눈부심이 심할 때는 편광 필터를 사용하여 얼음의 눈부심을 줄이고 원격 릴리스를 사용하여 흔들림을 줄입니다. 완벽한 순간을 기다리는 동안 편안함을 유지하기 위해 미끄럼 방지 신발, 단열 부츠, 방풍 겉옷, 따뜻한 모자를 챙기십시오. 타이밍이 중요합니다. 탐험가들은 빛을 잃지 않고 날씨 업데이트를 확인하기 위해 휴식 시간을 계획해야 합니다. 장소 사이에서 몸을 따뜻하게 하여 사기를 높입니다. 이렇게 하면 피로를 완전히 피하고 방문객의 참여를 유지할 수 있습니다.
1) 아비스코 국립공원 및 누올야 산등성이 꽁꽁 언 호수와 소나무 숲 위로 탁 트인 전경이 펼쳐집니다. 구름이 흘러가면서 흥미로운 색상 변화가 자주 나타나 몽환적인 질감을 연출합니다. 빛은 시민 박명 시간대에 움직이는 경향이 있어 브래킷 시퀀스는 밝고 그림자가 드리워진 윤곽을 모두 포착합니다. 14–24mm 또는 24–70mm 줌은 넓은 풍경과 가까운 얼음 디테일을 처리하며, 머리 위로 떠다닐 수 있는 매를 주시하세요. 랩란드에서는 타이밍이 중요합니다. 하늘을 배경으로 깨끗한 실루엣을 만들 수 있는 조용한 시간을 선택하세요. 이 장소들은 부드러운 눈 속에서 다양한 야생 동물 신호를 제공하며 하늘과 얼음의 상징적인 구도를 보러 오는 방문객들을 끌어들입니다.
2) 유카스예르비 인근 아이스호텔 주변 초점을 맞추어 불투명한 창문과 조각된 얼음, 색상 팔레트는 푸른 그림자와 따뜻한 건물 조명 사이를 이동하며 높은 대비와 회화적인 분위기를 연출합니다. 이른 저녁 푸른 시간대에 촬영하여 얼음 블록과 서리 가장자리의 질감을 강조하십시오. 틸트-시프트 또는 주의 깊은 원근법은 부드럽고 영화 같은 방식으로 건축 파노라마를 제공합니다. 창문의 섬세한 초상화를 위한 망원 렌즈 또는 호텔 외관에 접근하기 위한 광각 렌즈를 가져오십시오. 방문객들은 종종 이곳에 머무르며, 얼음 벽을 통해 스며 나오는 내부 램프에서 나오는 특이한 빛에 이끌립니다.
3) 키루나 외곽 – 얼어붙은 들판 너머 보이는 얼음 지평선 차가운 바람이 평평한 지형을 휩쓰는 황량한 선, 고요하고 창백한 빛은 하늘과 얼음의 색조 변화를 증폭시킵니다. 이곳은 랩란드의 광활함을 담아내는 긴 원근감 사진에 보답합니다. 더 긴 렌즈는 넓은 수평선을 배경으로 나무 줄과 전신주의 리듬을 조여줍니다. 흐린 날에는 극적인 실루엣과 부드럽고 낮은 태양 각도가 교과서에는 나오지 않는 질감을 드러낼 때가 중요합니다. 이곳의 이미지는 방문객들이 전형적인 북부 지방의 모습으로 기억하는 황량하고 아름다운 품질을 지니고 있습니다.
4) 비요클리덴 지역 눈밭과 숲이 우거진 지형이 극명하게 대비되는 곳에 자리 잡고 있으며, 빛은 순식간에 얼음처럼 차가운 푸른색에서 구릿빛으로 바뀌어 다채롭고 극적인 파노라마를 연출하기에 이상적입니다. 광각 렌즈를 사용하여 계곡 전체의 심도를 표현하고, 중간 망원 렌즈를 사용하면 외로운 소나무나 고산 지대 원뿔을 선명하게 포착할 수 있습니다. 때때로 조용한 순간들, 즉 부드러운 바람, 멀리 보이는 산토끼나 들꿩 같은 야생 동물은 장면 속에 생생한 질감을 더합니다. 이른 아침이나 늦은 오후에 촬영하면 따뜻한 색조를 얻을 수 있으며, 여백을 활용하여 미니멀한 구도를 구성할 기회도 제공합니다.
5) 릭스그랜슨 빙하의 질감과 바다와 같은 얼음 표면에 기대어 보세요. 차가운 바람은 긴 노출에 아름답게 반응하는 촉각적인 표면을 만들어냅니다. 늦은 오후의 조명은 드물게 따뜻하게 빛나면서 눈 위의 푸른 기운을 뚫고 색깔이 드러나게 합니다. 삼각대와 원격 셔터는 크레바스와 바람에 조각된 눈을 긴 렌즈로 포착하는 데 도움을 줍니다. 매나 다른 새들이 능선 위에 나타나 사진 계획에 역동적인 요소를 더할 수 있습니다. 이곳은 광활한 파노라마와 혹독한 조건의 황량하고 개방적인 특성을 기록하는 데 이상적입니다.
6) 토르네트레스크 빙원 바람이 잦아들면 광활한 빙판과 잔잔한 반영을 선사하며, 고요함 속에서 몽환적인 대칭과 하늘의 드라마가 펼쳐집니다. 광각 렌즈는 얼어붙은 물과 주변 소나무의 규모를 담아내고, 중간 망원 렌즈는 고드름 하나 또는 얼음의 갈라진 틈을 시선을 끄는 선으로 활용할 수 있습니다. 이곳에서는 빛의 변화가 빠르게 일어나므로, 질감을 훼손하지 않으면서 색상의 따뜻함을 극대화할 수 있도록 태양이 낮게 뜨는 시간대를 선택하세요. 이곳에서 촬영한 이미지는 고요하면서도 강렬한 느낌을 주며, 랩랜드의 외딴 지역을 탐험하는 방문객들에게 깊은 공감을 불러일으키는 고독감이 느껴집니다.
7) 옐리바레 고원 바람에 조각된 눈과 강렬한 수평선을 만드는 먼 언덕이 특징이며, 차가운 공기는 선명한 디테일과 구도의 날카로움을 선사합니다. 파노라마와 타이트한 프레임을 조합하여 부드러운 설원과 험준한 암벽의 대비를 보여줍니다. 이른 아침이나 늦은 오후의 부드러운 빛을 찾아보세요. 색감 변화는 장면의 분위기를 더합니다. 야생 동물의 흔적, 즉, 신선한 눈 위의 부드러운 발자국이나 멀리 보이는 맹금류는 단순한 풍경 이상의 이야기를 담아냅니다.
8) 요크모크 지역 눈 덮인 거리, 나무 외관, 그리고 강설 후 하늘이 맑아지면 별 궤적을 담을 수 있는 밤하늘을 제공합니다. 삼각대를 사용하여 주택과 주변 눈 더미의 디테일한 질감을 살리세요. 색상은 램프 불빛이 얼음에 반사되어 나타나며, 각 프레임에 매력적인 사진적 퀄리티를 부여합니다. 촬영 시기는 겨울의 긴 ‘블루 아워’와 일치합니다. 이는 방문객들이 잠자리에 든 후 마을에 감도는 조용한 분위기를 포착할 가능성을 높여줍니다. 이 장면은 탐험을 유도하며, 라플란드에 자리 잡은 전통적인 스웨덴의 리듬을 담은 이미지를 만들어냅니다.
9) 아르예플로그 및 호르나반 호수 지역 넓게 펼쳐진 얼음과 얼어붙은 해안선은 구도 실험을 위한 넉넉한 공간을 제공합니다. 장시간 노출은 호수의 바람결을 잔잔하게 만들어 초현실적이고 몽환적인 표면을 연출하고, 해안가 소나무의 선명한 실루엣과 대비를 이룹니다. 빛의 변화가 뚜렷하여 특히 황혼녘에는 파노라마 촬영이 매력적이며, 망원 렌즈는 먼 거리의 질감을 분리하는 데 도움을 줍니다. 호숫가 가장자리에 작은 실루엣으로 야생 동물이 나타나기도 하여, 이 지역을 탐험하는 사진작가에게 현실적이면서도 시적인 느낌을 주는 장소감을 더합니다.
10) 아르비드샤우르 지역 closes the circuit with woodland trails and snow-draped meadows that invite quiet, contemplative frames. The softer light of the late afternoon enhances color in the sky and on the snow, turning the scene into something beautifully simple yet richly layered. This area offers strong chances to capture intimate landscape details–ice crystals along a twig, a frozen creek, or a single set of tracks that lead the eye toward a distant horizon. Visitors who come here often leave with a portfolio of images that feel intimate, natural, and characterful for swedish snowy scenery in lapland.
Common guidelines across all ten spots: keep packs light yet complete with layers, hand warmers, and spare batteries; shoot in RAW to maximize dynamic range when skies are variable and clouds roll in over the horizon; prioritize timing to catch the soft, color-rich moments that occur during civil twilight or blue hour; move efficiently between locations to preserve energy and maximize shooting windows; observe wildlife from a respectful distance to preserve their natural behavior while still recording compelling images; these practices increase your chances to produce a cohesive set of photographs that truly represents the region, its softer light, and its dramatic landscapes; the result is a portfolio that highlights the dreamlike color and quiet grandeur of lapland in kiruna and beyond.
Gear and personal safety for snow, wind, and changing visibility
Plan a conservative turn-back rule: if visibility falls below 300 meters or gusts exceed 60 km/h, retreat to shelter until conditions improve. This plan keeps you safe until the next window and provides a clear reason to pause when weather shifts. In europe’s alpine regions, lapland, and iceland, weather can flip quickly; near lochend, at a historic castle, or along an exposed bridge, stay prudent and ready to retreat.
- Clothing and protection: Base layer should wick moisture (merino or synthetic), mid-layer for insulation, and a windproof/waterproof outer shell. Choose a type of boot with solid grip; add gaiters to seal snow from the ankles. Pack extra gloves, a beanie or balaclava, and a neck warmer. Cold exposure degrades response time, so minimize sweating by venting layers gradually. The need to protect extremities is real; proper setup helps you stay careful in windy, cold conditions.
- Footing, terrain, and shelter: Snow formation can hide hazards; inspect the next step carefully. When wind shifts, trees become temporary shelter, so avoid open faces and ridge tops. Cross bridges with care; ice on a bridge can be slick even when it looks solid. In lochend zones, keep a safe distance from shoreline edges. If you see a castle silhouette in the distance, use it as a landmark to orient yourself, not as a target to approach on uncertain ground.
- Navigation, watch, and route planning: Carry a map, compass, and offline GPS, and mark your plan and escape routes in field notes. Check national park advisories and local forecasts; watch for sudden visibility drops or wind gusts from unexpected directions. Include a contingency plan and a reason to retreat if weather deteriorates. Until you confirm safe passage, stay on lower, more sheltered terrain and avoid cliff edges.
- Electronics, batteries, and gear protection: Cold drains batteries quickly; keep spares in inner pockets and rotate them to stay warm. Carry a small power bank, a compact hand warmer, and a protective rain cover for your main camera. In image-making, a wide-angle lens helps you capture vast, ethereal scenes without needing to toil on unstable ground. Present gear with a sturdy strap and light protection against blowing snow to protect investment.
- Image-taking technique in gusts: Use a fast shutter to freeze motion in windy conditions, and brace a tripod on rock or snow. If you’re using a tripod, keep it low to reduce sway; consider a remote release or timer to minimize movement. Bracket exposures to handle changing light, especially where magical light lingers near a calm lake or over a historic valley. The goal is to craft honest, majestic scenes that demonstrate how wind sculpts trees and cliffs, without risking gear or life. There, creative outcomes emerge as light plays with every snow formation.
- Safety mindset and group discipline: Never push into uncertain ground; maintain spacing, communicate turns, and set bail-out points. Carry a whistle, an emergency blanket, and a small shelter tarp to protect against gusts. There is a prevailing reason to stay present: a simple misstep can turn a moment of wonder into a life-threatening situation. If someone falters, retreat to a safer point and regroup.
Timing, light, and atmospheric cues for snowy mountain scenes
Begin with civil twilight–when the sun sits just below the horizon but the sky still glows–this yields soft, directional lighting that flatters snow textures. Set a stable frame with a tripod; keep ISO 100–400; shutter 1/60–1/200; if wind is calm, consider an extended exposure (2–4 s) to reveal subtle texture in the snow; bracket three frames to guard against rapid changes.
Lighting quality shifts as clouds drift. Clear, low-humidity air produces crisp shadows that deepen depth; overcast sheets the light, reducing contrast; these differences determine how looking the scene is in the frame and how good the result can be.
Atmospheric cues help you time the shot: wind sculpts covered snow into sharp cornices; a veil of haze marks colder air, sharpening depth and the scene’s qualities. Look for owls perched on a spruce or a distant wolf crossing a meadow; if wildlife appears, switch to a longer lens and extend the frame for a dreamlike composition. A hawk may silhouette over the ridge, adding scale.
Equipment and approach: keep your gloves on to adjust settings fast; backpack extra batteries and a compact weather cover; use a cenis filter if available to balance skies or rely on a polarizer for contrast; rely on extended dynamic range to preserve details in bright highlights and shaded valleys. The goal is a sharp, noise-free frame with natural gradations.
When planning, Norway provides a practical template: select roads that thread between fjords and villages located beneath crags; heading toward higher passes after dawn yields crisper air and cleaner light. Check weather bands and road closures; time your approach to avoid glare on snow-covered slopes and to keep the sky in your frame, preserving landscapes.
Post-processing guide: stack 3–5 photos into a cohesive series, but keep the colors honest; apply modest adjustments to shadows and midtones to maintain depth and authenticity; aim for optimal balance and perfection; never overdo saturation; export 16:9 frames for these landscapes and include a few video clips to accompany the final photos. For next steps, keep your originals safely stored with tags to locate scenes quickly.
Composition techniques to maximize drama in snow-season terrain
Anchor the frame with a foreground on banks of snow, then push depth by layering ridges toward the skyline. Use a versatile 24–70 mm lens to cover intimate texture and distant peaks; keep ISO 100–400, aperture around f/8–f/11, and shutter near 1/60–1/250 s depending on breeze and light; this yields crisp detail on ice and tracks in the banks.
Plan panoramas that reveal depth and atmosphere: shoot a sequence from left to right, then stitch into a single wide field. Maintain an overlap of 25–30% to ensure alignment as light shifts across the scene. Over many tries, this approach yields consistent stitching.
Watch wind along a stream or pools; use long exposures (0.5–2 s) to blur motion while keeping edges sharp; this ethereal glow heightens the sense of movement on a calm day. If wind picks up, raise ISO to 800 to preserve texture.
Choose destinations such as wengen or millarville and vary vantage points; year after year, light angles shift, and opinion among shooters may differ, thats the beauty of practice, somewhere near the overlook.
Inside the frame, maintain balance by placing a strong foreground on one side and leaving negative space on the other; this approach keeps the field grounded and visually stable. okay, look for natural frames like banks or arches to contain the view, somewhere in the middle of the scene, and add a sense of place.
| Technique | Impact | 실용적인 팁 |
|---|---|---|
| Foreground anchors | Gives banks and depth | Place snow banks or ice features in the near third; use f/8–f/11; tripod helps |
| Panorama strategy | Expands space; creates panoramas | Capture 6–9 frames with 25–30% overlap; stitch in post; choose a stable perch |
| Light and color balance | Elevates beauty; ethereal tones | Shoot during golden hour; white balance 5200–5600 K; exposure compensation +0.3–+1.0 |
| Lenses and perspective | Controls compression vs context | 26–70 mm for context; 70–200 mm for compression; verify histogram to avoid underexposure |
| Motion management | Adds life to pools and wind-swept surfaces | Long exposures 0.5–2 s on still days; use tripod, remote release |
Camera settings and protective measures for snowfall and gusty winds
Set to manual, shoot RAW, expose snow with +0.7 to +1 EV; shutter 1/500–1/1000s; aperture f/8–f/11; ISO 100–400; telephoto lens in 300–600mm range; keep a monopod or sturdy tripod, and shoot from a wind-sheltered spot to ensure tack-sharp results.
Meter with spot or center-weighted modes and verify the histogram to avoid blown highlights on light surfaces; bracket +0.3 to +1 EV for critical areas such as frozen pools or coastal terrain, then review at ground level to confirm texture retention; in snowing conditions with gusts, use bursts to capture fleeting moments while maintaining a consistent baseline and plan to revisit problematic compositions later in the sequence.
White balance should stay around 6500–7500K for neutral snow tones, or shoot RAW and adjust in post if light shifts in seasonal daylight; for destinations like Lapland or coastal Norway, the middle of the day can yield flat color, so lean toward a slight cool or warm bias to protect perceptual accuracy and overall mood; also consider a pre-set WB on cloudy for richer sky color when storms loom.
Protective measures for equipment and yourself begin with weather-sealed gear and a reliable rain/snow sleeve; use a lens hood, keep desiccant packs in bags, and prevent condensation by acclimating lenses gradually between temperatures; avoid rapid temperature swings by keeping the camera inside your jacket during breaks and swapping batteries in a warm pocket; in -20c conditions, battery life drops sharply–carry at least two spares and keep them close to your body to maintain total power.
Storage and handling strategy: completely seal the camera body when leaving the shelter, wipe with a microfiber cloth before reassembly, and store in a weather-resistant bag when not in use; also, dry hands with gloves that allow finger mobility for fine control, then reassemble promptly to avoid frost on filters; during long sessions near an island shoreline or in a village perimeter, plan to switch between a wide-angle to reveal scenery and a telephoto to isolate details, maximizing creative flexibility.
Protection protocol for the skin and fingers includes a windproof shell, insulated gloves with tactile fingertips, and frequent warm breaks; keep a small spare blanket or pack to sit on during wind-sheltered pauses, ensuring you can stay comfortable and focused as you shoot throughout the day; this approach supports skill refinement and helps you photographically capture perfection without hesitation.
Workflow note: photographers should log weather changes and location notes–total wind speed, visibility, and temperature–so you can anticipate shifts in light and terrain; plan routes that span both middle-ground vantage points and elevated prospection, and consider a mix of terrain such as rocky outcrops, glacial pools, and village edges to diversify your frames; with this knowledge, you’ll maintain momentum even when storms roll in or the light dies back, avoiding doubt and keeping momentum across a long session in places like Norway and the Lapland region.
Site scouting, access logistics, and contingency plans for all locations
Begin a two-week pre-scout: lock permits from national authorities, map access routes, and establish two contingency paths that avoid avalanche zones.
각 장소를 일광 점검으로 기록하고, 차량 접근을 추적하며, 소나무 숲과 푸른 웅덩이 같은 지형지물을 기록합니다. 안전 지침을 준수하면서 망원 렌즈로 인스타그램에 올릴 만한 장면을 연출하기에 부드러운 빛이 유리한 캐노피 보호 구역을 표시합니다. 단일 도착 계획에 의존하지 말고, 3월 폭풍 속 변화하는 조건에 적응할 수 있도록 두 개의 뚜렷한 경로를 만듭니다.
지상 물류: 필수품을 담은 작은 여행용 가방을 항상 휴대하고, 국립 보호구역의 트레일헤드 근처에 주차하며, 레인저에게 접근 시간을 확인하고, 사전에 도로 상황을 확인하며, 각 장소로의 이동을 준비하고 팀과 지속적으로 소통합니다. Laukkujarvi 및 Lofoten 접근 지점 근처에 주차 계획을 세우고, 장비를 방습 케이스에 보관하고 촬영 세션을 위해 추가 배터리를 가져갑니다.
만일 등산로가 새로 내린 눈으로 막힌 경우, 더 낮은 고도의 능선이나 보호된 도랑으로 변경하십시오. 겹쳐 입을 수 있는 옷을 챙기고 장비가 습기에 노출되지 않도록 보호하십시오. 안전 점검을 꾸준히 실시하십시오. 무스나 매의 활동이 증가하면 야생 동물 관리팀과 협력하십시오. 거리를 유지하고 방해 없이 세부 사항을 포착하려면 망원 초점 거리를 사용하십시오. 날씨가 악화되면 인근 숙소나 차량 캐노피 대피소로 후퇴하고 가능하면 당일 내로 일정을 변경하십시오.
지역별 참고 사항: 3월의 햇빛이 푸른 시간대로 향할 때를 고려하여 일광창을 계획하십시오. 로포텐에서는 험준한 해안과 극적인 봉우리를 기대하십시오. 라우쿠야르비에서는 얕은 호수와 소나무 숲이 마법 같은 반영을 선사합니다. 국립공원에서는 표지판을 따라 서식지 보호를 위해 지정된 장소 내에 머무르십시오. 다음 장소로 이동할 때 역사적인 전망대와 인스타그램에 올릴 만한 각도를 포함하십시오.
장비 및 안전: 방해를 최소화하기 위해 망원 렌즈 설정을 사용하십시오. 구급 상자 및 비콘을 포함한 안전 장비를 유지하십시오. 날씨와 바람을 지속적으로 확인하십시오. 방수 가방에 백업을 보관하십시오. 장거리 여행 중에는 목표물을 빠르게 검토하고 인스타그램에 올릴 만한 결과를 얻는 데 도움이 되는 워밍업 시퀀스를 게시하는 훌륭한 루틴을 만드십시오. 계획은 변화하는 고산 조건에 따라 유연하게 유지되어야 하며 로포텐 및 시골과 같은 다양한 장소에서 겨울 동안 반복적으로 실행될 수 있습니다.
 고급 레스토랑 요리 경험 - 고급 식사 가이드">
 유럽 최고의 여행지 30곳에서 얻는 로맨틱한 사진 촬영 아이디어">
 모스크바의 겨울 원더랜드를 거닐다 – 눈 덮인 거리를 따라 펼쳐지는 아름다운 풍경 가이드">
 밤에 가장 흥미로운 건축 조명 – 비주얼 가이드">
 지하 박물관 - 갤러리와 숨겨진 역사를 만나보세요">
 석양 산책 및 기타 석양 모험 계획하기 – 실용적인 가이드">
 미술 스튜디오 워크숍 – 모든 수준의 아티스트를 위한 창의적이고 실습적인 수업">
 단순한 차 한 잔을 넘어 - 도쿄 전통 및 현대 다도 공간 안내">
 진정한 문화를 체험할 수 있는 세계 최고의 현지 시장 6곳 – 트레이딩 플레이스">
 고요한 도시 여행을 위한 8곳의 비밀 공원 – 침묵 속에서 탐험하세요">