

Comienza identificando un único punto de vista que enmarque los principales monumentos y guíe la mirada hacia un horizonte limpio y nivelado. Monta un trípode resistente, mantén el ISO entre 100 y 400, cierra el diafragma a f/8-f/11 y apunta a una exposición cercana a 1/30 s durante la hora azul vespertina para controlar el desenfoque por movimiento y evitar la saturación, luego ajusta el balance de blancos hacia tonos fríos para preservar el ambiente en las siluetas de los rascacielos, revelando un paisaje estratificado.
Encuesta calles del barrio, puentes y bordes de campos para construir un contexto estratificado: las calles del primer plano conducen a agrupaciones de edificios, luego torres lejanas se elevan sobre el agua. Delimita la exposición para que una toma capture ventanas delicadas sin recortes, luego otra eleva las sombras. Los detalles panorámicos sobreviven incluso en el gradiente de sombras.
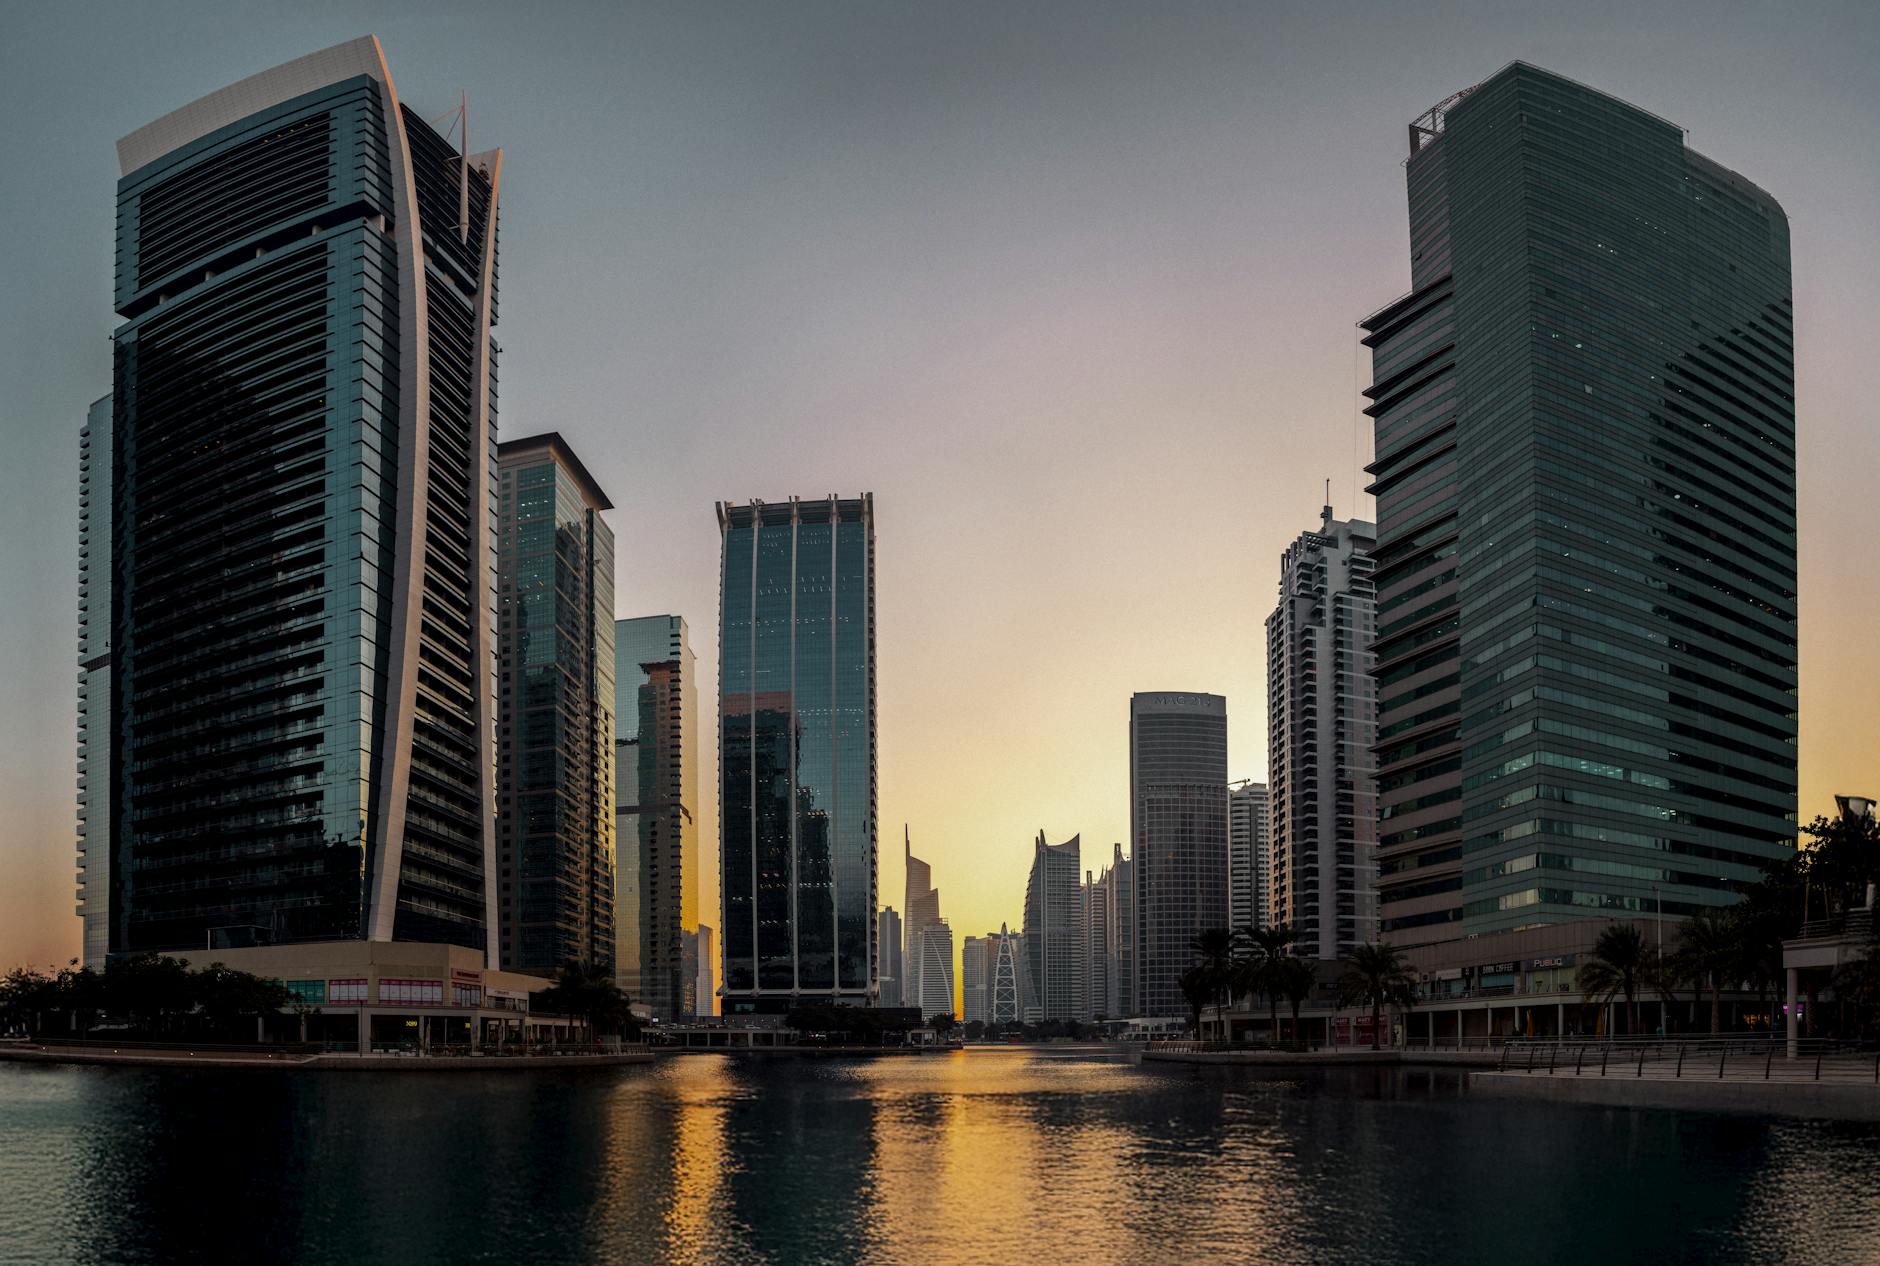
Desde cada punto de vista: desde la perspectiva del campo de Vancouver, las siluetas de los rascacielos se extienden sobre el agua, luego la luz del crepúsculo cede paso al drama de la hora azul. Un objetivo gran angular ofrece un amplio contexto panorámico; un teleobjetivo aísla el ritmo en las líneas de los edificios. Una toma con ángulo amplio proporciona contexto, mientras que un objetivo más largo ofrece una composición más ajustada. Probablemente notes cambios tonales y no puedes pasar por alto los sutiles reflejos en el vidrio. En los barrios de Halifax, las lejanas siluetas similares a las del Burj te recuerdan cómo la escala cambia con la distancia, y te sorprenderá cómo las líneas de resplandor se fusionan con las fachadas oscuras.
Registra experimentos a lo largo de horas: planifica sesiones justo antes del crepúsculo, durante la hora azul y después de la oscuridad. Un kit de campo compacto ayuda: trípode, mando a distancia, baterías de repuesto. En las zonas de Halifax o Vancouver, las texturas nocturnas emergen y el día no las capta. Mantén registros de los ajustes y revisa los resultados para identificar qué configuración logra el mejor equilibrio entre luces y sombras. No siempre se alcanza la perfección, pero las sesiones repetidas mejoran, mientras que las torres inspiradas en el Burj al fondo recuerdan la escala.
12 Consejos para Capturar Impresionantes Líneas del Horizonte Urbano: Lugares Únicos para Ver la Ciudad de Dubái
Burj Khalifa: vista de piso a techo a la hora dorada para calibrar correctamente la exposición, estás listo para perfeccionar tu técnica antes de explorar otros lugares de la ciudad.
- Burj Khalifa - Mirador (de piso a techo). La luz vespertina transforma las siluetas del horizonte; lleva un trípode y un objetivo gran angular (16-35mm) para mantener las líneas rectas. Dispara con ISO 100, apertura f/8, velocidad de obturación 1/125-1/250s en modo manual; haz bracketing ±1 EV para HDR y luego fusiona después. Compra el boleto con anticipación; evita los reflejos apoyándote en un borde discreto, con acceso público a ventanas durante los horarios programados. La panorámica hacia el sur captura una amplia extensión del centro, ofreciendo una excelente toma base para tu colección.
- Sky Views Dubai - Caja de cristal y puente en el cielo. Llega justo después del atardecer cuando las luces de la ciudad comienzan a brillar; usa un objetivo de 24-70mm para enmarcar un horizonte recto con mínima distorsión. Configuración: ISO 200-400, f/4-f/5.6, 1/60-1/125s; se puede tomar con la mano si estabilizas los codos; haz bracketing para cubrir los tonos más oscuros de las ventanas. Se necesita entrada; mantén los movimientos lentos para reducir las reflexiones de los ventanales de piso a techo, lo que ayuda a capturar reflejos limpios del agua sobre las calles urbanas.
- Dubai Frame - Marco histórico frente al moderno. Posiciónate en el lado sur para una vista equilibrada que muestre tanto los antiguos callejones junto al Creek como las nuevas megaestructuras. Dispara después de las 18:00 para evitar sombras duras; apertura f/8, ISO 100, 1/125s, 24mm gran angular. Usa un polarizador para reducir el reflejo en el vidrio y el agua; este lugar transmite una fuerte sensación de escala sin aglomeraciones. Los bordes del marco resaltan el contraste entre la arquitectura antigua y moderna de la ciudad.
- Rueda de Dubái - Rueda de Dubái en el puerto de Dubái. Un paseo vespertino ofrece un arco panorámico sobre las aguas; dispara con un 28-70mm, enfocando en la simetría entre los radios de la rueda y el horizonte; usa exposición múltiple para el color y el cielo. Exposición: ISO 100-200, f/5.6, 1/125-1/250s. Aprovecha el acceso con boleto a las plataformas de observación dedicadas; muévete lentamente por la plataforma para minimizar las reflexiones. Este punto de vista equilibra las luces urbanas con el agua abierta, logrando una composición maravillosa y aireada.
- El Pointe, Palm Jumeirah - Palmas frente al agua y siluetas. Párate en la orilla sur o cerca del borde de The Palm para una dramática yuxtaposición de arquitectura y mar. Dispara al atardecer hasta la hora azul; usa un 70-200mm para comprimir la perspectiva y revelar torres lejanas; ajusta ISO 100, apertura f/8, velocidad de obturación 1/80-1/160s; aplica una serie de 2-4 exposiciones para recuperar los detalles de las luces. Las multitudes a nivel de calle aportan contexto; una zona de entrada con boleto puede conceder acceso más cercano a miradores elevados a lo largo de paseos abiertos. Este lugar destaca la unión del agua y el horizonte con una línea limpia y elegante.
- Reserva Natural de Ras Al Khor - El reflejo de la ciudad sobre los humedales. La luz vespertina con aves en vuelo añade movimiento; se recomienda un objetivo de 24-105 mm; prueba con 1/200-1/320 s, f/6.3, ISO 200; medición puntual en el agua para evitar brillos quemados. Las pasarelas abiertas te mantienen por encima del nivel del agua para obtener reflejos fuertes mientras reduces el riesgo con la fauna. Este oasis urbano contrasta los muelles históricos con rascacielos modernos, ofreciendo un contrapunto único a la densidad del centro.
- Paseo Marítimo de Dubai Marina / Pier 7 - Ritmo urbano junto al agua. Elige un lugar cerca de la Western Tower o los centros comerciales de la Promenade para capturar una línea de horizonte larga y estable. Usa un objetivo de 24-70mm; exposición 1/125-1/250s, ISO 100-200, f/8; haz bracketing para el drama del atardecer y luego mezcla. Los senderos al aire libre en los segmentos orientados al sur ofrecen muchas oportunidades para enmarcar barcos, yates y actividad callejera en una sola toma. La textura de la calle y el agua crean una vista equilibrada y dinámica.
- Al Seef District - Ambiente histórico junto al canal. Dispara desde la línea de agua hacia los rascacielos brillantes al otro lado del canal; al atardecer, los tonos cálidos de los ladrillos contrastan con el cristal. Usa un objetivo de 16-35 mm para capturar la amplitud panorámica; ISO 100, f/8, 1/125s; lleva un trípode pequeño para mayor estabilidad sobre los adoquines. Este lugar combina escenas callejeras de herencia con siluetas modernas, una auténtica yuxtaposición urbana que funciona bien tanto en color como en blanco y negro.
- Puentes del Canal de Agua de Dubái - Cadencia arquitectónica sobre el agua. El atardecer o la hora azul ofrecen un renderizado limpio de arcos y reflejos. Prueba con un 24-105mm, mantén ISO 100-200, f/8, 1/125-1/200s; incorpora tomas con exposición múltiple para gestionar los destellos. Camina por las promenades abiertas para experimentar con ángulos; las líneas rectas de los puentes guían la mirada hacia los grupos de rascacielos más allá. Este lugar fusiona líneas urbanas con la calma acuática para crear un todo cohesionado.
- JBR The Walk - Energía a nivel de calle junto al mar. Las multitudes nocturnas y los letreros de neón aportan contexto a un encuadre gran angular; usa un objetivo de 16-35mm para capturar verticales contra un cielo brillante. Configuración: ISO 200-400, f/4-f/5.6, 1/60-1/125s; un toque de enfoque selectivo en las siluetas de palmeras en primer plano funciona bien. Acceso desde aceras abiertas; ten cuidado con los reflejos en los escaparates, que pueden reducirse con un polarizador portátil. Este ángulo aporta un ambiente animado y cercano a tu colección.
- Kowloon Tsui / Victoria comparación de inspiración interurbana. Observa cómo las aguas bañan un horizonte de cristal y fíjate en cómo las siluetas a nivel de calle se alinean con los rascacielos; la calma de las praderas inspirada en Edmonton en algunos cielos nocturnos te ayuda a calibrar el balance de blancos cuando el neón domina. Al estilo Shan, los marcos narrativos cobran vida cuando incluyes un elemento humano caminando por una calle o puente; usa ese enfoque para dar a tus fotos de Dubái un sentido de escala y energía más terrenal.
- Opción de rascacielos en la azotea - hotel o residencia con vistas. Busca acceso pagado y con boletos a una terraza en la azotea dedicada; dispara después del anochecer cuando las luces del edificio predominen. Usa trípode, 24-70mm, ISO 100, f/8, 1/60-1/125s; haz un par de tomas con exposición múltiple para preservar los detalles en el agua y las ventanas. Esta vista elevada y urbana ofrece un equilibrio ideal entre las líneas arquitectónicas y el cielo abierto, transmitiendo una atmósfera general difícil de superar.
Guía práctica para las mejores fotos del skyline de Dubái
Comienza con un movimiento concreto: llega al paseo marítimo de Dubai Marina justo antes de la hora azul, coloca la cámara baja cerca de la barandilla y enmarca los rascacielos más altos con una palmera en primer plano; un trípode resistente garantiza exposiciones largas y limpias.
Elige puntos de vista que contrasten el patrimonio con el vidrio moderno, como el Santuario de Vida Silvestre de Ras Al Khor, la costa de Palm Jumeirah, el distrito de Burj Khalifa cerca del Puente Souk Al Bahar, Dubai Creek Al Seef y las vistas de Dubai Marina. Una sola sesión ofrece una variedad de composiciones; un objetivo gran angular captura espacios dinámicos a través de islas y siluetas lejanas en el horizonte, creando un fondo estratificado con ambiente de pueblo.
- Paseo Marítimo de Dubai Marina: reflejos en el agua, palmera en primer plano, 16-35 mm, ISO 100, f/8, 6 s durante la hora azul.
- Reserva Natural de Ras Al Khor: reflejos de agua con grullas y torres lejanas; exposición de 8-12 s, 24 mm, trípode.
- Palm Jumeirah, borde costero: silueta curva, canales iluminados; 24-70 mm, hora dorada a hora azul.
- Puente Souk Al Bahar hacia el conjunto de Burj Khalifa: composición ajustada, profundidad de campo, 14-24 mm, f/8, 4-8 s, polarizador para reducir el brillo.
- Paseo marítimo Al Seef en Dubai Creek: arquitectura hereditaria combinada con monumentos modernos; 35-50 mm, hora azul para reflejos cálidos.
La logística: un corto trayecto en ferry por el Creek añade líneas de movimiento al primer plano y amplía la profundidad de campo; los tours con operadores autorizados ofrecen acceso a miradores en las azoteas; lleva un taburete plegable o un monopod si los espacios están concurridos.
Equipo y técnica: trípode, disparador remoto, batería de repuesto; un juego de lentes que abarca de 16 a 70 mm equilibra el primer plano con las siluetas lejanas; ISO 100, apertura f/8, velocidad de obturación de 6 s durante la hora azul; considera un filtro polarizador para controlar los reflejos en los cuerpos de agua; dispara en RAW, ajusta el balance de blancos hacia tonos más cálidos en la edición y mantén las líneas del horizonte rectas para resaltar las formas de las torres más altas.
Identifica puntos de vista icónicos de Dubái para paisajes urbanos amplios y dramáticos
Comienza en la plataforma de observación del Burj Khalifa, dirección 1 Sheikh Mohammed Bin Rashid Blvd, a la hora dorada para obtener imágenes panorámicas de la línea del horizonte y fotos gratificantes.
Navega hasta Palm Tower View en Palm Jumeirah; el mirador orientado al oeste ofrece rincones cómodos para alinear tomas largas a través del horizonte, ayudándote a conectar con los edificios locales y los reflejos brillantes.
La rueda Ain Dubai ofrece imágenes de 360 grados de Dubai Marina, Jumeirah Beach y Burj Khalifa; puedes girar manualmente para minimizar el resplandor, pasando una hora disfrutando de impresionantes vistas de la ciudad.
El Dubai Frame se alza como un ancla nítida, uniendo épocas; colócate junto a los paneles de cristal para capturar una panorámica que abarca los barrios portuarios y los rascacielos brillantes.
Playas públicas como JBR y Sunset Beach ofrecen amplios horizontes; mantén una postura cómoda, aplica exposición larga y respeta la privacidad de los surfistas.
Los puntos de vista orientados al oeste a lo largo del paseo marítimo de Dubai Marina ofrecen siluetas gratificantes; lleva varios objetivos, reserva el estacionamiento con anticipación, anota los horarios, ¡aleluya!
Planifica tu Sesión Fotográfica: Las Mejores Horas de Luz y Condiciones Climáticas en Dubái
El momento adecuado implica comenzar al amanecer o cerca de la hora azul; los fotógrafos deben apuntar a esta hora alrededor del alba y el crepúsculo, cuando el cielo se llena de color y las fachadas de cristal brillan sin el resplandor intenso.
El clima de Dubái suele ofrecer mañanas despejadas; en días más tranquilos, la humedad es baja, lo que mejora la separación de siluetas; el resplandor de la tarde aumenta, por lo que elige una ventana cuando el sol esté más bajo y los vientos sean suaves para mantener el aire limpio. Como la luz en Dubái cambia rápidamente, planifica ángulos consecutivos. Las ventanas de tiempo se estrechan rápidamente; ajusta los tonos de exposición.
Desde las rutas de las esplanadas, las imponentes siluetas se recortan contra el horizonte a lo largo de kilómetros a lo largo de fachadas de cristal; este encuadre revela el panorama más grande del mundo y brinda a los fotógrafos oportunidades increíblemente largas para ajustar los cambios de exposición.
Fotógrafos de Winnipeg y Ottawa deben comenzar con una verificación de la luz diurna para alinear horarios; un rápido cruce en ferry puede llevarlos a aguas más tranquilas para reflejos y nuevos ángulos; desde los bordes de la esplanada, enmarquen una toma amplia, luego enfoquen en detalles luminosos mientras el sol se pone; dejen el equipo a la sombra entre secuencias. Si exploran senderos cercanos, rutas de senderismo o un pueblo costero, obtendrán excelentes primeros planos que complementan torres imponentes. Allí, los reflejos se multiplican.
Componer con monumentos: Enmarcar el Burj Khalifa, la Marina y más allá
Elige una cubierta en el centro al atardecer; enmarca el Burj Khalifa con la Marina al otro lado del agua, mantén la torre ligeramente descentrada y barre hacia los horizontes más lejanos, incluyendo parques y otras torres; esta composición se convierte en un punto de referencia fascinante que los lectores querrán estudiar.
Estabiliza en un trípode resistente, ajusta ISO 200, apertura f/8, velocidad de obturación 4-8 segundos; dispara en RAW para preservar las exposiciones; considera un polarizador para controlar los reflejos; asegúrate de hacer bracketing de exposiciones cuando la luz cambie; trata de mantener el ruido bajo en las sombras.
Escanea zonas por encima del nivel de la calle y en las azoteas: terrazas en azoteas, plataformas de observación o puentes elevados; usa un gran angular de 16-35 mm para capturar amplitud, o un teleobjetivo de 70-200 mm para comprimir elementos; esas opciones ayudan a manejar la iluminación difícil.
De lugares en Lantau hasta puntos emblemáticos del centro, planifica transiciones que combinen elementos modernos con texturas de agua; este enfoque ayuda a quienes fotografían al atardecer a contar una historia equilibrada.
| Aspect | Recomendación |
| Shutter | 4-8 s |
| ISO | 100-200 |
| Apertura | f/8 |
| Longitud focal | 16-35 mm o 24-70 mm |
| WB | Auto o 3800-4200 K |
| Tripod | Por favor, proporciona el texto que necesitas traducir para poder ofrecerte una traducción precisa y de alta calidad al español. |
| Notes | RAW, control de ruido, exposiciones consistentes, mantener las reflexiones en el agua claras |
Libera una secuencia de fotos; el conjunto ya demuestra cómo los elementos se alinean sobre cubierta mientras las embarcaciones pesqueras derivan cerca; las historias publicadas en un feed mundial ayudan a los lectores a aprender exposiciones, ahorrar tiempo y planificar futuros disparos.
Gear esencial: Lentes, trípodes, polarizadores para la luz de Dubái
Empieza con un kit compacto y versátil: un zoom estándar rápido (24-70mm) más un gran angular (16-35mm) y un teleobjetivo (70-200mm) para cubrir miradores públicos, esquinas de parques con palmeras, líneas de tranvía y ángulos de skyline real. Incluye un trípode resistente y un polarizador en tu bolsa. Verifica el nivel de la batería, ten una tarjeta de repuesto lista y planifica los disparos de la tarde alrededor de la sombra y los reflejos.
La mezcla de vidrio combina 16-35mm para siluetas expansivas de Dubái; 24-70mm maneja secuencias de calle al cielo; 70-200mm ofrece detalles comprimidos. El tilt-shift de 24mm mantiene las líneas rectas al observarlas desde miradores elevados. Un objetivo rápido como el 50mm o el 85mm añade texturas íntimas bajo la luz de la tarde.
Los polarizadores reducen el brillo del vidrio y el agua, intensifican el azul del cielo y realzan la textura de las palmeras con menos reflejos a mediodía. Utiliza un polarizador girándolo para equilibrar la saturación mientras mantienes los tonos de piel en los paseos públicos.
Trípode de elección: fibra de carbono, carga de 1.5-2.0 kg, columna central bajada, patas ajustables en 3-4 secciones. Cabezal de esfera con rotación de 360 grados, placa de liberación rápida, bloqueo de panorámica independiente. Un modelo compacto viaja ligero, permanece accesible cerca de los miradores del Parque, soporta exposiciones largas que revelan el movimiento de las ruedas del tranvía. Lleva el equipo que resiste el calor y el polvo.
Configuración de la cámara: disparar en RAW, exposición por ráfaga, revisar el histograma, experimentar con ISO 100-400 a la luz del día; después del anochecer, subir a 800-1600 cuando la luz disminuye. Comienza con una velocidad de obturación rápida para congelar el movimiento de peatones y ruedas, luego velocidades lentas para capturar reflejos en el agua y el vidrio. El bullicio público se encuentra con un enfoque moderno en tu equipo. La configuración yurinatus ayuda a describir cómo la luz envuelve la arquitectura en panorámicas públicas.
Domina los cielos nocturnos: Reduciendo el ruido y capturando las luces brillantes de la ciudad
Recomendación: Empieza con un trípode resistente, un disparador remoto y captura en RAW. Configura ISO 100-200, apertura f/8-f/11, velocidad de obturación 20-40 segundos. Usa modo Manual, revisa el histograma y haz tres tomas con exposición -2, 0, +2 EV para preservar los detalles.
Desactiva la reducción de ruido de exposición larga en la cámara si planeas apilar; dispara múltiples fotogramas y luego aplica sustracción de marco oscuro en la edición; apila 5-8 fotogramas para reducir el ruido mientras conservas el detalle; edita con Lightroom o Photoshop; mantén el afilado moderado.
La elección del lugar importa: busca puntos de vista que revelen numerosas reflexiones y siluetas. En Edmonton, Toronto, Kowloon, Jumeirah, Seef y los distritos centro, los puntos altos cerca de las esquinas de las calles ofrecen líneas dramáticas. En la luz del atardecer o del amanecer, una exposición más larga de 40 segundos hace que los halos de las lámparas brillen; en la humedad del verano, los colores se vuelven más cálidos. Esos lugares suelen esconder palmeras y templos; aprovechar las líneas rectas de las calles ayuda a guiar la mirada hacia el vidrio brillante y los rastros del tráfico. Ya visto en muchos lugares, sobre una bahía o puerto, puedes capturar un brillo increíble. Como algunos momentos pasan rápido, llega temprano y explora el lugar; los barcos de pesca y otros sujetos en movimiento crean un desenfoque de movimiento sutil si mantienes el obturador abierto demasiado tiempo. Desde Kowloon hasta Kung, las texturas cambian con la iluminación de las calles; la variedad de lugares simplemente aumenta las oportunidades.
Mantén el horizonte recto; deja que las líneas guía de las calles dirijan la mirada hacia los destellos brillantes; coloca un tronco de palma o una linterna de templo en primer plano para dar profundidad; equilibra las estructuras altas con espacio negativo; dispara desde un lugar que ofrezca reflejos de agua a través del horizonte; el momento alrededor de la hora azul produce colores más ricos sin sacrificar nitidez.
Plan de postprocesamiento: fusionar 3-5 fotogramas con HDR o apilamiento; equilibrio de blancos (WB) alrededor de 3800-4200K para minimizar el tono cálido de las lámparas; aplicar reducción de ruido de luminancia sin difuminar la textura; ajustar curvas para recuperar la tonalidad; evitar el sobreafilado; corregir cualquier distorsión notable del objetivo; exportar en tamaño web de 2-3k o resolución completa para impresiones.
Notas prácticas: la música de los locales cercanos puede teñir los reflejos; simplemente practica en varios lugares; conéctate con fotógrafos en Edmonton o Toronto para intercambiar ideas de perspectivas; busca numerosas opciones, incluyendo paseos centrales con palmeras, pasillos callejeros y bordes del puerto; quienes llegan temprano tienen más probabilidades de ver cómo se forman patrones brillantes. Al observar lugares concurridos, podrías ver templos, barcos de pesca y farolas. Como el momento es importante, aún puedes obtener resultados increíbles con una planificación paciente.


