 Campeggio invernale - La guida di un esperto al campeggio sicuro e confortevole nella stagione fredda">

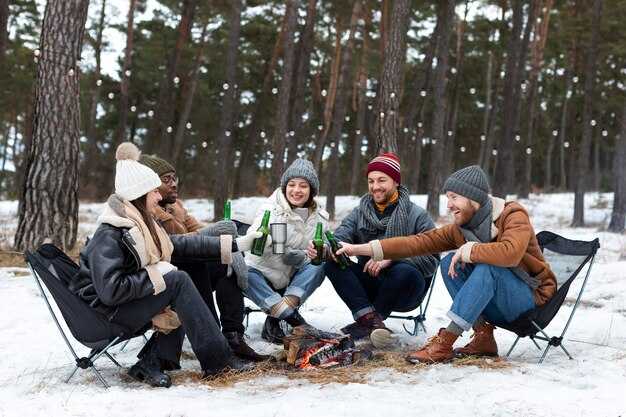
Inizia con un sistema a tre strati per ogni uscita al freddo: un strato base che assorbe l'umidità, voluminoso strato intermedio per stare al caldo, e un Guscio esterno antivento per ripararsi dal vento freddo. Aggiungi un collo gambale, un cappello caldo e un paio di guanti. Porta con te un batteria prepara la lampada frontale, un fornello compatto e scegli il ottimo equilibrio tra peso e isolamento termico. Per le uscite notturne, portate con voi un ricambio vestiti strato accessibile vicino alla tenda per cambiare se l'umidità aumenta. Assicurati che la base del tuo riparo fornisca un terreno solido e disponi copertura su tutti i lati per ridurre la perdita di calore durante le raffiche.
Disposizione di rifugi e attrezzatura Scegli un rifugio quattro stagioni o un solido telo con ancoraggi da neve. Posizionalo su terreno asciutto, lontano dall'acqua di scioglimento, e usa un materassino da sleeping spesso per aggiungere protezione dall'umidità e isolamento. Fissa una gonna da neve per ridurre al minimo il flusso del vento e disponi un minimale slitta per trasportare l'attrezzatura vicino alla porta per un facile accesso. Prepara copertura un piano che mantenga la fonte di fiamma e l'attrezzatura da cucina al di fuori dell'ingombro del rifugio principale mentre prepari i pasti.
Strategia termica La gestione della temperatura dipende da windchill il controllo dell'umidità. Mantieni una temperatura corporea stabile vestendoti a strati ed evitando di sudare durante l'attività; se l'umidità fuoriesce dalla pelle, potresti sentire più freddo e potresti Blocca quando ti fermi. L'aria più fredda aumenta la perdita di calore, quindi pianifica di conseguenza. Ventilazione durante cucina aiuta a ridurre l'accumulo di umidità e rallenta sciogliere di neve attorno al ricovero. Dopo lo sforzo, passare a un sacco asciutto e caldo per asciugarsi vestiti. Riserva l'attenzione per during periodi di riposo quando le raffiche si intensificano.
Navigazione e preparazione Porta con te una bussola affidabile e una mappa; pianifica percorsi tra sentieri segnalati e terreni aperti. preparato indica un kit compatto con accendifuoco, specchio di segnalazione e un telo di ricambio. Non farlo. non dare per scontate le assunzioni sul servizio cellulare; peterson note per i dispositivi di test prima di partire. Se esci dal percorso, tieni un bussola a portata di mano e segnala la tua posizione per il soccorso. Tra i pasti, controlla il rifugio copertura e regola l'esposizione al vento per rimanere al caldo e includi un piano che non ti costringa a prolungare il soggiorno quando il vento aumenta.
Cucinare ed energia Piano cucina finestre che si allineano con temperature diurne più elevate per ridurre umidità accumulo all'interno dell'ingranaggio. Usa un fornello compatto e combustibile secco; mantieni una piccola quantità. wood scatola o tanica di carburante vicino al tuo rifugio per ridurre al minimo il ghiaccio sulle pentole. Portare un slitta per trasportare carburante e utensili da cucina tra la zona fornello e la porta. Monitorare windchill per regolare i tempi di cottura ed evitare il surriscaldamento del combustibile.
Checklist e mentalità Prepare a minimal gear list that includes a spare batteria pack, a reliable bussola, a robust copertura plan, and a slitta for transport. Focus on the ottimo balance of weight and warmth, and keep during breaks monitoring umidità buildup. Acknowledge windchill factors and the Blocca risk; know when to retreat or seek shelter. Use peterson guidance to adapt to whether conditions shift and to avoid acting on impulse that could convict you to dangerous choices.
Sicurezza
Start with a three-layer torso system: moisture-wicking base, insulating mid layer, and windproof outer shell; ventilate to prevent sweat buildup; pre-warm your core by placing hot bottles wrapped in cloth inside your bag for the first hours; thats why this approach works when temperatures drop.
Choose shoes with solid traction and insulation; keep them dry and wear wool socks; between sock layers add a thin liner to minimize moisture transfer and avoid cold toes.
Prepare meals that supply energy for longer trips; pack high-calorie items like nuts, jerky, cheese, and dried fruit; hydrate with warm beverages; keep available snacks in a compact pocket to access quickly.
Shelter strategy: hang a tarp or cloths between trees to create a windbreak; roll a blanket around the sleeping area for insulation; a rooftop setup keeps you above damp ground and boosts airflow.
Drying and gear care: air out outerwear before packing; hang cloths to dry; keep a spare blanket near your body and store moisture-absorbing materials in sealed bags.
Safety planning: consult worldnomadscom for guidelines; even in alabama conditions, wind can shift quickly; check the forecast, set a short plan, and know available exits; during windy spells stay closer to protected spots.
Emergency habits: carry a whistle, headlamp, and a compact water bottle; never ignore frostbite or hypothermia signs; if you ever feel numb or stiff, act quickly; unless you adjust, exposure worsens, so monitor core feel and adapt your layers accordingly.
Layering strategies for staying warm: base, mid, and outer layers
Base first: wear a moisture-wicking base layer and add a second insulating layer, then an outer shell to trap heat; adjust with venting as needed.
The base layer should be skin-tight but not restrictive and built from wool or high-performance synthetics. Invest in quality tops and bottoms, aiming for two sets for short trips and three for longer stays. Wool, especially merino, stays warm even when damp and dries gradually, while synthetics dry quickly but may feel clammy if you sweat heavy. A simple rule is to avoid cotton next to skin; keep the underlayer right against you and change promptly when damp to prevent chill. Underwear and socks made from wool or synthetic blends reduce heat loss during movement and rest.
The second layer, or mid layer, is your main heat source during rests and halted activity. Choose a fleece or insulated synthetic that traps air but remains breathable. For moving sections, a lighter mid layer works well; for dinner breaks or overnight rests, a loftier piece adds strong warmth. Vent zippers when you’re active to prevent overheating, and add or shed pieces to maintain the right condition. In harsher environments, a compact down mid layer can serve as a changer to your comfort without bulk.
The outer shell must be windproof and water-resistant or waterproof while remaining breathable. A shell that seals well around the shoulders and torso prevents heat leakage, and using gators helps keep snow and moisture from creeping under the ankles. Cinch cuffs and a snug hood reduce drafts, and ensure you can move comfortably in moving or at rest. In places with colder nights, the outer layer should accommodate layering of the mid piece without restricting circulation, so you stay warm through extended exposure.
Practical notes: plan meals because dinner calories fuel heating during longer sessions; carry a simple toilet kit and know the best places to stop for breaks to avoid unnecessary exposure. Check regulation and registration requirements for backcountry areas, since some routes have extensive rules. Always carry a spare changer of socks and underwear, a right-sized pack for your gear, and a small heating option only where permitted and safe. This approach leads to the best balance between mobility and warmth, especially in canada or china climates, and helps you stay warm when the condition turns harsher.
Safe shelter setup in snow, wind, and cold: tents, snow walls, and windbreaks
Right-facing wind block: orient the door to the wind, open the shelter toward the lee, and anchor a snow pad under the floor. Made to withstand gusts, this setup works across a range of environments and keeps your body heat inside.
Snow walls should be 0.8–1.2 m high and 3–5 m long, stacked with staggered seams to prevent collapse. Dig a shallow doorway to minimize drafts, and carve an inner lip that redirects warm air toward the tent interior; theres also a small overhang to shed melt and condensation.
Add a windbreak 4–6 m from the shelter, made from packed snow blocks or a natural berm. Angle it 30–60 degrees to the wind to create a sheltered corridor, which extends your usable space without exposing the doorway to gusts. This simple barrier increases your comfort range and reduces heat loss when moving between camp and gear.
Ventilation matters: keep upper vents open and crack the door slightly during the day to push moisture out. Use a dry bag for cloths and keep damp items separate from sleeping gear; effective moisture control means less condensation and a warmer microclimate inside your shelter.
Cloths and warmth: dry cloths plus a blanket add reliable insulation. Pant legs tucked into socks or boots minimize exposed skin, and layering with mild, breathable fabrics helps regulate temperature without overheating. A compact sleeping system with a high R-value pad supports longer nights in cold air.
First checks: assess wind direction and the shelter’s condition before settling in. If gusts shift or the snow walls settle, seek to shore up with extra blocks and re-seat anchors to prevent wobble or gaps that let in cold air.
Power and fuel: if using a stove, keep it outside the sleeping area and vent away from the shelter. Melt water away from the tent and never burn fuel indoors. Theres always a risk of carbon monoxide buildup, so establish a safe, well-ventilated zone for heating or cooking–and have a backup plan should the wind surge.
Backpacking realities: year-round trips require a simple kit with spare cloths, a compact blanket, and a reliable fuel source. Prefer gear from respected manufacturers, and if you’re traveling through areas with variable weather or Mexico-adjacent routes, test items in advance to ensure durability and moisture resistance. Simple arrangements and careful packing prevent moisture buildup that can ruin warmth and comfort.
Recognizing hypothermia and frostbite signs and rapid response steps
Act immediately: relocate the person to a dry, windproof shelter, remove wet outerwear, and begin rewarming with dry layers and a heater if available.
Recognizing signs: hypothermia presents with shivering that may cease, confusion, slurred speech, fatigue, and a slow heartbeat. A core temperature below 35°C (95°F) requires urgent action. Frostbite shows as numb, pale or waxy skin, and hard, frozen patches on exposed areas such as fingertips, toes, ears, and the nose.
Response steps during a field incident: stay with the person and avoid leaving them alone. Move to cover or a windbreak, check breathing, and call the authority or emergency line if needed. Remove wet outerwear and replace with dry outerwear or warm liners; keep the group together and use a compass for orientation if you must move. Have a headlamp on for visibility and a packed set of warmth items within reach. Offer high-calorie treats or warm fluids if the person is conscious, and use body heat by sharing blankets. Do not rub frostbitten skin and do not rewarm if there is a high risk of refreezing.
Rewarming details: place the patient on a flat surface to maximize heat transfer; for frostbite, rewarm gradually in water around 37-39°C (98-102°F) for 15-30 minutes when possible, then cover with sterile dressings and keep the area warmer. Note melt-refreeze cycles can create slick patches; move with care. For hypothermia, replace wet clothes with dry layers, move to heat, and monitor breathing; if consciousness allows, provide small sips of warm liquids. Call for medical help if there is any doubt about severity, and plan for transport to a facility.
Prevention and planning: pack a compact kit with headlamp, mittens, liners, and high-calorie snacks; 4-season outerwear and smart layering keep body warmth. Keep room temperature stable and minimize heat loss with covers. Do not leave the most at-risk members behind; if movement is necessary, ensure everyone stays together. Instructable training modules help a group practice responses; coordinate with the authority regarding coverage and registration requirements, and carry a compass for navigation during moves. In climates like mexico, adjust pacing to avoid rapid cooling and ensure steady rewarming; conduct quick checks at rest stops to catch signs early.
Stove use and fuel safety: avoiding carbon monoxide and fire risks
Always operate stoves outdoors or in a well-ventilated shelter; never run a fuel stove inside a tent or enclosed space. Carbon monoxide hazards come without smell or taste, and most people underestimate their danger overnight. If you have a CO detector, ensure it is active and within reach; otherwise monitor for symptoms like headache or dizziness and move outside if they appear.
heres a simple, practical checklist that covers places this risk may show up, whether you are cooking for a couple or solo.
- Base and clearance: place the stove on a flat, noncombustible surface (metal tray, rock, or dedicated stand); ensure at least 1 m (3 ft) of open space from sleeping gear, cloth, and wool layers; this lowers the chances of ignition and reduces hazards.
- Ventilation: provide steady airflow; avoid sealing the shelter; if you must operate under a canopy or vestibule, keep the entrance open and maintain a steady draft so combustion gases can escape.
- Fuel handling: use the correct fuel type; keep spare containers kept in a separate, ventilated area away from heat sources; cap canisters after use; never refill inside the shelter; inspect hoses and connections for leaks before lighting.
- Ignition and operation: use long utensils; light away from your body; place pots and a kettle on stable supports; keep a thermos of hot water ready to reduce heating cycles; do not leave a stove unattended, especially overnight or during a quick break.
- Temperature and cold-weather considerations: in freezing conditions, fuels can thicken or pressure can decrease; keep canisters warm in a jacket or sock, but never place near direct flame; if you see a drop in performance, adjust heat gradually rather than forcing the system.
- Fire safety: clear the area of dry cloth, paper, and other flammables; have water or sand ready to smother any flare; know how to shut off the fuel supply quickly and test for leaks before lighting.
- Personal gear and safety: sunglasses help with glare when moving gear outdoors; wear a head covering such as a hat or hoodie; keep sleeping gear like sleeping bag and wool or fleece layers kept at a safe distance from the flame; keep utensils and cookware in waterproof containers; store a thermos with nice hot water for overnight comfort.
- Post-uso: lasciare raffreddare completamente il fornello prima di riporlo; pulire le stoviglie; verificare che non vi siano segni di perdite o residui e assicurarsi che tutti i tubi del carburante siano freddi prima del trasporto.
Navigazione invernale e sicurezza nei viaggi sul ghiaccio: pianificazione del percorso e segnalamento
Pianifica il percorso alla luce del giorno con una bussola e una mappa aggiornata, oltre a un dispositivo GPS con batteria carica e alimentazione di riserva. Non c'è niente che sostituisca l'informare qualcuno del tuo piano e il tenersi in contatto; gli strumenti disponibili aiutano, ma non sostituiscono il buon senso.
Attraversare il ghiaccio richiede preparazione: controlla le previsioni e il vento, stima un raggio di sicurezza per gli attraversamenti e stabilisci una linea alternativa lungo la costa. Usa una sonda per testare lo spessore a intervalli; se senti suoni sordi, vedi punti umidi o il ghiaccio si sposta, fai marcia indietro. Pianifica il confine del parco ed evita sezioni con fanghiglia o crepe.
Porta con te un kit di segnalazione: fischietto, specchietto compatto e un dispositivo di messaggistica satellitare o PLB. In condizioni di luce diurna o scarsa, tre brevi fischi attirano l'attenzione; se possibile, segnala la tua posizione con un pannello luminoso. Controlla sempre la durata della batteria; carica i dispositivi in anticipo e porta con te delle batterie di riserva. Queste opzioni offrono un modo rapido per chiedere aiuto in caso di separazione.
Prepara un sistema compatto di fornello e riparo per un pernottamento. Un fornello mantiene il tè caldo e il calore costante; scegli un riparo caldo e un isolamento confortevole. Usa una miscela di lana e materiali sintetici negli strati di base e intermedi per le diverse temperature. Includi calze e un cappello di ricambio; niente batte l'attrezzatura asciutta quando il vento si alza. Questa pratica della preparazione aumenta le tue probabilità di sopravvivenza in condizioni avverse.
Per la mobilità, le ciaspole riducono l'affaticamento e ti aiutano a muoverti con efficacia sulla neve crostosa; metti alla prova il tuo ritmo contro il vento e le previsioni. Se è necessario l'accesso con un veicolo, porta con te le catene e conosci il percorso; parcheggia lontano dalle rive e dalle aree soggette a fanghiglia. Aspettati che il ghiaccio vari; acquista attrezzatura da produttori affidabili e verifica la disponibilità di batterie e altri elementi essenziali prima della partenza. Questi passaggi ti fanno andare avanti, aumentano la speranza e migliorano le tue probabilità di una gita fantastica e sicura.
 Cattedrale di Cristo Salvatore di Mosca – Storia, Architettura e Guida alla Visita">
 Le 10 migliori destinazioni di vacanza in Russia oltre Mosca e San Pietroburgo">
 Cosa bere con il caviale – La guida definitiva agli abbinamenti">
 Come viene prodotta la vodka russa: dal grano al bicchiere">
 7 Migliori Destinazioni per gli Amanti della Vodka – Tour e Degustazioni">
 16 migliori birrifici di Mosca e birre artigianali in Russia – La guida definitiva">
 Curiosi dissetanti – Bibite regionali dall'Europa centrale e orientale">
 Come acquistare voli per la Russia e volare all'interno della Russia con una carta di credito straniera">
 Pesca invernale in Russia - La guida definitiva alla pesca sul ghiaccio">
 Hotel in Russia – I migliori posti dove soggiornare, consigli per la prenotazione e gemme nascoste">