 Winter Camping – An Expert’s Guide to Safe, Comfortable Cold-Weather Camping">

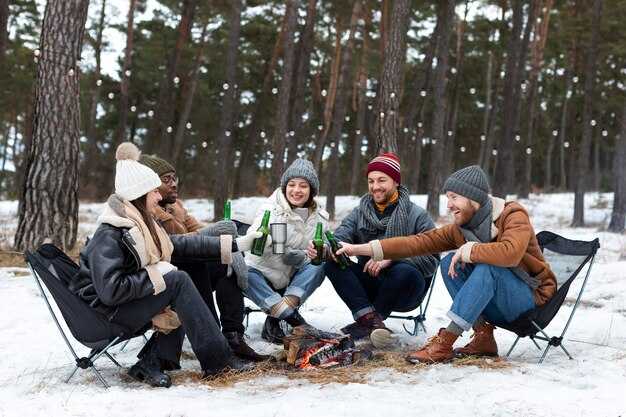
Începe cu un sistem pe trei straturi pentru fiecare ieșire pe vreme rece: a strat de bază care absoarbe umezeala, un pufos Strat intermediar pentru căldură și un strat exterior rezistent la vânt pentru a te feri de senzația de frig cauzată de vânt. Adaugă un gât obloane, o căciulă călduroasă și o pereche de mănuși. Luați cu dumneavoastră un baterie bagă-ți lanterna frontală, un aragaz compact și alege cel mai bun echilibru între greutate și izolare termică. Pentru excursii cu înnoptare, păstrează unul de rezervă haine un strat accesibil lângă cort, pentru a putea fi schimbat dacă crește umiditatea. Asigură-te că baza adăpostului tău oferă un teren solid și aranjează coverage pe toate părțile pentru a reduce pierderile de căldură în timpul rafalelor.
Aspecte legate de adăpost și echipament Alege un adăpost pentru toate cele patru anotimpuri sau o structură solidă din prelată cu ancore de zăpadă. Așează-l pe sol uscat, departe de apa provenită din topirea zăpezii, și folosește o saltea de dormit groasă pentru a bloca umezeala și a spori izolația. Fixează o apărătoare de zăpadă pentru a reduce fluxul de aer și întinde un minim de sanie pentru a căra echipamentul lângă ușă, pentru acces facil. Împachetează coverage un plan care menține sursa de foc și echipamentul de gătit în afara perimetrului principal al adăpostului, în timp ce pregătești mâncarea.
Strategie termică Gestionarea temperaturii depinde de factorul de răcire provocat de vânt și controlul umidității. Mențineți o temperatură internă constantă, îmbrăcând straturi și evitând transpirația în timpul activității; dacă umezeala scapă de pe piele, s-ar putea să vă simțiți mai frig și s-ar putea să Îngheață când te oprești. Aerul mai rece crește pierderea de căldură, așa că planifică în consecință. Ventilarea în timpul gătit ajută la reducerea acumulării de umiditate și încetinește a se topi de zăpadă din jurul adăpostului. După efort, treceți la un sac uscat și călduros și uscați haine. Rezervă atenție pentru în timpul perioadele de odihnă pe măsură ce rafalele se intensifică.
Navigație și pregătire Poartă cu tine o busolă și o hartă de încredere; planifică rute între trasee marcate și teren deschis. pregătit înseamnă un kit compact cu amnar, oglindă de semnalizare și o prelată de rezervă. dont nu valida presupunerile privind serviciul de telefonie mobilă; peterson note cu dispozitivele de testare înainte de a pleca. Dacă te abați de la traseu, păstrează un compas la îndemână și marchează-ți poziția pentru salvare. Între mese, verifică adăpostul coverage și ajustează expunerea la vânt pentru a te menține cald și include un plan care să nu te oblige să prelungești șederea când vântul se intensifică.
Gătitul și energia Plan gătit ferestre care se aliniază cu temperaturi diurne mai ridicate pentru a reduce umiditate acumulare în interiorul echipamentului. Folosiți un aragaz compact și combustibil uscat; păstrați un mic lemn cutie sau o butelie de combustibil aproape de adăpostul tău pentru a minimiza depunerile de gheață pe vase. Adu un sanie pentru a transporta combustibil și ustensile de gătit între zona aragazului și ușă. Monitorizați factorul de răcire provocat de vânt pentru a ajusta timpii de gătire și a evita supraîncălzirea combustibilului.
Listă de verificare și mentalitate Prepare a minimal gear list that includes a spare baterie pack, a reliable compas, a robust coverage plan, and a sanie for transport. Focus on the cel mai bun balance of weight and warmth, and keep în timpul breaks monitoring umiditate buildup. Acknowledge factorul de răcire provocat de vânt factors and the Îngheață risk; know when to retreat or seek shelter. Use peterson guidance to adapt to dacă conditions shift and to avoid acting on impulse that could convict you to dangerous choices.
Siguranță
Start with a three-layer torso system: moisture-wicking base, insulating mid layer, and windproof outer shell; ventilate to prevent sweat buildup; pre-warm your core by placing hot bottles wrapped in cloth inside your bag for the first hours; thats why this approach works when temperatures drop.
Choose shoes with solid traction and insulation; keep them dry and wear wool socks; between sock layers add a thin liner to minimize moisture transfer and avoid cold toes.
Prepare meals that supply energy for longer trips; pack high-calorie items like nuts, jerky, cheese, and dried fruit; hydrate with warm beverages; keep available snacks in a compact pocket to access quickly.
Shelter strategy: hang a tarp or cloths between trees to create a windbreak; roll a blanket around the sleeping area for insulation; a rooftop setup keeps you above damp ground and boosts airflow.
Drying and gear care: air out outerwear before packing; hang cloths to dry; keep a spare blanket near your body and store moisture-absorbing materials in sealed bags.
Safety planning: consult worldnomadscom for guidelines; even in alabama conditions, wind can shift quickly; check the forecast, set a short plan, and know available exits; during windy spells stay closer to protected spots.
Emergency habits: carry a whistle, headlamp, and a compact water bottle; never ignore frostbite or hypothermia signs; if you ever feel numb or stiff, act quickly; unless you adjust, exposure worsens, so monitor core feel and adapt your layers accordingly.
Layering strategies for staying warm: base, mid, and outer layers
Base first: wear a moisture-wicking base layer and add a second insulating layer, then an outer shell to trap heat; adjust with venting as needed.
The base layer should be skin-tight but not restrictive and built from wool or high-performance synthetics. Invest in quality tops and bottoms, aiming for two sets for short trips and three for longer stays. Wool, especially merino, stays warm even when damp and dries gradually, while synthetics dry quickly but may feel clammy if you sweat heavy. A simple rule is to avoid cotton next to skin; keep the underlayer right against you and change promptly when damp to prevent chill. Underwear and socks made from wool or synthetic blends reduce heat loss during movement and rest.
The second layer, or mid layer, is your main heat source during rests and halted activity. Choose a fleece or insulated synthetic that traps air but remains breathable. For moving sections, a lighter mid layer works well; for dinner breaks or overnight rests, a loftier piece adds strong warmth. Vent zippers when you’re active to prevent overheating, and add or shed pieces to maintain the right condition. In harsher environments, a compact down mid layer can serve as a changer to your comfort without bulk.
The outer shell must be windproof and water-resistant or waterproof while remaining breathable. A shell that seals well around the shoulders and torso prevents heat leakage, and using gators helps keep snow and moisture from creeping under the ankles. Cinch cuffs and a snug hood reduce drafts, and ensure you can move comfortably in moving or at rest. In places with colder nights, the outer layer should accommodate layering of the mid piece without restricting circulation, so you stay warm through extended exposure.
Practical notes: plan meals because dinner calories fuel heating during longer sessions; carry a simple toilet kit and know the best places to stop for breaks to avoid unnecessary exposure. Check regulation and registration requirements for backcountry areas, since some routes have extensive rules. Always carry a spare changer of socks and underwear, a right-sized pack for your gear, and a small heating option only where permitted and safe. This approach leads to the best balance between mobility and warmth, especially in canada or china climates, and helps you stay warm when the condition turns harsher.
Safe shelter setup in snow, wind, and cold: tents, snow walls, and windbreaks
Right-facing wind block: orient the door to the wind, open the shelter toward the lee, and anchor a snow pad under the floor. Made to withstand gusts, this setup works across a range of environments and keeps your body heat inside.
Snow walls should be 0.8–1.2 m high and 3–5 m long, stacked with staggered seams to prevent collapse. Dig a shallow doorway to minimize drafts, and carve an inner lip that redirects warm air toward the tent interior; theres also a small overhang to shed melt and condensation.
Add a windbreak 4–6 m from the shelter, made from packed snow blocks or a natural berm. Angle it 30–60 degrees to the wind to create a sheltered corridor, which extends your usable space without exposing the doorway to gusts. This simple barrier increases your comfort range and reduces heat loss when moving between camp and gear.
Ventilation matters: keep upper vents open and crack the door slightly during the day to push moisture out. Use a dry bag for cloths and keep damp items separate from sleeping gear; effective moisture control means less condensation and a warmer microclimate inside your shelter.
Cloths and warmth: dry cloths plus a blanket add reliable insulation. Pant legs tucked into socks or boots minimize exposed skin, and layering with mild, breathable fabrics helps regulate temperature without overheating. A compact sleeping system with a high R-value pad supports longer nights in cold air.
First checks: assess wind direction and the shelter’s condition before settling in. If gusts shift or the snow walls settle, seek to shore up with extra blocks and re-seat anchors to prevent wobble or gaps that let in cold air.
Power and fuel: if using a stove, keep it outside the sleeping area and vent away from the shelter. Melt water away from the tent and never burn fuel indoors. Theres always a risk of carbon monoxide buildup, so establish a safe, well-ventilated zone for heating or cooking–and have a backup plan should the wind surge.
Backpacking realities: year-round trips require a simple kit with spare cloths, a compact blanket, and a reliable fuel source. Prefer gear from respected manufacturers, and if you’re traveling through areas with variable weather or Mexico-adjacent routes, test items in advance to ensure durability and moisture resistance. Simple arrangements and careful packing prevent moisture buildup that can ruin warmth and comfort.
Recognizing hypothermia and frostbite signs and rapid response steps
Act immediately: relocate the person to a dry, windproof shelter, remove wet outerwear, and begin rewarming with dry layers and a heater if available.
Recognizing signs: hypothermia presents with shivering that may cease, confusion, slurred speech, fatigue, and a slow heartbeat. A core temperature below 35°C (95°F) requires urgent action. Frostbite shows as numb, pale or waxy skin, and hard, frozen patches on exposed areas such as fingertips, toes, ears, and the nose.
Response steps during a field incident: stay with the person and avoid leaving them alone. Move to cover or a windbreak, check breathing, and call the authority or emergency line if needed. Remove wet outerwear and replace with dry outerwear or warm liners; keep the group together and use a compass for orientation if you must move. Have a headlamp on for visibility and a packed set of warmth items within reach. Offer high-calorie treats or warm fluids if the person is conscious, and use body heat by sharing blankets. Do not rub frostbitten skin and do not rewarm if there is a high risk of refreezing.
Rewarming details: place the patient on a flat surface to maximize heat transfer; for frostbite, rewarm gradually in water around 37-39°C (98-102°F) for 15-30 minutes when possible, then cover with sterile dressings and keep the area warmer. Note melt-refreeze cycles can create slick patches; move with care. For hypothermia, replace wet clothes with dry layers, move to heat, and monitor breathing; if consciousness allows, provide small sips of warm liquids. Call for medical help if there is any doubt about severity, and plan for transport to a facility.
Prevention and planning: pack a compact kit with headlamp, mittens, liners, and high-calorie snacks; 4-season outerwear and smart layering keep body warmth. Keep room temperature stable and minimize heat loss with covers. Do not leave the most at-risk members behind; if movement is necessary, ensure everyone stays together. Instructable training modules help a group practice responses; coordinate with the authority regarding coverage and registration requirements, and carry a compass for navigation during moves. In climates like mexico, adjust pacing to avoid rapid cooling and ensure steady rewarming; conduct quick checks at rest stops to catch signs early.
Stove use and fuel safety: avoiding carbon monoxide and fire risks
Always operate stoves outdoors or in a well-ventilated shelter; never run a fuel stove inside a tent or enclosed space. Carbon monoxide hazards come without smell or taste, and most people underestimate their danger overnight. If you have a CO detector, ensure it is active and within reach; otherwise monitor for symptoms like headache or dizziness and move outside if they appear.
heres a simple, practical checklist that covers places this risk may show up, whether you are cooking for a couple or solo.
- Base and clearance: place the stove on a flat, noncombustible surface (metal tray, rock, or dedicated stand); ensure at least 1 m (3 ft) of open space from sleeping gear, cloth, and wool layers; this lowers the chances of ignition and reduces hazards.
- Ventilation: provide steady airflow; avoid sealing the shelter; if you must operate under a canopy or vestibule, keep the entrance open and maintain a steady draft so combustion gases can escape.
- Fuel handling: use the correct fuel type; keep spare containers kept in a separate, ventilated area away from heat sources; cap canisters after use; never refill inside the shelter; inspect hoses and connections for leaks before lighting.
- Ignition and operation: use long utensils; light away from your body; place pots and a kettle on stable supports; keep a thermos of hot water ready to reduce heating cycles; do not leave a stove unattended, especially overnight or during a quick break.
- Temperature and cold-weather considerations: in freezing conditions, fuels can thicken or pressure can decrease; keep canisters warm in a jacket or sock, but never place near direct flame; if you see a drop in performance, adjust heat gradually rather than forcing the system.
- Fire safety: clear the area of dry cloth, paper, and other flammables; have water or sand ready to smother any flare; know how to shut off the fuel supply quickly and test for leaks before lighting.
- Personal gear and safety: sunglasses help with glare when moving gear outdoors; wear a head covering such as a hat or hoodie; keep sleeping gear like sleeping bag and wool or fleece layers kept at a safe distance from the flame; keep utensils and cookware in waterproof containers; store a thermos with nice hot water for overnight comfort.
- După utilizare: permiteți aragazului să se răcească complet înainte de a-l împacheta; ștergeți ustensilele; verificați dacă există scurgeri sau reziduuri și asigurați-vă că toate conductele de combustibil sunt reci înainte de transport.
Navigație pe timp de iarnă și siguranța călătoriilor pe gheață: planificarea rutei și semnalizare
Planifică traseul pe timp de zi cu o hartă și o busolă actualizate, plus un dispozitiv GPS cu baterie încărcată complet și alimentare de rezervă. Nimic nu înlocuiește informarea cuiva despre planul tău și verificarea periodică; instrumentele disponibile ajută, dar nu înlocuiesc bunul simț.
Pentru a traversa gheața, e nevoie de pregătire: verifică prognoza și vântul, estimează o distanță sigură pentru traversări și stabilește o rută alternativă de-a lungul țărmului. Folosește un senzor pentru a testa grosimea la intervale; dacă auzi sunete înfundate, vezi pete umede sau gheața se mișcă, retrage-te. Ține cont de granița parcului și evită zonele cu mâzgă sau crăpături.
Poartă un kit de semnalizare: fluier, oglindă compactă și un comunicator prin satelit sau PLB. Pe timp de zi și lumină slabă, trei sunete scurte atrag atenția; marchează-ți poziția cu un panou viu colorat, dacă este posibil. Verifică întotdeauna durata de viață a bateriei; încarcă dispozitivele în prealabil și poartă baterii de rezervă. Aceste opțiuni oferă o modalitate rapidă de a solicita ajutor dacă te-ai rătăcit.
Împachetează un sistem compact de aragaz și adăpost pentru o noapte. Un aragaz menține ceaiul cald și căldura constantă; alege un adăpost călduros și o izolație confortabilă. Folosește un amestec de lână și materiale sintetice în straturile de bază și intermediare pentru variațiile de temperatură. Include șosete de rezervă și o căciulă de rezervă; nimic nu se compară cu echipamentul uscat când vântul se intensifică. Această pregătire sporește șansele de supraviețuire în condiții nefavorabile.
Pentru mobilitate, rachetele de zăpadă reduc oboseala și te ajută să te deplasezi eficient pe zăpada înghețată; testează-ți ritmul în funcție de vânt și prognoză. Dacă ai nevoie de acces cu vehiculul, poartă lanțuri și cunoaște traseul dinainte; parchează departe de maluri și de zonele predispuse la zăpadă moale. Așteaptă-te ca gheața să varieze; cumpără echipamente de la producători de încredere și verifică pachetele de baterii disponibile și alte elemente esențiale înainte de plecare. Acești pași te mențin în mișcare, sporesc speranța și îmbunătățesc șansele unei ieșiri grozave și sigure.
 Catedrala Hristos Mântuitorul din Moscova – Istorie, Arhitectură și Ghid de Vizitare">
 Top 10 Russia Holiday Destinations Beyond Moscow and St Petersburg">
 Ce să bei cu caviar – Ghidul Suprem pentru Asocieri">
 Cum se face vodka rusească – De la cereale la pahar">
 7 Destinații Ideale pentru Iubitorii de Vodcă – Tururi și Degustări">
 16 Cele mai bune berării din Moscova și beri artizanale din Rusia – Ghidul definitiv">
 Curiozități Setoase – Băuturi Răcoritoare Regionale din Europa Centrală și de Est">
 Cum să cumperi bilete de avion spre Rusia și să zbori în Rusia cu un card străin">
 Pescuitul la copcă în Rusia – Ghidul suprem al pescuitului la gheață">
 Hoteluri din Rusia – Cele mai bune locuri de cazare, sfaturi de rezervare și comori ascunse">