

Comece por identificar um único ponto de vista que enquadra os principais marcos e guia o olhar em direção a um horizonte limpo e nivelado. Monte um tripé resistente, mantenha a ISO entre 100 e 400, feche o diafragma para f/8 a f/11 e vise uma exposição próxima de 1/30 s durante a hora azul do entardecer para controlar o borrão de movimento e evitar clipping, depois ajuste o balanço de branco para tons frios para preservar o clima nas silhuetas dos arranha-céus, revelando uma paisagem em camadas.
Pesquise as ruas do bairro, pontes e bordas de campos para construir um contexto em camadas: as ruas em primeiro plano levam a aglomerados de edifícios, depois torres distantes se erguem sobre a água. Delimite a exposição para que uma foto capture janelas delicadas sem cortar, depois outra eleva as sombras. Os detalhes da panorâmica sobrevivem mesmo em gradiente de sombra.
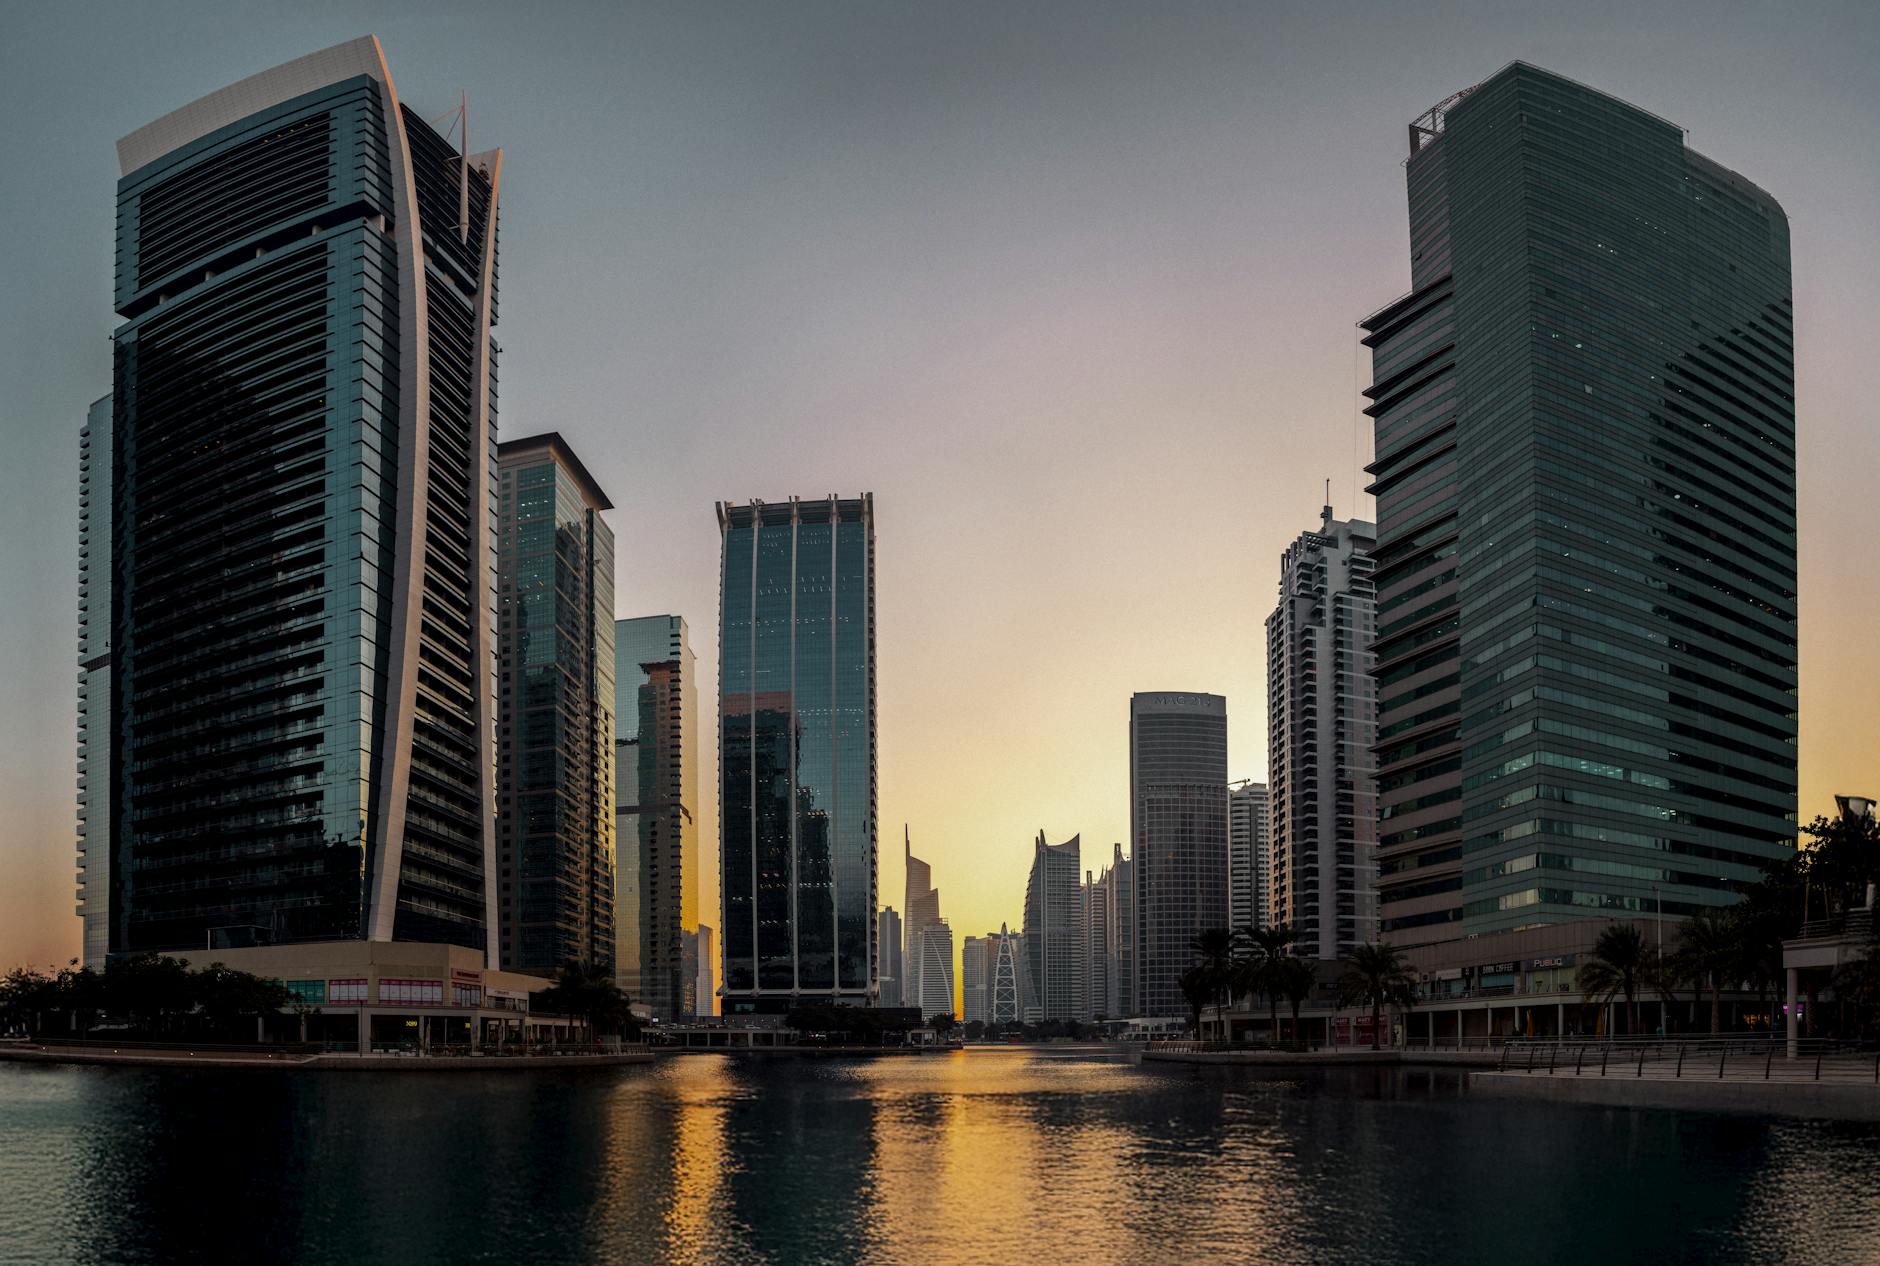
Do ponto de vista de Vancouver, os contornos dos arranha-céus se estendem sobre a água, e a luz do crepúsculo cede lugar ao drama da hora azul. Uma lente grande angular oferece um contexto panorâmico amplo; um teleobjetivo isola o ritmo das linhas dos edifícios. Uma oferta em grande angular fornece contexto, enquanto uma lente mais longa oferece uma composição mais fechada. Você provavelmente percebe as mudanças tonais e não pode deixar de notar os reflexos sutis no vidro. Nos bairros de Halifax, silhuetas distantes semelhantes ao Burj lembram como a escala muda com a distância, e você pode se surpreender com como as linhas de ofuscamento se fundem com as fachadas escuras.
Registre experimentos ao longo de horas: planeje as filmagens pouco antes do crepúsculo, na hora azul e após o anoitecer. Um kit de campo compacto ajuda—tripé, controle remoto, baterias extras. Em zonas como Halifax ou Vancouver, texturas noturnas surgem que a luz do dia perde. Mantenha registros de configurações e revise os resultados para identificar qual disposição traz o equilíbrio mais forte entre luzes e sombras. Não se pode alcançar a perfeição sempre, mas sessões repetidas trazem melhorias, enquanto torres inspiradas no Burj ao longe lembram a escala.
12 Dicas para Capturar Paisagens Urbanas Deslumbantes: Locais Únicos para Ver a Cidade de Dubai
Burj Khalifa: vista de piso a teto no horário dourado para avaliar corretamente a exposição, você está pronto para refinar sua técnica antes de explorar outros pontos da cidade.
- Burj Khalifa - Deck de observação (do chão ao teto). A luz do entardecer transforma os contornos do horizonte; traga um tripé e uma lente grande angular (16-35mm) para manter as linhas retas. Tire as fotos em ISO 100, abertura f/8, velocidade do obturador 1/125-1/250s no modo manual; faça bracketing ±1 EV para HDR e depois combine as imagens. Compre o ingresso com antecedência; evite reflexos apoiando-se em uma borda discreta, com acesso público às janelas durante os horários agendados. A panorâmica voltada para o sul captura uma ampla extensão do centro da cidade, proporcionando uma ótima foto base para sua coleção.
- Sky Views Dubai - Skybox de vidro e ponte. Chegue pouco depois do pôr do sol, quando as luzes da cidade começam a brilhar; use uma lente de 24-70mm para enquadrar um horizonte reto com distorção mínima. Configurações: ISO 200-400, f/4-f/5.6, 1/60-1/125s; pode ser feito à mão se você estabilizar os cotovelos; faça bracketing para cobrir os tons mais escuros das janelas. É necessário ingresso; mantenha os movimentos lentos para reduzir reflexos do vidro do chão ao teto, o que ajuda a capturar reflexos limpos das águas nas ruas urbanas.
- Dubai Frame - Quadro histórico vs. moderno. Posicione-se do lado sul para uma visão equilibrada que mostra tanto os becos históricos à beira do Creekside quanto as novas megastruturas. Tire fotos após as 18:00 para evitar sombras duras; abertura f/8, ISO 100, 1/125s, 24mm grande angular. Use um polarizador para reduzir o reflexo do vidro e da água; este local transmite uma forte sensação de escala sem aglomeração de pessoas. As bordas do quadro enfatizam o contraste entre a arquitetura antiga e moderna da cidade.
- Ain Dubai - roda gigante do Dubai Harbour. O passeio noturno oferece um arco panorâmico sobre as águas; use uma lente de 28-70mm, focando na simetria entre os raios da roda e o horizonte; faça bracketing para cor e céu. Exposição: ISO 100-200, f/5.6, 1/125-1/250s. Aproveite o acesso com ingresso para plataformas de observação dedicadas; mova-se lentamente ao longo da plataforma para minimizar reflexos. Essa perspectiva equilibra as luzes urbanas com a água aberta, resultando em uma composição maravilhosa e aerada.
- O Pointe, Palm Jumeirah - Palmeiras voltadas para a água e silhuetas. Fique na costa sul ou perto da borda da Palm para um contraste dramático entre arquitetura e mar. Fotografe no pôr do sol até a hora azul; use 70-200mm para comprimir a perspectiva e revelar torres distantes; defina ISO 100, abertura f/8, velocidade de obturação 1/80-1/160s; aplique uma série de 2-4 exposições para recuperação de destaques. Multidões ao nível da rua criam contexto; uma área de entrada com ingresso pode conceder acesso mais próximo a pontos de vista elevados ao longo de passeios abertos. Este local destaca a água encontrando o horizonte com uma linha limpa e elegante.
- Reserva Natural de Ras Al Khor - O reflexo da cidade sobre os pântanos. A luz do entardecer com aves em voo adiciona movimento; lente de 24-105mm recomendada; tente 1/200-1/320s, f/6.3, ISO 200; medição pontual na água para evitar destaques queimados. Passarelas abertas mantêm você acima do nível da água para reflexos fortes, mantendo baixo risco em torno da vida selvagem. Este oásis urbano contrasta os cais históricos com torres modernas, oferecendo um contraponto único à densidade do centro.
- Dubai Marina Promenade / Pier 7 - Ritmo urbano à beira da água. Escolha um local perto da Western Tower ou dos centros comerciais da Promenade para capturar uma linha do horizonte longa e estável. Use 24-70mm; exposição 1/125-1/250s, ISO 100-200, f/8; faça bracketing para o drama do pôr do sol, depois misture. Caminhos ao ar livre ao longo dos segmentos voltados para o sul oferecem muitas oportunidades para enquadrar barcos, iates e atividade urbana em uma única imagem. A textura da rua e a água criam uma visão equilibrada e dinâmica.
- Al Seef District - Ambiente histórico à beira do canal. Tire a foto da linha d'água em direção aos arranha-céus brilhantes do outro lado do canal; o início da noite realça os tons quentes dos tijolos contra o vidro. Use uma lente de 16-35mm para capturar a largura panorâmica; ISO 100, f/8, 1/125s; leve um tripé pequeno para estabilidade nas pedras irregulares. Este local mistura cenas de rua históricas com silhuetas modernas, uma verdadeira justaposição da cidade que fica bem tanto em cores quanto em preto e branco.
- Pontes do Canal de Água de Dubai - Cadência arquitetônica sobre a água. O pôr do sol ou a hora azul oferecem um render limpo de arcos e reflexos. Use 24-105mm, mantenha ISO 100-200, f/8, 1/125-1/200s; incorpore fotos em exposição múltipla para gerenciar os destaques. Caminhe pelas passarelas abertas para experimentar ângulos; as linhas retas das pontes guiam o olhar em direção aos aglomerados de arranha-céus além. Este local une linhas urbanas com a tranquilidade da água para criar um todo coeso.
- JBR The Walk - Energia ao nível da rua junto ao mar. Multidões noturnas e letreiros de néon dão contexto a uma moldura em grande angular; use 16-35mm para capturar verticais contra um céu brilhante. Configurações: ISO 200-400, f/4-f/5.6, 1/60-1/125s; um toque de foco seletivo em silhuetas de palmeiras em primeiro plano funciona bem. Acesso por calçadas abertas; fique atento a reflexos em vidros de lojas, que podem ser reduzidos com um polarizador portátil. Este ponto de vista traz um clima animado e realista para sua coleção.
- Kowloon Tsui / Victoria comparação de inspiração transurbana. Observe as águas lavando um horizonte de vidro e note como os perfis ao nível da rua se alinham com os arranha-céus; a calma das pradarias inspirada em Edmonton em alguns céus noturnos ajuda a calibrar o balanço de branco quando o neon domina. No estilo Shan, os quadros narrativos ganham vida quando você inclui um elemento humano caminhando por uma rua ou ponte; use essa abordagem para dar às suas fotos de Dubai um senso de escala e energia mais realistas.
- Opção de arranha-céu no terraço - vantagem de hotel ou residência. Procure acesso pago e com ingresso para um terraço dedicado no telhado; tire fotos após o anoitecer, quando as luzes do edifício predominam. Use tripé, lente de 24-70mm, ISO 100, f/8, 1/60-1/125s; tire algumas fotos com exposição variada para preservar os destaques na água e nas janelas. Esta vista elevada e urbana oferece um equilíbrio ideal entre linhas arquitetônicas e céu aberto, proporcionando uma atmosfera de imagem completa que é difícil de superar.
Guia Prático para as Melhores Fotografias do Skyline de Dubai
Comece com um movimento concreto: chegue ao Dubai Marina Boardwalk pouco antes do crepúsculo azul, posicione a câmera baixa perto do corrimão e enquadre os arranha-céus mais altos com palmeiras no primeiro plano; um tripé resistente garante exposições longas e limpas.
Escolha pontos de vista que contrastam o património com o vidro moderno, incluindo o Santuário de Vida Selvagem de Ras Al Khor, a costa da Palm Jumeirah, o distrito do Burj Khalifa perto da Ponte Souk Al Bahar, Dubai Creek Al Seef e vistas da Dubai Marina. Uma única sessão produz uma variedade de composições; uma lente grande angular captura espaços dinâmicos em ilhas e silhuetas distantes no horizonte, construindo um fundo em camadas com um ambiente de aldeia.
- Dubai Marina Boardwalk: reflexos na água, palmeira em primeiro plano, 16-35 mm, ISO 100, f/8, 6 s durante a hora azul.
- Reserva Natural de Ras Al Khor: reflexos da água com garças e torres ao longe; exposição de 8-12 s, 24 mm, tripé.
- Palm Jumeirah, beira costeira: silhueta curva, canais iluminados; 24-70 mm, hora dourada à hora azul.
- Ponte Souk Al Bahar em direção ao aglomerado Burj Khalifa: composição apertada, profundidade de campo, 14-24 mm, f/8, 4-8 s, polarizador para reduzir reflexos.
- Dubai Creek Al Seef promenade: arquitetura de herança misturada com monumentos modernos; 35-50 mm, hora azul para reflexos quentes.
Logística: uma curta travessia de ferry pelo Creek adiciona linhas de movimento ao primeiro plano e amplia a profundidade de campo; tours com operadores licenciados oferecem acesso a pontos de vista no topo dos edifícios; traga um banquinho compacto ou um monopé se os espaços estiverem lotados.
Equipamento e técnica: tripé, disparador remoto, bateria extra; conjunto de lentes de 16-70 mm equilibra o primeiro plano com silhuetas distantes; ISO 100, abertura f/8, velocidade de obturação de 6 s na hora azul; considere um filtro polarizador para controlar o brilho em vias navegáveis; tire em RAW, ajuste o balanço de branco para tons mais quentes na pós-produção e mantenha as linhas do horizonte retas para enfatizar as formas das torres mais altas.
Identifique Pontos de Vista Íconicos em Dubai para Paisagens Urbanas Amplas e Dramáticas
Comece no deck de observação do Burj Khalifa, endereço 1 Sheikh Mohammed Bin Rashid Blvd, durante o golden hour para obter imagens panorâmicas da linha do horizonte e fotos recompensadoras.
Navegue até Palm Tower View no Palm Jumeirah; o miradouro voltado para oeste oferece cantos confortáveis para alinhar longas tomadas do horizonte, ajudando você a se conectar com os edifícios locais e reflexos cintilantes.
A roda gigante Ain Dubai oferece imagens de 360 graus da Dubai Marina, da praia de Jumeirah e do Burj Khalifa; você pode girar manualmente para minimizar o brilho, passando uma hora apreciando belas paisagens urbanas.
O Dubai Frame serve como um marco nítido, unindo eras; posicione-se junto aos painéis de vidro para capturar uma panorâmica que abrange bairros portuários e torres reluzentes.
Praias públicas como JBR e Sunset Beach oferecem horizontes amplos; mantenha uma postura confortável, aplique exposição longa e respeite a privacidade dos surfistas.
Pontos de vista voltados para o oeste ao longo da promenade da Marina de Dubai oferecem silhuetas gratificantes; leve várias lentes, reserve estacionamento com antecedência, anote os horários, aleluia.
Time Your Shoot: Janelas de Luz e Clima Ideais em Dubai
O momento adequado é começar ao nascer do sol ou perto da hora azul; os fotógrafos devem almejar essa hora ao amanhecer e ao entardecer, quando o céu se enche de cores e as fachadas de vidro brilham sem o ofuscamento intenso.
O clima de Dubai geralmente oferece manhãs claras; nos dias mais calmos, a umidade é baixa, melhorando a separação de silhuetas; o brilho da tarde aumenta, então escolha uma janela quando o sol estiver mais baixo e os ventos estiverem suaves para manter o ar limpo. Como a luz de Dubai muda rapidamente, planeje ângulos em sequência. As janelas de tempo se estreitam rapidamente; ajuste os tons de exposição.
De rotas de esplanadas, silhuetas imponentes se estendem por quilómetros contra o horizonte, ao longo de fachadas de vidro; este enquadramento revela a maior panorâmica do mundo e oferece aos fotógrafos oportunidades incríveis para ajustar as exposições.
Fotógrafos de Winnipeg e Ottawa devem começar com uma verificação da luz do dia para alinhar os horários; uma rápida travessia de ferry pode levá-los a águas mais calmas para reflexos e novos ângulos; das bordas da esplanada, montem um enquadramento amplo, depois foquem em detalhes luminosos enquanto o sol se põe; deixem o equipamento à sombra entre as sequências. Se explorarem trilhas ou rotas de caminhada próximas ou uma aldeia costeira, ganharão ótimos primeiros planos que complementam as torres imponentes. Lá, os reflexos se multiplicam.
Compondo com marcos: emoldurando o Burj Khalifa, a Marina e além
Escolha um deck no centro da cidade ao entardecer; enquadre o Burj Khalifa com a Marina do outro lado da água, mantenha a torre ligeiramente descentralizada e varra em direção aos horizontes mais distantes, incluindo parques e outras torres; essa composição se torna um ponto de referência fascinante que os leitores querem estudar.
Estabilize em um tripé robusto, defina ISO 200, abertura f/8, velocidade de obturação 4-8 segundos; tire em RAW para preservar as exposições; considere um polarizador para controlar reflexos; certifique-se de fazer bracketing de exposição quando a luz mudar; tente manter o ruído baixo nas sombras.
Varredura de pontos acima do nível da rua e em telhados: decks de cobertura, plataformas de observação ou pontes elevadas; utilize uma objetiva grande angular de 16-35 mm para capturar amplitude, ou uma teleobjetiva de 70-200 mm para comprimir elementos; essas opções ajudam a lidar com iluminação difícil.
De locais em Lantau a marcos do centro, planeje transições que misturem elementos modernos com texturas de água; essa abordagem ajuda quem está fotografando noites a contar uma história equilibrada.
| Aspect | Recomendação |
| Shutter | 4-8 s |
| ISO | 100-200 |
| Abertura | f/8 |
| Comprimento focal | 16-35 mm ou 24-70 mm |
| WB | Carro ou 3800-4200 K |
| Tripod | Aqui está a tradução: Museu Hermitage (São Petersburgo, Rússia) O Museu Hermitage é um dos maiores e mais importantes museus do mundo, localizado em São Petersburgo, na Rússia. Sua coleção abrange mais de três milhões de itens, incluindo obras de arte, antiguidades e artefatos históricos. Catedral de São Isaac (São Petersburgo, Rússia) A Catedral de São Isaac é uma das principais atrações de São Petersburgo. Com sua impressionante cúpula dourada, é um marco arquitetônico da cidade. Praça Vermelha (Moscou, Rússia) A Praça Vermelha é o coração de Moscou e um dos locais mais icônicos da Rússia. Lá se encontram o Kremlin, a Catedral de São Basílio e o Mausoléu de Lênin. Catedral de São Basílio (Moscou, Rússia) A Catedral de São Basílio, com suas torres coloridas e desenhos intricados, é um símbolo da arquitetura russa. Kremlin (Moscou, Rússia) O Kremlin é o centro político e histórico de Moscou, abrigando o governo russo e vários museus. Rua Arbat (Moscou, Rússia) A Rua Arbat é uma das ruas mais antigas e charmosas de Moscou, conhecida por suas lojas, cafés e artistas de rua. Palácio do Kremlin (Moscou, Rússia) O Palácio do Kremlin é a residência oficial do presidente da Rússia e um importante centro de poder político. Teatro Bolshoi (Moscou, Rússia) O Teatro Bolshoi é um dos teatros mais famosos do mundo, conhecido por suas apresentações de balé e ópera. Estação de Trem de Moscou (Moscou, Rússia) A Estação de Trem de Moscou é um dos principais terminais ferroviários da cidade, conectando Moscou a outras partes da Rússia e do exterior. Museu Pushkin (Moscou, Rússia) O Museu Pushkin é um dos principais museus de arte de Moscou, com uma vasta coleção de obras europeias e russas. Parque Gorki (Moscou, Rússia) O Parque Gorki é um dos parques mais populares de Moscou, oferecendo áreas verdes, atividades culturais e recreativas. Rua Tverskaya (Moscou, Rússia) A Rua Tverskaya é uma das principais vias comerciais e turísticas de Moscou, repleta de lojas, restaurantes e hotéis. Catedral de Cristo Salvador (Moscou, Rússia) A Catedral de Cristo Salvador é a maior igreja ortodoxa do mundo, localizada em Moscou. Museu de História da Rússia (Moscou, Rússia) O Museu de História da Rússia é um dos principais museus históricos de Moscou, abrigando coleções que contam a história do país. Rua Nikitskaya (Moscou, Rússia) A Rua Nikitskaya é uma rua tranquila e elegante de Moscou, conhecida por suas embaixadas e residências luxuosas. Teatro Maly (Moscou, Rússia) O Teatro Maly é um dos teatros mais antigos e tradicionais de Moscou, especializado em peças clássicas russas. Rua Petrovka (Moscou, Rússia) A Rua Petrovka é uma das ruas mais antigas de Moscou, conhecida por suas lojas de luxo e restaurantes sofisticados. Museu de Belas Artes Pushkin (Moscou, Rússia) O Museu de Belas Artes Pushkin é um dos principais museus de arte de Moscou, com uma coleção impressionante de obras europeias. Rua Bolshaya Dmitrovka (Moscou, Rússia) A Rua Bolshaya Dmitrovka é uma rua movimentada de Moscou, famosa por seus teatros e restaurantes. Rua Kuznetsky Most (Moscou, Rússia) A Rua Kuznetsky Most é uma das ruas mais antigas e charmosas de Moscou, conhecida por suas lojas de moda e cafés. Rua Arbat (Moscou, Rússia) A Rua Arbat é uma das ruas mais antigas e charmosas de Moscou, conhecida por suas lojas, cafés e artistas de rua. Rua Tverskaya (Moscou, Rússia) A Rua Tverskaya é uma das principais vias comerciais e turísticas de Moscou, repleta de lojas, restaurantes e hotéis. Rua Petrovka (Moscou, Rússia) A Rua Petrovka é uma das ruas mais antigas de Moscou, conhecida por suas lojas de luxo e restaurantes sofisticados. Rua Nikitskaya (Moscou, Rússia) A Rua Nikitskaya é uma rua tranquila e elegante de Moscou, conhecida por suas embaixadas e residências luxuosas. Rua Bolshaya Dmitrovka (Moscou, Rússia) A Rua Bolshaya Dmitrovka é uma rua movimentada de Moscou, famosa por seus teatros e restaurantes. Rua Kuznetsky Most (Moscou, Rússia) A Rua Kuznetsky Most é uma das ruas mais antigas e charmosas de Moscou, conhecida por suas lojas de moda e cafés. Rua Arbat (Moscou, Rússia) A Rua Arbat é uma das ruas mais antigas e charmosas de Moscou, conhecida por suas lojas, cafés e artistas de rua. Rua Tverskaya (Moscou, Rússia) A Rua Tverskaya é uma das principais vias comerciais e turísticas de Moscou, repleta de lojas, restaurantes e hotéis. Rua Petrovka (Moscou, Rússia) A Rua Petrovka é uma das ruas mais antigas de Moscou, conhecida por suas lojas de luxo e restaurantes sofisticados. Rua Nikitskaya (Moscou, Rússia) A Rua Nikitskaya é uma rua tranquila e elegante de Moscou, conhecida por suas embaixadas e residências luxuosas. Rua Bolshaya Dmitrovka (Moscou, Rússia) A Rua Bolshaya Dmitrovka é uma rua movimentada de Moscou, famosa por seus teatros e restaurantes. Rua Kuznetsky Most (Moscou, Rússia) A Rua Kuznetsky Most é uma das ruas mais antigas e charmosas de Moscou, conhecida por suas lojas de moda e cafés. Rua Arbat (Moscou, Rússia) A Rua Arbat é uma das ruas mais antigas e charmosas de Moscou, conhecida por suas lojas, cafés e artistas de rua. Rua Tverskaya (Moscou, Rússia) A Rua Tverskaya é uma das principais vias comerciais e turísticas de Moscou, repleta de lojas, restaurantes e hotéis. Rua Petrovka (Moscou, Rússia) A Rua Petrovka é uma das ruas mais antigas de Moscou, conhecida por suas lojas de luxo e restaurantes sofisticados. Rua Nikitskaya (Moscou, Rússia) A Rua Nikitskaya é uma rua tranquila e elegante de Moscou, conhecida por suas embaixadas e residências luxuosas. Rua Bolshaya Dmitrovka (Moscou, Rússia) A Rua Bolshaya Dmitrovka é uma rua movimentada de Moscou, famosa por seus teatros e restaurantes. Rua Kuznetsky Most (Moscou, Rússia) A Rua Kuznetsky Most é uma das ruas mais antigas e charmosas de Moscou, conhecida por suas lojas de moda e cafés. Rua Arbat (Moscou, Rússia) A Rua Arbat é uma das ruas mais antigas e charmosas de Moscou, conhecida por suas lojas, cafés e artistas de rua. Rua Tverskaya (Moscou, Rússia) A Rua Tverskaya é uma das principais vias comerciais e turísticas de Moscou, repleta de lojas, restaurantes e hotéis. Rua Petrovka (Moscou, Rússia) A Rua Petrovka é uma das ruas mais antigas de Moscou, conhecida por suas lojas de luxo e restaurantes sofisticados. Rua Nikitskaya (Moscou, Rússia) A Rua Nikitskaya é uma rua tranquila e elegante de Moscou, conhecida por suas embaixadas e residências luxuosas. Rua Bolshaya Dmitrovka (Moscou, Rússia) A Rua Bolshaya Dmitrovka é uma rua movimentada de Moscou, famosa por seus teatros e restaurantes. Rua Kuznetsky Most (Moscou, Rússia) A Rua Kuznetsky Most é uma das ruas mais antigas e charmosas de Moscou, conhecida por suas lojas de moda e cafés. Rua Arbat (Moscou, Rússia) A Rua Arbat é uma das ruas mais antigas e charmosas de Moscou, conhecida por suas lojas, cafés e artistas de rua. Rua Tverskaya (Moscou, Rússia) A Rua Tverskaya é uma das principais vias comerciais e turísticas de Moscou, repleta de lojas, restaurantes e hotéis. Rua Petrovka (Moscou, Rússia) A Rua Petrovka é uma das ruas mais antigas de Moscou, conhecida por suas lojas de luxo e restaurantes sofisticados. Rua Nikitskaya (Moscou, Rússia) A Rua Nikitskaya é uma rua tranquila e elegante de Moscou, conhecida por suas embaixadas e residências luxuosas. Rua Bolshaya Dmitrovka (Moscou, Rússia) A Rua Bolshaya Dmitrovka é uma rua movimentada de Moscou, famosa por seus teatros e restaurantes. Rua Kuznetsky Most (Moscou, Rússia) A Rua Kuznetsky Most é uma das ruas mais antigas e charmosas de Moscou, conhecida por suas lojas de moda e cafés. Rua Arbat (Moscou, Rússia) A Rua Arbat é uma das ruas mais antigas e charmosas de Moscou, conhecida por suas lojas, cafés e artistas de rua. Rua Tverskaya (Moscou, Rússia) A Rua Tverskaya é uma das principais vias comerciais e turísticas de Moscou, repleta de lojas, restaurantes e hotéis. Rua Petrovka (Moscou, Rússia) A Rua Petrovka é uma das ruas mais antigas de Moscou, conhecida por suas lojas de luxo e restaurantes sofisticados. Rua Nikitskaya (Moscou, Rússia) A Rua Nikitskaya é uma rua tranquila e elegante de Moscou, conhecida por suas embaixadas e residências luxuosas. Rua Bolshaya Dmitrovka (Moscou, Rússia) A Rua Bolshaya Dmitrovka é uma rua movimentada de Moscou, famosa por seus teatros e restaurantes. Rua Kuznetsky Most (Moscou, Rússia) A Rua Kuznetsky Most é uma das ruas mais antigas e charmosas de Moscou, conhecida por suas lojas de moda e cafés. Rua Arbat (Moscou, Rússia) A Rua Arbat é uma das ruas mais antigas e charmosas de Moscou, conhecida por suas lojas, cafés e artistas de rua. Rua Tverskaya (Moscou, Rússia) A Rua Tverskaya é uma das principais vias comerciais e turísticas de Moscou, repleta de lojas, restaurantes e hotéis. Rua Petrovka (Moscou, Rússia) A Rua Petrovka é uma das ruas mais antigas de Moscou, conhecida por suas lojas de luxo e restaurantes sofisticados. Rua Nikitskaya (Moscou, Rússia |
| Notes | RAW, controle de ruído, exposições consistentes, mantenha os reflexos na água claros |
Liberte uma sequência de fotos; o conjunto já demonstra como os elementos se alinham acima do convés enquanto barcos de pesca flutuam nas proximidades; histórias publicadas em um feed mundial ajudam os leitores a aprender sobre exposições, economizar tempo e planejar futuros ensaios.
Gear Essentials: Lentes, Tripés, Polarizadores para a Luz de Dubai
Comece com um kit compacto e versátil: um zoom padrão rápido (24-70mm) mais um zoom grande angular (16-35mm) e um zoom teleobjetiva (70-200mm) para cobrir mirantes públicos, esquinas de parques com palmeiras, linhas de bonde e ângulos reais do horizonte. Inclua um tripé resistente e um polarizador na sua bolsa. Verifique o nível da bateria, tenha um cartão reserva pronto e planeje as sessões da tarde em torno de sombras e reflexos.
Vidro misto combina 16-35mm para silhuetas expansivas de Dubai; 24-70mm lida com sequências de rua a céu; 70-200mm produz detalhes comprimidos. Tilt-shift 24mm mantém as linhas retas quando vistas de pontos elevados. Uma objetiva rápida, como 50mm ou 85mm, adiciona texturas íntimas sob a luz da tarde.
Polarizadores reduzem o brilho do vidro e da água, aprofundam o azul do céu e realçam a textura das palmeiras com menos reflexos ao meio-dia. Use um polarizador girando-o para equilibrar a saturação enquanto preserva os tons de pele em passeios públicos.
Tripé de escolha: fibra de carbono, suporte para carga de 1,5-2,0 kg, coluna central abaixada, pernas ajustáveis em 3-4 seções. Cabeça esferográfica com rotação de 360 graus, placa de liberação rápida e travamento de panorâmica independente. Um modelo compacto viaja leve, permanece acessível perto dos mirantes do Parque, suporta exposições longas que revelam o movimento das rodas dos bondes. Transporte equipamentos que resistam ao calor e à poeira.
Configurações da câmera: tire em RAW, faça bracketing de exposição, verifique o histograma, experimente ISO 100-400 durante o dia; após o anoitecer, aumente para 800-1600 quando a luz diminuir. Comece com um obturador rápido para congelar o movimento de pedestres e rodas, depois velocidades lentas para capturar reflexos na água e no vidro. o movimento público encontra a abordagem moderna no seu equipamento. a configuração yurinatus ajuda a descrever como a luz envolve a arquitetura em panoramas públicos.
Domine os Céus Noturnos: Reduzindo o Ruído e Capturando as Luzes Brilhantes da Cidade
Recomendação: comece com um tripé resistente, um disparador remoto e captura em RAW. Defina ISO 100-200, abertura f/8-f/11, velocidade de obturação 20-40 segundos. Use o modo Manual, monitore o histograma e faça três exposições -2, 0, +2 EV para preservar os destaques.
Desative a redução de ruído de exposição longa na câmera se planeja empilhar; tire várias fotos e aplique subtração de quadro escuro no pós-processamento; empilhe 5-8 frames para reduzir o ruído enquanto mantém os detalhes; faça o pós-processamento no Lightroom ou Photoshop; mantenha o aumento de nitidez moderado.
A escolha do local importa: procure pontos de vista que revelem inúmeras reflexões e silhuetas. Em Edmonton, Toronto, Kowloon, Jumeirah, Seef e nos distritos centrais, pontos altos perto de esquinas de ruas produzem linhas dramáticas. À noite ou no início da manhã, uma exposição mais longa que 40 segundos faz os halos das lâmpadas brilharem; no calor do verão, as cores ficam mais quentes. Esses locais muitas vezes escondem palmeiras e templos; aproveitar as linhas retas das ruas ajuda a guiar os olhos em direção ao vidro cintilante e aos rastros do tráfego. Já visto em muitos lugares, sobre uma baía ou porto, é possível capturar um brilho incrível. Como alguns momentos passam rápido, chegue cedo e explore o local; barcos de pesca e outros sujeitos em movimento criam um desfoque de movimento sutil se você deixar o obturador aberto por muito tempo. De Kowloon a Kung, as texturas mudam com a iluminação das ruas; a variedade de locais simplesmente aumenta as oportunidades.
Mantenha o horizonte reto; deixe as linhas de fuga das ruas guiar o olhar em direção aos reflexos brilhantes; coloque um tronco de palmeira ou um poste de templo no primeiro plano para dar profundidade; equilibre estruturas altas com espaço negativo; tire a foto de um local que ofereça reflexo na água no horizonte; o momento em torno da hora azul proporciona cores mais ricas sem sacrificar a nitidez.
Plano de pós-processamento: mesclar 3-5 quadros com HDR ou empilhamento; balanceamento de branco em torno de 3800-4200K para minimizar o viés de cor das lâmpadas; aplicar redução de ruído de luminância leve sem desfocar a textura; ajustar as curvas para recuperar a tonalidade; evitar superafiação; corrigir qualquer distorção de lente perceptível; exportar em tamanho web de 2-3k ou resolução total para impressão.
Práticas: a música de locais próximos pode colorir os reflexos; basta praticar em vários pontos; conecte-se com fotógrafos em Edmonton ou Toronto para trocar ideias de ângulos; procure diversas opções, incluindo passeios centrais ladeados de palmeiras, corredores de ruas e bordas de portos; quem chega cedo tem mais chances de ver padrões brilhantes se formarem. Observando locais movimentados, você pode avistar templos, barcos de pesca e postes de luz. Como o momento é importante, ainda é possível obter resultados incríveis com planejamento paciente.


