 Cele mai bune locuri pentru drumeții cu rachete de zăpadă – Destinații de top pentru iarnă">

Start here: Kick off your season with a week in the sayan highlands, where easy loops and well-marked paths suit families that love exploring together. Often the snow endures for months from December through February, delivering reliable conditions for short treks. Take a simple map, pack pants and warm layers, and plan a lunch break at a cozy restaurant before the kids tire out.
Beyond the Sayan, other regions offer different landscapes: forested ravines, open meadows, and ridgelines that slow pace and reward with views. Some locales offer cable access to trailheads, easing younger participants into longer routes. In ruso-speaking zones, guides and maps can be bilingual, making exploration smoother for first-timers. Look for routes with clear markers and frequent rest stops, while families split duties so one adult takes the lead, another keeps exploring with the kids, and a third carries snacks and a small first-aid kit.
après-ski culture matters for balance and motivation: many bases offer restaurants with simple menus, hot drinks, and warm lounges. For an activelifestyle vibe, choose locales that are suitable for beginners and intermediates, with short loops and longer options as skills grow. Some spots even host kid-friendly night walks, keeping the pace gentle and the focus on enjoying the outdoors rather than chasing distance.
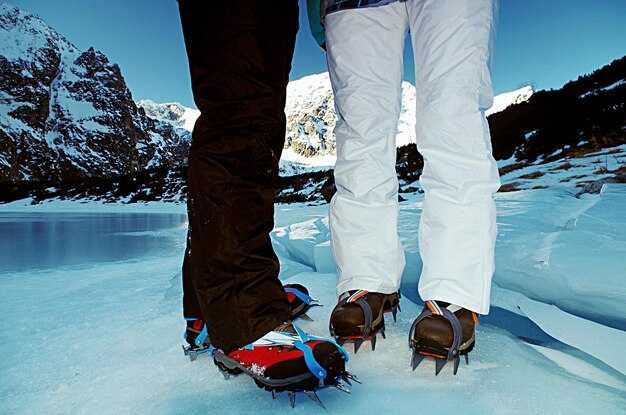
Equipment and conditions data help you plan: in the core months, snow depth commonly ranges from 40 to 70 cm on mid-mountain trails, and temperatures hover around -5 to -15 C in the morning, moderating by afternoon. Take waterproof pants, insulated layers, and sturdy boots, plus gaiters to keep snow out of boots. Hotels and lodges frequently offer guided tours and rentals, yielding offers that are suitable for first-timers and returning explorers alike.
Practical tips for families: pick locations with short, forgiving routes and clear signage, and dress kids in layers with waterproof pants. Ensure you have a reliable map, a small first-aid kit, and a lightweight shelter; take regular breaks at cozy cafés that serve simple meals. ضرووووووووووي to confirm the day’s forecast and trail conditions before you set out, and look for restaurants offering easy meals after the trek.
Dolomites Italy: Snowshoeing Top Trails and Tips
Begin on the Seceda ridge loop for a concise, well-rounded intro to snow activities in the Dolomites; a five-km circuit with about 300 m of ascent, typically 2.5–3.5 hours on snow that packs well, with sunny mornings maximizing views.
Cinque Torri loop (6–7 km, 350 m gain) delivers a stunning alpine amphitheater of granite walls; access from Falzarego Pass, with rifugi there serving hot drinks; plan around 3 hours and keep an eye on frost at higher faces.
Sella Pass circuits (5–8 km, 300–550 m) offer broad panoramas across the alps and the Odle spires; start early to catch the best light; on firmer snow, crampons are a must, and always carry equipment such as map, beacon and extra layers.
Gear and clothing essentials: pants that wick and insulate, a waterproof shell, and a compact daypack; bring a lightweight helmet only if you intend to roam near exposed ridges; a pair of crampons for variable snow; always include a headlamp and extra batteries for late finishes; huts and hotels nearby provide warming stops, making it feasible to camp for a longer excursion if you want a true multi-day rhythm.
Safety and planning: hire an expert guide for unfamiliar terrain; theyre often the safest option on steeper slopes; check current snow conditions and avalanche forecasts; book through well-known hotels near Cortina, Ortisei or Arabba to secure access and transport; there are five main routes around the Sella and Odle groups that remain popular even on weekends.
Broader travel notes: sources from transylvania, cheget and ergaki sometimes contrast with elbrus experiences, offering perspective on cold-season trekking; exodus of visitors from urban centers turns the Dolomites into a quiet, well-structured place, especially if you stay in hotels and camp near rifugios; rusiadeelenaa and nikkismirnov post practical tips, while nakhazo threads focus on sunrise capture, camera settings and enjoying the morning light; with the right equipment and a patient guide, the payoff is stunning: the five towers against a blue sky, a moment you’ll want to capture and relive, often repeated by seasoned experts who know the route well.
Beginner-Friendly Dolomites Snowshoe Trails
Recommendation: Begin with Seiser Alm (Alpe di Siusi) for a 4–6 km loop with a 60–120 m ascent. The wide, groomed trails stay gentle, ideal for first-timers, and offer world-class alpine panoramas. Gear rental and simple guided options are available at nearby guesthouses; роскошный lodging options provide a comforting base after the walk. Check local tiktok clips for current conditions so you can adjust plans if winds shift.
Other beginner-friendly options include Val di Funes and Lago di Carezza. The Val di Funes loop runs 5–7 km with 100–180 m of elevation gain, crossing snow-blanketed meadows with the Odle peaks in view; Carezza’s lakeside paths run 3–5 km with about 40–90 m of gain. Both start from accessible villages with reliable bus connections, and they attract families who want a relaxed pace and steady scenery.
Practicalities: the window typically spans December through April, with snowpack varying year to year. Stay on marked trails, keep to land-based routes, and use a local supplier for gear if you want to test equipment before committing. A compact kit (boots, poles, layers) fits in a small daypack. For a multi-day option, camping (camp, camping) is possible at designated sites, or book stays in guesthouses along the routes; сутки rates are common for short itineraries. The regional basins–бассеин–and nearby taganai gear shops offer additional options if you want to refresh gear during a stay. The opportunity to combine several short walks in one trip lets you tailor a personal plan that suits spring weather changes and your want for variety and pace.
lodging and base camps: many guesthouses offer a balanced mix of comfort and access to trails, including options described as роскошный for travelers who want a higher level of service. They often host day trips to nearby alpine land features, and they provide storage for gear after snow sessions. They also serve as a hub for social sharing, including short clips on tiktok that showcase scenic portions of the trails, which helps guests plan future parts of their route. For snowboarding enthusiasts, the Dolomites zone delivers a compatible, world-class backdrop that complements snowshoe trails and expands options during a single visit.
| Trail | Suprafață | Distanța (km) | Elevation gain (m) | Starting Point | Notițe |
|---|---|---|---|---|---|
| Seiser Alm Loop | Alpe di Siusi | 4–6 | 60–120 | Compaccio or Santa Cristina | Gentle, groomed, family-friendly; high malevolence of views; easy access via gondola; ideal first day |
| Val di Funes Loop | Val di Funes | 5–7 | 100–180 | Santa Maddalena | Odle peaks in view; rolling sections; good for a relaxed pace |
| Lago di Carezza Path | Carezza Lake area | 3–5 | 40–90 | Carezza / Nova Levante area | Scenic lakeside route; flat to gentle grade; light crowd |
| Fiames/Pocol Alpine Loop | Cortina d’Ampezzo area | 6–8 | 120–200 | Fiames | Alpine surroundings; accessible by public transport; solid for a second day |
Day-Trip Snowshoe Itineraries from Cortina and Ortisei
Begin with the Lagazuoi loop from Falzarego Pass: take the cable car to Rifugio Lagazuoi, snowshoe across the plateau to the WWI tunnels, then return the same way. This roughly 6 km round-trip with about 350 m of elevation gain fits a half-day and suits families with kids. The route delivers broad Dolomites panoramas and several flat sections for those new to snowshoeing. Nearby guesthouses offer indoor drying rooms for boots after the outing, and refuges along the way provide hot drinks and soup. If you’re camping, designated areas permit stays near the passes; otherwise many families opt for a warm meal indoors at a rifugio before heading back.
For a compact Cortina circuit, Cinque Torri and the Averau ridge form a 4–5 km loop with 280–320 m of ascent. Start at Rifugio Averau, snowshoe to the Cinque Torri towers for dramatic photos, then descend through pine forest back to the car or continue to Rifugio Nuvolau for a short extra loop. The route is typically 2.5–3 hours; it’s well-suited to small groups and kids who are comfortable on gentle grades. The refuges at Nuvolau and Averau have indoor seating, and the area sits at a couple of passes with sweeping views of the Sella and Tofane. For social posts, this scene translates well to russiantiktok and acorner2discover feeds.
Ortisei offers family-friendly plateau walks on Alpe di Siusi: a 6–8 km loop from Compaccio or Sant’Antonio with 150–250 m of ascent, usually 2–3 hours. The wide, well-packed tracks are forgiving for beginners and kids; hot drinks and snacks are available at several huts, and indoor warm spaces are common at guesthouses at the plateau edge. If you want a higher vantage, a Seceda option via Col Raiser adds a 250–350 m climb over 5–7 km, taking about 3–3.5 hours. The ridgeline delivers striking views of the Dolomites’ Sella group and Seiser Alm panorama; add a Fermeda detour for a longer loop. Both Ortisei routes work well for a relaxed day and are easy to fit around lunch at a nearby campsite or guesthouse.
Practical notes: wear waterproof pants, pack spare socks, and bring a light headlamp for late finishes; harnesses and microspikes are often sufficient, but assess conditions with local guides. The Lagazuoi and Cinque Torri routes pass through sizable passes and peaks; use the cable for ascent where available. Indoor spaces at refuges make post-tour recovery simple, and some itineraries can be paired with a short camping stop for those seeking a compact multi-day shape. This mix suits those ranging from small families to larger groups seeking a scenic snowshoeing day with strong photo opportunities and easy access from Cortina or Ortisei. It’s a good way to sample a fraction of Elbrus-scale winter landscape without long drives, and is a good match for those browsing موسكو or russiantiktok content or following acorner2discover.
Gear Checklist for Dolomites Snowshoeing
Equip with sturdy three-season boots with stiff midsoles, integrated gaiters, and microspikes, plus an avalanche beacon, probe, and compact shovel for Dolomites snowshoeing.
A layered system: breathable base layer, warm mid-layer, and waterproof shell; spare mid-layer, knit hat, insulated gloves, and socks that stay dry; sunglasses and sunscreen.
Navigation gear includes map, compass, a GPS device, and a power bank; headlamp with extra batteries; carry a route plan and share it with a partner before departure.
Movement gear: trekking poles with adjustable length and snow baskets; a 25-35 liter daypack with hip belt; emergency bivy or space blanket; hydration system.
Photo gear and restrictions: drone use only where permitted; bring a compact tripod and spare battery; choose famous viewpoints and stay on marked trails.
Weather and timing: altaiweather forecasts help set the daily plan; clear mornings yield perfect light on Dolomites ridges; plan advance for longer loops or shorter routes depending on conditions.
Region-specific notes: the Dolomites region offers huts with facilities to rest and refuel; swimming opportunities exist in nearby alpine lakes, but verify conditions and permissions.
Advice and opportunity: seek advance advice from local guides; discover routes that suit your fitness and adaptation; the final checklist should confirm contact details and insurance.
Context global: confortul inspirat din Sochifornia poate da tonul întregului echipament, călătorii din россия asociază adesea traseele din Dolomiți cu ciclismul sau înotul în lacurile dintre văi; așteptați-vă la cabane renumite și servicii de nivel Michelin în anumite locuri, politicile privind dronele variind în funcție de zonă.
Siguranța și conștientizarea riscului de avalanșă în teren alpin
Consultă zilnic prognoza nivologică înainte de a pleca și nu călători niciodată singur; apelează la un ghid dacă nu ești sigur; ia cu tine un dispozitiv de localizare în avalanșă, o sondă și o lopată, plus o hartă și o busolă; pune-ți în rucsac o mască pentru zăpada purtată de vânt și îmbracă-te cu pantaloni adecvați pentru condiții de frig; verifică echipamentul cu un furnizor de încredere și pune-ți de acord planurile cu toți participanții.
Evaluează terenul cu un ochi critic: caută vizibilitate clară peste pante, evită plăcile de vânt, cornișele și crăpăturile recente; alege trasee cu zone de oprire largi și zăpadă stabilă; între ultimele furtuni și ziua de azi, monitorizează semnele de instabilitate precum sunete înfundate sau prăbușiri „whumpf”; menține-te pe traseu cu o busolă și o hartă și păstrează pietonii și ceilalți drumeți la o distanță de 20–30 de metri.
În caz de urgență, treceți la căutarea balizei și cereți ajutor; dacă sunteți prins, aruncați rucsacii pentru a vă ajuta să rămâneți la suprafață, protejați-vă colegii și încercați să vă orientați spre suprafață; echipele de salvare ar trebui să efectueze simultan căutări cu balize și linii de sondă; odată ce sunteți găsit, relocați-vă într-o zonă sigură și ajustați planurile; fiți atenți la restricțiile de frontieră în coridoarele alpine și la cabanele montane cu camere separate.
Pregătirea echipamentului contează: pantaloni impermeabili; straturi suplimentare de haine, mănuși, ochelari de protecție și o mască; trusă de prim ajutor, lanternă frontală, baterie de rezervă și un kit de salvare compact; exersați utilizarea balizei, a sondei și a lopeții cu grupul; împărtășiți o scurtă poveste despre conștientizarea riscurilor cu noii veniți; folosiți traduceri în ruso sau rusă dacă echipa dvs. include vorbitori non-nativi; pentru trasee din apropierea calcarului sau în rosakhutor, altai sau dolomiti, inclusiv explorarea itinerariilor, confirmați opțiunile de adăpost și transport cu ghidul sau furnizorul dumneavoastră.
Cum ajungeți, parcare și aspecte logistice locale
Parchează în parcarea de la baza traseului Stolby, lângă centrul de vizitatori, și începe prima buclă înainte de ora 08:30 în weekenduri, pentru a evita cozile și a te asigura că ai lumină naturală la urcare.
- Cum ajungi: Din centrul orașului Krasnoiarsk, conduceți 15-25 de minute până în zona Stolby. Autobuze regionale asigură legătura cu stația Stolby, apoi un mers pe jos de 15 minute duce la începutul traseului. Dacă ajungeți cu avionul, închiriați o mașină de la Aeroportul Internațional Krasnoyarsk sau luați un taxi până la bază; un transfer scurt acoperă abordarea inițială.
- Parcare și acces: Parcarea oficială este compactă; în zilele de vârf se formează cozi la orele de intrare. Parcarea suplimentară se face de-a lungul drumului de acces. Pentru excursiile de mai multe zile, luați în considerare posibilitatea de a lăsa vehiculul în oraș și de a utiliza o navetă zilnică sau un taxi pentru a ajunge la începutul traseului în fiecare dimineață. Aduceți monede sau o opțiune de plată mobilă, acolo unde este disponibilă.
- Logistică locală: Situl înregistrează un flux moderat de vizitatori. Sursele de apă sunt aproape de zona de bază, deci aprovizionați-vă cu fluide pentru ziua respectivă. În zonele predispuse la vânt, adăpostiți-vă în mici depresiuni umbrite de-a lungul marginii pădurii. Lumina zilei durează, de obicei, de la sfârșitul dimineții până la mijlocul după-amiezii, deci planificați ascensiunile în consecință. Acestea sunt mai dificile pe rafele – verificați prognoza meteo înainte de a vă aventura pe crestele expuse.
- Context Putorana și parc național: Pentru expedițiile în Parcul Național Putorana, sunt necesare permise, iar accesul este limitat la anumite perioade. Verificați regulile actuale, taxele de intrare și opțiunile de ghidare pe site-ul oficial. Asigurați-vă că aveți un plan de mai multe zile cu echipamentul adecvat și contacte de urgență.
- Servirea mesei și reaprovizionare: În Krasnoiarsk, mai multe opțiuni de luat masa din apropierea centrului prepară mese rapide înainte de o zi pe zăpadă. În Stolbî, cafenele mici de lângă începutul traseului oferă băuturi calde; pentru energie pe traseu, împachetați o provizie bine echilibrată. Pentru echipament de ultim moment sau gustări la pachet, traseul se poate intersecta cu oportunități precum the_bazar_sochi atunci când rutele trec prin centre mai largi; altfel, aprovizionați-vă cu provizii pentru o zi întreagă de la piețele din oraș. Acestea sunt disponibile în anumite magazine din oraș dacă aveți nevoie de reaprovizionare rapidă.
- Echipament și planificare: Traseele pentru începători din jurul Stolby oferă opțiuni moderate. Pentru itinerarii de mai multe zile, luați cu voi un aragaz compact, hartă, straturi suplimentare de haine și șosete de schimb. Furnizorii locali pot oferi echipament de închiriat și opțiuni scurte cu ghid, dacă doriți un început confortabil; confirmați condițiile actuale ale traseelor cu cel mai apropiat centru de vizitare înainte de a pleca.
 Top 10 parcuri naționale rusești pentru a îmbrățișa natura și fauna sălbatică împreună">
 Cele mai bune 9 vodcă ieftine - Cele mai bune alegeri pentru buget cu aromă grozavă">
") Mutarea în Rusia – Un ghid esențial pentru expatriați (vize, costuri, locuințe)">
Mutarea în Rusia – Un ghid esențial pentru expatriați (vize, costuri, locuințe)">
 Tot ce trebuie să știi despre produsele lactate rusești – Un ghid cuprinzător">
 Top 10 feluri de mâncare rusești pe care trebuie să le încerci">
 Glamping – Camping cu Confort – Ghidul Suprem pentru Lux în Aer Liber">
 Ghidul KegWorks al Stilurilor de Bere Americane – Un Ghid Practic al Stilurilor de Bere din SUA">
 Cum să Mănânci Caviar – O Tradiție Rusească Atemporală, Etichetă și Sfaturi">
 Unde să mănânci în Moscova – De la Teremok la Café Pushkin">
 Cele mai bune garnituri pentru vodcă, care se potrivesc cu băutura dumneavoastră">