

白天的布鲁克林街头,老旧店铺前的场景,将涂鸦与老式建筑纹理结合,打造出一种现代、时尚的边缘感,足以吸引超过匆匆一瞥的目光。在空间有限的环境中,每一个细节都至关重要,让场景本身比你携带的设备更具表现力。在明亮、可控的光线下,最终效果近乎完美,甚至带有电影感,完美契合你想要传达的特定氛围。
在这十五个概念中,寻找强烈的对比:剧院霓虹招牌在粗糙的砖墙前闪烁,角落里有涂鸦和商店门面,或者一条狭窄的小巷被坚固的建筑围绕。让阳光在铬合金设备和金属装饰上反射,突出现代感的同时保持复古氛围。聚焦清晰的剪影、精心设计的姿势,以及符合时代但不压过主体的道具,打造出比普通街景更引人注目的影像。
设备与拍摄方式:使用全画幅机身,搭配50毫米镜头拍摄近景人像,24毫米镜头拍摄店铺全景。便携反光板和小型LED面板在不同光线条件下提供控制。通过严谨的造型,在质感与色调之间取得平衡,使主体成为更宏大叙事的焦点。统一的服装风格和特定造型使得系列作品连贯,引导观众穿越十五个概念。
以侦察笔记为指引度过一天:测试外部日光,监控交通,并记录每个地点的空间可用性。当将光线与砖墙、涂鸦和店铺立面的质感相协调时,场景便会变得壮丽,并准备好广泛分享。最终成果将激励他人在保持现代清晰度的同时,尝试复古氛围。
复古摄影计划指南
选择一个风格作为全天的主题,定义时代、色调和氛围,并将服装、道具和行程安排与之匹配,让每个细节都和谐统一。刻意营造出高贵的基调,但带有一丝梦幻感,让画面中每一帧都充满奇幻色彩。
地点侦察从布鲁克林北区开始,并延伸至附近的背景,包括涂鸦的砖墙、铁楼梯和适合您所处时代的开阔景观。在黎明和黄昏分别拍摄场景,对比光线;无论哪个地点符合概念,都要注意有两种对比的拍摄机会。
组建一支精干团队,聘请符合概念的专业人士。向博主和社交团队成员说明计划、拍摄清单和时间安排。准备一套简洁的装备:反光板、便携式背景布、布料样本和装饰品,以暗示时代感而不显拥挤。将精力集中在捕捉真实质感上,以增强整体视觉效果。
道具和装饰包应呼应那个时代:复古行李箱、蕾丝窗帘、老式相机、黄铜装饰。规划一条流畅的走位路线,在场景之间自然过渡,保持模特专注,并遵循户外拍摄时对野生动物友好的礼仪。将关键道具放置在每个背景中作为锚点,让主体与环境之间的互动在每个场景中都显得自然。
时间很重要:锁定黄金时段,安排服装更换,并为一天中的各个环节预留缓冲时间。制作一个场景-场景的时间表,使过渡看起来自然,为精彩、连贯的镜头提供机会。提前做好计划能帮助你在天气变化时保持冷静。
预算和后勤:确认许可证和地点规则,预留备用场地,并协调小预算用于团队和设备。考虑雇佣当地助手管理设备并协助搬运。选择布鲁克林场地或开阔乡村作为绝佳背景,并记录整个过程以制作连贯的博客和社交媒体回顾。
应急方案:如果户外拍摄失败,备用室内场景,采用复古背景。记录过程以保持不同场景和背景的一致风格,并调整顺序,同时不失梦幻氛围。利用可用空间维持连贯性和节奏。
服装与配饰的时代选择
选择一个时代作为基准,围绕其轮廓、质感和色彩故事组合每一件物品。一个聚焦的基线能让场景保持统一,避免杂乱,使氛围显得有意而非偶然。使用此指南将物品分类:基础服饰、外套和配饰,并思考每件物品如何在画面中不显拥挤。从选择基础色调开始——浅色调适合柔和的氛围;鲜艳的原色适合街头风格——并围绕一排衣架和镜子进行快速决策。加入一件引人注目的物品,比如一枚标志性胸针或一条显眼的腰带。
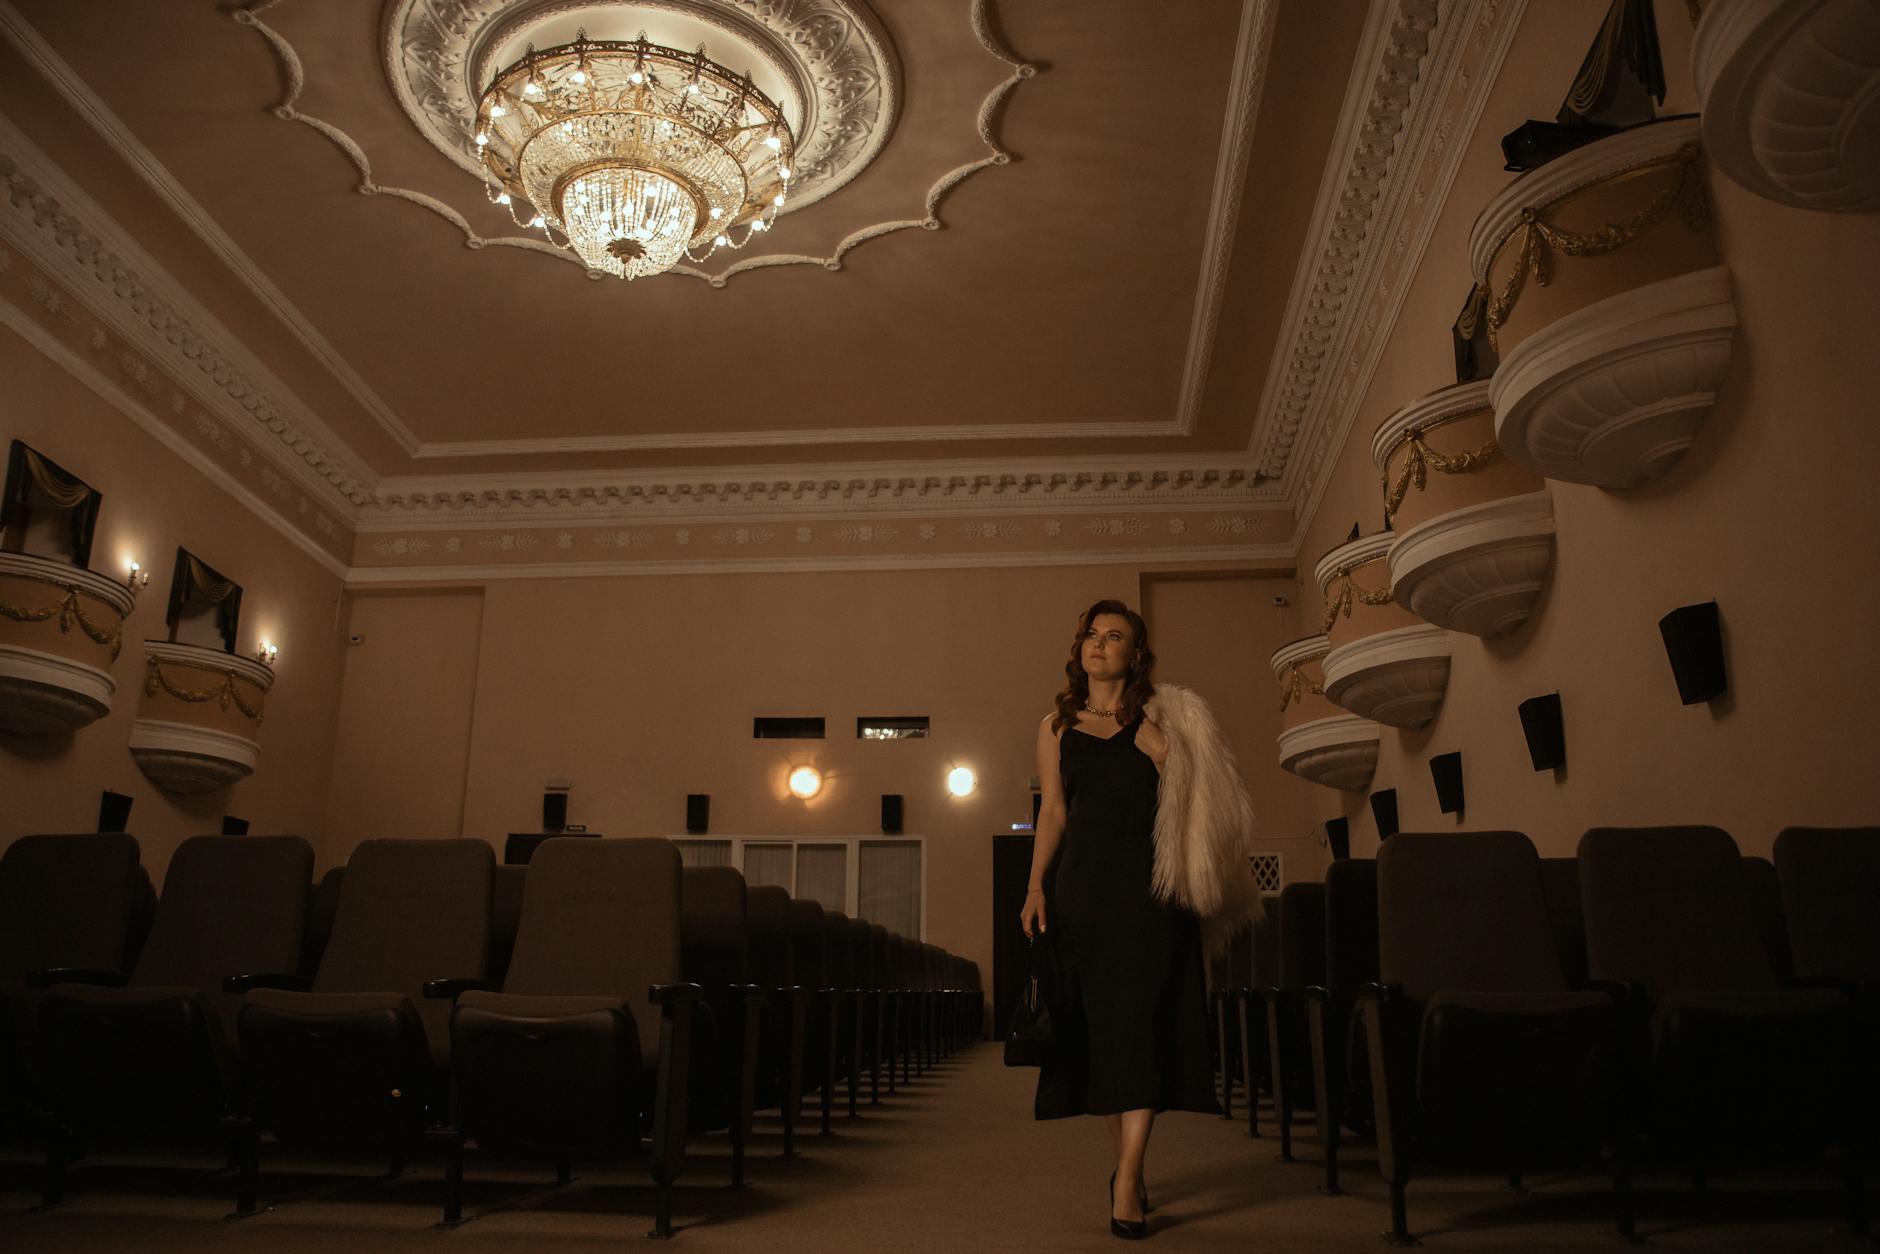
选择早20世纪爵士时代的氛围,可搭配珠饰连衣裙或流苏裙,戴克洛什帽或头巾式帽子,搭配长丝绸手套和精致手链。搭配T型跟高跟鞋或玛丽·简鞋,再加一串长珍珠项链,保持优雅线条。鞋款应选择修长款,尖头设计,细节处理要精致:收腰、低腰效果,羽毛披肩增添戏剧感而不显拥挤。通过限制每套造型只配一件焦点饰品,让整体造型更显清爽。
1940年代战争时期的服装风格可选择结构化外套、斜裁礼服和铅笔裙;面料如缎面、人造丝或羊毛克莱珀(wool crepe)效果较佳。配饰包括细腰带、简约首饰、胸针,以及呢帽或贝雷帽。色彩以海军蓝、奶油白、橄榄绿为主,搭配金属点缀;可与砖砌街道或湖景等工业背景相呼应,以增强氛围。注意每件单品之间的协调性,确保整体轮廓保持平衡。
中世纪的剪影在修身剪裁的连衣裙、摆裙和短款开衫中焕发活力。运用柔和的色调和精致的配饰:猫跟鞋、手套、猫眼墨镜和细腰带。发型应保持光滑且雕塑感。在氛围营造上,选择明亮色彩与砖墙或工业质感形成对比;从著名明星的造型中汲取灵感来指导风格选择。确保整体造型在街头场景和室内布置中都能保持统一。
1960年代末的时尚偏好迷你裙、踢踏舞靴和几何造型的珠宝。选择大胆的色块搭配、短发或蜂巢发型,以及超大墨镜。若是在布鲁克林的院子或城市背景中,可搭配带金属装饰的时髦踢踏舞裙和大胆的手袋。若是在室内拍摄,保持场景简洁明亮,避免杂乱;如换装裙或绒面裤能体现街头风格和现代主义设计。搭配配饰时,可与周围建筑线条呼应,营造和谐感。
时间管理:在拍摄前1小时安排衣柜检查;按年代标记衣架以加快决策。将服装组合存放在院子或专用更衣区,搭配多个造型的衣架。提供镜子和小型蒸汽机保持面料平整。在使用湖畔或城市街道作为背景时,将配饰与场景协调——珍珠在水中反射,金属饰品靠近砖墙。它们鼓励层次叠穿:一件剪裁得体的西装外套搭配丝绸衬衫,围巾从包中露出,皮带将整体线条重新收拢。如果预算有限,通过选择一个时代并最大化核心单品来应对限制,而不牺牲视觉冲击力。
位置准备在水塔酒吧:灯光、角度和装饰
将3200K的暖色主光源放置在45度角照向被摄者,搭配柔光板以柔化面部特征,并使用背光与酒吧背景区分。对侧的小反光板为脸颊提供细腻的补光,这有助于保留轮廓而不扁平化质感,快速测试拍摄确认画面平衡。
使用50毫米镜头拍摄玻璃器皿和装饰细节的特写镜头,再切换到35毫米镜头拍摄环境画面,展现柜台、天花线和座位。移动相机拍摄三个不同角度:沿着吧台的全景,眼平视角的中景,以及低角度突出垂直建筑。
装饰策略将美学与永恒的复古元素相结合:铜质扶手、磨损的皮革凳、丝绒垫子和天然绿植。在吧台上添加一辆迷你保时捷模型车,以增添童趣和玩具般的质感;这个道具选择既可爱又形成对比,同时清晰的署名归功于造型师和道具团队。
设置三个区域:靠窗处用于柔和的自然光照明,吧台旁用于玻璃器皿的光影反射,安静角落用于温暖座椅的多层次构图。保持台面整洁,摆放布料或餐巾以捕捉光线,避免产生强烈反光。
提前确认电源插座和延长线,携带扩散工具和色卡,并在拍摄序列前对第一盏提示灯进行白平衡测试。该风格以简洁的线条和温暖的氛围著称;感谢团队的付出,并准备一个可在不同广告活动中重复使用的灵活拍摄场地。
摄影设置与复古色调的胶片选择
用柯达Portra 400胶片在伦敦和曼哈顿进行拍摄,以增强皮肤色温。设置ISO 400,光圈在f/2.8至f/5.6之间,快门速度1/125至1/200,以保持画面清晰。白平衡:下午使用多云模式或阴影模式以增强暖色调。过曝+0.5至+1档以保留高光细节。使用50mm镜头获得自然透视效果;稳定拍摄对象,他们会在每次快门按下后感谢你,而结果在扫描后也会经得起时间考验。
事实:股票行为各异。Portra 160胶片呈现更柔和的绿色和浅色天空,而Cinestill胶片则偏向清晰、清爽的风格,皮肤色调更柔和。根据场景和氛围选择,再调整曝光以保留高光细节。
以下是不同胶片选项及其适用场景: 1. 黑白胶片(Black & White Film) - 适用场景:艺术摄影、高对比度场景、复古风格。 - 推荐品牌:Kodak Tri-X 400、Ilford HP5 Plus。 2. 彩色负片胶片(Color Negative Film) - 适用场景:日常拍摄、高保真色彩还原。 - 推荐品牌:Kodak Portra 400、Fujifilm Superia X-TRA 400。 3. 彩色反转片(Color Slide Film) - 适用场景:高色彩饱和度、专业级印刷。 - 推荐品牌:Kodak Ektachrome 100、Fujifilm Velvia 100。 4. 高感光胶片(High ISO Film) - 适用场景:低光环境、夜景拍摄。 - 推荐品牌:Kodak T-Max P3200、Ilford Delta 3200。 5. 特殊效果胶片(Specialty Film) - 适用场景:实验性摄影、独特视觉效果。 - 推荐品牌:Lomography Redscale、Kodak Ektar 100。 根据拍摄需求选择合适的胶片类型,以达到最佳效果。
- 柯达Portra 400 - 大多数场合的基准胶片;温暖的肤色,友好的颗粒感;在自然光下表现最佳。曝光增加0.5到1档;使用标准50mm或85mm镜头。
- 柯达Portra 160 - 适合柔和的浅色场景和全美风格布景;在柔和的日光下效果最佳;颗粒比400更细。曝光接近测光值或+0至+0.5档。
- 富士Pro 400H - 低调的绿色和柔和的色调;非常适合带有粉色花朵的院子和花园场景;曝光+0.5至+1以保持皮肤色调的真实。
- Cinestill 50D - 白平衡胶片;细粒;清晰、纯净的色彩;适合室内光线和有窗户光线的楼梯。曝光量约为1米,+0至+0.5。
- Cinestill 800T - 钨丝平衡,适合日落后的室内场景;影调丰富,高光温暖。建议使用1/60-1/125秒快门,f/2.8-f/4光圈,白平衡设置在钨丝(约3200-3400K)。
- 乐高色负片400 - 经济实惠,颗粒感强;适合度假或旅行时的即兴拍摄。根据光线情况,曝光增加+0.5至+1。
- 依尔福HP5 Plus 400(黑白胶片)——经典选择,适合拍摄楼梯、室内场景和氛围感画面;推进冲洗可增强对比度和质感。如需,可使用红色滤镜提升对比度。
根据不同场景设置实用参数,帮助你创建一致的复古色调:
- 户外庭院场景,粉色花朵,白天 拍摄:Portra 400
- ISO: 400,光圈:f/5.6,快门:1/125
- WB:多云;曝光:+0.5至+1
- 镜头:50毫米;动作:拿着花束或玩弄花瓣
- 拍摄花瓣的特写和更广阔的场景,以展示质感和色彩平衡。
- 室内带窗户的柔和光线,柔和阴影 胶片:Cinestill 50D 或 Portra 400
- ISO: 400(或在光线充足时为200),光圈:f/2.8-f/4,快门:1/60-1/125
- WB: 白平衡;曝光:+0 至 +0.5
- 镜头:50毫米或85毫米;场景:有人坐或站在窗台附近
- 使用反光板反射光线,保持肤色自然
- 楼梯构图,位于里士满的家中。胶片:柯达Portra 400或Pro 400H。
- ISO: 400,光圈:f/4-f/5.6,快门:1/60-1/125
- WB: 白平衡;曝光:约+0.5至+1
- 35毫米或50毫米镜头;捕捉一种叙事:有人踏上或停在台阶上。
- 拍摄一段编排好的动态镜头展示场景,然后用特写镜头捕捉氛围。
- 假日旅行,明亮的街景(曼哈顿)或伦敦风情 胶片:柯达Portra 160或Lomography 400
- ISO:160或400,光圈:f/4-f/5.6,快门:1/125-1/200
- WB: 云天或自动;曝光:+0 至 +0.5
- 50毫米镜头;动作:捕捉瞬间,拍摄朋友携带道具(如帽子或包)行走的瞬间
- 小道具,比如一条粉色围巾,能为沉闷的色调增添一抹亮色。
- 傍晚的城市漫步(里士满或全美风情街景) 胶片:Cinestill 800T 或 Portra 400,开放阴影
- ISO:400-800,光圈:f/2.8-f/4,快门:1/60-1/125
- 钨丝:800T;曝光:+0.5至+1
- 85毫米镜头用于人像;35毫米镜头用于环境拍摄
这些选择之所以能协调:通过每个项目使用两到三种胶片,以柔和曲线扫描,并保持场景中的光线一致,可以打造出统一的视觉效果。它们有一个共同点:一种自然的温暖感,更像是手工制作而非数字化处理,以及一种让人联想到拍摄瞬间之后的氛围。如果有人问如何雇佣实验室或服务,可以选择提供广泛扫描范围和色彩配置文件的机构,以匹配所使用的胶片,确保场景保持其独特的、永恒的质感。
道具和风格细节以体现时代感
以PeerSpace租赁的专属背景作为起点,这能固定画面风格、避免人群干扰,并确保照片呈现出复古氛围。规划灯光以保持阴影柔和、边缘清晰,避免眩光。如果无法找到精确的道具,可添加类似细节,比如老旧的时钟、搪瓷杯或卷曲的地图来强化年代感;预览中即可看到效果。这种方法通常比追寻远方档案中的完美复制品更可靠,最终成片效果也更美。
道具应围绕同一时代进行规划;避免使用塑料物品,改用木材、玻璃、布料纹理以及金属装饰来丰富视觉效果。增加纹理和精心布置能让每一帧都显得有意而为之,而非随意摆放。建议搭配一把椅子、一张桌子以及与场景相符的背景,以确保最终照片的信息清晰传达。有用的提示:保持团队人数精简,并指定一人负责道具处理,以避免偏离方向。
决定使用专用工作空间可以提高生产效率。在建筑内部或安静的空间工作有助于利用自然光线。布置保持控制感,阴影温和,形状清晰,让场景在预览时保持连贯,几乎具备电影感。想要真实感吗?这种方法使流程高效且视觉语言前沿。
| Prop | Era cue | 安装 | Notes |
|---|---|---|---|
| 搪瓷杯 | 1920年代至1930年代 | 办公桌角 | 哑光釉,边缘缺损 |
| 木箱 | 大萧条 | 地板前景 | 风化的表面,露出的钉子 |
| 玻璃瓶 | 1950s | 桌面 | 琥珀色,标签完好 |
| 金属锡罐 | 1940s | 货架展示 | 凹陷的盖子,锈迹斑斑 |
| 羊毛围巾 | 1940年代至1950年代 | 椅套 | 柔软的质地,天然纤维 |
| 木质收音机 | 1930年代至1940年代 | 边桌 | 木纹表面,表盘细节 |
| 卷起来的地图 | 1910年代至1920年代 | 办公桌台面 | 泛黄的纸页,卷曲的边缘 |
后期制作:复古色调、颗粒感和平衡
从中间调和阴影开始,使用香槟色基调。添加细粒粒(6-10)以模拟胶片纸质感,保持简洁克制。这种方法在春日柔光下能精准控制色调,保留细节而不产生过度噪点。若阴影变得混浊,可适当加深黑色以维持优雅对比。
选择一种带有历史感的分色:用冷色调的阴影搭配暖色调的香槟色高光,以呼应维多利亚风格的魅力。整体风格应体现那个时代的独特韵味,但不宜过于压抑画面;尽管概念保持永恒,但不同场景的色调应有所变化——从天花板覆盖布料的优雅室内,到展现树木、地标和天际线的开阔户外。利用光线突出建筑细节和人物面部的质感,尤其是在特写镜头中。
平衡色调范围,确保光影交界处不失真:保持山丘和天际线的柔和过渡;确保树木和远处的地标清晰可辨。对于近景、亲密构图,采用更严格的遮罩和局部对比度。虽然广阔场景从柔和的色调中受益,但近景构图在墙壁和天花板的纹理保持可见时效果更佳。当光影交替时,参考经典印刷品,保持细腻的对比度和层次,并将山丘纳入画面。
在实践中,采用受控工作流程:先进行曝光以保留肤色,再适度提升色彩饱和度。避免大胆的修改,转而追求精致、优雅的色彩调色板。这对于拍摄的统一性至关重要;最终效果在出版物或屏幕上可能会显得经典。如果场景天空清晰,可通过针对性的高光加亮保持天际线的可读性。为了增添档案感,可考虑在纸张上使用哑光印刷,并采用柔和的色调曲线扫描以保留密度。

