

Ξεκινήστε προσδιορίζοντας ένα σημείο παρατήρησης που εντοπίζει τα κύρια αξιοθέατα και οδηγεί το βλέμμα προς ένα καθαρό, οριζόντιο ορίζοντα. Τοποθετήστε ένα σταθερό τρίποδο, διατηρήστε ISO 100-400, κλείστε στο f/8-f/11 και στοχεύστε σε έκθεση περίπου 1/30 δευτερόλεπτα κατά τη διάρκεια της μπλε ώρας το βράδυ για να ελαχιστοποιήσετε το θολό και να αποφύγετε την υπερέκθεση, στη συνέχεια ρυθμίστε τη λευκή ισορροπία προς ψυχρότερα χρώματα για να διατηρήσετε την ατμόσφαιρα στις σιλουέτες των ψηλόκατασκευών, αποκαλύπτοντας ένα στρωματοποιημένο τοπίο.
Εξερευνήστε τις γειτονιές, τις γέφυρες και τις άκρες των χωράφων για να δημιουργήσετε ένα στρωματοποιημένο πλαίσιο: τα προσκήνια δρόμια οδηγούν σε συγκροτήματα κτιρίων, ενώ μακρινά πύργοι ανεβαίνουν πάνω από το νερό. Περιορίστε την έκθεση έτσι ώστε μια λήψη να αιχμαλωτίζει τα λεπτά παράθυρα χωρίς να τα κόβει, ενώ μια άλλη ανυψώνει τις σκιάσεις. Τα λεπτομερή στοιχεία του πανοράματος επιβιώνουν ακόμη και σε βαθμίδες σκιάσης.
Από κάθε οπτική γωνία: από την οπτική του Vancouver, οι σιλουέτες των πολυώροφων κτιρίων κυλούν πάνω από το νερό, ενώ το φως του ηλιοβασίλεμα μετατρέπεται σε μπλε ώρα. Ένα ευρύ φακό προσφέρει ευρύ πλάτος πανοράματος, ενώ ένα τηλεφωτογραφικό απομονώνει τον ρυθμό στις γραμμές των κτιρίων. Μια προσφορά από ευρύ γωνία δίνει πλάτος, ενώ ένα μακρύτερο φακό προσφέρει πιο στενή σύνθεση. Πιθανότατα παρατηρείτε μεταβολές στο τόνο και δεν μπορείτε να αγνοήσετε τις λεπτές ανακλάσεις στο γυαλί. Σε γειτονιές του Halifax, μακρινές σιλουέτες που θυμίζουν το Burj σας θυμίζουν πώς η κλίμακα αλλάζει με την απόσταση, και μπορεί να σας εκπλήξει πώς οι γραμμές λαμπρότητας συγχωνεύονται με τα σκοτεινά πρόσωπα των κτιρίων.
Εγγραφείτε πειράματα για ώρες: σχεδιάστε λήψεις λίγο πριν από το ηλιοβασίλεμα, κατά την ώρα του μπλε και μετά το σκοτάδι. Ένα συμπαγές εξοπλισμό βοηθά - τρίποδο, τηλεχειριστήριο, επιπλέον μπαταρίες. Στην περιοχή του Χαλιφάξ ή του Βανκούβερ, οι νυχτερινές υφές εμφανίζονται που η ημέρα χάνει. Διατηρήστε αρχεία ρυθμίσεων και αναθεωρήστε τα αποτελέσματα για να προσδιορίσετε ποια διάταξη φέρνει τη δυνατότερη ισορροπία μεταξύ φωτός και σκιάς. Δεν μπορείτε πάντα να φτάσετε στην τέλεια, αλλά επαναληπτικές συνεδρίες φέρνουν βελτίωση, ενώ οι πύργοι που εμπνέονται από το Μπουρτζ στο βάθος θυμίζουν την κλίμακα.
12 Συμβουλές για να Αποτυπώσετε Αξέχαστες Ουρανοξύστες Πόλεων: Μοναδικοί Τοποθεσίες για την Απολαύση της Δύναμης της Δουβαΐ
Burj Khalifa: θέαμα από το πάτωμα μέχρι την οροφή κατά την χρυσή ώρα για να αξιολογήσετε σωστά την έκθεση, είστε έτοιμοι να βελτιώσετε την τεχνική σας πριν εξερευνήσετε άλλα σημεία της πόλης.
- Burj Khalifa - Πλατφόρμα παρατηρήσεως (από το πάτωμα μέχρι την οροφή). Το βραδινό φως μεταμορφώνει τα σιλουέτα του ορίζοντα. Φέρτε ένα τρίποδο και ένα ευρύ φακό (16-35mm) για να διατηρήσετε ευθείες γραμμές. Χρησιμοποιήστε ISO 100, διαφράγμα f/8, κλείστρη 1/125-1/250s σε χειροκίνητο ρυθμό. Κάντε bracketing ±1 EV για HDR και συγχωνεύστε αργότερα. Αγοράστε το εισιτήριο εκ των προτέρων. Αποφύγετε τις ανακλάσεις στηρίζοντάς το σε ένα διακριτό άκρο, ανοιχτό σε δημόσια παράθυρα κατά τις προγραμματισμένες ώρες. Η νότια πανοραμική λήψη καλύπτει μια ευρεία έκταση στο κέντρο της πόλης, προσφέροντας μια υπέροχη βάση για τη συλλογή σας.
- Sky Views Dubai - Γυάλινο skybox και γέφυρα. Φτάστε λίγο μετά το ηλιοβασίλεμα όταν τα φώτα της πόλης αρχίζουν να λάμπουν; χρησιμοποιήστε ένα 24-70mm για να πλασιάσετε μια ευθεία ορίζοντα με ελάχιστη παραμόρφωση. Ρυθμίσεις: ISO 200-400, f/4-f/5.6, 1/60-1/125s; χειροκίνητη λήψη λειτουργεί αν σταθεροποιήσετε τους αγκώνες σας; κάνετε bracketing για να καλύψετε τα σκοτεινότερα χρώματα των παραθύρων. Χρειάζεται εισιτήριο; κρατήστε τις κινήσεις σας αργές για να μειώσετε τις ανακλάσεις από τα γυαλιά από το πάτωμα μέχρι την οροφή, το οποίο βοηθά να απελευθερώσετε καθαρές ανακλάσεις των νερών πάνω από τις αστικές οδούς.
- Δουβαΐ Frame - Παλιό vs σύγχρονο πλαίσιο. Θέστε τον εαυτό σας στη νότια πλευρά για μια ισορροπημένη θέα που δείχνει τόσο τις ιστορικές στενές δρόμους της Κρέικσαϊντ όσο και τις νέες μεγαδομές. Φωτογραφίστε μετά τις 18:00 για να αποφύγετε τις έντονες σκιάδες; διαφράγματα f/8, ISO 100, 1/125s, 24mm wide angle. Χρησιμοποιήστε έναν πολωτή για να μειώσετε τις ανακλάσεις από το γυαλί και το νερό; αυτή η θέση δίνει μια ισχυρή αίσθηση κλίμακας χωρίς πολυκοσμία. Τα άκρα του πλαίσιου επισημαίνουν τον αντίθεση μεταξύ της παλιάς και της σύγχρονης αρχιτεκτονικής της πόλης.
- Αιν Ντουμπάι - Τροχός του λιμένα του Ντουμπάι. Η βραδινή βόλτα προσφέρει μια πανοραμική καμπύλη πάνω από τα νερά. Χρησιμοποιήστε ένα 28-70mm, εστιάζοντας στη συμμετρία μεταξύ των ακτίνων του τροχού και του ορίζοντα της πόλης. Χρησιμοποιήστε βραχείες εκθέσεις για χρώμα και ουρανό. Εκθέσεις: ISO 100-200, f/5.6, 1/125-1/250s. Απολαύστε την πρόσβαση με εισιτήριο στις ειδικές πλατφόρμες παρατηρήσεως. Κινείστε αργά κατά μήκος της πλατφόρμας για να ελαχιστοποιήσετε τις ανακλάσεις. Αυτή η οπτική ισορροπεί τα φώτα της πόλης με το ανοιχτό νερό, δημιουργώντας μια υπέροχη, ελαφριά σύνθεση.
- Το Ποίντε, Παλμ Τζουμέιρα - Φοίνικες με θέα στη θάλασσα και σιλουέτες. Σταθείτε στην νότια ακτή ή κοντά στην άκρη του Παλμ για μια δραματική αντίθεση μεταξύ αρχιτεκτονικής και θάλασσας. Φωτογραφίστε κατά τη διάρκεια του ηλιοβασίλεμα μέχρι τη μπλε ώρα, χρησιμοποιώντας ένα φακό 70-200mm για συμπίεση της προοπτικής και αποκαλύψτε μακρινούς πύργους. Ρυθμίστε ISO 100, διαφράγματα f/8, ταχύτητα κλείστρου 1/80-1/160s και εφαρμόστε μια σειρά 2-4 βημάτων για ανάκτηση φωτεινών τμημάτων. Οι πολυάριθμοι περαστικοί στο επίπεδο του δρόμου προσδίδουν περιβάλλον, ενώ μια περιοχή εισόδου με εισιτήριο μπορεί να σας δώσει πρόσβαση σε ανυψωμένους σημείες παρατήρησης κατά μήκος ανοιχτών πεζοδρομίων. Αυτός ο τόπος επιδεικνύει την συνάντηση των υδάτων με τον ουρανό με μια καθαρή, ευγενή γραμμή.
- Ρας αλ Χορ - Η ανακλάση της πόλης στα υγροτόπια. Το φως του βραδιού με τα πουλιά σε πτήση προσθέτει κίνηση. Συνιστάται φακός 24-105mm. Δοκιμάστε 1/200-1/320s, f/6.3, ISO 200. Χρησιμοποιήστε σημειομετρία στο νερό για να αποφύγετε υπερεκθέσεις. Οι ανοιχτές περιστροφές σας κρατούν πάνω από το νερό για ισχυρές ανακλάσεις, ενώ παραμένετε σε ασφαλή απόσταση από τη χλωρίδα και την πανίδα. Αυτή η αστική οάση αντιστέκεται στα ιστορικά λιμάνια με τις σύγχρονες πύργους, προσφέροντας ένα μοναδικό αντίθετο στο πυκνό κέντρο της πόλης.
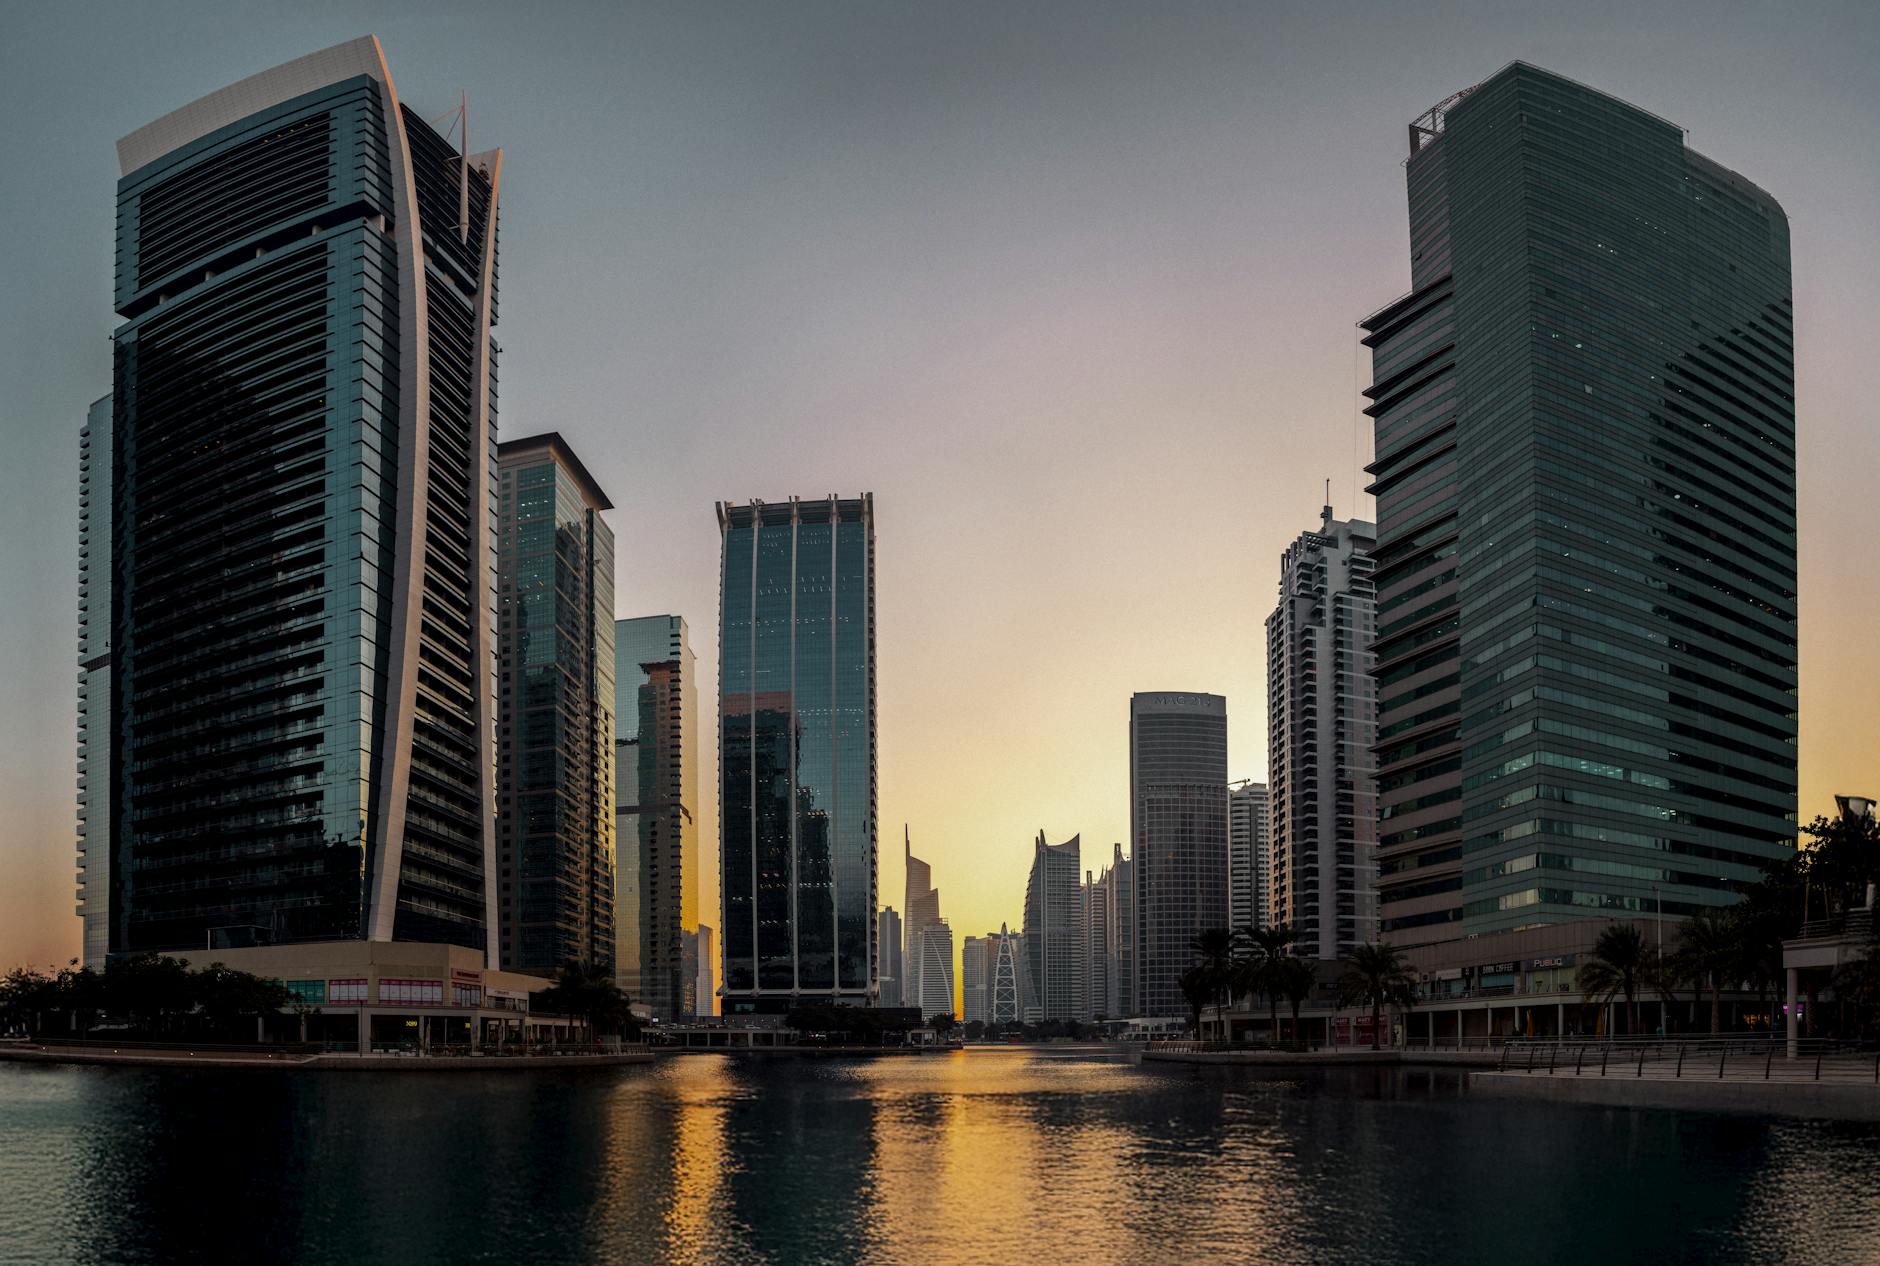
- Δουβαΐ Μαρίνα Προμενάντ / Pier 7 - Αστικός ρυθμός δίπλα στο νερό. Επιλέξτε μια θέση κοντά στο Western Tower ή στα κέντρα αγορών της Προμενάντ για να αποτυπώσετε μια μακρά, σταθερή γραμμή ορίζοντα. Χρησιμοποιήστε 24-70mm; έκθεση 1/125-1/250s, ISO 100-200, f/8; κάνετε bracketing για το δράμα του ηλιοβασίλεμα και μετά συνδυάστε. Οι ανοιχτοί δρόμοι κατά μήκος των νότιων τμημάτων προσφέρουν πολλές ευκαιρίες να συλλάβετε σκάφη, γιοτ και δραστηριότητα στο δρόμο σε ένα πλαίσιο. Η υφή του δρόμου και το νερό δημιουργούν μια ισορροπημένη, δυναμική εικόνα.
- Αλ Σιφ - Ιστορική ατμόσφαιρα δίπλα στο κανάλι. Φωτογραφίστε από την γραμμή του νερού προς τις λαμπερές πύργους από την άλλη πλευρά του καναλιού. Το βράδυ δίνει ζεστά χρώματα από το τούβλο σε αντίθεση με το γυαλί. Χρησιμοποιήστε φακό 16-35mm για πανοραμική εμβέλεια, ISO 100, f/8, 1/125s. Φέρτε ένα μικρό τρίποδο για σταθερότητα στα λιθόστρωτα. Αυτός ο τόπος συνδυάζει παραδοσιακές οδικές σκηνές με σύγχρονες σιλουέτες, μια πραγματική αντίθεση της πόλης που φαίνεται καλά τόσο σε χρώμα όσο και σε μονοχρωμία.
- Διαύγεια του Ντουμπάι - Αρχιτεκτονική ρυθμική πάνω στο νερό. Η ηλιοβασίλευση ή η μπλε ώρα προσφέρουν καθαρή απεικόνιση των τόξων και των ανακλάσεων. Δοκιμάστε 24-105mm, διατηρήστε ISO 100-200, f/8, 1/125-1/200s; ενσωματώστε λήψεις με διακύμανση για τη διαχείριση των φωτεινών σημείων. Περπατήστε κατά μήκος των ανοιχτών περιπατητικών για να πειραματιστείτε με τις γωνίες; οι ευθείες γραμμές των γεφυρών οδηγούν το βλέμμα προς τα κτίρια υψηλής στάθμης πέρα από αυτά. Αυτός ο τόπος συνδυάζει αστικές γραμμές με ηρεμία νερού για να δημιουργήσει ένα συνολικό σύνολο.
- JBR The Walk - Ενέργεια επίπεδο δρόμου δίπλα στη θάλασσα. Οι απογευματινές συγκεντρώσεις και τα νεον φώτα δίνουν πλάτος σε μια ευρεία γωνία; χρησιμοποιήστε 16-35mm για να αιχμαλωτίσετε κατακόρυφα στοιχεία ενάντια σε ένα λαμπερό ουρανό. Ρυθμίσεις: ISO 200-400, f/4-f/5.6, 1/60-1/125s; μια πινελιά επιλεκτικής εστίασης σε σιλουέτες φοίνικων στο προσκήνιο λειτουργεί καλά. Πρόσβαση από ανοιχτούς πεζοδρόμους; προσέξτε τις ανακλάσεις στα παράθυρα των καταστημάτων, που μπορούν να μειωθούν με ένα χειροκίνητο πολαρίζοντα. Αυτή η οπτική προσφέρει μια ζωντανή, γήινη αίσθηση στη συλλογή σας.
- Κουλοόν Τσουί / Βικτόρια σύγκριση ενδείξεων - έμπνευση διαπολιτισμική. Παρατηρήστε τα νερά που πλένουν ένα γυαλιστερό ουρανοξύστη και σημειώστε πώς οι σκιές στο επίπεδο του δρόμου ταιριάζουν με τους ψηλούς πύργους. Η ηρεμία των πεδιάδων του Έντμοντον σε ορισμένους νυχτερινούς ουρανούς σας βοηθά να ρυθμίσετε την ισορροπία λευκού όταν κυριαρχεί το νεόν. Με το στιλ Σαν, οι αφηγηματικές πλαίσιες ξεσπάζουν όταν συμπεριλαμβάνετε ένα ανθρώπινο στοιχείο που περπατάει σε ένα δρόμο ή μια γέφυρα. Χρησιμοποιήστε αυτήν την προσέγγιση για να δώσετε στις φωτογραφίες σας από το Ντουμπάι ένα πραγματικό αίσθημα κλίμακας και ενέργειας.
- Απόψη από ψηλά κτίρια - ξενοδοχείο ή κατοικία. Αναζητήστε πρόσβαση σε ειδική ταράτσα με πληρωμένο εισιτήριο, βγάλτε φωτογραφίες μετά το ηλιοβασίλεμα όταν τα φώτα των κτιρίων κυριαρχούν. Χρησιμοποιήστε τρίποδο, φακό 24-70mm, ISO 100, f/8, 1/60-1/125s. Κάντε μερικές λήψεις με διαφορετική έκθεση για να διατηρήσετε τις λάμψεις στο νερό και τα παράθυρα. Αυτή η ψηλή, αστική θέα προσφέρει το ιδανικό ισορροπία μεταξύ αρχιτεκτονικών γραμμών και ανοιχτού ουρανού, δημιουργώντας μια συνολική ατμόσφαιρα που είναι δύσκολο να ξεπεραστεί.
Οδηγός για τις καλύτερες φωτογραφίες του ορίζοντα της Ντουμπάι
Φτάσε στη Marina Walk του Ντουμπάι λίγο πριν την ώρα του μπλε, βάλτε τη κάμερα χαμηλά κοντά στο πλέγμα και πλασάρετε τους ψηλότερους πύργους με φοίνικες στο πρώτο πλάνο. Ένα σταθερό τρίποδο εξασφαλίζει καθαρές μακροχρόνιες εκθέσεις.
Επιλέξτε θέσεις με εξαιρετική θέα που συνδυάζουν την κληρονομιά με το σύγχρονο γυαλί, όπως το Ras Al Khor Wildlife Sanctuary, η ακτή της Palm Jumeirah, η περιοχή του Burj Khalifa κοντά στη γέφυρα Souk Al Bahar, το Dubai Creek Al Seef και οι θέαες από το Dubai Marina. Μια μόνο συνεδρίαση προσφέρει μια ποικιλία συνθέσεων· ένα ευρύ φακό καταγράφει δυναμικούς χώρους σε νησιά και απομακρυσμένες σιλουέτες στο ορίζοντα, δημιουργώντας ένα στρωματοποιημένο φόντο με ατμόσφαιρα χωριού.
- Διαδρομή του Dubai Marina: ανακλάσεις στο νερό, φοίνικα στο προσκήνιο, 16-35 mm, ISO 100, f/8, 6 δευτερόλεπτα κατά την ώρα του μπλε.
- Το φυσικό καταφύγιο Ras Al Khor: ανακλάσεις νερού με γερανούς και μακρινά πύργους; έκθεση 8-12 δευτερόλεπτα, 24 mm, τρίποδο.
- Παλαίμια Τζουμέιρα, η ακτή: κυματιστή σιλουέτα, φωτισμένοι κανάλια; 24-70 mm, χρυσή ώρα έως μπλε ώρα.
- Γέφυρα Souk Al Bahar προς το συγκρότημα Burj Khalifa: στενή σύνθεση, βάθος στο φόντο, 14-24 mm, f/8, 4-8 δευτερόλεπτα, πολαρίζων για να εξομαλύνει τις ανακλάσεις.
- Το προμναδούκτο του Dubai Creek Al Seef: αρχιτεκτονική κληρονομιάς σε συνδυασμό με σύγχρονα μνημεία; 35-50 mm, μπλε ώρα για ζεστά ανακλάσεις.
Η μεταφορά με βάρκα κατά μήκος του ποταμού προσθέτει γραμμές κίνησης στο πρώτο πλάνο και επεκτείνει το βάθος του πεδίου. Οι εκδρομές με πιστοποιημένους οδηγούς παρέχουν πρόσβαση σε σημεία παρατήρησης από τις στέγες των κτιρίων. Φέρτε ένα συμπαγές σκαμνί ή μονόποδο αν οι χώροι είναι πολυσύχναστοι.
Εξοπλισμός και τεχνική: τρίποδο, απομακρυσμένο κλείστρημα, επιπλέον μπαταρία; σύνολο φακών από 16-70 mm για ισορροπία μεταξύ προσκηνίου και απομακρυσμένων σιλουέτων; ISO 100, διαφράγμα f/8, έκθεση 6 δευτερόλεπτα κατά την ώρα του μπλε. Σκεφτείτε τη χρήση ενός πολωτικού φίλτρου για τον έλεγχο των ανακλαστικών στις υδάτινες επιφάνειες. Φωτογραφίστε σε RAW, ρυθμίστε τη θερμοκρασία χρώματος προς θερμότερους τόνους στη μετα-επεξεργασία και διατηρήστε τις γραμμές του ορίζοντα ευθείες για να επισημάνετε τις υψηλότερες μορφές πύργων.
Αναγνωρίστε τα Εμβληματικά Σημεία της Δουβαΐς για Εξαιρετικές, Δραματικές Αποψεις της Πόλης
Ξεκινήστε από την παρατηρητήρια του Burj Khalifa, διεύθυνση 1 Sheikh Mohammed Bin Rashid Blvd, κατά την ώρα του χρυσού φωτός για να αποκτήσετε μακρινές, ευρύχωρες εικόνες του ορίζοντα και αποδοτικές λήψεις.
Πλοηγηθείτε στο Palm Tower View στο Palm Jumeirah; η δυτική θέα προσφέρει άνετα γωνιά για να συνδέσετε μακροπρόθεσμες λήψεις πάνω από το ορίζοντα, βοηθώντας σας να συνδεθείτε με τα τοπικά κτίρια και τις λαμπερές ανακλάσεις.
Το τροχόσπιτο Ain Dubai παρέχει εικόνες 360 μοιρών της Dubai Marina, της παραλίας Jumeirah και του Burj Khalifa. Μπορείτε να περιστρέψετε χειροκίνητα για να μειώσετε τις ανακλάσεις, περνώντας μια ώρα να απολαύσετε τις αποζημιωτικές θέασεις της πόλης.
Το Dubai Frame αποτελεί ένα καθαρό σημείο αναφοράς που ενώνει εποχές. Σταθείτε δίπλα στα γυάλινα πάνελ για να απολαύσετε μια πανοραμική θέα που εκτείνεται από τις γειτονιές του λιμένα μέχρι τις λαμπερές πύργους.
Δημόσιες παραλίες όπως η JBR και η Sunset Beach προσφέρουν ευρύχωρα ορίζοντα. Διατηρήστε μια άνετη στάση, εφαρμόστε μακροχρόνια έκθεση και σεβαστέστε την ιδιωτική ζωή των σερφερ.
Δυτικά σημεία θέασης κατά μήκος της προμετάθειας του Dubai Marina προσφέρουν απολαυστικές σιλουέτες· φέρτε πολλαπλούς φακούς, προκαταχωρίστε το πάρκινγκ, σημειώστε τα χρονικά παράθυρα, αλληλούια.
Χρονίστε την Λήψη: Οι Καλύτερες Ώρες Φωτισμού και Καιρού στο Ντουμπάι
Η κατάλληλη χρονική στιγμή είναι να ξεκινήσετε με την πρώτη φως ή κοντά στην ώρα του μπλε, όταν οι φωτογράφοι πρέπει να στοχεύουν αυτή την ώρα γύρω από την αυγή και το ηλιοβασίλεμα, όταν ο ουρανός ανθίζει με χρώματα και τα γυαλίνα πρόσωπα λάμπουν χωρίς έντονο φως.
Το κλίμα του Ντουμπάι συνήθως προσφέρει καθαρά πρωινά. Οι ήρεμες μέρες χαρακτηρίζονται από χαμηλή υγρασία, η οποία βελτιώνει τη διαχωρισμό των σιλουέτ. Το απόγευμα, η ακτίνα του ήλιου αυξάνεται, οπότε επιλέξτε ένα παράθυρο όταν ο ήλιος είναι χαμηλότερος και οι άνεμοι ήρεμοι για να διατηρήσετε τον αέρα καθαρό. Λόγω της ταχύτητας με την οποία αλλάζει το φως στο Ντουμπάι, προγραμματίστε συνεχόμενες γωνίες. Τα παράθυρα χρόνου στενεύουν γρήγορα, προσαρμόστε τις αποχρώσεις έκθεσης.
Από τις διαδρομές της εσπλανάδας, ψηλές σιλουέτες τεντώνονται χιλιόμετρα κατά μήκος γυαλιστερών πρόσοψεων. Αυτή η πλαγιοτομή αποκαλύπτει την μεγαλύτερη παγκόσμια πανοραμική θέα και προσφέρει στους φωτογράφους απεριόριστες ευκαιρίες για να ρυθμίσουν τις αλλαγές έκθεσης.
Φωτογράφοι από το Γουίνιπεγκ και το Όταβα θα πρέπει να ξεκινήσουν με έλεγχο φωτός για να συγχρονίσουν τους προγραμματισμούς τους. Μια γρήγορη διαδρομή με πλοίο μπορεί να σας μεταφέρει σε πιο ήρεμα νερά για ανακλάσεις και νέες οπτικές γωνίες. Από τις άκρες της Εσπλανάδας, τοποθετήστε ένα ευρύ πλαίσιο και στη συνέχεια στενεύστε σε λάμψεις λεπτομερειών καθώς ο ήλιος βυθίζεται. Αφήστε το εξοπλισμό σας στη σκιά μεταξύ των σειρών. Αν εξερευνήσετε κοντινές μονοπάτια, διαδρομές πεζοπορίας ή ένα παραθαλάσσιο χωριό, θα αποκτήσετε εξαιρετικές προσκηνίες που συμπληρώνουν τα ψηλά κτίρια. Εκεί, οι ανακλάσεις πολλαπλασιάζονται.
Συντέθηκε με αξιοθέατα: Το Burj Khalifa, η Marina και πέρα από αυτά
Επιλέξτε μια ταράτσα στο κέντρο της πόλης το βράδυ. Περιλάβετε το Burj Khalifa με το Marina από την άλλη πλευρά του νερού, κρατώντας τον πύργο ελαφρώς εκτός κέντρου και κινούμενοι προς τα πιο μακρινά ορίζοντα, συμπεριλαμβανομένων των πάρκων και άλλων πύργων. Αυτή η σύνθεση γίνεται ένα συναρπαστικό σημείο αναφοράς που οι αναγνώστες θα θέλουν να μελετήσουν.
Σταθεροποιήστε σε ένα σταθερό τρίποδο, ρυθμίστε το ISO σε 200, το διαφράγμα σε f/8, το κλείστρημα σε 4-8 δευτερόλεπτα. Φωτογραφίστε σε RAW για να διατηρήσετε τις εκθέσεις. Σκεφτείτε να χρησιμοποιήσετε έναν πολωτή για να ελέγξετε τις ανακλάσεις. Βεβαιωθείτε ότι κάνετε bracketing όταν αλλάζει το φως. Προσπαθήστε να κρατήσετε χαμηλό θόρυβο στις σκιάσεις.
Σαρώστε τις θέσεις πάνω από το επίπεδο του δρόμου και στις στέγες: στέγες, πλατφόρμες παρατήρησης ή ανυψωμένα γεφύρια. Χρησιμοποιήστε ένα ευρύ φακό 16-35 mm για να καταγράψετε την έκταση ή ένα μακρύ 70-200 mm για να συμπιέσετε τα στοιχεία. Αυτές οι επιλογές βοηθούν στην αντιμετώπιση δύσκολων φωτισμών.
Από τα σημεία της Λαντάου έως τα αξιοθέατα του κέντρου της πόλης, σχεδιάστε μεταβάσεις που συνδυάζουν σύγχρονα στοιχεία με υδατικά μοτίβα. Αυτή η προσέγγιση βοηθά τους φωτογράφους που τραβούν το βράδυ να αφηγηθούν μια ισορροπημένη ιστορία.
| Aspect | Συγχαίρω την ευκαιρία να σας βοηθήσω να ανακαλύψετε την πλούσια πολιτιστική κληρονομιά της Ρωσίας. Η Αγία Πετρούπολη, γνωστή για την ομορφιά της και την ιστορική της σημασία, είναι μια πόλη που θα σας μαγέψει με την αρχιτεκτονική της, τα μουσεία της και τις εκπληκτικές της εκδηλώσεις. Μην χάσετε την ευκαιρία να επισκεφθείτε την Καθεδρικό του Αγίου Ισαάκ, ένα από τα πιο εντυπωσιακά μνημεία της πόλης, καθώς και το Μουσείο του Ερμιτάζ, ένα από τα μεγαλύτερα και πιο σημαντικά μουσεία στον κόσμο. Περπατήστε κατά μήκος του Νέβα, τη μεγαλύτερη ποταμιά της Ρωσίας, και απολαύστε την ομορφιά της πόλης από τις όχθες του. Εάν προτιμάτε μια πιο σύγχρονη εμπειρία, η Μόσχα προσφέρει μια ποικιλία από επιλογές. Από το Κρεμλίνο της Μόσχας μέχρι το Μουσείο Πούσκιν, η πόλη είναι γεμάτη με ιστορικά και πολιτιστικά αξιοθέατα. Μην ξεχάσετε να επισκεφθείτε την Πλατεία του Ερυθρού και να απολαύσετε ένα γεύμα σε ένα από τα πολλά εστιατόρια της πόλης. Για περισσότερες πληροφορίες, μπορείτε να επισκεφθείτε το site μας ή να μας στείλετε email στο info@travelagency.com. |
| Shutter | 4-8 s |
| ISO | 100-200 |
| Ανοίγματα | f/8 |
| Φακός | 16-35 χιλιοστόμετρα ή 24-70 χιλιοστόμετρα |
| WB | Αυτό ή 3800-4200 K |
| Tripod | Εδώ είναι η μετάφραση: Το Σαν Πέτερμπουργκ (ρωσικά: Санкт-Петербург) είναι μια από τις πιο εντυπωσιακές πόλεις της Ρωσίας, γνωστή για την πλούσια ιστορία, την αρχιτεκτονική και την πολιτιστική της κληρονομιά. Η Καθεδρικός Ναός του Αγίου Ισαάκ (ρωσικά: Исаакиевский собор) είναι ένα από τα πιο αξιοθέατα της πόλης, ενώ η Πλατεία του Παλάτιου (ρωσικά: Дворцовая площадь) αποτελεί το κέντρο της ιστορικής περιοχής. Η Μόσχα (ρωσικά: Москва) είναι η πρωτεύουσα της Ρωσίας και φιλοξενεί το Μουσείο Πούσκιν (ρωσικά: Государственный музей изобразительных искусств имени А.С. Пушкина), ένα από τα σημαντικότερα μουσεία της χώρας. Η Οδός Τβερσκόγια (ρωσικά: Тверская улица) είναι μια από τις κύριες οδούς της Μόσχας, όπου βρίσκονται πολλά καταστήματα και εστιατόρια. Η Πλατεία Κόκκινη (ρωσικά: Красная площадь) είναι ένα από τα πιο γνωστά αξιοθέατα της πόλης. Η Γέφυρα του Λένιν (ρωσικά: Ленинский мост) συνδέει δύο περιοχές της Μόσχας, ενώ η Καθεδρικός Ναός του Χριστού Σωτήρος (ρωσικά: Храм Христа Спасителя) είναι ένα από τα πιο εντυπωσιακά θρησκευτικά μνημεία. Η Οδός Νέβσκι (ρωσικά: Невский проспект) στο Σαν Πέτερμπουργκ είναι μια από τις πιο γνωστές οδούς της πόλης, όπου βρίσκονται πολλά ιστορικά κτίρια και πολιτιστικά ιδρύματα. Η Πλατεία Πούσκιν (ρωσικά: Пушкинская площадь) στη Μόσχα είναι ένα από τα πιο δημοφιλή σημεία συνάντησης των κατοίκων και των επισκεπτών. Η Οδός Αρμπάτ (ρωσικά: Арбат) είναι μια από τις παλαιότερες οδούς της Μόσχας, γνωστή για τα μικρά της καταστήματα και τα καφενεία. Η Πλατεία Μανέζναγια (ρωσικά: Манежная площадь) βρίσκεται κοντά στην Κόκκινη Πλατεία και είναι ένα από τα πιο πολυσύχναστα σημεία της πόλης. Η Οδός Μπολσόγια Νικίτσκαγια (ρωσικά: Большая Никитская улица) είναι μια από τις πιο ελίτ περιοχές της Μόσχας, όπου βρίσκονται πολυτελή καταστήματα και εστιατόρια. Η Πλατεία Σουβόροφ (ρωσικά: Суворовская площадь) είναι μια από τις μικρότερες πλατείες της Μόσχας, αλλά με μεγάλη ιστορική σημασία. Η Οδός Γκογκόλ (ρωσικά: улица Гоголя) είναι μια από τις πιο γνωστές οδούς της Μόσχας, όπου βρίσκονται πολλά ιστορικά κτίρια και πολιτιστικά ιδρύματα. Η Πλατεία Μαγιάκονσκαγια (ρωσικά: Маяковская площадь) είναι μια από τις πιο σύγχρονες πλατείες της Μόσχας, γνωστή για τα μοντέρνα της κτίρια. Η Οδός Πούσκιν (ρωσικά: улица Пушкина) είναι μια από τις πιο ήσυχες οδούς της Μόσχας, ιδανική για μια ήρεμη βόλτα. Η Πλατεία Κουζνέτσκι Μοστ (ρωσικά: Кузнецкий Мост) είναι μια από τις πιο πολυσύχναστες πλατείες της Μόσχας, γνωστή για τα πολυτελή της καταστήματα. Η Οδός Πρέτσνενσκι Βαλ (ρωσικά: Пречистенский Вал) είναι μια από τις παλαιότερες οδούς της Μόσχας, γνωστή για τα ιστορικά της κτίρια. Η Πλατεία Τβερσκόγια (ρωσικά: Тверская площадь) είναι μια από τις πιο κεντρικές πλατείες της Μόσχας, όπου βρίσκονται πολλά αξιοθέατα. Η Οδός Νικίτσκαγια (ρωσικά: Никитская улица) είναι μια από τις πιο ελίτ οδούς της Μόσχας, όπου βρίσκονται πολυτελή καταστήματα και εστιατόρια. Η Πλατεία Πούσκιν (ρωσικά: Пушкинская площадь) στη Μόσχα είναι ένα από τα πιο δημοφιλή σημεία συνάντησης των κατοίκων και των επισκεπτών. Η Οδός Αρμπάτ (ρωσικά: Арбат) είναι μια από τις παλαιότερες οδούς της Μόσχας, γνωστή για τα μικρά της καταστήματα και τα καφενεία. Η Πλατεία Μανέζναγια (ρωσικά: Манежная площадь) βρίσκεται κοντά στην Κόκκινη Πλατεία και είναι ένα από τα πιο πολυσύχναστα σημεία της πόλης. Η Οδός Μπολσόγια Νικίτσκαγια (ρωσικά: Большая Никитская улица) είναι μια από τις πιο ελίτ περιοχές της Μόσχας, όπου βρίσκονται πολυτελή καταστήματα και εστιατόρια. Η Πλατεία Σουβόροφ (ρωσικά: Суворовская площадь) είναι μια από τις μικρότερες πλατείες της Μόσχας, αλλά με μεγάλη ιστορική σημασία. Η Οδός Γκογκόλ (ρωσικά: улица Гоголя) είναι μια από τις πιο γνωστές οδούς της Μόσχας, όπου βρίσκονται πολλά ιστορικά κτίρια και πολιτιστικά ιδρύματα. Η Πλατεία Μαγιάκονσκαγια (ρωσικά: Маяковская площадь) είναι μια από τις πιο σύγχρονες πλατείες της Μόσχας, γνωστή για τα μοντέρνα της κτίρια. Η Οδός Πούσκιν (ρωσικά: улица Пушкина) είναι μια από τις πιο ήσυχες οδούς της Μόσχας, ιδανική για μια ήρεμη βόλτα. Η Πλατεία Κουζνέτσκι Μοστ (ρωσικά: Кузнецкий Мост) είναι μια από τις πιο πολυσύχναστες πλατείες της Μόσχας, γνωστή για τα πολυτελή της καταστήματα. Η Οδός Πρέτσνενσκι Βαλ (ρωσικά: Пречистенский Вал) είναι μια από τις παλαιότερες οδούς της Μόσχας, γνωστή για τα ιστορικά της κτίρια. Η Πλατεία Τβερσκόγια (ρωσικά: Тверская площадь) είναι μια από τις πιο κεντρικές πλατείες της Μόσχας, όπου βρίσκονται πολλά αξιοθέατα. Η Οδός Νικίτσκαγια (ρωσικά: Никитская улица) είναι μια από τις πιο ελίτ οδούς της Μόσχας, όπου βρίσκονται πολυτελή καταστήματα και εστιατόρια. |
| Notes | Ψηφιακή φωτογραφία υψηλής ποιότητας, με καθαρό, χωρίς θόρυβο RAW, σταθερές εκθέσεις και καθαρά αντανακλάσεις στο νερό. |
Απελευθέρωσε μια σειρά φωτογραφιών. Η συλλογή δείχνει πώς τα στοιχεία τοποθετούνται πάνω από το κατάστρωμα, ενώ τα ψαρόβαρκα παραμένουν σταθερά κοντά. Οι δημοσιευμένες ιστορίες σε παγκόσμια ροή βοηθούν τους αναγνώστες να μάθουν τις εκθέσεις, να εξοικονομήσουν χρόνο και να σχεδιάσουν μελλοντικές λήψεις.
Εξοπλισμός Βασικών Ανάγκων: Φακοί, Τριπόδια, Πολαρίδες για το Φως της Δουβαΐ
Ένα συμπαγές, ευέλικτο kit για να ξεκινήσεις: ένα γρήγορο zoom standard (24-70mm) μαζί με ένα wide zoom (16-35mm) και ένα zoom μακρινών (70-200mm) για να καλύψεις τις δημόσιες παρατηρητήριες, τις γωνίες των πάρκων με τις παλάμες, τις γραμμές των τραμ και τις βασιλικές γωνίες του ορίζοντα. Μην ξεχάσεις ένα σταθερό τρίποδο και έναν πολαριζέρ στο σακίδιό σου. Ελέγξε το επίπεδο της μπαταρίας, έχεις έτοιμο ένα επιπλέον κάρτα, σχεδίασε τις βραδινές σου λήψεις γύρω από τις σκιάσεις και τις ανακλάσεις.
Το μείγμα γυαλιού συνδυάζει 16-35mm για ευρύχωρες σιλουέτες του Ντουμπάι· το 24-70mm χειρίζεται ακολουθίες από δρόμους μέχρι ουρανό· το 70-200mm δίνει συμπιεσμένες λεπτομέρειες. Το tilt-shift 24mm διατηρεί ευθείες γραμμές όταν κοιτάζεις από ψηλά σημεία παρατήρησης. Ένα γρήγορο πρωτότυπο όπως το 50mm ή το 85mm προσθέτει εγγύς υφάσματα υπό το μεσημεριανό φως.
Οι πολωτήρες μειώνουν τις ανακλάσεις από το γυαλί και το νερό, ενισχύουν το μπλε του ουρανού και αποκαλύπτουν τις λεπτομέρειες των φύλλων των φοινίκων με μειωμένες ανακλάσεις κατά τη μέση της ημέρας. Χρησιμοποιήστε έναν πολωτήρα περιστρέφοντάς τον για να ισορροπεί τη κορεσμό, διατηρώντας τα φυσιολογικά χρώματα του δέρματος σε δημόσιους διαδρόμους.
Τριπόδι επιλογής: άνθρακα, φέρει 1.5-2.0 κιλά, κεντρική στήλη κάτω, πόδια ρυθμίζονται σε 3-4 τμήματα. Σφαίρα με περιστροφή 360 μοιρών, γρήγορη απελευθέρωση πλάκας, ανεξάρτητο κλείδωμα πλάγιας κίνησης. Ένα συμπαγές μοντέλο ταξιδεύει ελαφρύ, παραμένει προσβάσιμο κοντά στις παρατηρητηρίες του Πάρκου, υποστηρίζει μακροχρόνιες εκθέσεις που αποκαλύπτουν την κίνηση των τροχών των τραμ. Μεταφέρετε εξοπλισμό που αντέχει στη ζέστη και τη σκόνη.
Φωτογραφική ρύθμιση: βγάλτε RAW, κάνετε bracketing έκθεσης, ελέγξτε το ιστογράμμα, πειραματιστείτε με ISO 100-400 κατά τη διάρκεια της ημέρας. Μετά το ηλιοβασίλεμα, αυξήστε το σε 800-1600 όταν το φως μειώνεται. Ξεκινήστε με γρήγορο κλείστρημα για να παγιδεύσετε την κίνηση των πεζών και των τροχών, στη συνέχεια χρησιμοποιήστε αργές ταχύτητες για να αποσπάσετε ανακλάσεις από το νερό και το γυαλί. Η δημόσια κίνηση συναντά τη σύγχρονη προσέγγιση στο εξοπλισμό σας. Η ρύθμιση yurinatus βοηθά να περιγράψετε πώς το φως περιβάλλει την αρχιτεκτονική σε δημόσιες πανοραμικές λήψεις.
Μάστερ Νυχτερινών Ουρανών: Μείωση του Θορύβου και Αποθήκευση Λάμπρων Αστρικών Φωτισμών
Συνιστάται να ξεκινήσετε με ένα σταθερό τρίποδο, ένα τηλεχειριστή και λήψη σε RAW. Ρυθμίστε το ISO στο 100-200, το διαφράγμα στο f/8-f/11 και το χρόνο έκθεσης στα 20-40 δευτερόλεπτα. Χρησιμοποιήστε τη χειροκίνητη λειτουργία, παρακολουθήστε το ιστογράμμα και κάνετε bracketing με τρεις καρέ -2, 0, +2 EV για να διατηρήσετε τα φωτεινά σημεία.
Απενεργοποιήστε την αναγωγή θορύβου μακροχρόνιας έκθεσης στην κάμερα αν σκοπεύετε να κάνετε stacking; λάβετε πολλές καρέ και εφαρμόστε αφαίρεση σκούρων καρέ στη μεταεπεξεργασία; συνδυάστε 5-8 καρέ για να περιορίσετε τον θόρυβο διατηρώντας τα λεπτομέρεια; μεταεπεξεργαστείτε με το Lightroom ή το Photoshop; κρατήστε την οξύνωση μέτρια.
Η επιλογή της τοποθεσίας έχει σημασία: αναζητήστε θέσεις με οπτική γωνία που αποκαλύπτουν πολλές ανακλάσεις και σιλουέτες. Στο Edmonton, Toronto, Kowloon, Jumeirah, Seef και κέντρα περιοχών, ψηλές θέσεις κοντά στις γωνίες των δρόμων δίνουν δραματικές γραμμές. Σε βραδινό ή πρωινό φως, μια έκθεση μεγαλύτερη από 40 δευτερόλεπτα κάνει τους φωτισμούς να λάμπουν με αύρα· σε υγρή θερινή ατμόσφαιρα, τα χρώματα γίνονται πιο ζεστά. Αυτά τα σημεία συχνά κρύβουν φοίνικες και ναούς· η εκμετάλλευση των ευθύγραμμων γραμμών των δρόμων βοηθά να οδηγεί το βλέμμα προς το λαμπερό γυαλί και τις ατμοσφαιρικές γραμμές του κυκλοφοριακού. Έχετε ήδη δει σε πολλά σημεία, πάνω από μια κόλπο ή λιμάνι, μπορείτε να αιχμαλωτίσετε μια απίστευτη λάμψη. Επειδή κάποιες στιγμές περνούν γρήγορα, φτάστε νωρίς και εξερευνήστε το σημείο· τα ψαρόβαρκα και άλλα κινούμενα αντικείμενα δημιουργούν υποβλητικό ασαφήνεια κίνησης αν κρατήσετε το κλείστρημα ανοιχτό πολύ καιρό. Από το Kowloon έως το Kung, οι υφές αλλάζουν με τον φωτισμό των δρόμων· η ποικιλία των τοποθεσιών αυξάνει απλά τις ευκαιρίες.
Συντέλεσε τη σύνθεση διατηρώντας οριζόντια την οπτική γραμμή, αφήνοντας τις οδηγικές γραμμές των δρόμων να κατευθύνουν το βλέμμα προς τις λαμπερές ανακλαστικές επιφάνειες. Τοποθέτησε ένα κορμό φοίνικα ή ένα φανάρι ναού στο πρώτο πλάνο για βάθος. Ισορρόπησε τα ψηλά κτίρια με κενό χώρο. Φωτογράφισε από σημείο που προσφέρει ανακλάσεις νερού στον ορίζοντα. Η χρονική στιγμή γύρω από την ώρα του μπλε δίνει πιο πλούσια χρώματα χωρίς να θυσιάζεται η οξύτητα.
Μετά-επεξεργασία σχέδιο: συγχώνευση 3-5 καρέ με HDR ή stacking; ρύθμιση χρωματικής θερμοκρασίας γύρω στα 3800-4200K για να ελαχιστοποιηθεί η χρωματική αποχρωματισμός από τα φώτα; εφαρμογή ήπιας μείωσης θορύβου φωτεινότητας χωρίς να θολώνεται η υφή; ρύθμιση καμπύλων για ανάκτηση τονικότητας; αποφυγή υπερβολικής οξύνωσης; διόρθωση οποιασδήποτε εμφανούς παραμόρφωσης φακού; εξαγωγή σε μέγεθος 2-3k για ιστούς ή πλήρης ανάλυση για εκτύπωση.
Πρακτικές σημειώσεις: η μουσική από κοντινά μέρη μπορεί να χρωματίσει τις ανακλάσεις. Απλώς ασκηθείτε σε διάφορες θέσεις. Συνδεθείτε με φωτογράφους στο Edmonton ή στο Toronto για να ανταλλάξετε ιδέες θέσεων. Αναζητήστε πολλές επιλογές, συμπεριλαμβανομένων των διαδρομών με φοίνικες στο κέντρο, των οδικών διαδρομών και των ακτογραμμών. Οι άνθρωποι που φτάνουν νωρίς είναι πιο πιθανό να δουν να σχηματίζονται λαμπερά μοτίβα. Ενώ κοιτάζετε πολυσύχναστες περιοχές, μπορεί να δεις ναούς, ψαρόβαρκες και φανάρια. Επειδή η χρονική στιγμή έχει σημασία, μπορείτε ακόμα να πετύχετε εξαιρετικά αποτελέσματα με υπομονή και προγραμματισμό.


