 Comment faire du kéfir de lait authentique à la maison : un guide étape par étape de la fermentation traditionnelle">

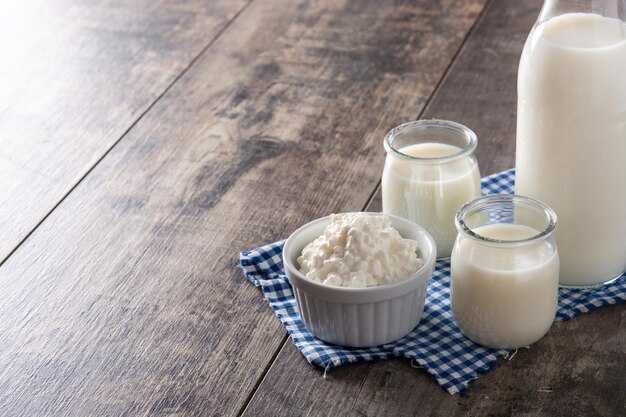
Begin with 2 tablespoons of live symbiotic grains and 1 liter of whole dairy, then let it sit at room temperature for about 24 hours. This yields a fizzy, probiotics-rich beverage with a gentle tang and a smooth texture. Once ready, you’ll notice a mild effervescence and a light dairy aroma. Never skip the initial enrichment; it forms the base for every batch.
Use a glass jar with a diameter around 10 cm and a wide neck to permit air exchange; cover with a breathable fabric and secure with a rubber band. Avoid metal lids, because acids can react. For best results, start with a russian-origin starter to keep batches consistent. Place the jar on the kitchen counter and avoid the fridge during the main culturing window, which typically lasts hours 20–28 depending on room temperature. Then proceed to strain when the surface shows gentle bubbles and the scent turns tangy.
After 24 hours, strain the drink through a plastic sieve, reserving the grains for another batch. Rinse grains briefly with clean water, then return them to the starter jar. This sustains a symbiotic culture; the flavor grows and carbonation appears even after the first run. If the room is cool, this can take longer; in warmer kitchens, expect the transition within 18–26 hours.
Transfer the strained beverage to the fridge to slow the process and develop a chill refreshment; over time it gains depth and a smoother mouthfeel. Consume within 5–7 days, using morning as a regular ritual. For best results, keep it plain, or blend with fruit, a pinch of salt, or a splash of plain yogurt. The drink contains probiotics and vitamins and may be enjoyed with simple cheese or as a base for smoothies; several batches will improve the overall balance.
With your hand, maintain cleanliness and avoid metal tools; always use clean jars and utensils. Where possible, measure ingredients with tablespoons and track hours for consistency. Never overfill the container and never rush the process–allow the calm bioprocess to unfold, and you’ll receive the freshest, best-tuned batch.
Milk Kefir: Practical Home Guide
Recommendation: Use a glass jar (0.5–1 liter), add 400–500 ml of a fresh dairy beverage and 1–2 tablespoons of a reliable starter, culture at 20–22°C for 24–36 hours, then strain and fill bottles for refrigeration.
Keep gear clean and avoid metal during stirring and handling. Stir with a wood spoon, strain through a plastic or stainless sieve, and transfer the liquid to bottles with tight caps. This approach minimizes contamination and keeps flavors stable; some households share starter in bags or jars across friends, which helps stay connected to a broader community and reduces worry about sourcing every batch.
Ingredient quality matters: aim for dairy with about 2–3% fat; ultra-pasteurized products can slow activity, so either choose pasteurized or lightly processed dairy. The culture is tolerated well by most dairy bases. As shown by many testers, a pinch of magnesium-containing minerals can improve texture. For a plant-based alternative, try almond or coconut beverage, noting that flavor and acid balance will differ. In warmer spring weather, culture tends to work faster, while cooler seasons require longer times; still, timing shows a predictable range of 24–48 hours with normal room temperatures.
Common problem: drink becomes too sour or too runny. If their flavor is not balanced, shorten the cycle or reduce starter, and ensure the container is clean. If an off-odor or mold appears, discard the batch and start with a new starter. After straining, you may notice whey separation; this is not dangerous and can be blended back or used in recipes. As shown by practical tests, adjusting time and temperature helps control acid levels.
Storage and reuse: strain and bottle, then refrigerate; you can reserve 2–3 tablespoons of starter from each batch to feed with fresh dairy for the next run. Bottles should stay capped and kept in a cool place; you can share starter with others, or secure a small supply from a trusted source. With careful care, your tradition can stay active for years; many households maintain active cultures by frequent feeding and occasional rest on the kitchen window ledge during spring sun. If you need a short break, the starter can be kept hung in a cool corner for up to a week. For further guidance, information about market options and shared tips from barcharov and other experienced makers helps you stay informed.
How to Make Authentic Milk Kefir at Home: A Step-by-Step Plan
Recommandation : keep a clean bottle, a strainer, and a yogurt-type starter ready; maintain the dairy beverage at a steady 22–25°C until you notice gentle foaming and a real tang, then bottle and refrigerate for best texture.
Phase one – preparation: sanitize glassware, set out a bottle with a breathable cover, and have a strainer on hand. Assemble the starter culture, a spoon, and a small amount of fresh dairy beverage. The essential rule is clean equipment to capture consistent results.
Phase two – culturing: pour the dairy beverage into the bottle, add the starter, and give it a gentle stir. Cover loosely to allow air exchange, then place in a warm spot away from direct sun. Depending on warmth, this session can take 24–48 hours; if you wanted a milder profile, shorten the time. Though you’ll see less foam with a lighter starter, the real goal is a balanced, yogurt-type tang.
Phase three – strain and bottle: strain the solids using the strainer over a clean container and press gently to collect the strained beverage. Transfer to a new clean bottle, leaving a little headspace, and cover. Label with the date and December or march batch numbers to help track flavor shifts over time. This step capture the clean, smooth texture you’re after, and the process becomes a repeatable routine.
Phase four – storage and use: refrigerate the bottled beverage and consume within 5–7 days, or longer if you prefer a firmer bite. Use the strained liquid as a base for smoothies or pour over cereal, and consider a double fermentation cycle if you want a stronger flavor–just know that longer leaving at room temperature increases acidity. The following tips help: stir gently before serving, avoid cross-contamination, and keep a separate utensil for scooping solids and liquids.
Notes: this beverage is commonly compared to kombucha for its tang and effervescence, yet it remains a dairy-based choice. If a question arises, start with a small batch and adjust the timing, then bottle for immediate use. This approach gives better results than rushing through cycles, and it doesn’t require any pill supplements to be effective. Thanks for reading; if you have more questions, reply with what you want to adjust, and I’ll tailor the plan accordingly, depending on your access to a clean strainer and a steady warm spot.
Step 1 Supplies: Gather milk, kefir grains, glass jar, and sanitation tools
Set up a clean, covered, wide-mouth jar and collect these items from a local source; this makes incubating predictable and safe. Keep a full workstation that stays organized; the difference shows after years of practice. Use a ratio of 2-3 tablespoons starter cultures per liter of dairy liquid; itll settle into smooth, tart profiles in 24-48 hours at 20-24°C. This setup is much better than an open bowl for consistency and flavor, and it preserves the vitamin-rich profile of the dairy.
- Container and cover: A 1-liter wide-mouth glass jar with a breathable cloth or paper lid secured by a rubber band; covered setup minimizes dust and air currents during incubating.
- Dairy liquid: Fresh, local dairy from a trusted source; pasteurized is fine, but non-homogenized options often yield a fuller body.
- Starter cultures: 2-3 tablespoons per liter; avoid excessive amounts, which can slow fermentation or lead to a thicker texture.
- Strainer: Fine-mesh, non-reactive to catch solids after incubating; rinse well between batches to prevent carryover.
- Utensils: Wooden or plastic spoon for stirring, measuring spoons, and a clean bottle brush for jars; avoid reactive metals.
- Sanitation tools: Mild soap, hot water, towels, and an optional food-safe sanitizer or 5% vinegar solution for quick sterilization; wash hands before handling.
- Thermometer or timer: A timer helps track time; a thermometer helps monitor incubating temperature for consistent results.
- Labeling and storage: Plus, use a waterproof marker or tape to note batch date, dairy source, and notes on texture; this aids in tracking popularity and future adjustments, like switching source or adjusting the ratio.
Keep notes by month; many makers notice higher activity in march and november. Wash hands before handling, check for a pleasant aroma, and watch for colonies; tiny buds may appear as activity increases. If itll produce an off taste, start again with a fresh batch and adjust the ratio accordingly.
Step 2 Preparing the Kefir Grains: Rehydrate, activate, and understand Grains of the Prophet
Begin by rehydrating dried grains: soak 1–2 tablespoons in 1 pint of clean, non-chlorinated water at room temperature for 6–12 hours. Stir halfway through to ensure even hydration. After soaking, drain the liquid, rinse with clean water, and place the grains in a clean jar. Let them rest for 1–2 hours to regain flexibility before the next stage. In the region around nancy, area markets sometimes capture a good blend of strains; kristen from bauman’s circle has documented sources that have been reliable for this step.
Activation: Move the rehydrated grains to a neutral base (about 1/2 cup water with a pinch of sugar) and keep at 20–25 C. Stir gently every 8–12 hours and avoid carbonated liquids. After 24–48 hours you should see a creamy coating at the surface and a mild, yeasty aroma. This exactly signals readiness for the main cycle. Rinse once more with clean water before proceeding and store the grains in a cool, clean area between batches to stay active. If a busy schedule hits, letting them rest briefly between rounds helps keep them ready.
Understanding: Grains of the Prophet consist of multiple strains; the most resilient ones produce a smooth texture and a light sparkle in the finished beverage. They have been consumed by many testers and can be multiplied with each batch, provided you supply steady temps and clean supplies. To keep them in good shape, let them rest only briefly between cycles and then plus reintroduce them to fresh liquid. For best results, use spring water when possible, and note that the region’s water profile can influence flavor. Occasionally someone separates a small portion to keep as backup, then returns the rest to the main jar; this helps to stay prepared under a busy schedule. The bauman project and kristen have contributed knowledge on how to lead this practice, and the exact handling tends to capture consistent results over time.
Storage and notes: Keep the grains in a clean jar, and store in the fridge if not using daily. Letting them come to room temp before use is recommended. In short, a quick turn of care keeps the process easy. The supplies you choose–quiet area, clean spoons, and glass jars–make the lead easier, ensuring you capture the most consistent results for the next rounds. Remember: you can maintain as many as needed by refreshing with a short cycle after each brewing session. Before you start, verify that you have whole, unbroken grains and a spare pint of water; this helps you stay in control and avoid wasted batches.
| Scène | Action | Time / Notes |
|---|---|---|
| Rehydrate | Soak grains in 1 pint clean water; stir mid-way; drain and rinse | 6–12 hours |
| Activate | Transfer to neutral base; keep at 20–25 C; stir every 8–12 hours; avoid carbonated liquids | 24–48 heures |
| Assess | Check for creamy surface and mild aroma; ready for main cycle | after activation |
Step 3 Feeding the Grains: Choose milk, portioning, and regular feeding routine
Use a pasteurized dairy beverage as the nourishment source for the grains. For a single batch, start with 1 pint and add 1 tablespoon of grains per cup of liquid. This little ratio is taught for consistency; if isnt tasting balanced, adjust on the next cycle. Beginning with a stable base makes it easier to track changes across november and december flavors.
Be selective about your dairy beverage type. For a smooth, full-bodied result, choose a source with stable protein and fat content; full-fat options yield a creamier texture, while low-fat variants can require longer fermentation. If you’re shopping at the market, read labels for added sugars and gums; aim for the simplest ingredient list. In guidance from bauman and barcharov, acids develop based on the starting grade and sugars in the beverage; keeping the same source across cycles helps keep the flavor profile consistent. The keh-feer flavor profile often emerges when the base is consistent; many wondered about the impact of different beverages on taste, having the opportunity to compare side by side.
- Proportion et ratios : Pour chaque tasse (240 ml) de boisson, utilisez 1 cuillère à soupe de grains. Pour une chopine (2 tasses), cela représente 2 cuillères à soupe. Si vous voulez considérer le lot comme un test, vous pouvez commencer avec 1,5 cuillère à soupe pour 1,5 tasse de liquide ; notez les changements dans votre carnet. Cette approche vous permet de comparer le goût d’un cycle à l’autre.
- Rinçage et manipulation : Rincez délicatement les grains à l'eau filtrée refroidie entre les cycles pour éliminer les dépôts et les accumulations. Ne frottez pas, faites simplement tourbillonner et rincez, puis replacez dans le récipient. Veillez à ne pas introduire de contaminants ; couvrez le bocal avec un tissu propre ou un couvercle qui permet la respiration.
- Routine de fermentation : Placez le bocal dans un endroit sûr à l'abri de la lumière directe et maintenez une température stable autour de 22-25°C (72-78°F). Vérifiez après 24 heures en inclinant doucement le bocal ; la surface devrait montrer des bulles et un arôme agréable. Si la saveur est trop forte, attendez un peu et goûtez à nouveau ; si elle est trop douce, prolongez un peu le cycle.
- Stockage et transport : Une fois le goût désiré atteint, filtrez et embouteillez la boisson, en conservant les grains pour les réutiliser. Conservez les bouteilles au réfrigérateur et vérifiez-les après 1 à 2 jours pour la carbonatation et le développement des saveurs. Utilisez des bouteilles qui ferment bien et indiquez la date ; dans les cuisines où ça bouge, vous pouvez accumuler plusieurs récipients d’une pinte et un mélange de saveurs en novembre ou décembre, ce qui est courant dans de nombreux foyers.
Continuez d'affiner en notant les boissons et les proportions qui donnent le goût que vous préférez ; avoir un registre clair vous permet de revenir plus tard à un profil favori. Après avoir couvert les bases, rincez et séchez vos ustensiles entre les cycles, vérifiez les joints des bouteilles et maintenez une cadence régulière qui correspond à votre routine.
Étape 4 Couvrir et Fermenter : configuration du récipient, couvercles et maintien d’une fermentation chaude et stable
Utiliser un grand bocal en verre de 1 à 2 L à large ouverture, propre et transparent, et le recouvrir d'un couvercle respirant ou d'une étamine de coton fixée par une bande souple. Cette configuration permet aux gaz de s'échapper lentement tout en réduisant le risque de contamination. Pour un contrôle optimal, choisir un couvercle non métallique ou un système de sas ; ne pas fermer hermétiquement. Si votre cuisine a des températures fluctuantes, placer le bocal sur une surface stable dans la chaleur matinale de la pièce, à l'abri du soleil direct, et l'envelopper d'une serviette légère pour minimiser les variations de température.
Conservez le récipient dans un endroit calme à environ 22–28 °C (72–82 °F). Évitez la chaleur directe ou les courants d’air, et minimisez les variations quotidiennes en le plaçant sur une étagère à l’écart des fours ou des portes de réfrigérateur. Si votre pièce est plus fraîche, vous pouvez placer le bocal près d’une source de chaleur douce ou l’isoler avec une couverture légère pour conserver la chaleur tout en laissant l’air circuler.
L'échange de gaz doit se faire à travers le tissu ou le sas, et non par un joint étanche. Desserrez périodiquement le couvercle d'un cran pour relâcher la pression si vous remarquez un bouillonnement qui semble vigoureux. Si vous êtes intolérant au lactose, vous pouvez filtrer après la session du matin pour réduire la teneur en lactosérum. Sakharova et Barcharov soulignent qu'il est important de maintenir l'installation propre et sèche afin de minimiser les mauvais goûts et les risques de moisissure.
Maintenez l'hygiène avec des ustensiles et des bocaux propres ; rincez à l'eau chaude et évitez les résidus de savon qui persistent et peuvent affecter les cultures. Le long des parois et à travers les grains, remuez simplement avec un ustensile propre pour maintenir une masse uniforme en formation. Si vous constatez une croissance anormale ou une odeur étrange, jetez le lot et recommencez avec de meilleurs éléments et des récipients de qualité prêts à l'emploi.
Lorsque le processus approche de son terme, vous pouvez consommer directement ou filtrer pour séparer le lactosérum et créer un profil de boisson plus léger. La différence entre les deux approches réside dans la texture et l'arôme : les boissons non filtrées restent plus troubles et plus acidulées, tandis que celles qui sont filtrées sont plus claires. Grâce à un contrôle minutieux, vous obtiendrez un résultat homogène et équilibré, qu'il est préférable de consommer frais le matin, provenant directement de votre propre cuisine. Les grandes quantités peuvent être divisées en deux bocaux pour gérer la stabilité de la température et garantir des résultats plus prévisibles. Utilisez cette méthode pour que votre prochaine production soit forte, savoureuse et prête pour une dégustation de fin de semaine entre amis ou en famille.
 Cinq cafés et restaurants soviétiques légendaires de Moscou – Un guide historique">
 De l'argent dans les mers : quels poissons pêcher dans le Pacifique russe ?">
 Une journée à Moscou – Le guide ultime des attractions incontournables">
 15 des meilleures stations de ski en Russie – De Carélie à Sakhaline">
 Meilleure période pour visiter la Russie – Saisons, météo et conseils de voyage">
 La rue Arbat à Moscou – Une visite de la rue la plus célèbre de la ville">
 Guide de voyage en Russie – Conseils ultimes pour Moscou, Saint-Pétersbourg et au-delà">
 Top 5 des campings près de Moscou pour s'évader de la ville">
 Aéroport Cheremetievo Après Minuit – Comment rejoindre le centre-ville de Moscou — Forum de Moscou">
 Moscou pour les gourmets – Une aventure culinaire à travers les meilleurs restaurants de la ville">