 10 zimných horských miest, ktoré musíte vidieť pre krajinársku fotografiu">

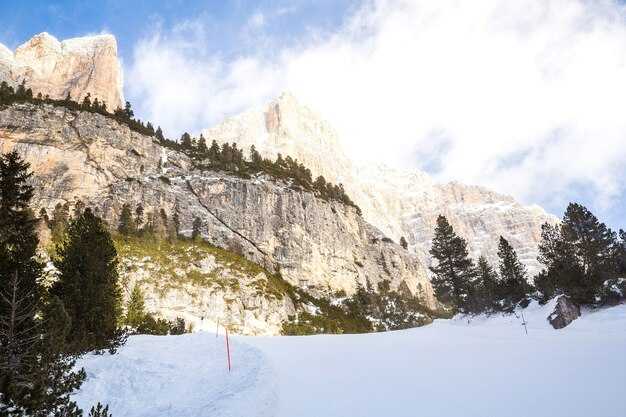
Odporúčanie: Start at first light above the valley, around 1800–2100 meters, where powdery surfaces glow and distant ridges meet the horizon; this lets your photographic setup capture a lifetime of decisive moments with crisp contrast.
Protection and gear: Protection against gusts and frost is essential. Pack a windproof shell, insulated gloves, and a compact shelter. A sturdy tripod and spare batteries prevent shake on long exposures, preserving texture on ice, rock, and other surfaces.
Vnútri vanoise basin, a castle-like rock spire guides the eye toward a lake where icebergs drift along glassy water; a castle itself becomes a focal point, inviting a closer look. The scene shifts with the angle of the sun, offering different moods in a single day. Keep your lens at 50–85 mm to compress distance and emphasize scale.
swedish light in the cold-season gives soft warmth to fields of snow and the surfaces of frozen lakes; step into the open and watch how the long blue shadows anchor composition.
For a nostalgic christmas mood, search near shepherd huts and wooden chalets where string lights glow through crisp air; you’ll capture a quiet color palette that enhances texture in the snow and frost.
nadpis east along the ridge, a wind-sculpted cornice points toward your next frame; this lets you chase a dramatic silhouette as the sun climbs above the horizon.
Along each route you encounter wolf tracks crossing snow fields; use them as subtle guides to lead the viewer through the frame without overpowering the scene.
Distances matter: aim for panoramas where distant peaks sit at the edge of a foreground ridge about 150–300 metre away, keeping the scale honest and the texture rich in light and ice.
Let your skill guide the way as lines meet at a clean horizon; when perfection lands, you’ll hear the silence of the season and feel your own lifetime memory solidify.
Let the day’s light decide the final image: shoot with a dry run, then bracket exposures to preserve dynamic range; this approach poďme you refine technique and head toward true photographic balance.
Structured plan to cover ten spots under harsh cold-season conditions
Prepare a compact routing window: target civil twilight and blue hour, two backups, and move in a clockwise sequence across ten locations in lapland including kiruna. This approach keeps momentum, minimizes exposure, and yields images with dramatic color and soft light.
Equipment and safety essentials: sturdy tripod with wide legs, fast glass (f/2.8 or faster) for dim light, a spare battery stash, hand warmers, weather-sealed filter, lens hood, and a small heater pack to stabilize camera during long exposures. Keep batteries in a warm pocket between shots; avoid condensation by acclimating gear. Use a polarizing filter to tame glare on ice when glare is intense; a remote release reduces shake. Pack microspikes, insulated boots, windproof outerwear, and a warm hat to stay comfortable during long waits for a perfect moment. Timing remains crucial; explorers should plan breaks to check weather updates without losing light. Warm up between locations to keep morale high; this completely avoids fatigue and ensures visitors stay engaged.
1) Abisko National Park and Nuolja ridge offers completely open panoramas over frozen lakes and pine groves; the scene often shows interesting color shifts as clouds drift, lending a dreamy quality to textures. Light tends to swing around civil twilight, so bracketed sequences capture both bright and shadowed contours. A 14–24 mm or 24–70 mm zoom handles wide vistas and close ice details; stay aware of a hawk that may drift overhead. Timing in lapland matters; pick a calm window to maximize chances for clean silhouettes against the sky. These spots provide diverse wildlife cues among soft snow, and attract visitors who come for iconic comps of sky and ice.
2) Jukkasjärvi vicinity around Icehotel centers on frosted windows and carved ice; the color palette shifts between blue shadows and warm building lights, producing images with high contrast and a painterly mood. Shoot through early evening blue hour to emphasize texture on the ice blocks and frost edges; a tilt-shift or careful perspective yields architectural panoramas in a soft, cinematic way. Bring a telephoto for intimate portraits of windows or a wide lens for the approach to the hotel’s façade. Visitors often linger here, drawn by the unusual glow that comes from the interior lamps bleeding through ice walls.
3) Kiruna outskirts – ice horizons over frozen fields presents stark lines where militantly cold wind scours the flat terrain; the calm, pale light amplifies color gradients in the sky and on ice. The place rewards long perspective shots that capture the vastness of lapland; a longer lens tightens the rhythm of tree rows and utility poles against a broad horizon. Timing is key during overcast days, when dramatic silhouettes and soft, low sun angles reveal textures that textbooks don’t show. Images here often carry a stark, beautiful quality that visitors remember as quintessentially northern.
4) Björkliden area sits at a high-contrast junction of snowfields and forested folds; the light can turn from ice-blue to copper in minutes, making it ideal for color-rich, dramatic panoramas. Use a wide lens to present the depth of field across the valley; a mid-tele can isolate a lone pine or alpine cone with crisp detail. Wildlife occasional quiet moments–soft wind, a distant hare or grouse–add living texture to the scene. Timing during early morning or late afternoon yields a warmer hue, and the place offers chances to compose minimalist frames with negative space.
5) Riksgränsen leans into glacial textures and sea-like ice surfaces; the colder wind creates a tactile surface that responds beautifully to longer exposures. The lighting during late afternoon can glow with a rare warmth, letting color break through the blue cast on snow. A tripod and remote shutter help stabilize long-lens captures of crevasses and wind-sculpted snow. Hawks or other birds may appear above the ridge, adding a dynamic element to your photographic plan. This spot is ideal for expansive panoramas and for documenting the stark, open character of harsh conditions.
6) Torneträsk ice fields offer broad ice sheets and calm reflections when wind subsides; the stillness yields dreamy symmetry and sky drama. A wide-angle setup captures the scale of frozen water and surrounding pines; a medium tele can isolate a single icicle or a crack in the ice as a leading line. The fall of light here happens quickly; pick a window when the sun sits low to maximize color warmth without washing texture. Images from this location often feel serene yet powerful, with a sense of solitude that resonates with visitors exploring lapland’s remote corners.
7) Gällivare plateau features wind-sculpted snow and distant hills that frame a strong horizon line; the colder air yields crisp detail and a sense of edginess in composition. A combination of panoramas and tighter frames showcases the contrast between smooth snowfields and jagged rock faces. Look for soft light in early morning or late afternoon; the color shift adds mood to the scene. Wildlife glimpses–soft tracks in fresh powder or a distant bird of prey–raise the story above a simple landscape.
8) Jokkmokk area provides snow-draped streets, wooden facades, and night-sky potential for star trails when skies clear after snowfall. Use a tripod-based approach for high-detail texture on the houses and the surrounding snow mounds; color emerges from lamplight reflections on ice, delivering a charming, photographic quality to each frame. Timing aligns with prolonged blue hours in winter; this increases your chances to capture the quiet atmosphere that lingers over the town after visitors retire. The scene invites exploration and yields images that speak to a traditional Swedish rhythm set in lapland.
9) Arjeplog and Hornavan Lake area reveals broad ice expanses and a frozen shoreline that offer generous space for compositional experiments. A long exposure can smooth the wind-ripples on the lake, producing a surreal, dreamy surface that contrasts with crisp silhouettes of shoreline pines. Light shifts are pronounced here, making panoramas especially compelling at dusk; a telephoto helps isolate textures in the distance. Wildlife visits may occur as small silhouettes at the lake edge, contributing to a sense of place that feels both real and poetic for photographers exploring the region.
10) Arvidsjaur region closes the circuit with woodland trails and snow-draped meadows that invite quiet, contemplative frames. The softer light of the late afternoon enhances color in the sky and on the snow, turning the scene into something beautifully simple yet richly layered. This area offers strong chances to capture intimate landscape details–ice crystals along a twig, a frozen creek, or a single set of tracks that lead the eye toward a distant horizon. Visitors who come here often leave with a portfolio of images that feel intimate, natural, and characterful for swedish snowy scenery in lapland.
Common guidelines across all ten spots: keep packs light yet complete with layers, hand warmers, and spare batteries; shoot in RAW to maximize dynamic range when skies are variable and clouds roll in over the horizon; prioritize timing to catch the soft, color-rich moments that occur during civil twilight or blue hour; move efficiently between locations to preserve energy and maximize shooting windows; observe wildlife from a respectful distance to preserve their natural behavior while still recording compelling images; these practices increase your chances to produce a cohesive set of photographs that truly represents the region, its softer light, and its dramatic landscapes; the result is a portfolio that highlights the dreamlike color and quiet grandeur of lapland in kiruna and beyond.
Gear and personal safety for snow, wind, and changing visibility
Plan a conservative turn-back rule: if visibility falls below 300 meters or gusts exceed 60 km/h, retreat to shelter until conditions improve. This plan keeps you safe until the next window and provides a clear reason to pause when weather shifts. In europe’s alpine regions, lapland, and iceland, weather can flip quickly; near lochend, at a historic castle, or along an exposed bridge, stay prudent and ready to retreat.
- Clothing and protection: Base layer should wick moisture (merino or synthetic), mid-layer for insulation, and a windproof/waterproof outer shell. Choose a type of boot with solid grip; add gaiters to seal snow from the ankles. Pack extra gloves, a beanie or balaclava, and a neck warmer. Cold exposure degrades response time, so minimize sweating by venting layers gradually. The need to protect extremities is real; proper setup helps you stay careful in windy, cold conditions.
- Footing, terrain, and shelter: Snow formation can hide hazards; inspect the next step carefully. When wind shifts, trees become temporary shelter, so avoid open faces and ridge tops. Cross bridges with care; ice on a bridge can be slick even when it looks solid. In lochend zones, keep a safe distance from shoreline edges. If you see a castle silhouette in the distance, use it as a landmark to orient yourself, not as a target to approach on uncertain ground.
- Navigation, watch, and route planning: Carry a map, compass, and offline GPS, and mark your plan and escape routes in field notes. Check national park advisories and local forecasts; watch for sudden visibility drops or wind gusts from unexpected directions. Include a contingency plan and a reason to retreat if weather deteriorates. Until you confirm safe passage, stay on lower, more sheltered terrain and avoid cliff edges.
- Electronics, batteries, and gear protection: Cold drains batteries quickly; keep spares in inner pockets and rotate them to stay warm. Carry a small power bank, a compact hand warmer, and a protective rain cover for your main camera. In image-making, a wide-angle lens helps you capture vast, ethereal scenes without needing to toil on unstable ground. Present gear with a sturdy strap and light protection against blowing snow to protect investment.
- Image-taking technique in gusts: Use a fast shutter to freeze motion in windy conditions, and brace a tripod on rock or snow. If you’re using a tripod, keep it low to reduce sway; consider a remote release or timer to minimize movement. Bracket exposures to handle changing light, especially where magical light lingers near a calm lake or over a historic valley. The goal is to craft honest, majestic scenes that demonstrate how wind sculpts trees and cliffs, without risking gear or life. There, creative outcomes emerge as light plays with every snow formation.
- Safety mindset and group discipline: Never push into uncertain ground; maintain spacing, communicate turns, and set bail-out points. Carry a whistle, an emergency blanket, and a small shelter tarp to protect against gusts. There is a prevailing reason to stay present: a simple misstep can turn a moment of wonder into a life-threatening situation. If someone falters, retreat to a safer point and regroup.
Timing, light, and atmospheric cues for snowy mountain scenes
Begin with civil twilight–when the sun sits just below the horizon but the sky still glows–this yields soft, directional lighting that flatters snow textures. Set a stable frame with a tripod; keep ISO 100–400; shutter 1/60–1/200; if wind is calm, consider an extended exposure (2–4 s) to reveal subtle texture in the snow; bracket three frames to guard against rapid changes.
Lighting quality shifts as clouds drift. Clear, low-humidity air produces crisp shadows that deepen depth; overcast sheets the light, reducing contrast; these differences determine how looking the scene is in the frame and how good the result can be.
Atmospheric cues help you time the shot: wind sculpts covered snow into sharp cornices; a veil of haze marks colder air, sharpening depth and the scene’s qualities. Look for owls perched on a spruce or a distant wolf crossing a meadow; if wildlife appears, switch to a longer lens and extend the frame for a dreamlike composition. A hawk may silhouette over the ridge, adding scale.
Equipment and approach: keep your gloves on to adjust settings fast; backpack extra batteries and a compact weather cover; use a cenis filter if available to balance skies or rely on a polarizer for contrast; rely on extended dynamic range to preserve details in bright highlights and shaded valleys. The goal is a sharp, noise-free frame with natural gradations.
When planning, Norway provides a practical template: select roads that thread between fjords and villages located beneath crags; heading toward higher passes after dawn yields crisper air and cleaner light. Check weather bands and road closures; time your approach to avoid glare on snow-covered slopes and to keep the sky in your frame, preserving landscapes.
Post-processing guide: stack 3–5 photos into a cohesive series, but keep the colors honest; apply modest adjustments to shadows and midtones to maintain depth and authenticity; aim for optimal balance and perfection; never overdo saturation; export 16:9 frames for these landscapes and include a few video clips to accompany the final photos. For next steps, keep your originals safely stored with tags to locate scenes quickly.
Composition techniques to maximize drama in snow-season terrain
Anchor the frame with a foreground on banks of snow, then push depth by layering ridges toward the skyline. Use a versatile 24–70 mm lens to cover intimate texture and distant peaks; keep ISO 100–400, aperture around f/8–f/11, and shutter near 1/60–1/250 s depending on breeze and light; this yields crisp detail on ice and tracks in the banks.
Plan panoramas that reveal depth and atmosphere: shoot a sequence from left to right, then stitch into a single wide field. Maintain an overlap of 25–30% to ensure alignment as light shifts across the scene. Over many tries, this approach yields consistent stitching.
Watch wind along a stream or pools; use long exposures (0.5–2 s) to blur motion while keeping edges sharp; this ethereal glow heightens the sense of movement on a calm day. If wind picks up, raise ISO to 800 to preserve texture.
Choose destinations such as wengen or millarville and vary vantage points; year after year, light angles shift, and opinion among shooters may differ, thats the beauty of practice, somewhere near the overlook.
Inside the frame, maintain balance by placing a strong foreground on one side and leaving negative space on the other; this approach keeps the field grounded and visually stable. okay, look for natural frames like banks or arches to contain the view, somewhere in the middle of the scene, and add a sense of place.
| Technique | Impact | Praktické tipy |
|---|---|---|
| Foreground anchors | Gives banks and depth | Place snow banks or ice features in the near third; use f/8–f/11; tripod helps |
| Panorama strategy | Expands space; creates panoramas | Capture 6–9 frames with 25–30% overlap; stitch in post; choose a stable perch |
| Light and color balance | Elevates beauty; ethereal tones | Shoot during golden hour; white balance 5200–5600 K; exposure compensation +0.3–+1.0 |
| Lenses and perspective | Controls compression vs context | 26–70 mm for context; 70–200 mm for compression; verify histogram to avoid underexposure |
| Motion management | Adds life to pools and wind-swept surfaces | Long exposures 0.5–2 s on still days; use tripod, remote release |
Camera settings and protective measures for snowfall and gusty winds
Set to manual, shoot RAW, expose snow with +0.7 to +1 EV; shutter 1/500–1/1000s; aperture f/8–f/11; ISO 100–400; telephoto lens in 300–600mm range; keep a monopod or sturdy tripod, and shoot from a wind-sheltered spot to ensure tack-sharp results.
Meter with spot or center-weighted modes and verify the histogram to avoid blown highlights on light surfaces; bracket +0.3 to +1 EV for critical areas such as frozen pools or coastal terrain, then review at ground level to confirm texture retention; in snowing conditions with gusts, use bursts to capture fleeting moments while maintaining a consistent baseline and plan to revisit problematic compositions later in the sequence.
White balance should stay around 6500–7500K for neutral snow tones, or shoot RAW and adjust in post if light shifts in seasonal daylight; for destinations like Lapland or coastal Norway, the middle of the day can yield flat color, so lean toward a slight cool or warm bias to protect perceptual accuracy and overall mood; also consider a pre-set WB on cloudy for richer sky color when storms loom.
Protective measures for equipment and yourself begin with weather-sealed gear and a reliable rain/snow sleeve; use a lens hood, keep desiccant packs in bags, and prevent condensation by acclimating lenses gradually between temperatures; avoid rapid temperature swings by keeping the camera inside your jacket during breaks and swapping batteries in a warm pocket; in -20c conditions, battery life drops sharply–carry at least two spares and keep them close to your body to maintain total power.
Storage and handling strategy: completely seal the camera body when leaving the shelter, wipe with a microfiber cloth before reassembly, and store in a weather-resistant bag when not in use; also, dry hands with gloves that allow finger mobility for fine control, then reassemble promptly to avoid frost on filters; during long sessions near an island shoreline or in a village perimeter, plan to switch between a wide-angle to reveal scenery and a telephoto to isolate details, maximizing creative flexibility.
Protection protocol for the skin and fingers includes a windproof shell, insulated gloves with tactile fingertips, and frequent warm breaks; keep a small spare blanket or pack to sit on during wind-sheltered pauses, ensuring you can stay comfortable and focused as you shoot throughout the day; this approach supports skill refinement and helps you photographically capture perfection without hesitation.
Workflow note: photographers should log weather changes and location notes–total wind speed, visibility, and temperature–so you can anticipate shifts in light and terrain; plan routes that span both middle-ground vantage points and elevated prospection, and consider a mix of terrain such as rocky outcrops, glacial pools, and village edges to diversify your frames; with this knowledge, you’ll maintain momentum even when storms roll in or the light dies back, avoiding doubt and keeping momentum across a long session in places like Norway and the Lapland region.
Site scouting, access logistics, and contingency plans for all locations
Begin a two-week pre-scout: lock permits from national authorities, map access routes, and establish two contingency paths that avoid avalanche zones.
Zdokumentujte každé miesto s kontrolami denného svetla, sledujte prístup vozidiel a zaznamenajte terénne prvky, ako sú borovicové háje a modré vrecká. Označte zóny chránené korunami stromov, kde mäkké svetlo praje vytváraniu snímok hodných Instagramu pomocou teleobjektívu, pričom dodržujte bezpečnostné pokyny. Nikdy sa nespoliehajte na jediný plán príchodu; vytvorte dve odlišné trasy, aby ste sa prispôsobili meniacim sa podmienkam v marcových búrkach.
Pozemná logistika: majte po ruke malý cestovný balíček so základnými vecami; parkujte v blízkosti začiatkov turistických chodníkov v národných rezerváciách; potvrďte si časy prístupu u strážcov; vopred si overte stav ciest; zabezpečte si cestu na každé miesto a udržiavajte neustálu komunikáciu s tímom. Naplánujte parkovanie v blízkosti prístupových bodov laukkujarvi a lofoten; uložte si vybavenie vo vodeodolných puzdrách a prineste si extra batérie na fotenia.
Konzultačné opatrenia: Ak je chodník zablokovaný čerstvým snehom, prejdite na hrebene v nižšej nadmorskej výške alebo chránené rokliny; noste vrstvené oblečenie a chráňte vybavenie pred vlhkosťou; zabezpečte, aby bezpečnostné kontroly zostali konštantné; koordinujte sa s tímami pre divokú zver, ak sa zvýši aktivita losov alebo jastrabov; udržiavajte si odstup a používajte teleobjektív na zachytenie detailov bez rušenia. Ak sa počasie zhorší, ustúpte do blízkej chaty alebo prístrešku pre vozidlá a preplánujte si to v ten istý deň, ak je to možné.
Špecifické poznámky k lokalite: naplánujte okná pre denné svetlo, ktoré sú v súlade s marcovým svetlom smerom k modrým hodinám; v Lofotoch očakávajte členité pobrežia a dramatické štíty; v Laukkujärvi ponúkajú plytké jazerá a porasty borovíc magické odrazy; v národných parkoch dodržiavajte značenie a pohybujte sa len po vyznačených miestach na ochranu biotopov. Zaraďte historické vyhliadky a uhly hodné Instagramu pri presune na ďalšie miesto.
Výbava a bezpečnosť: Používajte teleobjektív, aby ste minimalizovali rušivé vplyvy; majte pri sebe bezpečnostné vybavenie, vrátane lekárničky a majáku; neustále kontrolujte počasie a vietor; zálohy uchovávajte vo vodotesnom vrecku; počas dlhých ciest si vytvorte dobrú rutinu, ktorá zahŕňa rýchlu kontrolu cieľov a uverejňovanie zahrievacích sekvencií, ktoré pomôžu dosiahnuť výsledky hodné Instagramu. Plán by mal zostať flexibilný vzhľadom na meniace sa alpské podmienky a mal by sa dať opakovane realizovať počas zím na rôznych miestach, ako sú Lofoty a vidieky.
 Kulinárske zážitky Fine Dining – Luxusný sprievodca stravovaním">
 Nápady na romantické fotenie z 30 najlepších destinácií Európy">
 Prechádzka zimnou krajinou zázrakov v Moskve – malebný sprievodca zasneženými ulicami">
 Najzaujímavejšie architektonické osvetlenie v noci – vizuálny sprievodca">
 Podzemné múzeum – Objavte galérie a skryté histórie">
 Naplánujte si prechádzku pri západe slnka a iné dobrodružstvá pri západe slnka – praktický sprievodca">
 Workshopy v Art Studio – Kreatívne a praktické kurzy pre umelcov všetkých úrovní">
 Za hranice popíjania – Sprievodca po tradičných a moderných miestach čajových obradov v Tokiu">
 Miesta výmeny – 6 najlepších miestnych trhov na svete pre autentickú kultúru">
 8 Tajných Parkov pre Tiché Cestovanie po Meste – Objavujte v Tichosti">