

Bir ana noktadan başlayın ve büyük anıtları kapsayan, düzgün bir yatay hatta doğru yönlendiren bir bakış açısı belirleyin. Dayanıklı bir üç ayak kullanın, ISO 100-400 arasında tutun, f/8-f/11 diyaframı kullanın ve akşam mavi saatte yaklaşık 1/30 saniye pozlama süresi hedefleyin, hareket bulanıklığını ve kırpma riskini azaltmak için. Daha soğuk tonlara doğru beyaz dengesini ayarlayın, yüksek binaların siluetlerini korumak için, katmanlı bir manzara ortaya çıkarın.
Mahalle sokaklarını, köprüleri ve alan kenarlarını inceleyerek katmanlı bir bağlam oluşturun: ön planda sokaklar binaların kümesine doğru uzanır, ardından uzakta su üzerinde kuleler yükselir. Görüntüye sınır koyarak, bir çerçeve hassas pencere detaylarını kaybetmeden yakalayın, ardından diğer çerçeve gölgeleri açın. Panoramik detaylar hatta gölge gradyanında da korunur.
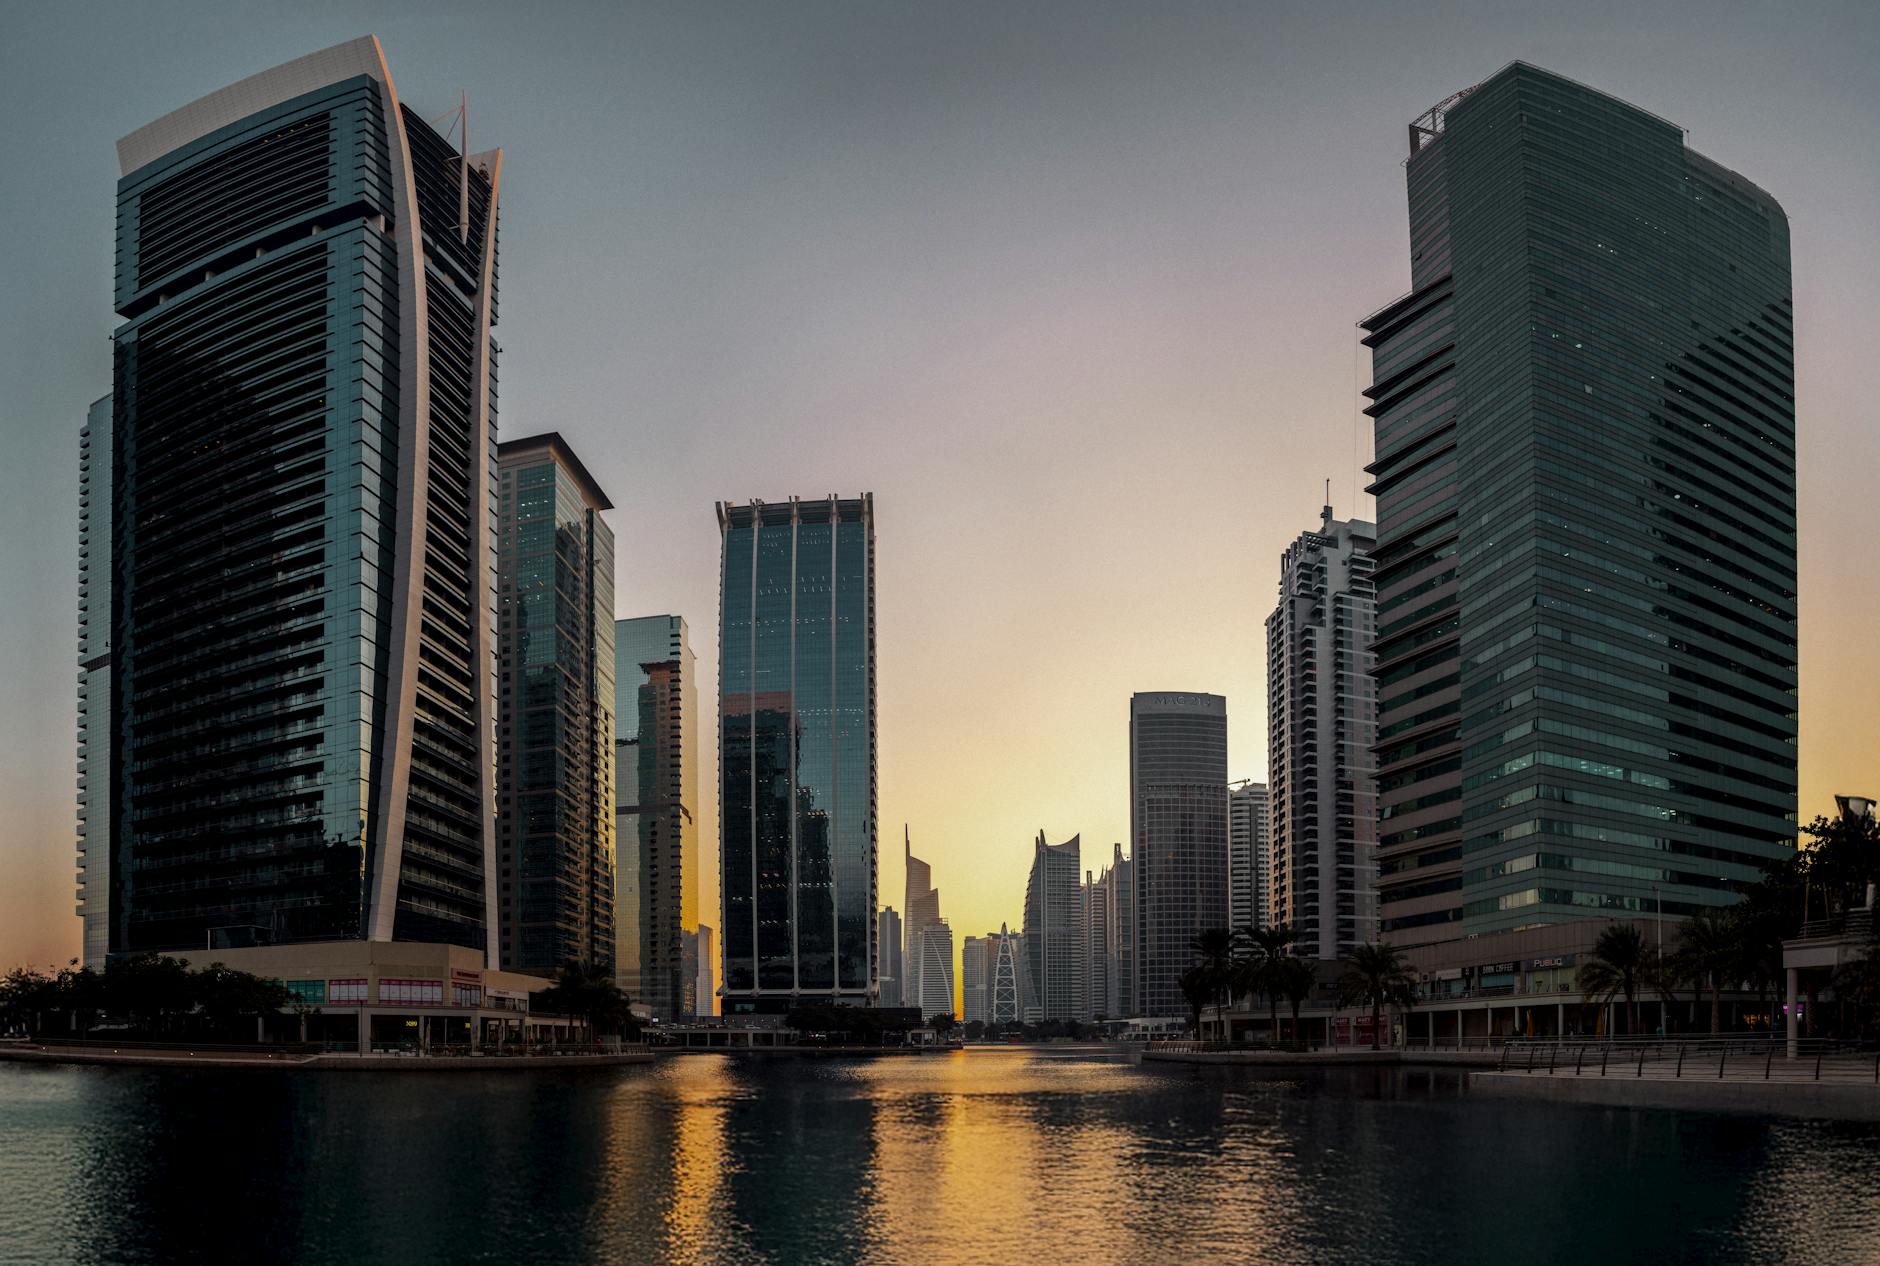
Vancouver'dan alındığında, yüksek binaların göl üzerinde kaybolan siluetleri, akşamın mavi saatine doğru dramatik bir dönüşüm yaşar. Geniş açılı bir lens geniş bir panorama bağlamı sunarken, telefoto lens binaların hatlarında ritmi izole eder. Geniş açılı bir çerçeve bağlam sunarken, daha uzun bir lens daha sıkı bir kompozisyon sunar. Muhtemelen ton değişimlerini fark edersiniz ve cam üzerindeki ince yansımalar kaçınılmazdır. Halifax mahallelerinde, uzaktaki Burj benzeri siluetler mesafeyle ölçek değişiminin nasıl değiştiğini hatırlatır ve parlak çizgilerin karanlık cephelerle birleştiği şekilde şaşırırsınız.
Deneyimleri saatler boyunca kaydet: akşam alacakaranlıklarında, mavi saatlerde ve karanlıkta çekimleri planla. Bir kompakt alan seti yardımcı olur - üç ayak, uzaktan kumanda, yedek pil. Halifax veya Vancouver bölgelerinde, gündüz ışığı kaçırdığı gece dokuları ortaya çıkar. Ayarları günlüğe kaydet, ardından sonuçları inceleyerek hangi düzenlemelerin ışık ve gölgeler arasında en güçlü dengeyi sağladığını belirle. Her zaman mükemmeliyete ulaşamazsın, ancak tekrarlayan oturumlar iyileşme getirir, arka planda Burj'dan ilham alan kuleler ölçeği hatırlatır.
Şehir Manzaralarını Harika Bir Şekilde Çekmek İçin 12 İpucu: Dubai Şehrinin Benzersiz Görünümleri
Burj Khalifa'da altından tavanına kadar uzanan manzarayı altın saatte ölçüm yaparak doğru pozlama ayarlayın, ardından diğer şehir noktalarını keşfedebilirsiniz.
- Burj Khalifa - Gözlem terası (Tavan-zemin). Akşam ışığı gökdelenlerin siluetlerini dönüştürür; çizgileri düz tutmak için bir üçayak ve geniş bir objektif (16-35mm) getirin. Manuel ayarlarla ISO 100, açık f/8, kapanış 1/125-1/250s ayarlayın; HDR için ±1 EV aralık ayarlayın ve daha sonra birleştirin. Biletleri önceden satın alın; parlaklıkları önlemek için gizli bir kenara dayanın, planlanan zamanlarda herkese açık pencerelerden yararlanın. Güney yönlü panorama, merkezi bölgeyi kapsayarak geniş bir perspektif sunar, koleksiyonunuz için harika bir temel çerçeve oluşturur.
- Sky Views Dubai - Camdan ve köprü. Şehir ışıkları parlamaya başladığı akşam yakınına varın; 24-70mm'lik bir lens kullanarak minimum distorsiyonla düzgün bir yatay hat çerçevelendirin. Ayarlar: ISO 200-400, f/4-f/5.6, 1/60-1/125s; dirsekleri sabitleyerek elden çekim yapabilirsiniz; camdan pencerelerin daha karanlık tonlarını kaplamak için bracket kullanın. Bilet gerekiyor; tavan-döşemeye kadar uzanan camdan yansımalar azaltmak için hareketleri yavaş tutun, bu da şehrin sokaklarından su yansımalarının temiz bir şekilde görüntülenmesini sağlar.
- Dubai Çerçevesi - Tarihi ve modern çerçeve. Dengeleyici bir görüntü elde etmek için güney tarafında konumlandırın; bu şekilde tarihi Creek kenar sokakları ve yeni megayapılarını birlikte görebilirsiniz. 18:00'den sonra çekim yapın, sert gölgeleri önlemek için. Açıklık f/8, ISO 100, 1/125s, 24mm geniş açılı. Cam ve suyun parıltısını azaltmak için bir polarizör kullanın; bu nokta, kalabalık olmadan güçlü bir ölçek hissi verir. Çerçevenin kenarları, eski ve yeni şehir mimarisinin kontrastını vurgular.
- Ain Dubai - Dubai Limanı tekerleği. Akşam turu, su üzerinde panoramik bir yay sağlar; 28-70mm ile çekim yapın, tekerlek çarkları ve şehir manzarası arasındaki simetriye odaklanın; renk ve gökyüzü için bracket kullanın. Pozlama: ISO 100-200, f/5.6, 1/125-1/250s. Özel gözlem platformlarına sahip biletli erişimi kullanın; platform boyunca yavaşça hareket ederek yansımaları minimum seviyeye indirin. Bu bakış açısı, şehir ışıklarıyla açık suyu dengeli bir şekilde birleştirir, harika ve havalı bir kompozisyon sunar.
- Palm Jumeirah'daki The Pointe - Suya bakan palmiye ve siluetler. Güney kıyısına veya The Palm'ın kenarına durun, mimari ve deniz arasındaki dramatik kontrastı yakalayın. Güneş batışından mavi saatlere kadar çekim yapın; perspektifi sıkıştırarak uzak kuleleri ortaya çıkarmak için 70-200mm kullanın; ISO 100, diafram f/8, kapanış hızı 1/80-1/160s ayarlayın; ışık kaybını önlemek için 2-4 aralık serisi uygulayın. Sokak seviyesindeki kalabalıklar bağlam sağlar; bir biletli giriş alanı, açık promenadlerde yükseltilmiş görüntü noktalarına daha yakın erişim sağlayabilir. Bu yer, su ve gökhatıyı temiz, zarafetli bir çizgiyle vurgular.
- Ras Al Khor Doğa Korusu - Şehrin bataklıklar üzerindeki yansıması. Uçan kuşlarla hareketli bir görüntü veren akşam ışığı; 24-105mm mercekte önerilir; 1/200-1/320s hız, f/6.3, ISO 200; su üzerinde nokta ölçümle yansıtma kaybolmasını önleyin. Açık yürüyüş yolları, güçlü yansımalar elde etmek için sizi su seviyesinin üzerinde tuturken, doğa yaşamıyla düşük riskli kalmanızı sağlar. Bu şehir içi oasis, tarihi liman bölgeleriyle modern kuleleri karşılaştırır ve şehrin yoğunluğuna karşı bir kontrast sunar.
- Dubai Marina Promenade / Pier 7 - Suya kıyısında şehir ritmi. Western Tower veya Promenade outlet merkezleri yakınında bir yer seçerek uzun, sabit bir gökhatı çerçevelesini yakalayın. 24-70mm kullanın; pozlama 1/125-1/250s, ISO 100-200, f/8; güneş batış draması için bracket yapın, ardından karıştırın. Güney yönlü açık hava yolları, tek bir çerçevede tekne, yat ve sokak hareketini çerçevelemenize fırsat sunar. Sokak dokusu ve su, denge ve dinamik bir görüntü oluşturur.
- Al Seef Bölgesi - Tarihi akarsu kenarı havası. Su hattından kanalın karşısındaki parlayan kulelere doğru çekim yapın; akşamleyin sıcak tuğla tonları camla kontrast oluşturur. Panoramik genişlik için 16-35mm kullanın; ISO 100, f/8, 1/125s; köşeli taşlar üzerinde stabilite için küçük bir üçayak getirin. Bu yer, miras sokak manzaralarıyla modern siluetleri birleştirir, renkli ve siyah-beyaz olarak da iyi görünen bir şehrin gerçek çelişkisi.
- Dubai Su Kanal Köprüleri - Su üzerinde mimari ritim. Güneş batışı veya mavi saat, kemerlerin ve yansımaların temiz bir görüntüsünü sunar. 24-105mm kullanın, ISO 100-200, f/8, 1/125-1/200s; ışık yönetimi için bracketed çekimler dahil edin. Açık promenadlarda yürüyerek açılarla deneyin; köprülerin düz çizgileri, uzakta yer alan gökdelen kümesine doğru gözü çeker. Bu yer, şehiri çizgileri ile sakin suyun birleştiği bir bütün oluşturur.
- JBR The Walk - Deniz kenarında seviyeli canlılık. Akşam kalabalıkları ve neon işaretler geniş açılı çerçevelere kontext sağlıyor; dikeyleri parlak bir gökyüzü karşısında yakalamak için 16-35mm kullanın. Ayarlar: ISO 200-400, f/4-f/5.6, 1/60-1/125s; ön planda palmiye siluetlerine seçici odaklama etkili çalışıyor. Açık yaya yolları üzerinden erişim; dükkan camlarına yansımalar dikkatli takip edilecek; bu yansımaları elle tutulan bir polarizörle azaltabilirsiniz. Bu bakış açısı koleksiyonunuza canlı ve gerçekçi bir his veriyor.
- Kowloon Tsui / Victoria karşılaştırma ipucu - şehirlerarası ilham. Camdan yapılmış gökdelene batan sulara dikkat edin ve nasıl yere yakın siluetler yüksek binalarla hizalanır not edin; bazı gece göklerinde Edmonton'dan esinlenmiş ovalık sakinlik, neonda hakimiyet kurduğunda beyaz dengesini ayarlamanıza yardımcı olur. Şan tarzında, anlatım çerçeveleri, bir insan öğesini bir cadde veya köprü boyunca yürüyen bir kişi olarak dahil ettiğinizde daha canlı çıkar; bu yöntemi kullanarak Dubai çekimlerinize yerde duran bir ölçek ve enerji verin.
- Çatı katlı yüksek bina seçeneği - otel veya konut manzarası. Ödeme yaparak, biletli erişimle özel bir çatı terasına bakın; binaların ışıkları hakim olduğu akşamüstü saatlerde çekim yapın. Üç ayaklı, 24-70mm, ISO 100, f/8, 1/60-1/125s; su ve camlarda ışık kaybını önlemek için birkaç kadrajı ayarlayın. Bu yükseltilmiş, şehri manzarası mimari çizgilerle açık gök arasında ideal bir denge sunar ve bir bütün olarak bir resim ruhunu verir.
Dubai'nin En İyi Gökdelen Çekimleri İçin Pratik Rehber
Dubai Marina Boardwalk'a mavi saat öncesinde var, kamera raylara yakın düşük bir konumda yerleştir ve en yüksek kuleleri ön planda palmiye çizgileriyle çerçevele. Sabit bir üç ayaklı makas sayesinde temiz, uzun pozlama elde edebilirsin.
Seçilen bakış noktaları, miras ile modern camı karşılaştırır, Ras Al Khor Doğa Koruma Alanı, Palm Jumeirah sahilini, Burj Khalifa bölgesini Souk Al Bahar Köprüsü yakınlarında, Dubai Creek Al Seef ve Dubai Marina manzaralarını içerir. Tek bir oturum, çeşitli kompozisyonlar sunar; geniş bir mercek, adalar arasında dinamik alanları ve ufukta uzak siluetleri yakalar, köy havasıyla katmanlı bir arka plan oluşturur.
- Dubai Marina Boardwalk: su yansımaları, ön planda palmiye, 16-35 mm, ISO 100, f/8, 6 s mavi saat.
- Ras Al Khor Doğa Koruma Alanı: turnalar ve uzak kulelerle su yansımaları; 8-12 s pozlama, 24 mm, üç ayak.
- Palm Jumeirah sahil kenarı: eğimli silüet, aydınlatılmış su yolları; 24-70 mm, altın saat ile mavi saat.
- Souk Al Bahar Köprüsü, Burj Khalifa kümesine doğru: sık kompozisyon, arka plan derinliği, 14-24 mm, f/8, 4-8 s, polarizer parıltıyı bastırmak için.
- Dubai Creek Al Seef promenadı: miras mimarisinin modern anıtlarla harmanlanması; 35-50 mm, akşamleyin ısıtıcı yansımalar için.
Lojistik: Creek boyunca kısa bir feribot yolculuğu, ön planda hareket çizgileri ekler ve alan derinliğini genişletir; lisanslı operatörlerle yapılan turlar, çatı gözlem noktalarına erişim sağlar; alanlar kalabalıksa, kompakt bir sandalye veya monopod getirin.
Ekipman ve teknik: üç ayak, uzaktan şütür, yedek pil; 16-70 mm aralığına sahip mercek seti, ön planda uzak siluetlerle dengeli bir görüntü sağlar; ISO 100, diyafram f/8, 6 saniye açıkta mavi saat; su yollarındaki parıltıyı kontrol etmek için bir polarizasyon filtresi kullanmayı düşünün; RAW formatında çekim yapın, son işlemde beyaz dengesi daha sıcak tonlara doğru ayarlayın ve en yüksek kule formlarını vurgulamak için yatay çizgileri düzgün tutun.
Dubai'nin İkonik Manzaralı Noktalarını Keşfedin ve Şehir Manzaralarını Yansıtın
Burj Khalifa'nın gözlem terasından, Sheikh Mohammed Bin Rashid Bulvarı 1 numaralı adresinde, altın saatlerde başlayın ve geniş bir şehri görüntüleyen uzun çapraz görüntüler ve ödüllü çekimler elde edin.
Palm Jumeirah'daki Palm Tower View'e gidin; batıya bakan bu gözlem noktası, şehri kapsayan uzun çerçeveler için rahat köşeler sunar ve size yerel binalarla parıldayan yansımalarla bağlanmanızı sağlar.
Ain Dubai tekerleği, Dubai Marina, Cümeyre Sahili ve Burc Halife'yi 360 derecelik görüntüler sunar; parıltıyı azaltmak için elle döndürerek, bir saat boyunca ödüllü şehir manzaralarını zevkle yiyebilirsiniz.
Dubai Frame, zamanları birbirine bağlayan bir simge olarak duruyor; cam panellerin yanında durup, liman mahallelerinden ve parlayan kulelere uzanan bir panorama yakalayın.
Halk plajları JBR ve Sunset Beach geniş manzaralar sunar; rahat bir pozisyon alınız, uzun pozlama uygulayınız ve sürfçilerin gizliliğini sayınız.
Dubai Marina promenadinde batıya bakan gözlem noktaları ödüllendirici siluetler sunuyor; çok sayıda merceği al, park etmeyi önceden ayarlay, saat aralıklarını not et, haleluyah.
Dubai'de En İyi Işık ve Hava Durumu Pencereleri: Çekimlerinizi Zamanlayın
Uygun zamanlama, ilk ışıkta veya mavi saat yakınında başlamakla beraber; fotoğrafçılar, sabah ve akşam güneşin batışında gök renklerle dolduğu ve cam cephelerin parlak ışıkta parıldamadığı saatleri hedef almalıdır.
Dubai hava genellikle açık sabahlar sunar; daha sakin günlerde nem seviyesi düşük kalır, bu da siluet ayrımını iyileştirir. Öğle saatlerinde parlaklık artar, bu yüzden güneş daha düşük ve rüzgârlar hafif kalırken bir pencere seçin. Dubai'nin ışığı hızla değiştiği için, birbirini izleyen açılar planlayın. Zaman penceleri hızla daralır; poz eksikliklerini ayarlayın.
Esplanad rotalarından, ufuk boyunca uzanan devasa siluetler cam ön yüzler boyunca kilometrelerce uzanır; bu çerçeve dünyanın en büyük panoramayı ortaya koyar ve fotoğrafçılara çok uzun pozlama değişiklikleri için fırsatlar sunar.
Winnipeg ve Ottawa'dan gelen fotoğrafçılar, saatlerini uyumlaştırmak için gündüz ışığını kontrol etmelidir; sakin su yansımalarını ve yeni açılar için kısa bir feribot geçişi yapabilirsiniz; Esplanad kenarlarından geniş bir çerçeve kurun, ardından güneş batarken parlak detaylara odaklanın; Sekanslar arasında ekipmanınızı gölgede bırakın. Yakınlardaki yolları, yürüyüş rotalarını veya bir sahil köyünü keşfederseniz, devasa kulelerle uyumlu harika ön planlar elde edersiniz. Orada yansımalar çoğalır.
Burj Khalifa, Marina ve Ötesi ile Çerçevelenme
Şehir merkezindeki bir terasa sabahleyin yerleş; Burc Halife'yi su üzerinde Marina ile çerçeveleyin, kuleyi biraz dış merkezde tutun, daha uzak gökdelene ve parklara doğru süzün; bu kompozisyon, okurların incelemek istedikleri bir ilgi çekici nokta olacak.
Kamerayı dayanıklı bir üç ayak üzerinde sabitleyin, ISO 200 ayarlayın, diafram f/8, kapanış süresi 4-8 saniye olarak ayarlayın; RAW formatında çekim yaparak pozlamaları koruyun; yansımaları yatıştırmak için bir polarizasyon filtresi kullanmayı düşünün; ışık değiştiğinde pozlamaları aralıklarla yapın; gölgelerde gürültüyü düşük tutmaya çalışın.
Tavan seviyesinden ve çatılardan taramalar yapın: çatı terasları, gözlem platformları veya yükseltilmiş köprüler; geniş bir 16-35 mm kullanarak genişlik yakalayın veya daha uzun bir 70-200 mm kullanarak öğeleri sıkıştırın; bu seçenekler zor ışık koşullarını ele almanıza yardımcı olur.
Lantau'daki yerlerden şehre kadar, modern unsurları su tekstürleriyle harmanlayan geçişler planlayın; bu yaklaşımla akşam çekimleri yapanlar denge sağlayarak bir hikâye anlatabilir.
| Aspect | Öneri |
| Shutter | 4-8 s |
| ISO | 100-200 |
| Apertür | f/8 |
| Focal uzaklık | 16-35 mm veya 24-70 mm |
| WB | Oto veya 3800-4200 K |
| Tripod | Here is the translation of your text into natural, native-quality Turkish, following all your instructions: --- Örnek Metin: "Saint Isaac's Cathedral is located in Saint Petersburg, near the Nevsky Prospekt. The museum is open from 10 AM to 6 PM, and the entrance fee is $15. You can reach it by taking the metro to Nevsky Prospekt Station. For more information, visit the official website at www.example.com or call +1 234 567 8900." Çeviri: "Aziz İsa Katedrali, Sankt-Peterburg'da Nevski Prospekt yakınlarında bulunuyor. Müzede giriş saatleri 10:00-18:00 arasıdır ve giriş ücreti $15. Metro ile Nevski Prospekt İstasyonu'na inerek oraya ulaşabilirsiniz. Daha fazla bilgi için resmi web sitesini ziyaret edin: www.example.com veya +1 234 567 8900 numarasından bize ulaşın." --- |
| Notes | Ham, gürültü kontrolü, tutarlı pozlar, su yansımalarını açık tutun. |
Foto bir dizi serbest bırak; set, balıkçı teknelerinin yakında sürüklenirken üst kattaki elemanların nasıl hizalandığını gösteriyor; dünya çapında bir akışta yayınlanan hikâyeler, okurları maruz kalma sürelerini öğrenmeye, zaman kaybetmeye, gelecekteki çekimleri planlamaya yardımcı oluyor.
Gear Essentials: Lenses, Tripods, Polarizers for Dubai Işığı
Başlangıçta kompakt, esnek bir setle başlayın: hızlı standart bir zoom (24-70mm) plus geniş bir zoom (16-35mm) ve uzun bir zoom (70-200mm) kamera seti, halka açık bakış noktaları, palmiye ağaçlarıyla süslenmiş park köşeleri, tramvay hatları ve kraliyet manzaraları için. Çantanıza dayanıklı bir üç ayak ve polarizörü ekleyin. Pil düzeyini kontrol edin, yedek kart hazır tutun, gölgelendirme ve yansımalar için öğle sonrası çekimleri planlayın.
Cam şişesi karışımı, geniş Dubai siluetleri için 16-35mm aralığını kullanır; 24-70mm, sokak-gökyüzü sekanslarını ele alır; 70-200mm, sıkıştırılmış detaylar sunar. 24mm tilt-shift, yüksek noktalardan bakıldığında çizgileri düz tutar. 50mm veya 85mm gibi hızlı başlık lensler, öğle ışığında yakın dokular ekler.
Polarizerler, cam ve sudan gelen parıltıyı azaltır, gökyüzünü daha derin bir maviye çevirir ve öğle parıltısında palmiye yapraklarının dokusunu daha az parıltılı olarak gösterir. Polarizer kullanımı, renk yoğunluğunu dengelemek için döndürülerek, halka açık promenadlarda cilt tonlarını korur.
Tripod seçimi: karbon lif, 1.5-2.0 kg yük kapasitesi, merkez sütun aşağı, bacaklar 3-4 bölümlü ayarlanabilir. 360 derece dönebilir, hızlı serbest bırakma plakası, bağımsız pan kilidi olan top başlık. Kompakt bir model, hafif seyahat eder, Parc gözlem noktalarına yakın erişilebilir, tramvay tekerlek hareketini ortaya çıkaran uzun pozlama destekler. Isı ve toza dayanıklı ekipman taşır.
Kamerayı ayarlarken RAW formatında çek, pozlama yap, histogramı kontrol et, gün ışığında ISO 100-400 arasında deney et; akşamüstü ışık azaldığında 800-1600'e çık. Hareketli insan ve tekerlekleri dondurmak için hızlı kapanma hızından başla, sonra yavaş hızlarla su ve camdan yansımaları çek. Kamusal gürültü modern bir yaklaşımla donanımlarınızla buluşuyor. Yurinatus ayarı, kamusal panoramalarda ışığın mimariye sarılmasını tanımlamakta yardımcı oluyor.
Geceleri Yıldızları Yakalamak: Gürültüyü Azaltmak ve Parlak Şehir Işıklarını Yakalamak
Güzel bir fotoğraf çekmek için dayanıklı bir üç ayak, uzaktan şütür ve RAW kaydı ile başlayın. ISO 100-200, diafragma f/8-f/11, şütür 20-40 saniye olarak ayarlayın. Manuel modu kullanın, histogramı izleyin ve -2, 0, +2 EV gibi üç kareye ayarlayarak ışıkları koruyun.
Kameradaki uzun pozlama gürültü azaltma (NR) işlemini devre dışı bırakın, eğer stack yapmayı planlıyorsanız; çoklu çerçeveler çekin ve sonra post işlemde karanlık çerçeve çıkarma uygulayın; gürültüyü yatıştırmak için ayrıntıyı korurken 5-8 çerçeve stack yapın; Lightroom veya Photoshop ile post işlem yapın; keskinleştirmeyi müderece tutun.
Konum seçimi önemlidir: birçok yansıma ve siluet ortaya çıkaran bakış açılarını arayın. Edmonton, Toronto, Kowloon, Cumeirah, Seef ve merkez bölgelerde, sokak köşelerine yakın yüksek noktalar dramatik çizgiler sunar. Akşam veya sabah ışığında, 40 saniyeden uzun bir pozlama lambaların halolarını parlatır; yaz neminde renkler daha sıcak tonlarda değişir. Bu yerler genellikle palmiye ağaçları ve tapınaklar saklar; sokakların düz çizgilerinden yararlanarak gözleri parlayan cam ve trafik izlerine yönlendirin. Zaten birçok yerde görülen, bir körfez veya liman üzerinde de harika bir parıltı yakalayabilirsiniz. Bazı anlar geçici olabilir, bu yüzden erken gelip yerleştirin; balıkçılık gemileri ve diğer hareket eden konular, kapak açığını çok uzun tutarsanız hafif hareket bulanıklığı oluşturur. Kowloon'dan Kung'a kadar, sokak aydınlatmasıyla tekstürler değişir; konum çeşitliliği sadece fırsatları artırır.
Bakış çizgilerini sokaklardan gelen bakış yönleriyle şimşekli ışık noktalarına doğru yönlendirin; derinlik için ön planda bir palmiye gövdesi veya tapınak lambası yerleştirin; yüksek yapıları negatif boşlukla dengleyin; su yansıması olan bir noktadan çekin; mavi saat çevresinde çekim yaparak daha zengin renkler elde edin, keskinliği kaybetmeden.
Post işleme planı: 3-5 çerçeveyi HDR veya yığma ile birleştir; lambaların renk bozması azaltmak için 3800-4200K civarında beyaz dengesi ayarlama; gürültü giderimi yaparken dokusunu bulanıklaştırmadan hafif parlaklık gürültüsünü azaltma; tonlama kurtarma için eğrileri ayarlama; aşırı keskinleştirme yapma; belirgin lens bozulmalarını düzeltme; web için 2-3K boyutunda veya baskı için tam çözünürlükte dışa aktarma.
Müzik, yakın mekanlardan geliyorsa, yansımaların rengini etkileyebilir; farklı yerlerde pratik yapmak için çeşitli noktalarda çalışın; Edmonton veya Toronto'daki fotoğrafçılarla iletişime geçerek farklı bakış açılarını paylaşın; palm-lined centre promenadları, sokak koridorları ve liman kenarları gibi birçok seçeneği arayın; erken gelenler, parlak desenlerin şekillenmesini daha çok görebilir. Kalabalık yerleri gözden geçirirken, tapınaklar, balıkçılık tekne ve sokak lambaları görüntüleyebilirsiniz. Zaman önemlidir, ancak sabırlı planlama yaparak hala harika sonuçlar elde edebilirsiniz.


