

Почніть з перевірки відповідності вимогам зараз. Існують чіткі шляхи отримання довгострокового проживання через дозвіл на спільні вигоди. Терміни обробки варіюються залежно від регіону та перевірок біографії. Підготуйте фотографії, копії паспортів, підтвердження наявності коштів та супровідний лист, щоб пришвидшити обробку. Уважно розгляньте необхідні кроки та терміни.
Можуть виникнути можливі питання щодо відповідності вимогам, необхідних документів та термінів. Якщо ви перебуваєте у Швейцарії, місцеві органи влади можуть допомогти з перевіркою документів, охоплюючи кроки, які скорочують терміни. Такі занепокоєння є звичайними, і точні відповіді прискорюють прогрес.
Зміни в політиці можуть відбуватися з незначним попередженням; зміни можуть вплинути на право на роботу, оподаткування або медичне страхування. Думайте наперед, складайте плани на випадок непередбачених обставин і не припускайте, що єдиний шлях підходить усім. Знання посадових осіб, які займаються справами, допомагає; безпечне зберігання коштів залишається важливим. Необхідно завершити підтверджуючі кроки та зібрати підтверджуючі матеріали, щоб залишатися готовими. Тримайте варіанти відкритими, підтримуючи чіткий зв'язок з владою.
Існує кілька шляхів в'їзду; плани подорожей повинні відповідати потребам роботодавця, мовній підготовці та варіантам житла. Якщо ви плануєте працювати, зосередьтеся на секторах, які пропонують віддалене введення в посаду або місцеві посади, і подумайте про довгострокові зобов'язання щодо інтеграції. Переконайтеся, що документи залишаються актуальними, щоб запобігти затримкам.
Критерії відповідності вимогам для візи спільних цінностей: хто має право
Зберіть завірені документи: довідку про несудимість, свідоцтва про народження, свідоцтва про шлюб, якщо це необхідно, документи про право власності або договори оренди, а також підтвердження наявності коштів з інвестиційних звітів. Надайте переклади для неангломовних документів, видані сертифікованим перекладачем. Зберігайте онлайн-копії для швидкого доступу.
Більшість заявників відповідають вимогам, якщо вони відповідають трьом основним критеріям: чиста кримінальна історія, підтверджена поліцейськими перевірками, правдоподібний план переїзду та підтверджені кошти або економічні можливості від інвестицій або права власності на майно. Результати варіюються залежно від країни та поточної політики через цикли планування та перегляду. Дослідження через офіційні портали допомагає, і переклади повинні бути готові для онлайн-подання. Тримайте сертифікати в актуальному стані.
Докази права власності або довгострокової оренди підтверджують стабільність у плані переїзду та статус проживання. Для нерухомості додайте документи про право власності або договори оренди; для інвестиційного шляху додайте офіційні заяви, що підтверджують наявність капіталу. Документація повинна бути актуальною, послідовною та піддаватися перевірці.
Контрольний список документів
Документи для підготовки: довідки з поліції; свідоцтва про народження та шлюб; сторінки паспорта; документи про право власності або договори оренди; інвестиційні звіти; банківські довідки; завірені переклади; усі документи повинні бути завірені та супроводжуватися стислим супровідним листом. Зберігайте копії онлайн та в паперовій формі; переконайтеся, що дати актуальні. Онлайн-завантаження повинні бути чіткими, розбірливими та належним чином відсканованими.
Етапи подання та терміни
Подайте через онлайн-портал із завантаженням документів, перевіркою біографії та співбесідами. Результати залежать від перевірки через поліцейські та офіційні бази даних. Заявники з Чехії або Нової Зеландії можуть зіткнутися з додатковими перевірками або запитами на додаткову документацію; планування наперед допомагає пройти. Обробка зазвичай триває 6-12 тижнів, залежно від завантаженості та змін у політиці. Відкриті перевірки статусу тримають вас в курсі; будьте готові надати оновлену або нову документацію, якщо буде потрібно.
Наявність надійних записів і чіткого шляху до проживання збільшує шанси на сприятливі результати. Досліджуйте ресурси з офіційних джерел і тримайте всі матеріали впорядкованими, щоб спростити процес переїзду. Якщо посилаєтесь на дані або посилання, віддавайте перевагу офіційним базам даних і уникайте getty як доказ відповідності вимогам. Знання митних правил і транскордонне планування зміцнюють готовність завдяки дослідженням і практичним крокам.
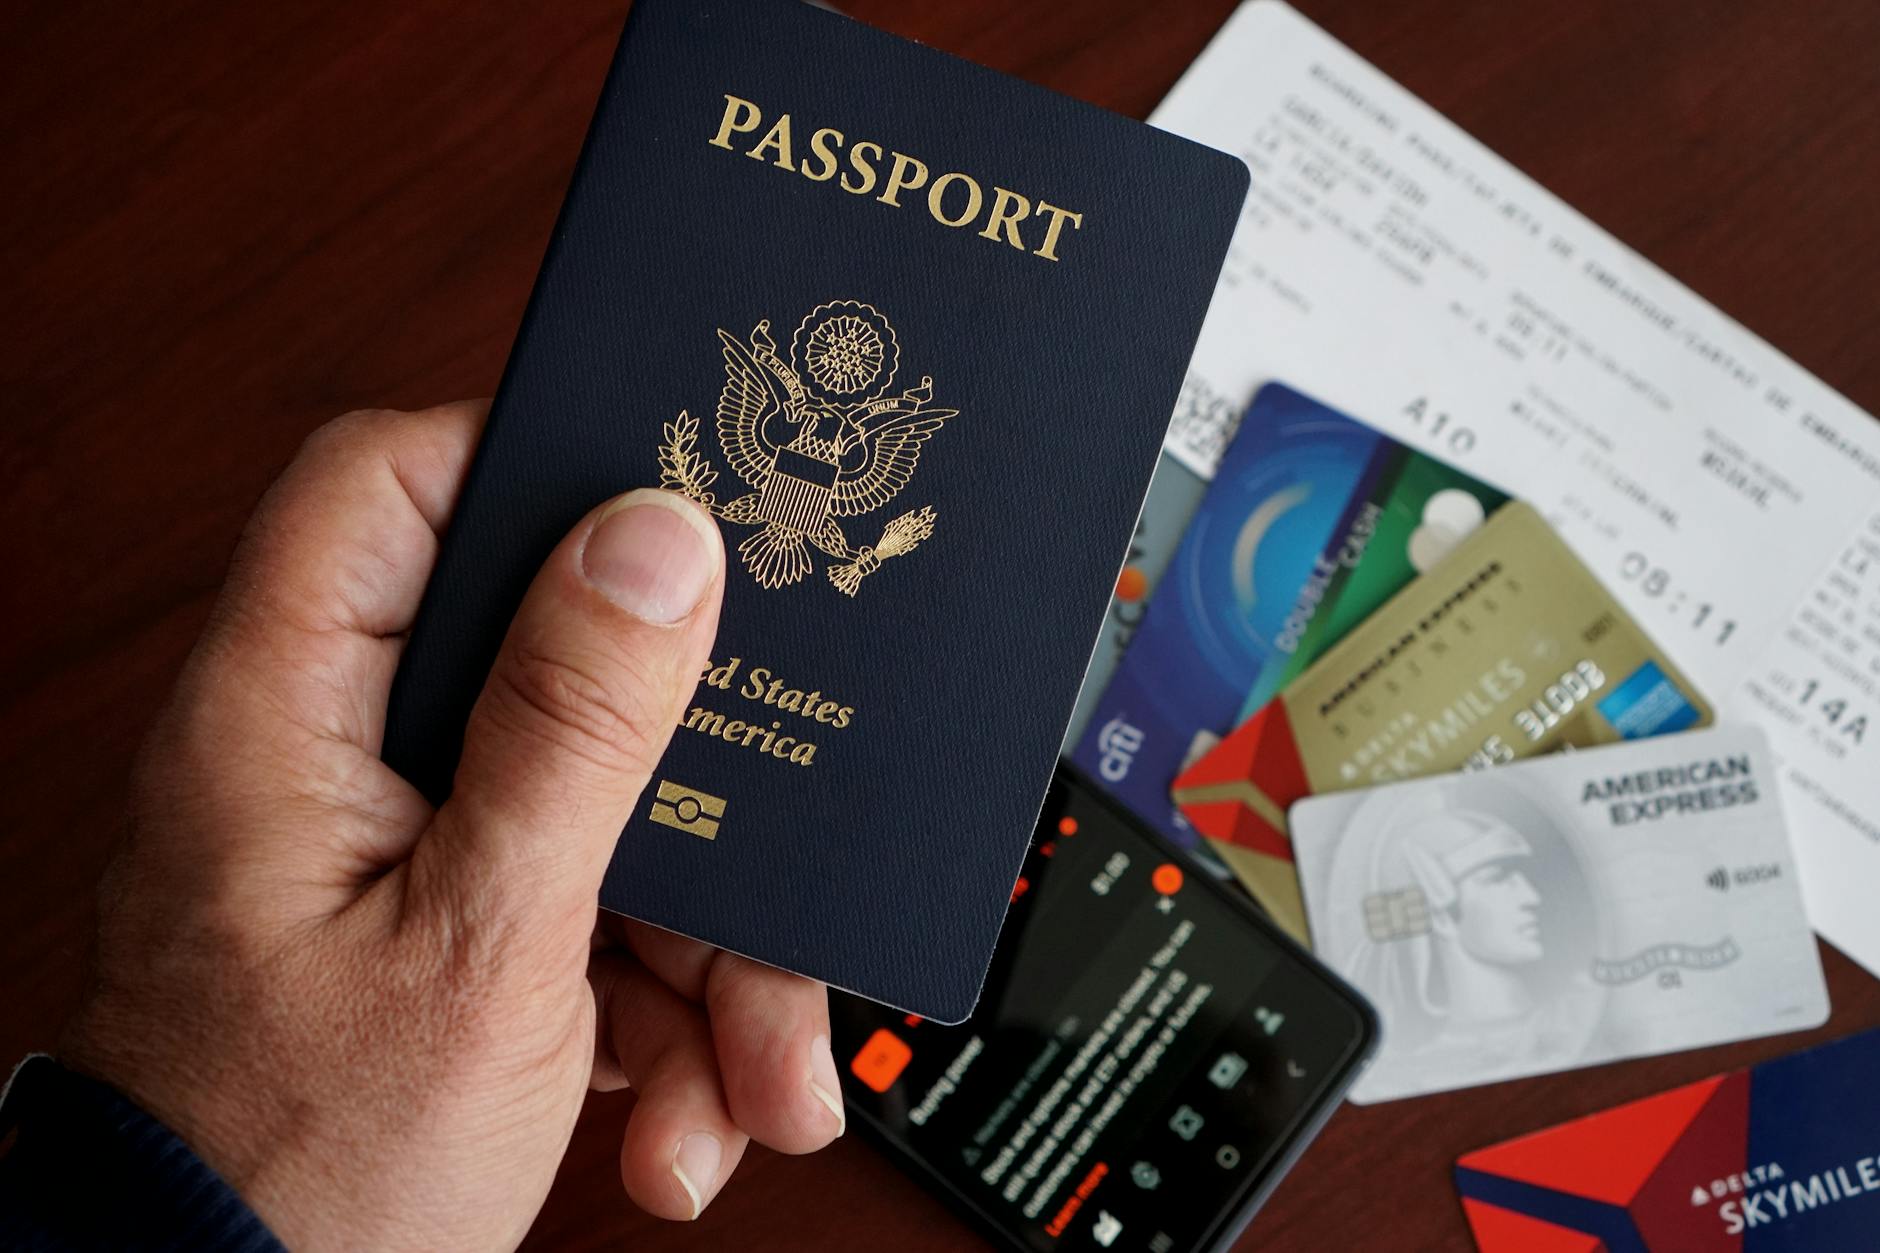
Контрольний список документів: паспорти, посвідчення особи, переклади та нотаріальне засвідчення

Негайно зберіть паспорти, посвідчення особи, переклади та нотаріальне засвідчення; цей крок є обов'язковим для подання документів за кордоном.
П'ять основних груп документів, що охоплюють підготовку: паспорти, посвідчення особи, переклади, нотаріальне засвідчення та підтвердження фінансових можливостей.
Паспорти: переконайтеся, що термін дії становить щонайменше шість місяців після запланованого перебування; підтвердьте наявність щонайменше двох порожніх сторінок; зробіть кольорові фотокопії сторінки з даними та органу, що видав документ; зберігайте оригінали окремо від копій.
Посвідчення особи: включіть національне посвідчення особи та водійське посвідчення; перевірте, чи збігаються імена, дати народження та написання з даними паспорта; принесіть оригінали плюс фотокопії.
Переклади: отримайте завірені переклади для будь-яких неангломовних документів; переклади повинні містити ім'я перекладача, печатку, дату та примітку про точність; написання має відповідати оригіналам, навіть для абревіатур.
Нотаріальне засвідчення: зберіть нотаріально завірені копії, де це потрібно; апостиль може знадобитися для деяких документів; зверніться до ліцензованого нотаріуса, запросіть завірені копії та підтвердьте прийняття органами влади.
Підтвердження доходу та фінансових можливостей: надайте банківські виписки за останні шість місяців, листи від роботодавця, розрахункові листки та докази наявності коштів для покриття витрат на проживання; якщо документи походять з-за кордону, покажіть джерело та безперервність доходу; слід включити як оригінали, так і завірені копії.
Підтвердження місця проживання: рахунки за комунальні послуги на ім'я заявника, договори оренди, урядова кореспонденція; додайте переклади, якщо це необхідно; переконайтеся, що дані адреси збігаються з іншими документами.
Методи та зберігання: збережіть копії у двох форматах (фізичному та цифровому); чітко називайте файли (Прізвище_ТипДокумента_Дата); зберігайте цифрові копії в зашифрованій хмарі як варіант; перевіряйте написання у всіх документах на відповідність; це допомагає зробити заявки більш плавними.
Український контекст та альтернативи: для українських заявників підготуйте додаткові документи або примітки та дослідіть спрощені шляхи або альтернативне місце для сертифікації; використовуйте веб-сайт і надійні джерела для отримання актуальних вимог.
Питання слід реєструвати у спеціальному файлі; запишіть контактні дані органів, що видають документи, та посольств; ця дослідницька примітка допомагає зробити переїзд до росії більш плавним і зменшує кількість запитів туди-сюди.
Фінансова готовність: кошти, підтвердження доходу та налаштування банківської системи

Рекомендація: тримайте кошти доступними для переїзду та початкових витрат; тримайте ліквідний резерв для покриття депозитів і непередбачених зборів під час подання заявки на отримання документів на проживання. Плануйте дні обробки та можливі затримки; уникайте переказів в останню хвилину.
-
Кошти та бюджет
Бюджетна структура для російських ринків: оренда в містах коливається від 400 до 700 доларів США в менших містах; 800-1500 доларів США у великих мегаполісах. Комунальні послуги 50-120 доларів США; продукти 180-320 доларів США; транспорт 30-70 доларів США. Додайте 2-3 місяці витрат на проживання як буфер. На дні під час реєстрації тримайте доступні додаткові кошти для покриття депозитів і зборів за подання заявки. Конкретні витрати можуть відрізнятися; завжди перевіряйте у місцевих орендодавців і банках. Для переїзду заплануйте одноразове утримання застави в розмірі місячної орендної плати.
-
Підтвердження доходу
Документи, що підтверджують особистий дохід: розрахункові листки за останні 3 місяці; лист від поточного роботодавця; попередній трудовий договір; податкові декларації, якщо є. Для самозайнятих: рахунки-фактури клієнтів і бухгалтерська книга, що показує дохід від праці. Усі документи повинні бути перекладені або супроводжуватися завіреними копіями. Зберігайте оригінали, якщо вони потрібні для імміграційних перевірок; для подання заяв за кордоном можуть знадобитися нотаріально завірені копії. Поясніть джерело фінансування в супровідній записці, якщо цього вимагає влада.
-
Налаштування банківської системи
Відкрийте місцевий банківський рахунок після реєстрації; принесіть паспорт, реєстраційну картку та підтвердження статусу резидента. Обробка банківських операцій зазвичай займає кілька днів; виберіть установу з англійським інтерфейсом і чітким онлайн-доступом. Прив'яжіть виплати заробітної плати до вашої організаційної платіжної відомості або офіційного призначення. Встановіть розумні щоденні ліміти; пам'ятайте про безпеку. Якщо попередні доходи надходили з Норвегії чи Греції, додайте попередні платіжні відомості, щоб прискорити подання заявки. Для випадків за кордоном вибирайте банки, які пропонують мультивалютні рахунки та прості міжнародні перекази. Тримайте кошти окремо від щоденних витрат, щоб спростити відстеження.
План мови та інтеграції: практичні кроки, щоб почати вивчати російську мову

Почніть з 20-хвилинної щоденної рутини: 10 хвилин прослуховування повільних діалогів, 5 хвилин повторення фраз вголос, 5 хвилин написання короткого щоденникового запису кирилицею. Ця проста структура допомагає вам почати практично говорити та читати.
Почніть з основного словникового запасу приблизно з 500 слів, охоплюючи привітання, числа, час, напрямки, їжу та загальні дієслова. Це місце стає вашою базою для вимови та розпізнавання шаблонів, і воно забезпечує більше структури для щоденної практики.
Ведіть журнал доказів: записуйте завершені уроки, витрачені години та короткі голосові записи для перегляду. Щотижневий перегляд зберігає інформацію актуальною та керує підготовкою до покращення письма.
Приєднайтеся до групи резидентів або організації, яка пропонує мовну підтримку; це зміцнює спілкування з сусідами та спрощує зусилля з працевлаштування. Цей підхід також підтримує моральну мотивацію та важливе формування навичок.
Фінансовий план: виділіть щомісячний бюджет на заняття або репетиторів; використовуйте безкоштовні програми; відстежуйте квитанції для підтвердження підготовки та демонстрації фінансової готовності.
Початковий графік: виберіть початковий місяць, встановіть реалістичний темп і сплануйте вісім-дванадцять тижнів до будь-якої оцінки; це забезпечує дійсність і дозволяє уникнути тривалих затримок без перешкод.
Зазвичай, вимірюйте прогрес тим, що ви можете робити: відстежуйте покращення в письмі, аудіюванні та говорінні; заплануйте щотижневий перегляд, щоб скоригувати темп і теми, і зберігайте інформацію про отримані уроки.
Місцезнаходження та ресурси: навчайтеся вдома, в бібліотеці або на зустрічах з обміну мовами; маркування та короткі нотатки підсилюють практику, а звичка писати протягом усього часу.
Працевлаштування та організація: завдяки постійній практиці ви можете надати чіткі докази персоналу організації; це підтримує готовність до роботи та інтеграцію в місцеве життя.
Інформаційний потік: зберіть відповідну інформацію про місцеві заняття, терміни та підтвердження наявності коштів; ведіть облік протягом усього часу, щоб уникнути прогалин і підтримувати підготовку в належному стані.
Житло, реєстрація місця проживання та ключові бюрократичні кроки
Подайте початковий договір оренди, форми реєстрації місця проживання та документи, що посвідчують особу, протягом 14 днів після прибуття; апостилі потрібні для закордонних сертифікатів; очікуйте, що перевірки почнуться негайно.
Варіанти житла та терміни
Варіанти включають квартири-студії, однокімнатні квартири та довгострокову оренду через акредитовані агентства. Поточні тарифи варіюються залежно від міста; підтвердьте застави, дати заселення та умови поновлення. Порожні місця у формах слід заповнити перед поданням. Плануйте коригування подорожей або перебування за потреби.
Документація, етапи подання та перевірки політики
Документи з Румунії, України, Багамських островів можуть вимагати апостилів; додайте переклади, якщо потрібно, і проведіть тест на ідентичність або біографію. Деякі російські документи можуть вимагати додаткового апостилю або автентифікації. Системи подання документів різняться; початковим кроком є подання сканів сторінок паспорта, договору оренди житла та будь-яких дипломів зі штампами апостилю. Політика для профілів, що прямують до Австрії, може вимагати додаткової перевірки; поточні вказівки покладаються на штампи дати для дійсності. Для документів російського походження перевірте, чи застосовується додатковий апостиль або автентифікація; плата може відрізнятися залежно від місця розташування. Потім зберігайте копії тут для аудиту та координуйте свої дії з акредитованими офісами, щоб завершити домовленості щодо перебування.


