

Beginne mit der Festlegung eines Blickwinkels, der die wichtigsten Wahrzeichen einbezieht und den Blick auf einen klaren, waagerechten Horizont lenkt. Stelle ein stabiles Stativ auf, halte die ISO zwischen 100 und 400, blende auf f/8 bis f/11 ab und ziele auf eine Belichtungszeit von etwa 1/30 s während der Abendblauen Stunde, um Bewegungsunschärfe zu vermeiden und Überstrahlungen zu verhindern. Passe dann den Weißabgleich zu kühleren Tönen an, um die Stimmung in den Hochhaus-Silhouetten zu bewahren und eine mehrschichtige Landschaft zu offenbaren.
Erhebe die Nachbarschaftsstraßen, Brücken und Feldränder, um einen mehrschichtigen Kontext zu schaffen: Vordergrundstraßen führen zu Gebäudegruppen, dann erheben sich in der Ferne Türme über dem Wasser. Begrenze die Belichtung, sodass ein Bild zarte Fenster ohne Ausfransen einfängt, während ein anderes die Schatten anhebt. Panoramadetails bleiben auch im Schattengradient erhalten.
Von jedem Standpunkt aus: Vom Feldausblick in Vancouver rollen Hochhaussilhouetten über das Wasser, dann gibt das Abendlicht der Blaue-Stunde-Dramatik nach. Eine Weitwinkeloptik bietet eine breite Panoramaperspektive; ein Teleobjektiv isoliert den Rhythmus der Gebäudelinien. Ein Weitwinkelbild liefert Kontext, während eine längere Brennweite eine engere Komposition bietet. Man bemerkt wahrscheinlich Tonverschiebungen und kann die subtilen Reflexionen auf Glas nicht übersehen. In den Vierteln von Halifax erinnern ferne, burj-ähnliche Silhouetten daran, wie sich die Größe mit der Entfernung verändert, und man ist überrascht, wie sich Lichtreflexe mit dunklen Fassaden verbinden.
Experimente über Stunden aufzeichnen: Planen Sie Aufnahmen kurz vor der Dämmerung, zur blauen Stunde und nach Einbruch der Dunkelheit. Ein kompaktes Feldset hilft - Stativ, Fernauslöser, Ersatzakkus. In Halifax oder in den Zonen von Vancouver entstehen nachts Texturen, die das Tageslicht verpasst. Führen Sie Protokolle der Einstellungen und überprüfen Sie die Ergebnisse, um herauszufinden, welche Anordnung das stärkste Gleichgewicht zwischen Licht und Schatten schafft. Perfektion ist nicht immer erreichbar, aber wiederholte Sessions bringen Verbesserung, während burj-inspirierte Türme in der Ferne die Größe erinnern.
12 Tipps für atemberaubende Stadt-Skylines: Einzigartige Aussichtspunkte in Dubai
Burj Khalifa: Panoramablick von Boden bis Decke zur Goldenen Stunde, um die Belichtung richtig einzuschätzen. Sie sind bereit, Ihre Technik zu verfeinern, bevor Sie weitere Stadtspots erkunden.
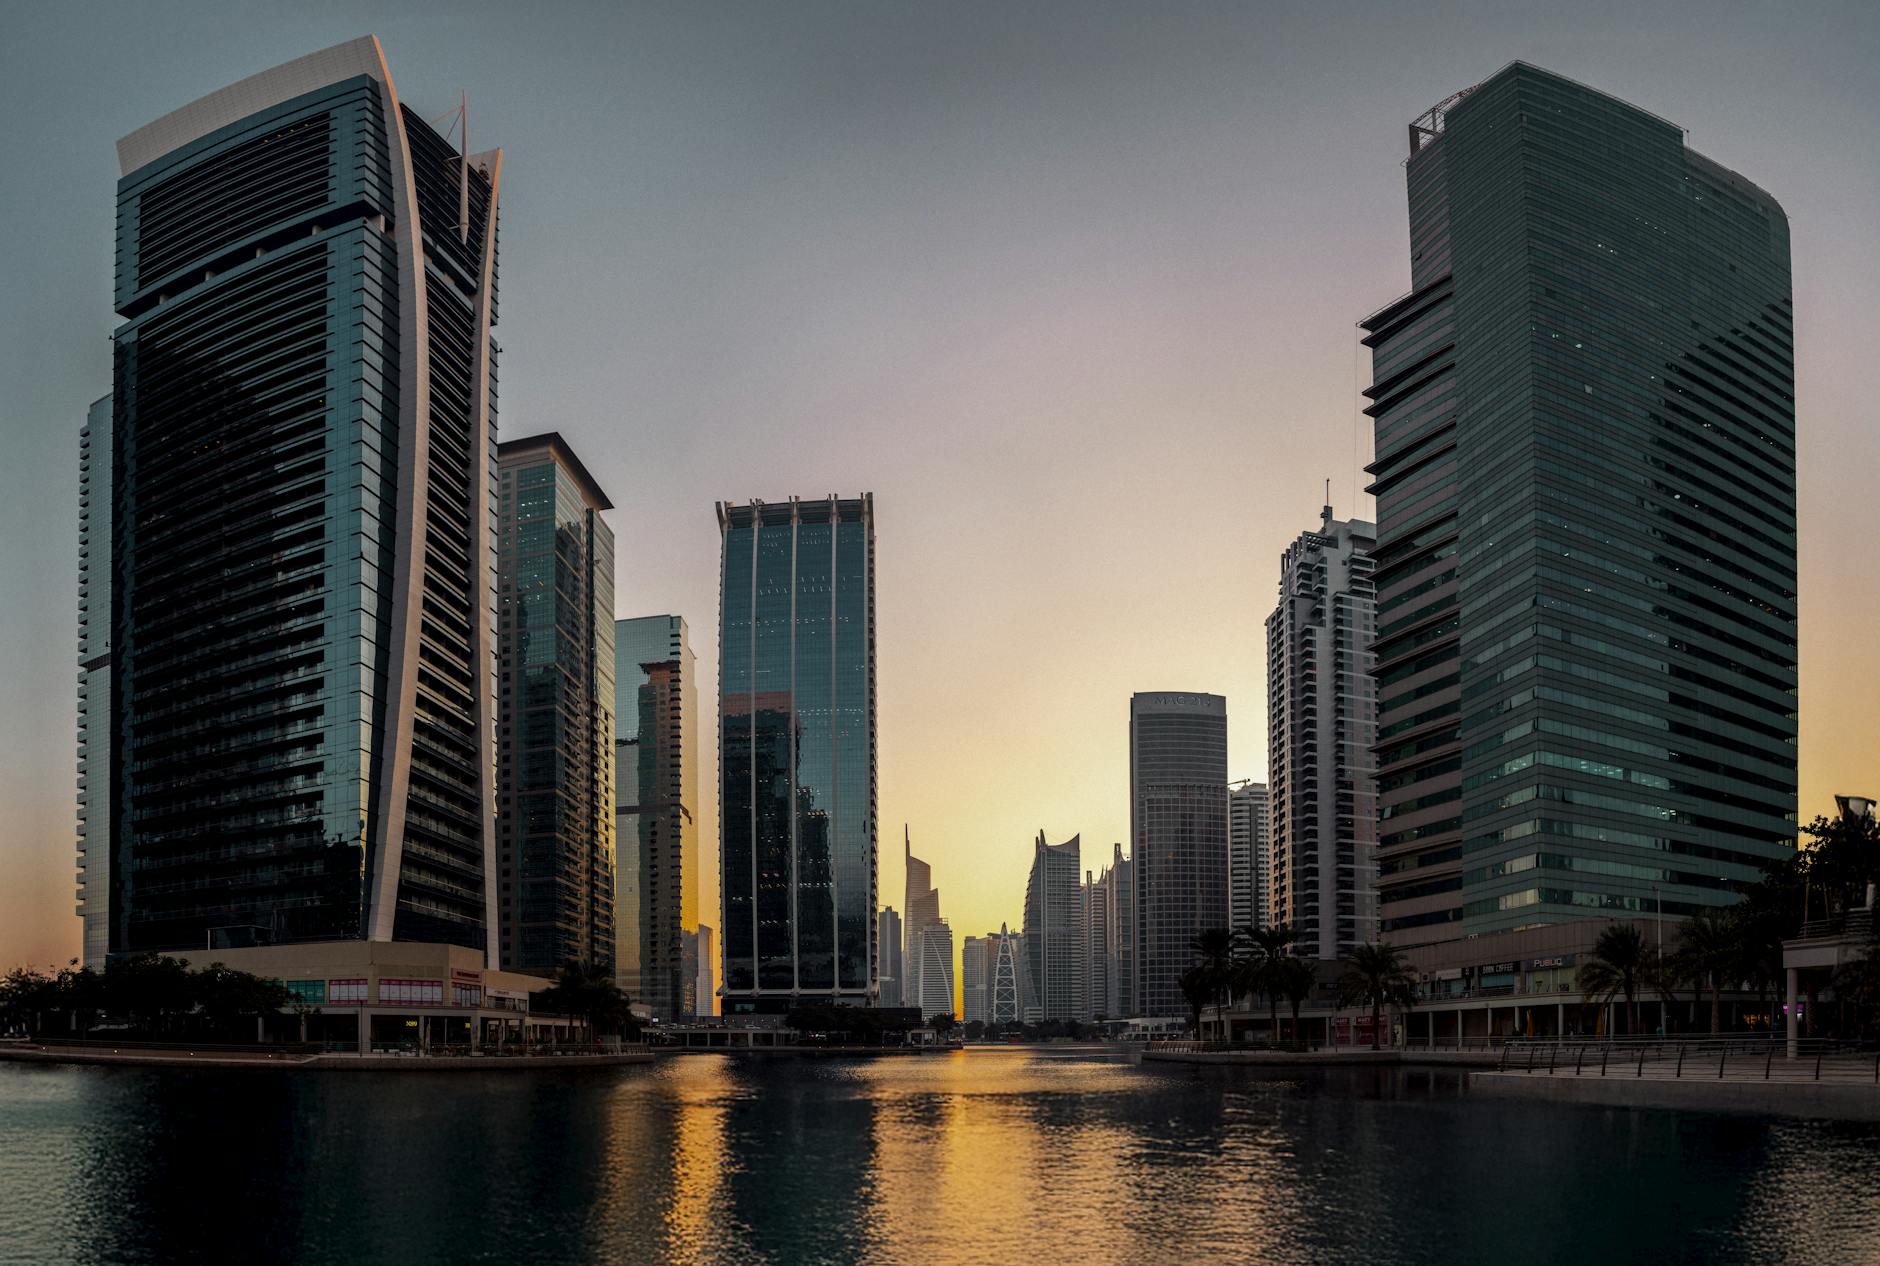
- Burj Khalifa - Aussichtsplattform (Fenster vom Boden bis zur Decke). Das Abendlicht verwandelt die Silhouetten der Skyline; bringen Sie ein Stativ und ein Weitwinkelobjektiv (16-35mm) mit, um die Linien gerade zu halten. Fotografieren Sie mit ISO 100, Blende f/8, Verschlusszeit 1/125-1/250s im manuellen Modus; belichten Sie ±1 EV für HDR und verschmelzen Sie die Aufnahmen später. Kaufen Sie das Ticket im Voraus; vermeiden Sie Reflexionen, indem Sie sich auf eine unauffällige Kante stützen, und nutzen Sie die öffentlich zugänglichen Fenster während der vorgesehenen Zeiten. Die südliche Panoramaansicht erfasst eine weite Aussicht über das Stadtzentrum und bietet eine wunderbare Basisaufnahme für Ihre Sammlung.
- Sky Views Dubai - Glas-Skybox und Brücke. Kommen Sie kurz nach Sonnenuntergang, wenn die Lichter der Stadt zu leuchten beginnen; verwenden Sie ein 24-70mm-Objektiv, um einen geraden Horizont mit minimaler Verzerrung einzufangen. Einstellungen: ISO 200-400, Blende f/4-f/5.6, 1/60-1/125s; von Hand möglich, wenn Sie die Ellbogen stabilisieren; belichten Sie mehrmals, um die dunkleren Töne der Fenster abzubilden. Ein Ticket ist erforderlich; bewegen Sie sich langsam, um Reflexionen von den bodentiefen Glasfronten zu reduzieren, was hilft, saubere Reflexionen des Wassers über den Stadtstraßen zu erzeugen.
- Dubai Frame - Historischer vs. moderner Rahmen. Positionieren Sie sich auf der Südseite für eine ausgewogene Ansicht, die sowohl historische Creekseitenstraßen als auch neue Megastrukturen zeigt. Fotografieren Sie nach 18:00 Uhr, um harte Schatten zu vermeiden; Blende f/8, ISO 100, 1/125s, 24 mm Weitwinkel. Verwenden Sie einen Polarisationsfilter, um Reflexe von Glas und Wasser zu reduzieren; dieser Standort vermittelt ein starkes Gefühl für die Größe, ohne von Menschenmassen überlagert zu werden. Die Ränder des Rahmens betonen den Kontrast zwischen der Architektur der alten und der neuen Stadt.
- Ain Dubai - Dubai Harbour-Riesenrad. Eine Abendfahrt bietet einen Panoramabogen über das Wasser; fotografieren Sie mit einem 28-70-mm-Objektiv, wobei Sie die Symmetrie zwischen den Speichen des Rades und der Skyline in den Fokus nehmen; belichten Sie für Farbe und Himmel. Belichtung: ISO 100-200, Blende f/5.6, 1/125-1/250 s. Nutzen Sie den Zugang zu den ausgewiesenen Aussichtsplattformen; bewegen Sie sich langsam entlang der Plattform, um Reflexionen minimal zu halten. Diese Perspektive balanciert Stadtlichter mit freiem Wasser und ergibt eine wunderbare, luftige Komposition.
- Die Pointe, Palm Jumeirah - Wasserseitige Palmen und Silhouetten. Stehen Sie am südlichen Ufer oder nahe der Kante der Palm für einen dramatischen Kontrast zwischen Architektur und Meer. Fotografieren Sie bei Sonnenuntergang bis in die Blaue Stunde; verwenden Sie 70-200mm, um die Perspektive zu komprimieren und entfernte Türme freizulegen; stellen Sie ISO 100, Blende f/8, Verschlusszeit 1/80-1/160s ein; wenden Sie eine 2-4er-Belichtungsreihe für die Wiederherstellung von Lichtern an. Menschenmengen auf Straßenniveau schaffen Kontext; ein Eintrittsbereich mit Ticket kann näheren Zugang zu erhöhten Aussichtspunkten entlang offener Promenaden ermöglichen. Dieser Ort hebt das Zusammentreffen von Wasser und Skyline mit einer sauberen, eleganten Linie hervor.
- Ras Al Khor Wildlife Sanctuary - Die Spiegelung der Stadt über den Feuchtgebieten. Abendlicht mit fliegenden Vögeln verleiht dem Bild Bewegung; empfohlenes Objektiv: 24-105mm; probieren Sie 1/200-1/320s, Blende f/6.3, ISO 200; Spotmessung auf dem Wasser, um überbelichtete Stellen zu vermeiden. Offene Holzstege halten Sie über dem Wasserniveau für starke Spiegelungen, während Sie gleichzeitig sicher in der Nähe der Tierwelt bleiben. Diese urbane Oase setzt historische Wasserfronten mit modernen Türmen in Kontrast und bietet einen einzigartigen Gegenpol zur Dichte des Stadtzentrums.
- Dubai Marina Promenade / Pier 7 - Urbaner Rhythmus am Wasser. Wählen Sie einen Platz in der Nähe des Western Tower oder der Promenade-Einkaufszentren, um eine lange, stabile Skyline einzufangen. Verwenden Sie 24-70mm; Belichtung 1/125-1/250s, ISO 100-200, Blende f/8; bracken Sie für dramatische Sonnenuntergänge, dann mischen Sie. Offene Wege entlang der nach Süden ausgerichteten Abschnitte bieten reichlich Möglichkeiten, Boote, Yachten und Straßenaktivitäten in einem Bild einzufangen. Die Straßenstruktur und das Wasser schaffen eine ausgewogene, dynamische Ansicht.
- Al Seef-Viertel - Historisches Flair am Kreek. Fotografiere von der Wasserlinie aus in Richtung der glänzenden Türme auf der anderen Seite des Kanals; am frühen Abend entstehen warme Backstein-Töne gegen Glas. Nutze ein 16-35mm-Objektiv für die Panorama-Weite; ISO 100, Blende 8, 1/125s; nimm einen kleinen Stativ für Stabilität auf dem Kopfsteinpflaster. Dieser Ort verbindet historische Straßenszenen mit modernen Silhouetten - eine echte Stadtkontrast, die sich sowohl in Farbe als auch in Schwarz-Weiß gut präsentiert.
- Dubai Water Canal Bridges - Architekturelle Kadenz über dem Wasser. Bei Sonnenuntergang oder in der blauen Stunde bieten sich klare Aufnahmen von Bögen und Spiegelungen. Verwenden Sie eine 24-105mm-Brennweite, halten Sie die ISO bei 100-200, Blende f/8 und Belichtungszeiten von 1/125 bis 1/200 Sekunden; nutzen Sie Belichtungsreihen für eine bessere Helligkeitskontrolle. Spazieren Sie entlang der offenen Promenaden, um mit Perspektiven zu experimentieren; die geraden Linien der Brücken lenken den Blick zu den Hochhausclustern dahinter. Dieser Ort verbindet urbane Linien mit ruhigem Wasser zu einem harmonischen Ganzen.
- JBR The Walk - Lebendige Energie auf Straßenniveau am Meer. Abendliche Menschenmengen und Neonlichter verleihen einem Weitwinkelbild Kontext; nutzen Sie 16-35mm, um Vertikalen vor einem leuchtenden Himmel einzufangen. Einstellungen: ISO 200-400, Blende f/4-f/5.6, 1/60-1/125s; ein Hauch selektiver Schärfe auf Silhouetten von Palmen im Vordergrund wirkt gut. Zugang über offene Gehwege; achten Sie auf Reflexionen in Schaufenstern, die mit einem handgehaltenen Polarisationsfilter reduziert werden können. Diese Perspektive verleiht Ihrer Sammlung eine lebendige, erdverbundene Atmosphäre.
- Kowloon Tsui / Victoria Vergleich - kreative Inspiration zwischen den Städten. Beobachte, wie das Wasser an einer gläsernen Skyline leckt, und achte darauf, wie die Silhouetten auf Straßenniveau mit den hohen Türmen übereinstimmen; die von Edmonton inspirierte Ruhe der Prärie in einigen Nachthimmeln hilft dir, den Weißabgleich zu kalibrieren, wenn Neon dominiert. Im Shan-Stil springen narrative Bildkompositionen hervor, wenn du eine menschliche Figur einbeziehst, die eine Straße oder Brücke entlanggeht; wende diesen Ansatz an, um deinen Dubai-Aufnahmen ein erdverbundenes Gefühl von Maßstab und Energie zu verleihen.
- Dachterrassen-Hochhausoption - Hotel- oder Wohnungsaussicht. Suche nach einem bezahlten, ticketpflichtigen Zugang zu einer speziellen Dachterrasse; fotografiere nach Einbruch der Dunkelheit, wenn die Gebäudebeleuchtung dominiert. Nutze ein Stativ, 24-70mm, ISO 100, f/8, 1/60-1/125s; belichte einige Aufnahmen mit Belichtungsreihen, um die Lichter auf Wasser und Fenstern zu erhalten. Diese erhöhte, urbane Perspektive bietet eine ideale Balance zwischen architektonischen Linien und freiem Himmel und vermittelt eine Gesamtstimmung, die schwer zu übertreffen ist.
Praktischer Leitfaden für die besten Skyline-Aufnahmen von Dubai
Begib dich kurz vor der blauen Stunde zum Dubai Marina Boardwalk, stelle die Kamera tief nahe am Geländer auf und rahme die höchsten Türme mit einer Palmenstreifen-Vordergrund ein; ein stabiler Stativ sorgt für saubere Langzeitbelichtungen.
Wähle Aussichtspunkte, die Tradition mit moderner Glasarchitektur kontrastieren, darunter das Ras Al Khor Wildlife Sanctuary, die Küste von Palm Jumeirah, das Viertel des Burj Khalifa nahe der Souk Al Bahar Bridge, Dubai Creek Al Seef und die Aussichten auf die Dubai Marina. Eine einzelne Session liefert eine Vielzahl von Kompositionen; eine Weitwinkeloptik erfasst dynamische Räume über Inseln hinweg und ferne Silhouetten am Horizont, wodurch ein mehrschichtiger Hintergrund mit Dorfcharme entsteht.
- Dubai Marina Boardwalk: Spiegelungen im Wasser, Palmen im Vordergrund, 16-35 mm, ISO 100, f/8, 6 s während der blauen Stunde.
- Ras Al Khor Wildlife Sanctuary: Wasserspiegelungen mit Kranichen und fernen Türmen; 8-12 s Belichtung, 24 mm, Stativ.
- Palm Jumeirah Küstenrand: geschwungene Silhouette, beleuchtete Wasserwege; 24-70 mm, Goldene Stunde bis Blaue Stunde.
- Souk Al Bahar-Brücke in Richtung Burj Khalifa-Cluster: enge Komposition, Tiefenschärfe im Hintergrund, 14-24 mm, f/8, 4-8 s, Polfilter zur Glättung von Reflexionen.
- Dubai Creek Al Seef Promenade: Traditionelle Architektur im Einklang mit modernen Denkmälern; 35-50 mm, Blaue Stunde für warme Reflexionen.
Logistik: Eine kurze Fährenfahrt entlang des Creek fügt Bewegungslinien im Vordergrund hinzu und erweitert die Tiefenwirkung; Touren mit lizenzierten Anbietern ermöglichen den Zugang zu Dachaussichtspunkten; bringen Sie einen kompakten Hocker oder Monopod mit, falls die Plätze überfüllt sind.
Gear und Technik: Stativ, Fernauslöser, Ersatzakku; Objektivset im Bereich 16-70 mm für ausgewogene Vorder- und Hintergrundsilhouetten; ISO 100, Blende f/8, Verschlusszeit 6 s in der blauen Stunde; ein Polarisationsfilter hilft, Reflexe auf Gewässern zu kontrollieren; Aufnahmen im RAW-Format, Weißabgleich in der Nachbearbeitung zu wärmeren Tönen anpassen und Horizontlinien gerade halten, um die höchsten Turmformen zu betonen.
Identifiziere ikonische Aussichtspunkte in Dubai für weite, dramatische Stadtpanoramen
Beginne auf der Aussichtsplattform des Burj Khalifa, Adresse 1 Sheikh Mohammed Bin Rashid Blvd, zur Goldenen Stunde, um lange, weitreichende Skyline-Aufnahmen und lohnende Fotos zu erhalten.
Navigieren Sie zum Palm Tower View auf der Palm Jumeirah; der nach Westen ausgerichtete Aussichtspunkt bietet bequeme Ecken, um Langaufnahmen über den Himmel zu machen, und hilft Ihnen, sich mit lokalen Gebäuden und schimmernden Reflexionen zu verbinden.
Das Ain-Dubai-Riesenrad liefert 360-Grad-Bilder der Dubai Marina, des Jumeirah Beach und des Burj Khalifa; Sie können es manuell drehen, um Blendungen zu minimieren, und eine Stunde damit verbringen, sich an den lohnenden Stadtansichten zu erfreuen.
Der Dubai Frame verbindet die Epochen wie ein scharf umrissener Anker; stellen Sie sich an die Glaswände, um eine Panoramaansicht von Hafenvierteln und glänzenden Türmen einzufangen.
Öffentliche Strände wie JBR und Sunset Beach bieten weite Horizonte; behalten Sie eine bequeme Haltung bei, wenden Sie Langzeitbelichtung an und respektieren Sie die Privatsphäre der Surfer.
Westlich ausgerichtete Aussichtspunkte entlang der Dubai Marina Promenade bieten lohnende Silhouetten; nehmt mehrere Objektive mit, bucht Parkplätze vorab, beachtet die Zeitfenster, Halleluja.
Zeit für Ihr Shooting: Optimale Licht- und Wetterfenster in Dubai
Gute Zeitplanung bedeutet, bei Tagesanbruch oder nahe der blauen Stunde zu beginnen; Fotografen sollten diese Stunde um die Dämmerung herum anpeilen, wenn der Himmel in Farben erstrahlt und Glasfassaden ohne grelles Licht glänzen.
Das Wetter in Dubai bietet meist klare Morgenstunden; an ruhigeren Tagen bleibt die Luftfeuchtigkeit niedrig, was die Konturenschärfe verbessert; am Nachmittag nimmt die Blendung zu, daher wählt man am besten eine Zeit, in der die Sonne tiefer steht und die Winde sanft bleiben, um die Luftqualität zu erhalten. Da sich das Licht in Dubai schnell verändert, plant man am besten aufeinanderfolgende Aufnahmen. Die Zeitfenster werden schnell schmaler; passen Sie die Belichtungstöne an.
Von der Esplanade aus erstrecken sich kilometerlange, gläserne Fassaden als schlanke Silhouetten gegen den Horizont; dieser Rahmen offenbart die größte Panoramaansicht der Welt und bietet Fotografen unglaubliche Möglichkeiten, Belichtungsänderungen über lange Strecken zu gestalten.
Fotografen aus Winnipeg und Ottawa sollten mit einer Tageslichtkontrolle beginnen, um die Zeitpläne abzustimmen; eine kurze Fährüberfahrt kann Sie zu ruhigerem Wasser für Spiegelungen und neue Perspektiven bringen; von den Rändern der Esplanade aus können Sie einen weiten Rahmen einrichten, dann auf leuchtende Details zoomen, wenn die Sonne untergeht; Lassen Sie die Ausrüstung zwischen den Aufnahmen im Schatten. Wenn Sie in der Nähe gelegene Wanderwege oder Wanderrouten oder ein Küsten Dorf erkunden, erhalten Sie großartige Vordergründe, die sich mit den hohen Türmen ergänzen. Dort vervielfachen sich die Spiegelungen.
Burj Khalifa, Marina und darüber hinaus
Wähle eine Terrasse im Zentrum am Abend; rahme den Burj Khalifa mit der Marina im Wasser ein, halte den Turm leicht außermittig und schwenke zu den weiter entfernten Skylines, einschließlich Parks und anderen Türmen; diese Komposition wird zu einem faszinierenden Ankerpunkt, den die Leser gerne studieren.
Stabilisiere auf einem stabilen Stativ, setze ISO 200, Blende f/8, Verschlusszeit 4-8 Sekunden; fotografiere im RAW-Format, um Belichtungen zu erhalten; erwäge einen Polarisationsfilter, um Reflexe zu reduzieren; achte darauf, Belichtungen zu bracketen, wenn sich das Licht ändert; strebe an, das Rauschen in den Schatten niedrig zu halten.
Scanne Stellen oberhalb der Straßenniveau und auf Dächern: Dachterrassen, Aussichtsplattformen oder erhöhte Brücken; verwende ein Weitwinkelobjektiv von 16-35 mm, um die Weite einzufangen, oder ein längeres 70-200 mm, um Elemente zu komprimieren; diese Optionen helfen bei schwierigen Lichtverhältnissen.
Von Orten auf Lantau bis zu Wahrzeichen im Zentrum planen Sie Übergänge, die moderne Elemente mit Wassereffekten verbinden; dieser Ansatz hilft Fotografen bei Abendaufnahmen, eine ausgewogene Geschichte zu erzählen.
| Aspect | Empfehlung |
| Shutter | 4-8 s |
| ISO | 100-200 |
| Apertur | f/8 |
| Brennweite | 16-35 mm oder 24-70 mm |
| WB | Auto oder 3800-4200 K |
| Tripod | Here is the translation of your text into natural, native-quality German with the specified requirements: --- Beispieltext (Original): "Visit Saint Isaac's Cathedral in St. Petersburg, then head to the Hermitage Museum. Afterward, explore Red Square in Moscow and don't miss the Kremlin. For shopping, go to GUM Department Store. If you need a break, stop by Café Pushkin. For a unique experience, try the Moscow Metro, known for its stunning architecture. Don't forget to visit the Bolshoi Theatre and the Tretyakov Gallery. For a quick bite, grab a burger at McDonald's on Tverskaya Street, 12. If you need a phone, check out the prices at the Apple Store on New Arbat Avenue, 15." Übersetzung: "Besuchen Sie die Isaakskathedrale in Sankt Petersburg, dann gehen Sie ins Eremitage-Museum. Anschließend erkunden Sie den Roten Platz in Moskau und verpassen Sie nicht das Kreml-Gelände. Für Einkäufe gehen Sie ins Kaufhaus GUM. Wenn Sie eine Pause brauchen, halten Sie im Café Puschkin. Für ein einzigartiges Erlebnis probieren Sie die Moskauer Metro, bekannt für ihre beeindruckende Architektur. Vergessen Sie nicht, das Bolschoi-Theater und die Tretjakow-Galerie zu besuchen. Für einen schnellen Snack holen Sie sich einen Burger bei McDonald's in der Twerskaja-Straße 12. Wenn Sie ein Telefon brauchen, vergleichen Sie die Preise im Apple Store auf der Nowy Arbat 15." --- Falls Sie einen anderen Text übersetzt haben möchten, geben Sie diesen bitte an, und ich werde ihn entsprechend den Anforderungen übersetzen. |
| Notes | ROH, Rauschunterdrückung, konsistente Belichtungen, Wasserreflexionen klar halten |
Eine Sequenz von Fotos wird veröffentlicht; die Sammlung zeigt bereits, wie Elemente über Deck ausgerichtet sind, während Fischerboote in der Nähe treiben; in einer weltweiten Feed veröffentliche Geschichten helfen Lesern, Belichtungen zu lernen, Zeit zu sparen und zukünftige Aufnahmen zu planen.
Gear Essentials: Objektive, Stative, Polfilter für das Licht in Dubai
Beginne mit einem kompakten, vielseitigen Kit: einem schnellen Standardzoom (24-70 mm) plus einem Weitwinkelzoom (16-35 mm) und einem Telezoom (70-200 mm), um Aussichtspunkte, parkähnliche Ecken mit Palmen, Straßenbahnlinien und königliche Skyline-Perspektiven abdecken zu können. Packe ein stabiles Stativ und einen Polarisationsfilter in deine Tasche. Überprüfe den Akkustand, halte eine Ersatzkarte bereit und plane Nachmittagsshootings um Schatten und Reflexionen herum.
Glass-Mix kombiniert 16-35mm für weitläufige Dubai-Silhouetten; 24-70mm bewältigt Straßen-zu-Himmel-Sequenzen; 70-200mm liefert komprimierte Details. Tilt-Shift 24mm hält Linien gerade, wenn man sie von erhöhten Aussichtspunkten betrachtet. Ein schnelles Festbrennweitenobjektiv wie 50mm oder 85mm fügt unter Nachmittagslicht intime Texturen hinzu.
Polarisationsfilter reduzieren Reflexe von Glas und Wasser, vertiefen den Blauhimmel und zeigen Palmendetails mit weniger Reflexen bei Mittagssonne. Nutzen Sie einen Polarisationsfilter, indem Sie ihn drehen, um die Sättigung auszugleichen, während Hauttöne auf öffentlichen Promenaden erhalten bleiben.
Stativwahl: Kohlefaser, 1,5-2,0 kg Traglast, Mittelsäule unten, Beine in 3-4 Abschnitten verstellbar. Kugelkopf mit 360-Grad-Drehung, Schnellverschlussplatte, unabhängige Neigefeststellung. Ein kompaktes Modell reist leicht, bleibt zugänglich in der Nähe von Park-Aussichtspunkten, unterstützt Langzeitbelichtungen, die die Bewegung von Straßenbahnrädern zeigen. Transportieren Sie Ausrüstung, die gegen Hitze und Staub resistent ist.
Kameraeinstellungen: RAW aufnehmen, Belichtungskorrektur, Histogramm prüfen, ISO 100-400 bei Tageslicht experimentieren; nach Einbruch der Dunkelheit auf 800-1600 erhöhen, wenn das Licht nachlässt. Beginnen Sie mit einer schnellen Verschlusszeit, um Fußgänger und sich bewegende Räder einzufrieren, dann langsamere Geschwindigkeiten, um Reflexionen von Wasser und Glas zu ziehen. Öffentliche Hektik trifft auf modernen Ansatz in Ihrer Ausrüstung. Die yurinatus-Einstellung hilft dabei, zu beschreiben, wie Licht die Architektur bei öffentlichen Panoramen umspielt.
Meistere die Nacht: Rauschen reduzieren und funkelnde Stadtlichter einfangen
Empfehlung: Beginnen Sie mit einem stabilen Stativ, einem Fernauslöser und RAW-Aufnahme. Stellen Sie ISO 100-200, Blende f/8-f/11 und Verschlusszeit 20-40 Sekunden ein. Verwenden Sie den manuellen Modus, überwachen Sie das Histogramm und belichten Sie drei Aufnahmen mit -2, 0 und +2 EV, um die Lichter zu erhalten.
Deaktiviere die Langzeitbelichtungs-Rauschunterdrückung in der Kamera, wenn du Stacking planst; mache mehrere Aufnahmen und wende dann in der Nachbearbeitung eine Dunkelbildsubtraktion an; stacke 5-8 Aufnahmen, um Rauschen zu reduzieren, während Details erhalten bleiben; bearbeite in Lightroom oder Photoshop; halte die Schärfung moderat.
Ortswahl ist entscheidend: Suchen Sie nach Aussichtspunkten, die zahlreiche Spiegelungen und Silhouetten zeigen. In Edmonton, Toronto, Kowloon, Jumeirah, Seef und den Innenstadtvierteln ergeben sich an hohen Standorten nahe Straßenecken dramatische Linien. Bei Abend- oder Morgenlicht erzeugt eine längere Belichtungszeit als 40 Sekunden Halos von Lampen; bei sommerlicher Luftfeuchtigkeit verschieben sich die Farben wärmer. Diese Orte verbergen oft Palmen und Tempel; die Nutzung gerader Straßenlinien lenkt den Blick zu schimmerndem Glas und Verkehrsspuren. Schon an vielen Orten - etwa über einer Bucht oder einem Hafen - lässt sich ein atemberaubendes Leuchten einfangen. Da manche Momente schnell vergehen, kommen Sie früh und erkunden Sie den Standort; Fischkutter und andere bewegte Motive erzeugen bei zu langer Belichtungszeit subtile Unschärfe. Von Kowloon bis Kung verändern sich die Texturen mit der Straßenbeleuchtung; die Vielfalt der Orte erhöht einfach die Chancen.
Zusammensetzungstrategie: Halte den Horizont gerade; lasse die Straßenführungslinien den Blick auf schimmernde Lichter lenken; platziere einen Palmenstamm oder eine Tempellaterne im Vordergrund für Tiefe; balanciere hohe Strukturen mit negativem Raum; fotografiere von einem Ort mit Wasserspiegelung über den Horizont; die Aufnahme während der blauen Stunde ergibt reichere Farben ohne Schärfeverlust.
Postbearbeitungsplan: 3-5 Frames mit HDR oder Stacking zusammenführen; WB auf 3800-4200K einstellen, um Farbstiche von Lampen zu minimieren; leichte Luminanz-Rauschreduzierung ohne Texturverlust anwenden; Kurven anpassen, um die Tonwertumsetzung zu verbessern; Über-Sharpening vermeiden; sichtbare Linsenverzerrungen korrigieren; für Web in 2-3k exportieren oder in voller Auflösung für Drucke.
Praktische Hinweise: Musik aus nahegelegenen Veranstaltungsorten kann Spiegelungen färben; übe einfach an verschiedenen Orten; knüpfe Kontakte zu Fotografen in Edmonton oder Toronto, um Ideen für Blickwinkel auszutauschen; suche nach zahlreichen Optionen, darunter palmengesäumte Promenaden im Zentrum, Straßenzüge und Hafenränder; wer früh ankommt, hat größere Chancen, funkelnde Muster entstehen zu sehen. Beim Blick auf überfüllte Orte kannst du Tempel, Fischkutter und Straßenlaternen entdecken. Da der Zeitpunkt entscheidend ist, kannst du mit geduldiger Planung trotzdem beeindruckende Ergebnisse erzielen.


