 10 kedvenc helyem utcai fotózáshoz Lisszabonban – A legjobb fotós helyszínek Lisszabonban">

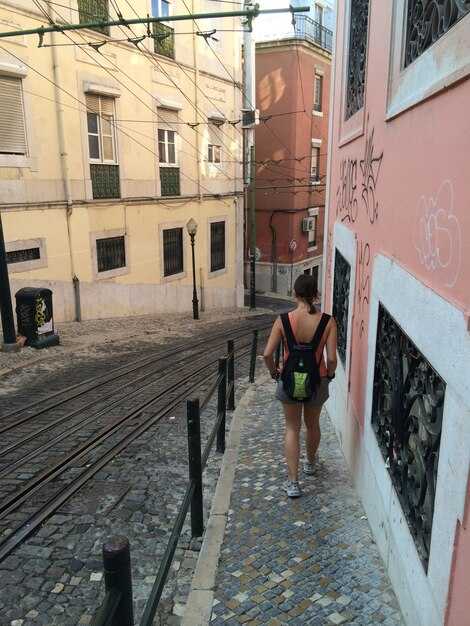
Start at the Alfama overlook at golden hour to anchor your visual path. From there, the Portuguese capital by the Tagus reveals pink tiled façades and hills that rise behind a simple house. Be patient; the first frame should feel definite and purposeful, not rushed.
Move through districts Baixa, Chiado, Graça, and Estrela along the busy streets, then climb toward higher viewpoints for contrasts in scale. In each district you can find multiple textures: azulejo panels, balconies, and stairways that tell centuries of daily life without shouting clichés. When you caption, mention the district names to give context.
Stand by the riverfront near Cais do Sodré and watch the light drift across the water, contrasting white stucco with pink roofs. The coastal breeze adds a natural movement to frames as boats drift by; the mood can be lenyűgöző even in crowds.
When the light changes, notice how havana tones bloom on tile and plaster. The small courtyards and the way stair partitions cast shadows tell a story without loud gestures. Focus on how a single house facade catches the sun and then dissolves into pattern on the next frame.
To broaden your sense of place, compare the rhythm here with mumbais’ crowded lanes, guatemala markets, or fjords seen in distant landscapes. Such references keep you from copying familiar angles and push for a more personal string of frames across cities and districts.
Patience and a light touch with gear help you stay honest to the light. without rushing, you can find subtle silhouettes, doorways, and windows that compose into a narrative across multiple moments.
Return at blue hour to extend the arc: you’ll see a natural shift in color across tiles, iron rails, and harbor reflections. In that quiet, the spaces between districts reveal a personal method rather than a generic portrait of this coastal capital.
My 10 Favorite Lisbon Street Photography Spots and Morocco Souks Guide
1) Alfama’s dawn-lit lanes: start here; the thing to chase is light rolling across stairways and white walls. North-facing alleys offer obvious opportunities for photographing everyday life, while women on balconies add elegant color. It quickly becomes one of my favourites.
2) Baixa-Chiado around Praça do Comércio: broad avenues and granite façades create clean geometry; shoot across the square as trams rattle by and cars move along the road. Whether you shoot wide or tight, you’ll find favourites in the strong lines and portraits near street vendors.
3) Mouraria’s azulejo corridors: named streets, tight bends, and local tradition; photographing here yields human stories and women selling crafts. This area is an obvious field for adventures across sunlit and shadowed corners; long exposures help blur passersby while tiles frame the scene.
4) Graça and Senhora do Monte overlooks: elegant terraces frame the city; north viewpoints let you scope back across the rooftops, giving wide contrasts to pair with street scenes.
5) LX Factory’s textures: an industrial quarter with brick walls, murals, and small studios; this location offers opportunities for close-ups of signage, fashion, and street life. Keep an eye on the river breeze that makes colors pop.
6) Time Out Market precinct and adjacent riverside walks: you’ll see locals and visitors mingling near stalls; this area rewards quick, candid shots and dramatic shadows by the afternoon sun. A favourite for people-and-architecture contrasts.
7) Feira da Ladra flea market: textures and portraits among thrift stalls; rhythm is obvious–tents, coins, scarves–yielding many usable discoveries for showing money matters and routine commerce. Photographing here bridges old and new traditions.
8) Tram 28 route through Graça and Baixa hills: the road serpents between pedestrians and cars; capture motion with a slow shutter, or frame riders stepping off at stops. This iconic line is a tester for timing and composition, whether you shoot stills or actions.
9) Belém riverside and monuments: water reflections pair with the tower and riverfront trees; this area works well for long exposures and portraits with the focal point. If you crave waterfalls, plan a day trip to Madeira to compare moods beyond the coast.
10) Príncipe Real gardens and adjacent side streets: night scenes glow with neon and lanterns; tranquil corners give space for elegant camera positions, and you’ll catch locals strolling, couples chatting, and visitors wandering after sundown.
Morocco souks guide: In Marrakech’s Jemaa el-Fnaa, Fez’s Talaa Kebira, and Rabat’s medina you find traditional crafts, leather, spices, and textiles, with obvious opportunities for candid moments among crowds. Whether you travel solo or with companions, the women vendors and everyday traders create a wealth of moments for photographing; this country offers north African tradition in vibrant palettes. For planning, check Expedia for flight options, and search guatemalas travel blogs for fresh angles. If you want a word to guide your bargaining, carry small money; prices are negotiable, and bargaining adds to the immersion. For a cross-reference, you can compare with Switzerland’s alpine towns or a stroll along the Hudson in usas, then test the vibe in subway networks for urban rhythm. Beyond the souks, the road winds through markets and waterfalls, and the northern districts often feel more elegant; a simple phrase to break the ice can unlock new shots.
Best times to shoot Lisbon: dawn, blue hour, and crowd considerations
Prefer dawn on a hilltop overlook, then slide into blue hour for a cinematic shift. Arrive 20–30 minutes early to lock a vantage and give the street life a moment to settle; a little patience pays off with cleaner tones and richer texture. Use a range of lenses to cover sweeping façades and intimate details, and plan for the next block to capture changes beyond the first light at different times.
Dawn angles on the hills above the ancient neighborhood reveal tiled roofs and decorative balconies as they glow. Blue hour intensifies contrast between dark alleys and warm lamps, ideal for long exposures if you have a tripod. Markets begin to stir after sunup but remain quiet for the first half-hour, letting locals move through doorways and arcades without crowding your frame.
Timing for blue hour varies with season; plan for 15–25 minutes of color drift. Because the light shifts quickly, for a crisp handheld result, shoot at ISO 100–400, f/4–f/8, 1/60–1/125 s; for reflection on wet stones or puddles, lengthen shutter with a tripod. The mood can feel like a quiet movie scene; the last light flicker can be captured with a longer exposure to retain detail in shadows, and the aurora borealis mood can inspire you to frame luminous edges more strongly. If light fades, switch to a longer exposure to retain detail in shadows.
Crowd considerations: on weekdays, you’ll find calmer morning hours; weekends attract locals to markets and viewpoints, so plan a second pass around 9–10 a.m. to capture the human tempo. If you want to keep a clean frame, shoot from elevated spots or use reflections in shop windows to mask busy sidewalks; otherwise weave people into the scene as authentic movement rather than obstacles. Later blocks can deliver dynamic energy, so your approach should be flexible and patient.
Gear and prep: keep a light kit with a flexible zoom and a fast prime; test the dufault exposure and switch to manual. Build lists of preferred angles and later routes around the neighborhood. Your plan can borrow cues from viator lists and from italian courtyards, cultural hubs, and hudson river vibes, and even the vibe from guatemala’s markets or vanuatu shores to broaden your sense of composition. Consider a few sets around ancient arches, caves and cave-like corners, and reflective storefronts to replicate the range of moods, including glaciers in memory to push texture. Your approach should combine patience and speed to maximize shots during dawn and blue hour, then adapt when crowds grow. If you want to expand your mental map, think of scenes from kusatsu’s quiet backstreets, or chau-inspired street tableaux, and imagine how those textures translate to the cityscape.
10 Lisbon spots: access tips, vantage points, and practical notes
Start with this: ride the subway to Baixa-Chiado to reach the centre fast, then walk the rolling hills to the belvederes; a longer lens helps capture deep textures, and a good compact keeps you ready for quick shoots; go away from crowds by arriving at dawn and letting traffic fade.
1) Miradouro de Santa Luzia (Alfama): Access from the cathedral quarter via steep steps; the location is incredibly atmospheric at dawn when they gather in small groups; the tiled walls frame the river, and the capilano-like crowd line adds scale; use a longer lens to jump into tight details and capture the drama.
2) Castelo de São Jorge: walk along the outer ramparts for deep, sweeping views over the centre; the skyline is striking, with domes and spires punctuating the old town; arrive early to avoid crowds and switch to a longer lens for tighter rooftops.
3) Elevador de Santa Justa: ride the iron lift to the Carmo terrace, then step onto the viewing platform for a city-wide perspective; it’s incredibly convenient to jump between two high viewpoints; arrive before 9:00 to dodge queues and ensure you catch the cathedral spires in the distance.
4) Miradouro da Senhora do Monte (Graça): the climb from the tram is long but the payoff is a deep panorama over the centre; stay for sunset when the light becomes striking gold; bring a tripod if you have one; walks along the hill give you multiple vantage points.
5) Terreiro do Paço and riverfront: the terrace facing the Tagus offers wide, straight lines of boats and traffic along the water; the scene is sprawling at twilight; find a comfortable spot on the quay and weave between shadows to capture the rhythm of the city.
6) Belem riverside: MAAT, Jerónimos, and the tower create a classics trio; good light comes in late afternoon; access via tram from the centre or subway to Cais do Sodré, then a short walk; the site gives generous space to capture the river, bridge, and sky; these favourites are widely considered among top viewpoints.
7) Parque das Nações: a modern, sprawling riverfront with wide promenades and a skyline of towers; elevator access to elevated decks helps you shoot the bridge and boats; as the area is newer, you find cleaner lines and easier sightlines for cities’ images.
8) Monsanto Forest Park: a sprawling hillscape with forest and city glimpses through the pines; plan longer walks, check the weather, and keep a compact ready for wide-angle captures; the capilano-like bridges and rolling paths give scale, and you can find caves of shadow under the boughs that make the city feel smaller.
9) Avenida da Liberdade and nearby terraces: calm avenues framed by refined façades; late afternoon light glows along the centre and you can capture symmetrical lines with a lens; watch the traffic, then dip into georgias for a quick break and a fresh perspective.
10) Jardim do Torel: a tucked-away terrace with a sprawling overlook toward the city; access via gradual steps, perfect for golden-hour shots with a peaceful vibe; bring a french lens to frame doors and balconies; ensure you have a longer walk back to the metro to beat the heat, chau.
Morocco souks and medinas: etiquette, photo permissions, and safe framing
Begin with a respectful approach: greet locals, smile, and ask before taking shots of individuals. In congested lanes, a quick nod keeps the flow smooth and reduces tension among crowds.
In the centre of a bustling market, framing matters more than speed. Use contrasting textures–bright textiles against carved wooden screens or pink plaster against tiled arches–to tell a story without isolating anyone. This architectural balance helps you capture the scene as a coherent whole.
Photo permissions: approach vendors near entrances or stalls and explain your intent in one or two sentences in French or Arabic if possible. If consent is given, shoot wide to include context; if not, respect the gesture and switch to a broader scene that focuses on the environment rather than faces.
Respect religious spaces: outside mosques and prayer halls, keep voices low, avoid flash, and ask before any interior shots. Allow the locals to guide you; many will welcome exterior portraits that show daily life around the courtyard or fountain.
Framing tips: carry a light kit and plan routes that minimize disruption. Pack a lens set that allows fullsize captures from a distance when needed; this keeps your frame clean and reduces the chance of capturing someone who does not wish to be photographed. Inland markets often reveal more intimate scenes than coastal corridors; beyond the main aisles, you can feel a different vibe in each alley–another moment, another colour, another pink arch. If your route also reaches the coast, keep the same approach.
Practical notes: if you sense discomfort, back away calmly. This planet rewards tact; traveling photographers who consider locals tend to build trust and gather better shots. Canadian travelers, for example, often get welcomed if they stay patient and avoid blocking narrow walks.
Examples and lists: centre features like carved doors, pink arches, and textile stalls anchor your series. By planning ahead you’ll leave with a set of shots that are cohesive and respectful, not hurried attempts that require post editing to rescue the frame.
| Action | How to do it | Előny |
|---|---|---|
| Kérdezz, mielőtt közeli felvételt készítesz. | Bonjour ! Beleeg tatarjem? | Csökkenti a konfliktust és bizalmat épít |
| Kiskorúak felügyelet nélkül nem tartózkodhatnak itt. | Keress alternatív nagytotálokat, ha nincs beleegyezés. | Védi a magánéletet és a méltóságot |
| Tiszteld a szent helyeket | Ne használjon vakut; csak a külső elemeket fényképezze le. | Biztonság és tisztelet fenntartása |
| Mozogj feltűnés nélkül a tömegben. | Tartsd a felszerelésed kompaktan; ne torlaszolj el átjárókat | Simább folyás és jobb felvételek |
Felszerelés és beállítások forgalmas utcákhoz: objektívek, ISO, záridő és stabilizáció
Kezdj egy 35 mm-es ekvivalens prime objektívvel és stabilizált beállítással; ez számodra természetes érzékelést biztosít, amely a tömegben és a szögletes homlokzatok között helyezkedik el. Használj ISO 400–800-at nyílt nappali fényben, 800–1600-at árnyékban, és tartsd a záridőt 1/125 és 1/250 másodperc között, hogy megfagyaszd a mozgást, miközben megőrzöd a tömegben zajló mozgás érzetét.
- Objektívek: válasszon egy standard fix objektívet a 28–35 mm-es tartományban a természetes perspektívához, vagy egy kompakt 50 mm-est a szűkebb pillanatokhoz. Egy könnyű zoomobjektív (nagyjából 24–70 mm) full-frame rugalmasságot kínál anélkül, hogy lelassítana. Szűk városi környezetben egy 24 mm-es nagylátószögű objektív segít egyetlen, egyedi levegővétellel bekeretezni a jelenetet, miközben a háttér olvasható marad.
- ISO és zársebesség: a napfényes, árnyékos helyekhez az ISO 200–400 és 1/250s ideális. Amikor tömeg alakul ki, vagy változnak a fényviszonyok, emelje az ISO-t 800–1600-ra és a zársebességet 1/200s-re. Szürkületben vagy neonfényben az 1600–3200 ISO és az 1/125s megőrzi a sziluetteket, miközben elkerüli az elmosódást a mozgó járókelőknél.
- Rekesz és mélység: f/4–f/5.6-os rekeszértéken fényképezzen, hogy az előtérben zajló események és a környezeti elemek is megjelenjenek; a nagyobb rekesznyílások egyetlen témát emelnek ki, míg a kisebbek a környező textúrát adják hozzá, amit a nézők a forgalmas utcák közt észrevesznek.
- Stabilizálás: ha elérhető, engedélyezze az optikai vagy lencsealapú stabilizálást, és másodlagos védelemként támaszkodjon a test stabilitására. Szűk járdákon támaszkodjon a könyökére, húzza közel a kamerát, és rövid sorozatokkal fényképezzen, hogy kihasználja a mikro-makro remegéseket a természetes mozgás érzetéhez.
- Technika: ha lehetséges, válassz full-frame szenzort a tisztább árnyékokért tömegben; egyébként egy APS-C opció is megfelel, egyenértékű gyújtótávolságokkal. Használj folyamatos AF-et kis fókuszvédőkkel a hirtelen mozdulatokhoz, és fókuszálj előre arra a távolságra, ahol a történésekre számítasz.
- Nézőpont és kompozíció: tartsa a nézőpontot szemmagasságban vagy ahhoz közel a realizmus megőrzése érdekében; egy kissé alacsonyabb szög felfedheti a burkolat és az üzletek textúráját, míg egy magasabb szög kiemeli az emberek mozgását. Törekedjen négyzet vagy téglalap alakú kompozícióra a jelenet egyensúlyának megfelelően, olyan perspektívát választva, amely természetesnek hat, nem pedig megrendezettnek.
- Munkafolyamat és ütem: állítson be gyors sorozatfelvétel ütemet (3–5 képkocka másodpercenként) az akciódús pillanatoknál, tekintse át csak a kulcskockákat, és címkézzen fel megjegyzéseket a későbbi kiválasztáshoz. A tömegekben a következetesség hírnevet épít a megbízható eredményekről; ossza meg jegyzeteit azokkal a követőkkel, akik szeretik látni, hogyan dolgozik a zsúfolt utcákon.
- Szín és hangulat: ragyogó kék égen vagy neonfényes éjszakákon a fehéregyensúlyt nappali fényben 5200–5600K közelében kalibrálja, és a mesterséges megvilágításban állítsa be a melegebb árnyalatokhoz. Egy természetes megjelenés gyakran lenyűgözőbb, mint a túlstilizált jelenetek; tartson meg néhány olyan képet, amely a környezetet olyannak mutatja, amilyen, és nem csak a tárgyat.
- Logisztika: két váz vagy egy váz két objektívvel a felszerelésváltások minimalizálására a forgalmas sugárutakon; legyen egy időjárásálló szett készenlétben a hirtelen záporokra, amelyek gyakoriak a tengerparti városokban és a trópusi éghajlaton egyaránt. A nagy gyalogos forgalmú, ismert helyszíneken előnyös egy kompakt, feltűnésmentes készlet.
- Beállítottság és fogadtatás: amikor publikálsz, a kommentek tükrözhetik, hogyan kezeled a teret és időzítést; válaszolj udvariasan a kritikákra és folyamatosan finomítsd a megközelítésed. Azokon a területeken, amelyek híresek az utcai életükről, egy következetes, tisztelettudó módszer segít beilleszkedni a helyiek és a látogatók közé, pozitív hírnevet építve.
Útvonaltervezéskor vedd figyelembe, hogy a különböző környezetek – kék óra, terek vagy árnyékos udvarok – hogyan követelnek meg kisebb ISO- és zármódosításokat. A népszerű útvonalak közül egy kompakt, jól kiegyensúlyozott készlet elegendő energiát biztosít a folyamat élvezetéhez és a munkafolyamat zökkenőmentességéhez – legyen szó Manhattanről, Afrikáról vagy egy tengerparti városról, ahol borealis égbolt van a fejed felett. Ugyanaz a felszerelés és beállítási munkafolyamat tucatnyi ismerős, jól ismert zónában és kis sikátorban is működik, így minden alkalommal egyedi, tökéletesen bekeretezett képet készíthetsz, amikor kilépsz az utcára.
Liszt és marokkói utcai fotók utófeldolgozása: szín, kontraszt és rendszerezés
Kezdd kalibrált monitorral és kétszeri RAW feldolgozással: először a helyes expozíciót állítsd be, majd a színeket. Konkrét szabály: állíts semleges fehéregyensúlyt, tartsd a csúcsfényeket kontroll alatt, és hagyd az árnyékokat a helyreállításra. Ez a megközelítés elkerüli a borzalmas kiégést, és beváltan bizonyított; ez egy évek óta kedvelt módszerem az utazásaim során, különösen a tengerparti tájak és a nyüzsgő piacok közötti váltásokkor. Ha még nem próbáltad, ez egy megbízható kiindulópont.
Színkorrekciós stratégia: osszuk fel a munkát egy globális hangulat és helyi finomítások. Alkalmazzon először egy finom, meleg emelést a középtónusokon a marokkói stílusú jelenetekhez, majd egy hűvösebb árnyalatot az égboltra és az árnyékokra. A létrejövő paletta a következőket nyújtja kontrasztos melegség és hűvösség, egy reason szerkesztők gyakran választják a western néz ki, miközben a színt természetesnek tartja. Mert kék akcentusok, például csempék és feliratok esetében, tartsa a telítettséget szabályozva a részletek megőrzése érdekében. Ez lista lépések segítenek megtalálni a megfelelő egyensúlyt a színek felfedezése közben.
Helyi beállítások: használjon maszkokat az arcok, kezek és texturált felületek célzására. Növelje a tisztaságot ott, ahol a textúra fontos (kő, szövet), de csökkentse a zajt a sötét sarkokban. Mozgalmas belsők esetén shops vagy subway autók, alkalmazz szelektív élességet az élekre és egy kis színt a volfrám kiemelésekre. Ha még nem építettél alapvonalat, futtass egy lencse- Korrekciós menet a perspektíva tisztán tartásához.
Szervezés és munkafolyamat: nevezd át a fájlokat következetesen, adj hozzá kulcsszavakat, mint például partvidéki, piacok, boltívek, utazók. Építs ki kollekciókat a kék árnyékok és a meleg fények közötti kontrasztokra, és tartsd fenn a before/alatt/after rutineljárás a szerkesztések összehasonlítására. A JPEG exportokat vékony profillal mentse, miközben a RAW fájlokat egy külön archívumban tárolja. Ez szilárd alapot biztosít a hosszú távú hozzáféréshez; remélem, hasznosnak találja, és saját igényeihez igazítja.
Éjszakai és gyenge fényviszonyok melletti megjegyzések: ha homályos folyosókon vagy metróalagutakban fényképez, készítsen RAW formátumú képeket ISO 1600–3200-on; a képszerkesztés során finoman zajcsökkentse a vörös és kék csatornákat, és használjon lencse Perspektívajavítások. Kerüld a bőr túlélesítését; csak mérsékelt élesítést alkalmazz a széleken.
Íme egy rövid ellenőrzőlista, amelyet szerkesztés közben követhetsz: állítsd be a fehéregyensúlyt a semleges színek megőrzése érdekében vegyes fényviszonyok között; vizsgáld meg a hisztogramot a színezés előtt és közben; figyeld a bőrtónusokat és a színek átszivárgását a boltok feliratain; fontold meg az objektívkorrekció alkalmazását a perspektívatorzulások javítására.
A kontrasztokban rejlő varázslatot keresve: hasonlítsd össze világhírű szekvenciákkal, hogy meghatározd a saját stílusodat anélkül, hogy lemásolnád. Autós útvonalak és piacok nyújtanak dinamikus jeleneteket; a különböző stílusok felfedezése a folyamat része. Ugrálj a képkockák között a folytonosság teszteléséhez; a cél egy egységes borító egy felvétel-sorozaton keresztül. A hangulat legyen autentikus, meleg árnyékokat és hideg csúcsfényeket egyensúlyozva, miközben hű maradsz a témához.
A Lofoten-szigetekre és Hohenschwangau kastélyára való hivatkozások ihletet adhatnak a színek hangulatához és a szerkezethez, de a lényegi technika ugyanaz marad: a színek harmóniájának, a megfelelő kontrasztnak és a tiszta szervezésnek a fenntartása.
") Moszkva flúgos utcai művészete – Hol találod meg (FOTÓK)">
Moszkva flúgos utcai művészete – Hol találod meg (FOTÓK)">
 A legjobb moszkvai fotós helyek a lenyűgöző 2025-ös képekért">
 20 Rejtett gyöngyszem és titkos tipp Moszkvában – Egy nem szokványos helyi útmutató">
 Régi vágású moszkvai kocsmározás – Klasszikus bárok, rejtett gyöngyszemek és éjszakai élet">
 Moszkva – üdülőváros – Luxusutazás, wellness és kultúra az orosz fővárosban">
 Tallulah-vízesés Útikalauz – Hogyan látogassuk meg a Tallulah-szorost, megközelítési pontok és a legjobb kilátópontok">
 Európa legszebb kompútjai – Festői tengerparti utazások">
 A tökéletes szánkózódomb-útmutató – A 419-es körzet lejtőinek összefoglalója">
 Misztikus moszkvai multimédia – Lenyűgöző művészetek, kultúra és technológia Oroszország fővárosában">
 A leglélegzetelállítóbb rejtett gyöngyszem templomok Európa-szerte">