 My 10 Favorite Lisbon Street Photography Spots – Best Photo Locations in Lisbon">

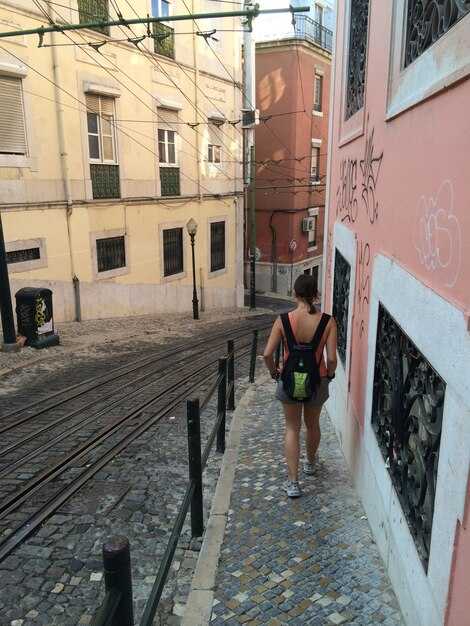
Start at the Alfama overlook at golden hour to anchor your visual path. From there, the Portuguese capital by the Tagus reveals pink tiled façades and hills that rise behind a simple house. Be patient; the first frame should feel definite and purposeful, not rushed.
Move through districts Baixa, Chiado, Graça, and Estrela along the busy streets, then climb toward higher viewpoints for contrasts in scale. In each district you can find multiple textures: azulejo panels, balconies, and stairways that tell centuries of daily life without shouting clichés. When you caption, mention the district names to give context.
Stand by the riverfront near Cais do Sodré and watch the light drift across the water, contrasting white stucco with pink roofs. The coastal breeze adds a natural movement to frames as boats drift by; the mood can be henkeäsalpaava even in crowds.
When the light changes, notice how havana tones bloom on tile and plaster. The small courtyards and the way stair partitions cast shadows tell a story without loud gestures. Focus on how a single house facade catches the sun and then dissolves into pattern on the next frame.
To broaden your sense of place, compare the rhythm here with mumbais’ crowded lanes, guatemala markets, or fjords seen in distant landscapes. Such references keep you from copying familiar angles and push for a more personal string of frames across cities and districts.
Patience and a light touch with gear help you stay honest to the light. without rushing, you can find subtle silhouettes, doorways, and windows that compose into a narrative across multiple moments.
Return at blue hour to extend the arc: you’ll see a natural shift in color across tiles, iron rails, and harbor reflections. In that quiet, the spaces between districts reveal a personal method rather than a generic portrait of this coastal capital.
My 10 Favorite Lisbon Street Photography Spots and Morocco Souks Guide
1) Alfama’s dawn-lit lanes: start here; the thing to chase is light rolling across stairways and white walls. North-facing alleys offer obvious opportunities for photographing everyday life, while women on balconies add elegant color. It quickly becomes one of my favourites.
2) Baixa-Chiado around Praça do Comércio: broad avenues and granite façades create clean geometry; shoot across the square as trams rattle by and cars move along the road. Whether you shoot wide or tight, you’ll find favourites in the strong lines and portraits near street vendors.
3) Mouraria’s azulejo corridors: named streets, tight bends, and local tradition; photographing here yields human stories and women selling crafts. This area is an obvious field for adventures across sunlit and shadowed corners; long exposures help blur passersby while tiles frame the scene.
4) Graça and Senhora do Monte overlooks: elegant terraces frame the city; north viewpoints let you scope back across the rooftops, giving wide contrasts to pair with street scenes.
5) LX Factory’s textures: an industrial quarter with brick walls, murals, and small studios; this location offers opportunities for close-ups of signage, fashion, and street life. Keep an eye on the river breeze that makes colors pop.
6) Time Out Market precinct and adjacent riverside walks: you’ll see locals and visitors mingling near stalls; this area rewards quick, candid shots and dramatic shadows by the afternoon sun. A favourite for people-and-architecture contrasts.
7) Feira da Ladra flea market: textures and portraits among thrift stalls; rhythm is obvious–tents, coins, scarves–yielding many usable discoveries for showing money matters and routine commerce. Photographing here bridges old and new traditions.
8) Tram 28 route through Graça and Baixa hills: the road serpents between pedestrians and cars; capture motion with a slow shutter, or frame riders stepping off at stops. This iconic line is a tester for timing and composition, whether you shoot stills or actions.
9) Belém riverside and monuments: water reflections pair with the tower and riverfront trees; this area works well for long exposures and portraits with the focal point. If you crave waterfalls, plan a day trip to Madeira to compare moods beyond the coast.
10) Príncipe Real gardens and adjacent side streets: night scenes glow with neon and lanterns; tranquil corners give space for elegant camera positions, and you’ll catch locals strolling, couples chatting, and visitors wandering after sundown.
Morocco souks guide: In Marrakech’s Jemaa el-Fnaa, Fez’s Talaa Kebira, and Rabat’s medina you find traditional crafts, leather, spices, and textiles, with obvious opportunities for candid moments among crowds. Whether you travel solo or with companions, the women vendors and everyday traders create a wealth of moments for photographing; this country offers north African tradition in vibrant palettes. For planning, check Expedia for flight options, and search guatemalas travel blogs for fresh angles. If you want a word to guide your bargaining, carry small money; prices are negotiable, and bargaining adds to the immersion. For a cross-reference, you can compare with Switzerland’s alpine towns or a stroll along the Hudson in usas, then test the vibe in subway networks for urban rhythm. Beyond the souks, the road winds through markets and waterfalls, and the northern districts often feel more elegant; a simple phrase to break the ice can unlock new shots.
Best times to shoot Lisbon: dawn, blue hour, and crowd considerations
Prefer dawn on a hilltop overlook, then slide into blue hour for a cinematic shift. Arrive 20–30 minutes early to lock a vantage and give the street life a moment to settle; a little patience pays off with cleaner tones and richer texture. Use a range of lenses to cover sweeping façades and intimate details, and plan for the next block to capture changes beyond the first light at different times.
Dawn angles on the hills above the ancient neighborhood reveal tiled roofs and decorative balconies as they glow. Blue hour intensifies contrast between dark alleys and warm lamps, ideal for long exposures if you have a tripod. Markets begin to stir after sunup but remain quiet for the first half-hour, letting locals move through doorways and arcades without crowding your frame.
Timing for blue hour varies with season; plan for 15–25 minutes of color drift. Because the light shifts quickly, for a crisp handheld result, shoot at ISO 100–400, f/4–f/8, 1/60–1/125 s; for reflection on wet stones or puddles, lengthen shutter with a tripod. The mood can feel like a quiet movie scene; the last light flicker can be captured with a longer exposure to retain detail in shadows, and the aurora borealis mood can inspire you to frame luminous edges more strongly. If light fades, switch to a longer exposure to retain detail in shadows.
Crowd considerations: on weekdays, you’ll find calmer morning hours; weekends attract locals to markets and viewpoints, so plan a second pass around 9–10 a.m. to capture the human tempo. If you want to keep a clean frame, shoot from elevated spots or use reflections in shop windows to mask busy sidewalks; otherwise weave people into the scene as authentic movement rather than obstacles. Later blocks can deliver dynamic energy, so your approach should be flexible and patient.
Gear and prep: keep a light kit with a flexible zoom and a fast prime; test the dufault exposure and switch to manual. Build lists of preferred angles and later routes around the neighborhood. Your plan can borrow cues from viator lists and from italian courtyards, cultural hubs, and hudson river vibes, and even the vibe from guatemala’s markets or vanuatu shores to broaden your sense of composition. Consider a few sets around ancient arches, caves and cave-like corners, and reflective storefronts to replicate the range of moods, including glaciers in memory to push texture. Your approach should combine patience and speed to maximize shots during dawn and blue hour, then adapt when crowds grow. If you want to expand your mental map, think of scenes from kusatsu’s quiet backstreets, or chau-inspired street tableaux, and imagine how those textures translate to the cityscape.
10 Lisbon spots: access tips, vantage points, and practical notes
Start with this: ride the subway to Baixa-Chiado to reach the centre fast, then walk the rolling hills to the belvederes; a longer lens helps capture deep textures, and a good compact keeps you ready for quick shoots; go away from crowds by arriving at dawn and letting traffic fade.
1) Miradouro de Santa Luzia (Alfama): Access from the cathedral quarter via steep steps; the location is incredibly atmospheric at dawn when they gather in small groups; the tiled walls frame the river, and the capilano-like crowd line adds scale; use a longer lens to jump into tight details and capture the drama.
2) Castelo de São Jorge: walk along the outer ramparts for deep, sweeping views over the centre; the skyline is striking, with domes and spires punctuating the old town; arrive early to avoid crowds and switch to a longer lens for tighter rooftops.
3) Elevador de Santa Justa: ride the iron lift to the Carmo terrace, then step onto the viewing platform for a city-wide perspective; it’s incredibly convenient to jump between two high viewpoints; arrive before 9:00 to dodge queues and ensure you catch the cathedral spires in the distance.
4) Miradouro da Senhora do Monte (Graça): the climb from the tram is long but the payoff is a deep panorama over the centre; stay for sunset when the light becomes striking gold; bring a tripod if you have one; walks along the hill give you multiple vantage points.
5) Terreiro do Paço and riverfront: the terrace facing the Tagus offers wide, straight lines of boats and traffic along the water; the scene is sprawling at twilight; find a comfortable spot on the quay and weave between shadows to capture the rhythm of the city.
6) Belem riverside: MAAT, Jerónimos, and the tower create a classics trio; good light comes in late afternoon; access via tram from the centre or subway to Cais do Sodré, then a short walk; the site gives generous space to capture the river, bridge, and sky; these favourites are widely considered among top viewpoints.
7) Parque das Nações: a modern, sprawling riverfront with wide promenades and a skyline of towers; elevator access to elevated decks helps you shoot the bridge and boats; as the area is newer, you find cleaner lines and easier sightlines for cities’ images.
8) Monsanto Forest Park: a sprawling hillscape with forest and city glimpses through the pines; plan longer walks, check the weather, and keep a compact ready for wide-angle captures; the capilano-like bridges and rolling paths give scale, and you can find caves of shadow under the boughs that make the city feel smaller.
9) Avenida da Liberdade and nearby terraces: calm avenues framed by refined façades; late afternoon light glows along the centre and you can capture symmetrical lines with a lens; watch the traffic, then dip into georgias for a quick break and a fresh perspective.
10) Jardim do Torel: a tucked-away terrace with a sprawling overlook toward the city; access via gradual steps, perfect for golden-hour shots with a peaceful vibe; bring a french lens to frame doors and balconies; ensure you have a longer walk back to the metro to beat the heat, chau.
Morocco souks and medinas: etiquette, photo permissions, and safe framing
Begin with a respectful approach: greet locals, smile, and ask before taking shots of individuals. In congested lanes, a quick nod keeps the flow smooth and reduces tension among crowds.
In the centre of a bustling market, framing matters more than speed. Use contrasting textures–bright textiles against carved wooden screens or pink plaster against tiled arches–to tell a story without isolating anyone. This architectural balance helps you capture the scene as a coherent whole.
Photo permissions: approach vendors near entrances or stalls and explain your intent in one or two sentences in French or Arabic if possible. If consent is given, shoot wide to include context; if not, respect the gesture and switch to a broader scene that focuses on the environment rather than faces.
Respect religious spaces: outside mosques and prayer halls, keep voices low, avoid flash, and ask before any interior shots. Allow the locals to guide you; many will welcome exterior portraits that show daily life around the courtyard or fountain.
Framing tips: carry a light kit and plan routes that minimize disruption. Pack a lens set that allows fullsize captures from a distance when needed; this keeps your frame clean and reduces the chance of capturing someone who does not wish to be photographed. Inland markets often reveal more intimate scenes than coastal corridors; beyond the main aisles, you can feel a different vibe in each alley–another moment, another colour, another pink arch. If your route also reaches the coast, keep the same approach.
Practical notes: if you sense discomfort, back away calmly. This planet rewards tact; traveling photographers who consider locals tend to build trust and gather better shots. Canadian travelers, for example, often get welcomed if they stay patient and avoid blocking narrow walks.
Examples and lists: centre features like carved doors, pink arches, and textile stalls anchor your series. By planning ahead you’ll leave with a set of shots that are cohesive and respectful, not hurried attempts that require post editing to rescue the frame.
| Toiminta | How to do it | Benefit |
|---|---|---|
| Kysy ennen lähikuvia | Bonjour. Saanko luvan kääntää tekstisi suomeksi? | Vähentää konflikteja ja rakentaa luottamusta |
| Vältä alaikäisiä ilman huoltajaa | Etsi vaihtoehtoisia laajoja kohtauksia, jos suostumusta ei ole annettu | Suojelee yksityisyyttä ja ihmisarvoa |
| Kunnioita pyhiä tiloja | Älä käytä salamaa; valokuvaa vain ulkoisia ominaisuuksia | Ylläpitää turvallisuutta ja kunnioitusta |
| Liiku huomaamattomasti väkijoukoissa | Pidä varusteet tiiviinä; älä tuki kulkuväyliä | Sujuvampi virtaus ja paremmat otokset |
Varusteet ja asetukset vilkkaille kaduille: objektiivit, ISO, suljin ja vakaus
Aloita 35 mm:n kinovastaavalla valovoimaisella objektiivilla ja vakaajalla; itsellesi tämä tarjoaa luonnollisen näkökulman, joka sopii ihmisjoukkoihin ja suoriin julkisivuihin. Käytä ISO-arvoja 400–800 avoimessa päivänvalossa, 800–1600 varjossa ja pidä suljinajan välillä 1/125 ja 1/250 s, jotta liike pysähtyy säilyttäen samalla jonkinlaisen vaikutelman liikkeestä väkijoukossa.
- Objektiivit: Valitse normaali kiinteäpolttovälinen objektiivi 28–35 mm:n alueelta luonnollista perspektiiviä varten tai lisää pienikokoinen 50 mm tarkempiin hetkiin. Kevyt zoom-objektiivi (noin 24–70 mm) tarjoaa täyden kennon joustavuuden hidastamatta sinua. Tiukassa kaupunkiympäristössä 24 mm:n laaja vaihtoehto auttaa sinua kehystämään kohtauksen yhdellä, ainutlaatuisella tilan hengityksellä pitäen taustan luettavana.
- ISO ja suljin: päivänvalo ja varjoisat kohdat hyötyvät ISO 200–400 ja 1/250 s asetuksista. Kun väkijoukko vyöryy tai valo muuttuu, nosta ISO-arvoon 800–1600 ja 1/200 s. Hämärässä tai neonvalossa asetukset 1600–3200 ja 1/125 s säilyttävät siluetit välttäen samalla liikkuvien jalankulkijoiden hämärtymisen.
- Aukko ja syvyys: kuvaa arvoilla f/4–f/5,6, jotta sekä etualan toiminta että kontekstuaaliset elementit pysyvät mukana; suuremmat aukot eristävät yksittäisen kohteen, kun taas pienentäminen lisää ympäröivää tekstuuria, jonka katsojat huomaavat vilkkailla kaduilla.
- Vakaaja: Käytä mahdollisuuksien mukaan optista tai linssipohjaista vakautusta ja luota kehon vakauteen toissijaisena keinona. Kapeilla jalkakäytävillä tue kyynärpäät, pidä kamera lähellä kehoa ja ota lyhyitä sarjoja hyödyntäen mikro-makrovärinää luonnollisen liiketuntuman saavuttamiseksi.
- Tekniikka: suosi täysikokokennoa mahdollisuuksien mukaan puhtaampien varjojen saamiseksi ihmisjoukossa; muuten APS-C-vaihtoehto vastaavilla polttoväleillä toimii hyvin. Käytä jatkuvaa automaattitarkennusta pienillä tarkennuksen rajoittimilla äkillisiä liikkeitä varten ja esitarkenna etäisyydelle, jossa odotat toiminnan tapahtuvan.
- Näkökulma ja rajaus: Pidä näkökulma silmän korkeudella tai sen läheisyydessä realismin säilyttämiseksi. Hieman alhaisempi kuvakulma voi paljastaa päällysteen ja kauppojen rakenteen, kun taas korkeampi kuvakulma korostaa ihmisten liikettä. Pyri neliön- tai suorakulmionmuotoiseen kehykseen kohtauksen tasapainon mukaan ja valitse perspektiivi, joka tuntuu luonnolliselta eikä lavastetulta.
- Työnkulku ja tahti: aseta nopea sarjakuvausnopeus (3–5 kuvaa sekunnissa) toimintahetkiin, tarkista vain avainruudut ja lisää kommentteja myöhempää valintaa varten. Ihmisjoukoissa johdonmukaisuus rakentaa maineen luotettavista tuloksista; jaa muistiinpanosi seuraajien kanssa, jotka rakastavat nähdä, miten työskentelet vilkkailla kaduilla.
- Väri ja tunnelma: kirkkaan sinisellä taivaalla tai neonöissä kalibroi valkotasapaino lähelle arvoja 5200–5600K päivänvalossa ja säädä lämpimämpiin sävyihin keinovalaistuksessa. Luonnollinen ilme on usein kiehtovampi kuin ylityylitellyt kohtaukset; säästä muutama ruutu, jotka näyttävät ympäristön sellaisena kuin se on, älä vain kohdetta.
- Logistiikka: kuljeta kahta runkoa tai yhtä runkoa kahdella objektiivilla minimoidaksesi varusteiden vaihdot vilkkailla kaduilla; pidä säänkestävä kokoonpano valmiina äkillisiin sadekuuroihin, joita esiintyy sekä rannikkokaupungeissa että trooppisissa ilmastoissa. Paikat, joissa on paljon jalankulkijoita, hyötyvät pienikokoisesta setistä, joka pysyy huomaamattomana.
- Ajattelutapa ja vastaanotto: julkaistessasi kommenttisi voivat heijastaa tapaasi käsitellä tilaa ja ajoitusta; vastaa kohteliaasti kritiikkiin ja hienosäädä jatkuvasti lähestymistapaasi. Alueilla, jotka ovat kuuluisia katuelämästään, johdonmukainen ja kunnioittava menetelmä auttaa sinua sulautumaan paikallisten ja vierailijoiden joukkoon ja rakentamaan positiivista mainetta.
Reittejä suunnitellessa on hyvä ottaa huomioon, kuinka erilaiset ympäristöt – sininen hetki, aukiot tai varjoisat sisäpihat – vaativat pieniä ISO- ja suljinsäätöjä. Suosituimpien reittien joukossa kompakti, hyvin tasapainotettu setti pitää sinut täynnä energiaa, jotta voit nauttia prosessista ja pitää työnkulkusi sujuvana – olitpa sitten Manhattanilla, Afrikassa tai rannikkokaupungissa, jossa loistavat revontulet. Sama varusteiden ja asetusten työnkulku toimii kymmenissä tutuissa, tunnetuissa paikoissa ja pienissä kujissa, auttaen sinua toimittamaan ainutlaatuisen, täydellisesti kehystetyn näkymän joka kerta, kun astut jalkakäytävälle.
Jälkikäsittely Lissabonin ja Marokon katukuvia varten: väri, kontrasti ja organisointi
Aloita kalibroidulla näytöllä ja kaksivaiheisella RAW-työnkululla: korjaa ensin valotus, sitten väri. Konkreettinen sääntö: aseta neutraali valkotasapaino, pidä yläsävyt hallinnassa ja jätä varjot palautettaviksi. Tämä lähestymistapa välttää hirvittävät leikkautumiset ja on todistettu tehokkaaksi; tämä on ollut suosikkimenetelmä vuosien matkoilla, erityisesti vaihdettaessa rannikkomaisemien ja vilkkaiden markkinapaikkojen välillä. Jos et ole vielä kokeillut, se on luotettava perusta aloittaa.
Värimäärittelyn strategia: jaa työ yleinen mieliala ja paikallisia tarkennuksia. Aloita hienoisella lämmöllä ja nosta keskisävyjä marokkolaistyylisissä kohtauksissa, ja lisää sitten viileämpi vivahde taivaisiin ja varjoihin. Tuloksena oleva paletti tuottaa verrattuna lämpöä ja viileyttä, a reason toimittajat valitsevat usein western ulkonäkö samalla kun väri pysyy luonnollisena. Sillä blue korostuksia, kuten laattoja ja opasteita, ja pidä värikylläisyys hallinnassa yksityiskohtien säilyttämiseksi. Tämä lista värisiirtymän avulla löytämään oikean tasapainon värejä tutkiessasi.
Paikalliset säädöt: käytä maskeja kasvojen, käsien ja tekstuuri pintojen kohdistamiseen. Lisää selkeyttä siellä missä tekstuuri on tärkeää (kivi, kangas), mutta pehmennä kohinaa pimeissä nurkissa. Sisätiloissa kiireisen kaupat tai metrolliikenne autot, käytä valikoivaa terävöitystä reunoihin ja ripauta väriä volframivaloihin. Jos et ole vielä luonut perusasetusta, suorita linssi- korjauskierros, jotta näkökulma pysyy selkeänä.
Organisaatio ja työnkulku: nimeä tiedostot johdonmukaisesti, liitä avainsanoja, kuten rannikko, markkinat, kaaret, matkailijat. Luo kokoelmia sinisten varjojen ja lämpimien korostusten kontrasteille ja ylläpidä ennen/during/after rutiini versioiden vertailuun. Tallenna viedyt JPEG-tiedostot pienellä profiililla säilyttäen RAW-kuvat erillisessä arkistossa. Tämä tarjoaa vankan pohjan pitkäaikaiseen käyttöön; toivottavasti tästä on apua ja voit soveltaa sitä omiin tarpeisiisi.
Yö- ja hämäräkuvaus: kun kuvaat hämäriä käytäviä tai metrotunneleita, kuvaa RAW-muodossa ISO-arvoilla 1600–3200; käytä jälkikäsittelyssä kevyttä kohinanvaimennusta punaisille ja sinisille kanaville, ja linssi korjauksia perspektiivin korjaamiseksi. Vältä ihon liiallista terävöittämistä; käytä kohtalaista terävöintiä vain reunoihin.
Tässä nopea tarkistuslista, jota voit noudattaa editoidessasi: säädä valkotasapaino säilyttääksesi neutraalin värin vaihtelevassa valaistuksessa; tarkastele histogrammia ennen värimäärittelyä ja sen aikana; tarkkaile ihon sävyjä ja värien vuotoa kauppojen kylteissä; harkitse linssikorjausta perspektiivivääristymien korjaamiseksi.
Etsitkö taikaa kontrasteista: vertaa maailmankuuluihin otoksiin määrittääksesi oman tyylisi kopioimatta. Ajoreitit ja markkinat tarjoavat dynaamisia kohtauksia; eri tyylien tutkiminen on osa prosessia. Hyppää ruutujen välillä testataksesi jatkuvuutta; tavoitteena on yhtenäinen kokonaisuus kuvasarjan läpi. Tavoitteena on luoda aito tunnelma, jossa pyritään tasapainottamaan lämpimät varjot viileillä korostuksilla, samalla kun pysytään uskollisena kohteelle.
Viittaukset Lofooteille ja Hohenschwangaulle voivat inspiroida värimaailmaa ja rakennetta, mutta ydintekniikka pysyy samana: säilytä värien harmonia, oikea kontrasti ja selkeä organisointi.
") Moscow’s Wacky Street Art – Where to Find It (PHOTOS)">
Moscow’s Wacky Street Art – Where to Find It (PHOTOS)">
 Parhaat valokuvauspaikat Moskovassa upeisiin vuoden 2025 kuviin">
 20 Moscow Hidden Gems and Best-Kept Secrets – An Offbeat Local Guide">
 Old-School Moscow Pub Crawl – Classic Bars, Hidden Gems & Nightlife">
 Moscow – A Resort City – Luxury Travel, Wellness, and Culture in the Russian Capital">
 Tallulah Falls Location Guide – How to Visit Tallulah Gorge, Access Points, and the Best Viewpoints">
 Europe’s Most Beautiful Ferry Rides – Scenic Coastal Journeys">
 Ultimate Sledding Hill Guide – A Roundup of Slopes in the 419">
 Mystical Moscow Multimedia – Immersive Arts, Culture, and Tech in Russia’s Capital">
 The Most Breathtaking Hidden Gem Churches Across Europe">