 리스본에서 가장 좋아하는 거리 사진 촬영 장소 10곳 – 리스본 최고의 사진 촬영 장소">

Start at the Alfama overlook at golden hour to anchor your visual path. From there, the Portuguese capital by the Tagus reveals pink tiled façades and hills that rise behind a simple house. Be patient; the first frame should feel definite and purposeful, not rushed.
Move through districts Baixa, Chiado, Graça, and Estrela along the busy streets, then climb toward higher viewpoints for contrasts in scale. In each district you can find multiple textures: azulejo panels, balconies, and stairways that tell centuries of daily life without shouting clichés. When you caption, mention the district names to give context.
Stand by the riverfront near Cais do Sodré and watch the light drift across the water, contrasting white stucco with pink roofs. The coastal breeze adds a natural movement to frames as boats drift by; the mood can be 경외감을 불러일으키는 even in crowds.
When the light changes, notice how havana tones bloom on tile and plaster. The small courtyards and the way stair partitions cast shadows tell a story without loud gestures. Focus on how a single house facade catches the sun and then dissolves into pattern on the next frame.
To broaden your sense of place, compare the rhythm here with mumbais’ crowded lanes, guatemala markets, or fjords seen in distant landscapes. Such references keep you from copying familiar angles and push for a more personal string of frames across cities and districts.
Patience and a light touch with gear help you stay honest to the light. without rushing, you can find subtle silhouettes, doorways, and windows that compose into a narrative across multiple moments.
Return at blue hour to extend the arc: you’ll see a natural shift in color across tiles, iron rails, and harbor reflections. In that quiet, the spaces between districts reveal a personal method rather than a generic portrait of this coastal capital.
My 10 Favorite Lisbon Street Photography Spots and Morocco Souks Guide
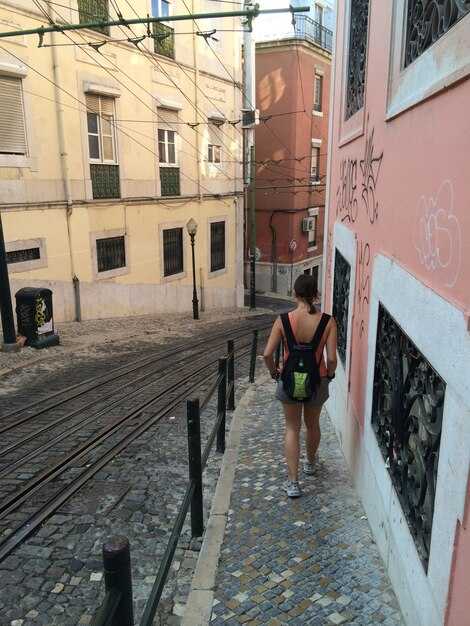
1) Alfama’s dawn-lit lanes: start here; the thing to chase is light rolling across stairways and white walls. North-facing alleys offer obvious opportunities for photographing everyday life, while women on balconies add elegant color. It quickly becomes one of my favourites.
2) Baixa-Chiado around Praça do Comércio: broad avenues and granite façades create clean geometry; shoot across the square as trams rattle by and cars move along the road. Whether you shoot wide or tight, you’ll find favourites in the strong lines and portraits near street vendors.
3) Mouraria’s azulejo corridors: named streets, tight bends, and local tradition; photographing here yields human stories and women selling crafts. This area is an obvious field for adventures across sunlit and shadowed corners; long exposures help blur passersby while tiles frame the scene.
4) Graça and Senhora do Monte overlooks: elegant terraces frame the city; north viewpoints let you scope back across the rooftops, giving wide contrasts to pair with street scenes.
5) LX Factory’s textures: an industrial quarter with brick walls, murals, and small studios; this location offers opportunities for close-ups of signage, fashion, and street life. Keep an eye on the river breeze that makes colors pop.
6) Time Out Market precinct and adjacent riverside walks: you’ll see locals and visitors mingling near stalls; this area rewards quick, candid shots and dramatic shadows by the afternoon sun. A favourite for people-and-architecture contrasts.
7) Feira da Ladra flea market: textures and portraits among thrift stalls; rhythm is obvious–tents, coins, scarves–yielding many usable discoveries for showing money matters and routine commerce. Photographing here bridges old and new traditions.
8) Tram 28 route through Graça and Baixa hills: the road serpents between pedestrians and cars; capture motion with a slow shutter, or frame riders stepping off at stops. This iconic line is a tester for timing and composition, whether you shoot stills or actions.
9) Belém riverside and monuments: water reflections pair with the tower and riverfront trees; this area works well for long exposures and portraits with the focal point. If you crave waterfalls, plan a day trip to Madeira to compare moods beyond the coast.
10) Príncipe Real gardens and adjacent side streets: night scenes glow with neon and lanterns; tranquil corners give space for elegant camera positions, and you’ll catch locals strolling, couples chatting, and visitors wandering after sundown.
Morocco souks guide: In Marrakech’s Jemaa el-Fnaa, Fez’s Talaa Kebira, and Rabat’s medina you find traditional crafts, leather, spices, and textiles, with obvious opportunities for candid moments among crowds. Whether you travel solo or with companions, the women vendors and everyday traders create a wealth of moments for photographing; this country offers north African tradition in vibrant palettes. For planning, check Expedia for flight options, and search guatemalas travel blogs for fresh angles. If you want a word to guide your bargaining, carry small money; prices are negotiable, and bargaining adds to the immersion. For a cross-reference, you can compare with Switzerland’s alpine towns or a stroll along the Hudson in usas, then test the vibe in subway networks for urban rhythm. Beyond the souks, the road winds through markets and waterfalls, and the northern districts often feel more elegant; a simple phrase to break the ice can unlock new shots.
Best times to shoot Lisbon: dawn, blue hour, and crowd considerations
Prefer dawn on a hilltop overlook, then slide into blue hour for a cinematic shift. Arrive 20–30 minutes early to lock a vantage and give the street life a moment to settle; a little patience pays off with cleaner tones and richer texture. Use a range of lenses to cover sweeping façades and intimate details, and plan for the next block to capture changes beyond the first light at different times.
Dawn angles on the hills above the ancient neighborhood reveal tiled roofs and decorative balconies as they glow. Blue hour intensifies contrast between dark alleys and warm lamps, ideal for long exposures if you have a tripod. Markets begin to stir after sunup but remain quiet for the first half-hour, letting locals move through doorways and arcades without crowding your frame.
Timing for blue hour varies with season; plan for 15–25 minutes of color drift. Because the light shifts quickly, for a crisp handheld result, shoot at ISO 100–400, f/4–f/8, 1/60–1/125 s; for reflection on wet stones or puddles, lengthen shutter with a tripod. The mood can feel like a quiet movie scene; the last light flicker can be captured with a longer exposure to retain detail in shadows, and the aurora borealis mood can inspire you to frame luminous edges more strongly. If light fades, switch to a longer exposure to retain detail in shadows.
Crowd considerations: on weekdays, you’ll find calmer morning hours; weekends attract locals to markets and viewpoints, so plan a second pass around 9–10 a.m. to capture the human tempo. If you want to keep a clean frame, shoot from elevated spots or use reflections in shop windows to mask busy sidewalks; otherwise weave people into the scene as authentic movement rather than obstacles. Later blocks can deliver dynamic energy, so your approach should be flexible and patient.
Gear and prep: keep a light kit with a flexible zoom and a fast prime; test the dufault exposure and switch to manual. Build lists of preferred angles and later routes around the neighborhood. Your plan can borrow cues from viator lists and from italian courtyards, cultural hubs, and hudson river vibes, and even the vibe from guatemala’s markets or vanuatu shores to broaden your sense of composition. Consider a few sets around ancient arches, caves and cave-like corners, and reflective storefronts to replicate the range of moods, including glaciers in memory to push texture. Your approach should combine patience and speed to maximize shots during dawn and blue hour, then adapt when crowds grow. If you want to expand your mental map, think of scenes from kusatsu’s quiet backstreets, or chau-inspired street tableaux, and imagine how those textures translate to the cityscape.
10 Lisbon spots: access tips, vantage points, and practical notes
Start with this: ride the subway to Baixa-Chiado to reach the centre fast, then walk the rolling hills to the belvederes; a longer lens helps capture deep textures, and a good compact keeps you ready for quick shoots; go away from crowds by arriving at dawn and letting traffic fade.
1) Miradouro de Santa Luzia (Alfama): Access from the cathedral quarter via steep steps; the location is incredibly atmospheric at dawn when they gather in small groups; the tiled walls frame the river, and the capilano-like crowd line adds scale; use a longer lens to jump into tight details and capture the drama.
2) Castelo de São Jorge: walk along the outer ramparts for deep, sweeping views over the centre; the skyline is striking, with domes and spires punctuating the old town; arrive early to avoid crowds and switch to a longer lens for tighter rooftops.
3) Elevador de Santa Justa: ride the iron lift to the Carmo terrace, then step onto the viewing platform for a city-wide perspective; it’s incredibly convenient to jump between two high viewpoints; arrive before 9:00 to dodge queues and ensure you catch the cathedral spires in the distance.
4) Miradouro da Senhora do Monte (Graça): the climb from the tram is long but the payoff is a deep panorama over the centre; stay for sunset when the light becomes striking gold; bring a tripod if you have one; walks along the hill give you multiple vantage points.
5) Terreiro do Paço and riverfront: the terrace facing the Tagus offers wide, straight lines of boats and traffic along the water; the scene is sprawling at twilight; find a comfortable spot on the quay and weave between shadows to capture the rhythm of the city.
6) Belem riverside: MAAT, Jerónimos, and the tower create a classics trio; good light comes in late afternoon; access via tram from the centre or subway to Cais do Sodré, then a short walk; the site gives generous space to capture the river, bridge, and sky; these favourites are widely considered among top viewpoints.
7) Parque das Nações: a modern, sprawling riverfront with wide promenades and a skyline of towers; elevator access to elevated decks helps you shoot the bridge and boats; as the area is newer, you find cleaner lines and easier sightlines for cities’ images.
8) Monsanto Forest Park: a sprawling hillscape with forest and city glimpses through the pines; plan longer walks, check the weather, and keep a compact ready for wide-angle captures; the capilano-like bridges and rolling paths give scale, and you can find caves of shadow under the boughs that make the city feel smaller.
9) Avenida da Liberdade and nearby terraces: calm avenues framed by refined façades; late afternoon light glows along the centre and you can capture symmetrical lines with a lens; watch the traffic, then dip into georgias for a quick break and a fresh perspective.
10) Jardim do Torel: a tucked-away terrace with a sprawling overlook toward the city; access via gradual steps, perfect for golden-hour shots with a peaceful vibe; bring a french lens to frame doors and balconies; ensure you have a longer walk back to the metro to beat the heat, chau.
Morocco souks and medinas: etiquette, photo permissions, and safe framing
Begin with a respectful approach: greet locals, smile, and ask before taking shots of individuals. In congested lanes, a quick nod keeps the flow smooth and reduces tension among crowds.
In the centre of a bustling market, framing matters more than speed. Use contrasting textures–bright textiles against carved wooden screens or pink plaster against tiled arches–to tell a story without isolating anyone. This architectural balance helps you capture the scene as a coherent whole.
Photo permissions: approach vendors near entrances or stalls and explain your intent in one or two sentences in French or Arabic if possible. If consent is given, shoot wide to include context; if not, respect the gesture and switch to a broader scene that focuses on the environment rather than faces.
Respect religious spaces: outside mosques and prayer halls, keep voices low, avoid flash, and ask before any interior shots. Allow the locals to guide you; many will welcome exterior portraits that show daily life around the courtyard or fountain.
Framing tips: carry a light kit and plan routes that minimize disruption. Pack a lens set that allows fullsize captures from a distance when needed; this keeps your frame clean and reduces the chance of capturing someone who does not wish to be photographed. Inland markets often reveal more intimate scenes than coastal corridors; beyond the main aisles, you can feel a different vibe in each alley–another moment, another colour, another pink arch. If your route also reaches the coast, keep the same approach.
Practical notes: if you sense discomfort, back away calmly. This planet rewards tact; traveling photographers who consider locals tend to build trust and gather better shots. Canadian travelers, for example, often get welcomed if they stay patient and avoid blocking narrow walks.
Examples and lists: centre features like carved doors, pink arches, and textile stalls anchor your series. By planning ahead you’ll leave with a set of shots that are cohesive and respectful, not hurried attempts that require post editing to rescue the frame.
| 액션 | How to do it | 이점 |
|---|---|---|
| 클로즈업 전에 물어보세요. | Bonjour! 번역을 시작해도 될까요? | 갈등을 줄이고 신뢰를 구축합니다. |
| 보호자 없는 미성년자 출입 금지 | 동의를 얻을 수 없는 경우 대체 와이드 장면을 찾으십시오. | 프라이버시와 존엄성을 보호합니다. |
| 예배 공간을 존중하십시오. | 플래시를 사용하지 마십시오; 외부 특징만 촬영하십시오. | 안전과 존중 유지 |
| 군중 속에서 눈에 띄지 않게 움직이세요 | 장비는 콤팩트하게 유지하고, 통로를 막지 마십시오. | 더 부드러운 흐름과 더 나은 장면 |
번잡한 거리 촬영을 위한 장비 및 설정: 렌즈, ISO, 셔터 속도, 손떨림 보정
35mm 환산 화각의 단렌즈와 손떨림 보정 기능을 갖춘 장비로 시작하세요. 그러면 군중과 사각형 외관 사이에 자리 잡은 자연스러운 시각을 제공합니다. 맑은 날에는 ISO 400–800, 그늘에서는 800–1600을 사용하고, 셔터 속도는 1/125~1/250초로 유지하여 움직임을 고정하면서 군중 속에서 약간의 움직임도 보존하세요.
- 렌즈: 자연스러운 원근감을 위해 28–35mm 범위의 표준 단렌즈를 선택하거나, 더 깊이 있는 순간을 위해 콤팩트한 50mm 렌즈를 추가하십시오. 가벼운 줌렌즈(약 24–70mm)는 속도를 늦추지 않으면서 풀프레임의 유연성을 제공합니다. 좁은 도심 지역에서는 24mm 광각 옵션이 배경을 읽기 쉽게 유지하면서 단 한 번의 독특한 공간으로 장면을 구성하는 데 도움이 됩니다.
- ISO 및 셔터: 햇빛이 부분적으로 가려진 그림자가 있는 밝은 날에는 ISO 200–400 및 1/250초가 적합합니다. 인파가 몰리거나 빛이 변하면 ISO 800–1600 및 1/200초로 올립니다. 황혼이나 네온사인이 빛나는 경우에는 1600–3200 및 1/125초로 설정하면 움직이는 보행자의 흐릿함을 방지하면서 실루엣을 살릴 수 있습니다.
- 조리개와 심도: f/4–f/5.6으로 촬영하여 전경의 움직임과 배경 요소를 모두 담아내세요. 더 넓은 조리개는 피사체 하나만 분리하는 반면, 조리개를 조이면 복잡한 거리에서 시청자가 주목하는 주변 질감을 더할 수 있습니다.
- 안정화: 가능하면 광학 또는 렌즈 기반 안정화를 활성화하고, 차선책으로 바디 안정성에 의존합니다. 좁은 인도에서는 팔꿈치를 고정하고 카메라를 몸에 바싹 붙인 다음 짧게 여러 번 촬영하여 미세한 흔들림을 활용해 자연스러운 움직임을 연출합니다.
- 기법: 가능하다면 깨끗한 그림자 표현을 위해 풀프레임 센서를 선호하고, 그렇지 않다면 동등한 초점 거리를 가진 APS-C 옵션도 좋습니다. 갑작스러운 움직임에 대비해 작은 초점 보호대와 함께 연속 AF를 사용하고, 예상되는 동작이 펼쳐질 거리에 미리 초점을 맞추세요.
- 시점 및 구도: 현실감을 유지하기 위해 시점을 눈높이 또는 그 근처에 두고, 약간 낮은 각도는 포장 도로와 상점 전면의 질감을 드러내고, 더 높은 각도는 사람들의 움직임을 강조합니다. 장면의 균형에 따라 정사각형 또는 직사각형 구도를 목표로 하고, 연출된 느낌보다는 자연스러운 느낌을 주는 시각을 선택하세요.
- 작업 흐름 및 속도: 액션 순간에는 빠른 버스트 케이던스(초당 3~5프레임)로 설정하고, 주요 프레임만 검토하고, 추후 선택을 위해 코멘트를 태그합니다. 군중 속에서는 일관성이 신뢰할 수 있는 결과에 대한 명성을 쌓으며, 복잡한 거리에서 당신의 작업 방식을 보고 싶어하는 팔로워들과 노트를 공유하세요.
- 색상과 분위기: 맑은 푸른 하늘이나 네온 불빛 아래에서 화이트 밸런스를 주광에서는 5200–5600K 근처로 조정하고 인공 조명에서는 따뜻한 색조로 조정합니다. 자연스러운 모습이 과도하게 연출된 장면보다 더 매력적으로 느껴지는 경우가 많습니다. 피사체뿐만 아니라 환경을 있는 그대로 보여주는 몇몇 프레임을 유지하십시오.
- 물류: 붐비는 거리에서 장비 교체를 최소화하기 위해 시체 두 구 또는 렌즈 두 개가 장착된 시체 한 구를 운반하며, 해안 도시와 열대 기후에서 흔히 발생하는 갑작스러운 소나기에 대비하여 방수 장비 세트를 준비합니다. 보행자 통행량이 많은 것으로 알려진 위치에서는 눈에 잘 띄지 않는 소형 키트가 유용합니다.
- 마음가짐과 반응: 작품을 공개할 때, 댓글은 공간과 타이밍을 다루는 방식을 반영할 수 있습니다. 비평에 정중하게 응대하고 지속적으로 접근 방식을 개선하세요. 거리 문화로 유명한 지역에서는, 일관되고 존중하는 태도가 현지인과 방문객 사이에 긍정적인 평판을 쌓는 데 도움이 됩니다.
경로를 계획할 때, 푸른 시간, 사각 광장, 그늘진 안뜰과 같은 다양한 환경이 ISO 및 셔터에 약간의 조정을 요구한다는 점을 고려하십시오. 인기 있는 경로 중에서도 작고 균형 잡힌 키트는 과정 자체를 즐기고 워크플로우를 원활하게 유지할 수 있도록 에너지를 충분히 유지해 줍니다. 맨해튼, 아프리카, 또는 오로라가 하늘을 가득 채운 해안 마을 어디든 마찬가지입니다. 동일한 장비와 설정 워크플로우는 수십 개의 친숙하고 잘 알려진 지역과 작은 골목길에서도 작동하여 당신이 발을 딛는 매 순간마다 독특하고 완벽하게 구도를 잡은 장면을 전달할 수 있도록 도와줍니다.
리스본 및 모로코 거리 사진 후처리: 색상, 대비, 및 정리
보정된 모니터와 2단계 RAW 워크플로우로 시작하세요. 노출을 먼저 보정하고, 색상을 나중에 보정합니다. 구체적인 규칙은 다음과 같습니다. 중립적인 화이트 밸런스를 설정하고, 하이라이트를 제어하며, 그림자는 복구할 수 있도록 남겨둡니다. 이 방법은 심각한 클리핑을 방지하고 효과적인 것으로 입증되었으며, 특히 해안 장면과 번잡한 시장을 전환할 때 수년간 즐겨 사용한 방법입니다. 아직 시도해 보지 않았다면, 신뢰할 수 있는 기준선으로 시작해 보세요.
컬러 그레이딩 전략: 작업을 분할 전반적인 분위기 그리고 로컬 개선. 모로코 스타일 장면에 은은한 따뜻한 미드톤 리프트를 적용한 다음, 하늘과 그림자에 차가운 편향을 적용합니다. 결과적으로 다음과 같은 팔레트가 제공됩니다. 대조적인 따뜻함과 차가움, 하나 reason 편집자들은 종종 다음을 선택합니다. western 컬러는 자연스럽게 유지하면서 살펴보세요. 다음과 같습니다. 파란색 타일이나 간판과 같은 액센트의 채도를 조절하여 디테일을 유지하십시오. 목록 일련의 단계를 통해 색상을 탐색하면서 적절한 균형을 찾을 수 있습니다.
로컬 조정: 마스크를 사용하여 얼굴, 손, 질감이 있는 표면을 타겟팅합니다. 질감이 중요한 부분(돌, 천)에서는 선명도를 높이고 어두운 구석에서는 노이즈를 부드럽게 합니다. 복잡한 실내의 경우 상점 또는 지하철 자동차에 대해 가장자리에 선택적 선명도를 적용하고 텅스텐 하이라이트에 약간의 색상을 적용합니다. 아직 기준선을 구축하지 않았다면 다음을 실행하세요. lens- 관점 유지를 위한 수정 패스.
조직 및 워크플로: 파일 이름을 일관성 있게 변경하고 해안, 시장, 아치, 여행자와 같은 키워드를 첨부합니다. 푸른 그림자와 따뜻한 하이라이트 간의 대비를 위한 컬렉션을 구축하고 유지 관리합니다. 전에/동안/after 편집 사항을 비교하는 루틴을 설정하세요. 내보낸 JPEG은 슬림 프로필로 저장하고 RAW 파일은 전용 아카이브에 보관하세요. 이렇게 하면 장기적인 접근에 대한 확실한 대비책이 될 것입니다. 도움이 되셨기를 바라며, 자신에게 맞게 조정해 보세요.
야간 및 저조도 촬영 참고 사항: 어두운 복도나 지하 터널에서 촬영할 때는 ISO 1600–3200으로 RAW 촬영하고, 후반 작업 시 빨간색 및 파란색 채널에 약한 노이즈 감소를 적용하고 lens 원근법 수정. 피부 과도한 선명도 향상 방지, 적당한 선명도만 가장자리에 사용.
편집 시 다음 빠른 점검 목록을 따르세요. 혼합 조명 아래에서 중립적인 색상을 유지하도록 화이트 밸런스 조정, 그레이딩 전후 히스토그램 검토, 피부 톤 및 상점 간판의 색 번짐 관찰, 원근 왜곡을 수정하기 위해 렌즈 보정 단계를 고려하십시오.
대조에서 마법을 찾으세요: 모방하지 않고 자신만의 스타일을 정의하기 위해 세계적으로 유명한 시퀀스와 비교해 보세요. 운전 경로와 시장은 역동적인 장면을 제공합니다. 다양한 스타일을 탐색하는 것은 과정의 일부입니다. 프레임 사이를 이동하며 연속성을 테스트하세요. 목표는 일련의 샷에서 일관성 있는 커버를 만드는 것입니다. 따뜻한 그림자와 시원한 하이라이트의 균형을 맞추면서 주제에 충실하여 진정성 있는 톤을 느껴야 합니다.
로포텐 제도와 호엔슈방가우에 대한 언급은 색상 분위기와 구조에 영감을 줄 수 있지만, 핵심 기술은 동일하게 유지됩니다. 즉 색상 조화, 적절한 대비, 깔끔한 구성을 유지하는 것입니다.
") 모스크바의 엉뚱한 거리 예술 – 어디에서 찾을 수 있을까 (사진)">
모스크바의 엉뚱한 거리 예술 – 어디에서 찾을 수 있을까 (사진)">
 2025년 최고의 모스크바 사진 명소">
 20가지 모스크바의 숨겨진 보석과 최고의 비밀 – 색다른 현지 가이드">
 올드 스쿨 모스크바 펍 크롤링 – 클래식 바, 숨겨진 보석 & 나이트라이프">
 모스크바 – 휴양 도시 – 러시아 수도에서 즐기는 럭셔리 여행, 웰빙, 그리고 문화">
 Tallulah Falls 여행 가이드 – Tallulah Gorge 방문 방법, 접근 지점, 최고의 전망 포인트">
 유럽에서 가장 아름다운 페리 여행 – 그림 같은 해안 여정">
 궁극의 썰매 언덕 가이드 – 419 지역 슬로프 종합 정보">
 신비로운 모스크바 멀티미디어 – 러시아 수도에서 즐기는 몰입형 예술, 문화, 기술">
 유럽 전역에서 가장 숨 막힐 듯 아름다운 숨겨진 보석 같은 교회들">