 I miei 10 spot preferiti per la street photography a Lisbona – I migliori posti per le foto a Lisbona">

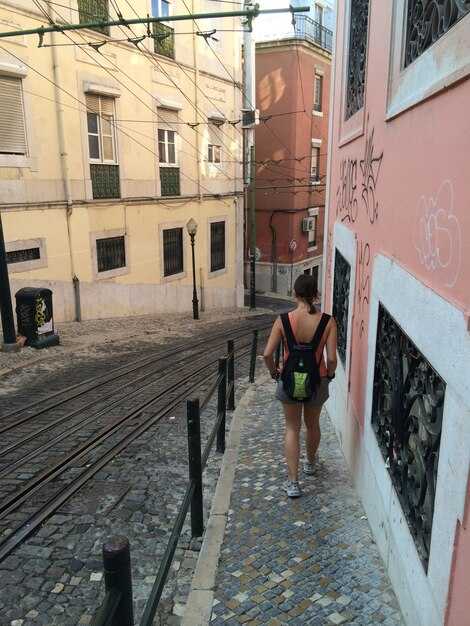
Start at the Alfama overlook at golden hour to anchor your visual path. From there, the Portuguese capital by the Tagus reveals pink tiled façades and hills that rise behind a simple house. Be patient; the first frame should feel definite and purposeful, not rushed.
Move through districts Baixa, Chiado, Graça, and Estrela along the busy streets, then climb toward higher viewpoints for contrasts in scale. In each district you can find multiple textures: azulejo panels, balconies, and stairways that tell centuries of daily life without shouting clichés. When you caption, mention the district names to give context.
Stand by the riverfront near Cais do Sodré and watch the light drift across the water, contrasting white stucco with pink roofs. The coastal breeze adds a natural movement to frames as boats drift by; the mood can be awe-inspiring even in crowds.
When the light changes, notice how havana tones bloom on tile and plaster. The small courtyards and the way stair partitions cast shadows tell a story without loud gestures. Focus on how a single house facade catches the sun and then dissolves into pattern on the next frame.
To broaden your sense of place, compare the rhythm here with mumbais’ crowded lanes, guatemala markets, or fjords seen in distant landscapes. Such references keep you from copying familiar angles and push for a more personal string of frames across cities and districts.
Patience and a light touch with gear help you stay honest to the light. without rushing, you can find subtle silhouettes, doorways, and windows that compose into a narrative across multiple moments.
Return at blue hour to extend the arc: you’ll see a natural shift in color across tiles, iron rails, and harbor reflections. In that quiet, the spaces between districts reveal a personal method rather than a generic portrait of this coastal capital.
My 10 Favorite Lisbon Street Photography Spots and Morocco Souks Guide
1) Alfama’s dawn-lit lanes: start here; the thing to chase is light rolling across stairways and white walls. North-facing alleys offer obvious opportunities for photographing everyday life, while women on balconies add elegant color. It quickly becomes one of my favourites.
2) Baixa-Chiado around Praça do Comércio: broad avenues and granite façades create clean geometry; shoot across the square as trams rattle by and cars move along the road. Whether you shoot wide or tight, you’ll find favourites in the strong lines and portraits near street vendors.
3) Mouraria’s azulejo corridors: named streets, tight bends, and local tradition; photographing here yields human stories and women selling crafts. This area is an obvious field for adventures across sunlit and shadowed corners; long exposures help blur passersby while tiles frame the scene.
4) Graça and Senhora do Monte overlooks: elegant terraces frame the city; north viewpoints let you scope back across the rooftops, giving wide contrasts to pair with street scenes.
5) LX Factory’s textures: an industrial quarter with brick walls, murals, and small studios; this location offers opportunities for close-ups of signage, fashion, and street life. Keep an eye on the river breeze that makes colors pop.
6) Time Out Market precinct and adjacent riverside walks: you’ll see locals and visitors mingling near stalls; this area rewards quick, candid shots and dramatic shadows by the afternoon sun. A favourite for people-and-architecture contrasts.
7) Feira da Ladra flea market: textures and portraits among thrift stalls; rhythm is obvious–tents, coins, scarves–yielding many usable discoveries for showing money matters and routine commerce. Photographing here bridges old and new traditions.
8) Tram 28 route through Graça and Baixa hills: the road serpents between pedestrians and cars; capture motion with a slow shutter, or frame riders stepping off at stops. This iconic line is a tester for timing and composition, whether you shoot stills or actions.
9) Belém riverside and monuments: water reflections pair with the tower and riverfront trees; this area works well for long exposures and portraits with the focal point. If you crave waterfalls, plan a day trip to Madeira to compare moods beyond the coast.
10) Príncipe Real gardens and adjacent side streets: night scenes glow with neon and lanterns; tranquil corners give space for elegant camera positions, and you’ll catch locals strolling, couples chatting, and visitors wandering after sundown.
Morocco souks guide: In Marrakech’s Jemaa el-Fnaa, Fez’s Talaa Kebira, and Rabat’s medina you find traditional crafts, leather, spices, and textiles, with obvious opportunities for candid moments among crowds. Whether you travel solo or with companions, the women vendors and everyday traders create a wealth of moments for photographing; this country offers north African tradition in vibrant palettes. For planning, check Expedia for flight options, and search guatemalas travel blogs for fresh angles. If you want a word to guide your bargaining, carry small money; prices are negotiable, and bargaining adds to the immersion. For a cross-reference, you can compare with Switzerland’s alpine towns or a stroll along the Hudson in usas, then test the vibe in subway networks for urban rhythm. Beyond the souks, the road winds through markets and waterfalls, and the northern districts often feel more elegant; a simple phrase to break the ice can unlock new shots.
Best times to shoot Lisbon: dawn, blue hour, and crowd considerations
Prefer dawn on a hilltop overlook, then slide into blue hour for a cinematic shift. Arrive 20–30 minutes early to lock a vantage and give the street life a moment to settle; a little patience pays off with cleaner tones and richer texture. Use a range of lenses to cover sweeping façades and intimate details, and plan for the next block to capture changes beyond the first light at different times.
Dawn angles on the hills above the ancient neighborhood reveal tiled roofs and decorative balconies as they glow. Blue hour intensifies contrast between dark alleys and warm lamps, ideal for long exposures if you have a tripod. Markets begin to stir after sunup but remain quiet for the first half-hour, letting locals move through doorways and arcades without crowding your frame.
Timing for blue hour varies with season; plan for 15–25 minutes of color drift. Because the light shifts quickly, for a crisp handheld result, shoot at ISO 100–400, f/4–f/8, 1/60–1/125 s; for reflection on wet stones or puddles, lengthen shutter with a tripod. The mood can feel like a quiet movie scene; the last light flicker can be captured with a longer exposure to retain detail in shadows, and the aurora borealis mood can inspire you to frame luminous edges more strongly. If light fades, switch to a longer exposure to retain detail in shadows.
Crowd considerations: on weekdays, you’ll find calmer morning hours; weekends attract locals to markets and viewpoints, so plan a second pass around 9–10 a.m. to capture the human tempo. If you want to keep a clean frame, shoot from elevated spots or use reflections in shop windows to mask busy sidewalks; otherwise weave people into the scene as authentic movement rather than obstacles. Later blocks can deliver dynamic energy, so your approach should be flexible and patient.
Gear and prep: keep a light kit with a flexible zoom and a fast prime; test the dufault exposure and switch to manual. Build lists of preferred angles and later routes around the neighborhood. Your plan can borrow cues from viator lists and from italian courtyards, cultural hubs, and hudson river vibes, and even the vibe from guatemala’s markets or vanuatu shores to broaden your sense of composition. Consider a few sets around ancient arches, caves and cave-like corners, and reflective storefronts to replicate the range of moods, including glaciers in memory to push texture. Your approach should combine patience and speed to maximize shots during dawn and blue hour, then adapt when crowds grow. If you want to expand your mental map, think of scenes from kusatsu’s quiet backstreets, or chau-inspired street tableaux, and imagine how those textures translate to the cityscape.
10 Lisbon spots: access tips, vantage points, and practical notes
Start with this: ride the subway to Baixa-Chiado to reach the centre fast, then walk the rolling hills to the belvederes; a longer lens helps capture deep textures, and a good compact keeps you ready for quick shoots; go away from crowds by arriving at dawn and letting traffic fade.
1) Miradouro de Santa Luzia (Alfama): Access from the cathedral quarter via steep steps; the location is incredibly atmospheric at dawn when they gather in small groups; the tiled walls frame the river, and the capilano-like crowd line adds scale; use a longer lens to jump into tight details and capture the drama.
2) Castelo de São Jorge: walk along the outer ramparts for deep, sweeping views over the centre; the skyline is striking, with domes and spires punctuating the old town; arrive early to avoid crowds and switch to a longer lens for tighter rooftops.
3) Elevador de Santa Justa: ride the iron lift to the Carmo terrace, then step onto the viewing platform for a city-wide perspective; it’s incredibly convenient to jump between two high viewpoints; arrive before 9:00 to dodge queues and ensure you catch the cathedral spires in the distance.
4) Miradouro da Senhora do Monte (Graça): the climb from the tram is long but the payoff is a deep panorama over the centre; stay for sunset when the light becomes striking gold; bring a tripod if you have one; walks along the hill give you multiple vantage points.
5) Terreiro do Paço and riverfront: the terrace facing the Tagus offers wide, straight lines of boats and traffic along the water; the scene is sprawling at twilight; find a comfortable spot on the quay and weave between shadows to capture the rhythm of the city.
6) Belem riverside: MAAT, Jerónimos, and the tower create a classics trio; good light comes in late afternoon; access via tram from the centre or subway to Cais do Sodré, then a short walk; the site gives generous space to capture the river, bridge, and sky; these favourites are widely considered among top viewpoints.
7) Parque das Nações: a modern, sprawling riverfront with wide promenades and a skyline of towers; elevator access to elevated decks helps you shoot the bridge and boats; as the area is newer, you find cleaner lines and easier sightlines for cities’ images.
8) Monsanto Forest Park: a sprawling hillscape with forest and city glimpses through the pines; plan longer walks, check the weather, and keep a compact ready for wide-angle captures; the capilano-like bridges and rolling paths give scale, and you can find caves of shadow under the boughs that make the city feel smaller.
9) Avenida da Liberdade and nearby terraces: calm avenues framed by refined façades; late afternoon light glows along the centre and you can capture symmetrical lines with a lens; watch the traffic, then dip into georgias for a quick break and a fresh perspective.
10) Jardim do Torel: a tucked-away terrace with a sprawling overlook toward the city; access via gradual steps, perfect for golden-hour shots with a peaceful vibe; bring a french lens to frame doors and balconies; ensure you have a longer walk back to the metro to beat the heat, chau.
Morocco souks and medinas: etiquette, photo permissions, and safe framing
Begin with a respectful approach: greet locals, smile, and ask before taking shots of individuals. In congested lanes, a quick nod keeps the flow smooth and reduces tension among crowds.
In the centre of a bustling market, framing matters more than speed. Use contrasting textures–bright textiles against carved wooden screens or pink plaster against tiled arches–to tell a story without isolating anyone. This architectural balance helps you capture the scene as a coherent whole.
Photo permissions: approach vendors near entrances or stalls and explain your intent in one or two sentences in French or Arabic if possible. If consent is given, shoot wide to include context; if not, respect the gesture and switch to a broader scene that focuses on the environment rather than faces.
Respect religious spaces: outside mosques and prayer halls, keep voices low, avoid flash, and ask before any interior shots. Allow the locals to guide you; many will welcome exterior portraits that show daily life around the courtyard or fountain.
Framing tips: carry a light kit and plan routes that minimize disruption. Pack a lens set that allows fullsize captures from a distance when needed; this keeps your frame clean and reduces the chance of capturing someone who does not wish to be photographed. Inland markets often reveal more intimate scenes than coastal corridors; beyond the main aisles, you can feel a different vibe in each alley–another moment, another colour, another pink arch. If your route also reaches the coast, keep the same approach.
Practical notes: if you sense discomfort, back away calmly. This planet rewards tact; traveling photographers who consider locals tend to build trust and gather better shots. Canadian travelers, for example, often get welcomed if they stay patient and avoid blocking narrow walks.
Examples and lists: centre features like carved doors, pink arches, and textile stalls anchor your series. By planning ahead you’ll leave with a set of shots that are cohesive and respectful, not hurried attempts that require post editing to rescue the frame.
| Azione | Come farlo | Benefit |
|---|---|---|
| Chiedi prima dei primi piani | Bonjour! Vuole che traduca il testo fornito? | Riduce i conflitti e crea fiducia |
| Evitare i minori non accompagnati. | Trova scene ampie alternative se il consenso non viene fornito | Protegge la privacy e la dignità |
| Rispetta i luoghi di culto | Non usare il flash; fotografa solo le caratteristiche esterne. | Mantiene la sicurezza e il rispetto |
| Muoviti discretamente tra la folla. | Tenere l'attrezzatura compatta; non bloccare i passaggi | Flusso più fluido e scatti migliori |
Attrezzatura e impostazioni per strade affollate: obiettivi, ISO, otturatore e stabilizzazione
Inizia con un obiettivo primario equivalente a 35 mm e una configurazione stabilizzata; per te, questo offre una percezione naturale che si adatta tra la folla e le facciate squadrate. Utilizza ISO 400–800 in piena luce diurna, 800–1600 all'ombra e mantieni l'otturatore tra 1/125 e 1/250 di secondo per bloccare il movimento, preservando al contempo un certo senso di movimento nella folla.
- Obiettivi: scegli un obiettivo standard a focale fissa tra i 28 e i 35 mm per ottenere una prospettiva naturale, oppure aggiungi un compatto 50 mm per i momenti più intimi. Uno zoom leggero (circa 24–70 mm) offre la flessibilità del full-frame senza rallentarti. In contesti urbani ristretti, un'opzione grandangolare da 24 mm ti aiuta a inquadrare la scena in un unico, irripetibile respiro di spazio, mantenendo leggibile lo sfondo.
- ISO e otturatore: la luce diurna con zone d'ombra beneficia di ISO 200–400 e 1/250s. Quando la folla aumenta o la luce cambia, aumentare a ISO 800–1600 e 1/200s. Per il crepuscolo o il bagliore dei neon, 1600–3200 con 1/125s preserva le silhouette evitando la sfocatura nei pedoni in movimento.
- Apertura e profondità: scatta a f/4–f/5,6 per mantenere sia l'azione in primo piano che gli elementi contestuali in gioco; aperture più ampie isolano un singolo soggetto, mentre chiudere il diaframma aggiunge la texture circostante che gli spettatori notano nelle strade affollate.
- Stabilizzazione: abilita la stabilizzazione ottica o quella basata sull'obiettivo, ove disponibile, e affidati alla stabilità del corpo come seconda linea di difesa. Su marciapiedi stretti, blocca i gomiti, tieni la fotocamera vicina e scatta con brevi raffiche per sfruttare le micro-macro vibrazioni per una sensazione di movimento naturale.
- Tecnica: preferire un sensore full-frame, se possibile, per ombre più pulite nella folla; altrimenti, un'opzione APS‑C con lunghezze focali equivalenti funziona bene. Utilizzare l'AF continuo con piccole protezioni di messa a fuoco per movimenti improvvisi e pre-focalizzare a una distanza alla quale si prevede che si svolga l'azione.
- Punto di vista e inquadratura: mantieni il punto di vista all'altezza degli occhi o vicino per conservare il realismo; un'angolazione leggermente inferiore può rivelare la texture della pavimentazione e delle vetrine, mentre un'angolazione più alta enfatizza il movimento delle persone. Mira a un'inquadratura quadrata o rettangolare in base all'equilibrio della scena, scegliendo una prospettiva che appaia naturale piuttosto che costruita.
- Workflow e ritmo: imposta una cadenza rapida e intensa (3–5 fotogrammi al secondo) nei momenti d'azione, rivedi solo i fotogrammi chiave e aggiungi commenti per una selezione successiva. Tra la folla, la coerenza crea una reputazione di risultati affidabili; condividi le tue note con i follower che amano vedere come lavori in strade affollate.
- Colore e atmosfera: in cieli azzurri luminosi o notti al neon, calibra il bilanciamento del bianco tra 5200 e 5600K alla luce del giorno e regolalo per tonalità più calde in condizioni di illuminazione artificiale. Un aspetto naturale spesso risulta più affascinante di scene troppo stilizzate; conserva alcuni scatti che mostrano l'ambiente così com'è, non solo il soggetto.
- Logistica: trasportare due corpi macchina o un singolo corpo macchina con due obiettivi per ridurre al minimo i cambi di attrezzatura su viali affollati; mantenere una configurazione resistente alle intemperie pronta per gli acquazzoni improvvisi, comuni sia nelle città costiere che nei climi tropicali. Le location note con un denso traffico pedonale traggono vantaggio da un kit compatto che rimane discreto.
- Mentalità e accoglienza: quando pubblichi, i tuoi commenti possono riflettere il modo in cui gestisci spazio e tempistiche; rispondi educatamente alle critiche e perfeziona continuamente il tuo approccio. Nelle zone famose per la vita di strada, un metodo coerente e rispettoso ti aiuta a integrarti tra gente del posto e turisti, costruendo una reputazione positiva.
Quando pianifichi i percorsi, considera come ambienti diversi – l'ora blu, le piazze quadrate o i cortili ombreggiati – richiedano lievi adattamenti in ISO e otturatore. Tra i percorsi più popolari, un kit compatto e ben bilanciato ti mantiene pieno di energia per goderti il processo e mantenere fluido il tuo flusso di lavoro, che tu sia a Manhattan, in Africa o in una città costiera con cieli boreali sopra la testa. La stessa attrezzatura e lo stesso flusso di lavoro delle impostazioni funzionano per dozzine di zone familiari e ben note e piccoli vicoli, aiutandoti a fornire una vista unica e perfettamente inquadrata ogni volta che metti piede sul marciapiede.
Post-produzione per foto di strada di Lisbona e del Marocco: colore, contrasto e organizzazione
Inizia con un monitor calibrato e un flusso di lavoro RAW a due passaggi: correggi prima l'esposizione, poi il colore. Una regola concreta: imposta un bilanciamento del bianco neutro, mantieni le alte luci sotto controllo e lascia che siano le ombre a essere recuperate. Questo approccio evita clipping terribili e si è dimostrato efficace; è un metodo che uso con successo da anni durante i viaggi, specialmente quando passo da scene costiere a mercati affollati. Se non l'hai ancora provato, è un punto di partenza affidabile.
Strategia di color grading: dividi il lavoro in umore globale e Rifiniture locali. Inizia con un leggero e caldo sollevamento dei mezzitoni per scene in stile marocchino, quindi applica una polarizzazione più fredda a cieli e ombre. La palette risultante offre contrastante calore e freschezza, un motivo gli editori spesso scelgono i western mantenere un aspetto naturale e dai colori naturali. Per blu accenti come piastrelle e segnaletica, mantenere la saturazione controllata per preservare i dettagli. Questo elenco di passaggi ti aiuta a cercare il giusto equilibrio mentre esplori il colore.
Regolazioni locali: usa le maschere per mirare a volti, mani e superfici texturizzate. Aumenta la chiarezza dove la texture conta (pietra, tessuto), ma attenua il rumore negli angoli bui. Per interni in ambienti affollati. negozi or metropolitana auto, applica una nitidezza selettiva ai bordi e un tocco di colore alle luci al tungsteno. Se non hai ancora creato una baseline, esegui un obiettivo- Passaggio di correzione per mantenere una prospettiva chiara.
Organizzazione e flusso di lavoro: rinomina i file in modo coerente, aggiungi parole chiave come costiero, mercati, archi, viaggiatori. Crea raccolte per i contrasti tra ombre blu ed evidenziazioni calde e mantieni un before/during/dopo routine per confrontare le modifiche. Salva i JPEG esportati con un profilo slim mantenendo i RAW in un archivio dedicato. Questo fornirà una solida copertura per l'accesso a lungo termine; spero che tu lo trovi utile e lo adatti alle tue preferenze.
Note per condizioni di notte e scarsa illuminazione: quando si scatta in corridoi bui o gallerie della metropolitana, scattare in RAW a ISO 1600–3200; in post-produzione, applicare una leggera riduzione del rumore ai canali rosso e blu, e utilizzare obiettivo Correzioni per sistemare la prospettiva. Evitare una nitidezza eccessiva sulla pelle; usare una nitidezza moderata solo sui bordi.
Eccoli degli accorgimenti rapidi da seguire durante l'editing: regola il bilanciamento del bianco per mantenere colori neutri in condizioni di illuminazione mista; esamina l'istogramma prima e durante il grading; presta attenzione alle tonalità della pelle e allo sversamento di colore sulle insegne dei negozi; considera un intervento di correzione lente per sistemare le distorsioni prospettiche.
Alla ricerca della magia nei contrasti: confronta con sequenze famose in tutto il mondo per definire il tuo stile senza copiare. Itinerari e mercati offrono scene dinamiche; esplorare stili diversi fa parte del processo. Salta tra i fotogrammi per testare la continuità; l'obiettivo è una copertina coesa attraverso una sequenza di scatti. Il tono dovrebbe risultare autentico, cercando di bilanciare ombre calde con luci fredde, pur rimanendo fedele al soggetto.
I riferimenti alle isole Lofoten e a Hohenschwangau possono ispirare l'atmosfera cromatica e la struttura, ma la tecnica di base rimane la stessa: mantenere l'armonia dei colori, un contrasto adeguato e un'organizzazione pulita.
") La stravagante street art di Mosca – Dove trovarla (FOTO)">
La stravagante street art di Mosca – Dove trovarla (FOTO)">
 I migliori punti fotografici di Mosca per foto mozzafiato nel 2025">
 20 Gemme nascoste di Mosca e segreti meglio custoditi - Una guida locale insolita">
 Giro dei pub vecchia scuola di Mosca – Bar classici, gemme nascoste e vita notturna">
 Mosca – Città di villeggiatura – Viaggi di lusso, benessere e cultura nella capitale russa">
 Guida alla località di Tallulah Falls – Come visitare le gole di Tallulah, punti di accesso e i migliori punti panoramici">
 Le tratte dei traghetti più belle d'Europa - Viaggi panoramici lungo la costa">
 La guida definitiva alle piste da slittino – Un elenco di pendii nel 419">
 Mystical Moscow Multimedia – Arte immersive, cultura e tecnologia nella capitale russa">
 Le chiese gioiello nascoste più mozzafiato d'Europa">