

Προγραμματίζοντας ένα ταξίδι στη Ρωσία απαιτεί προσεκτική εξέταση πολλών παραγόντων, και ένα από τα πιο σημαντικά βήματα σε αυτή τη διαδικασία είναι η απόκτηση του κατάλληλου βίζα. Είτε είστε φοιτητής που επιθυμεί να σπουδάσει, είτε τουρίστας που επιθυμεί να εξερευνήσει, είτε επαγγελματίας που συμμετέχει σε μια διάσκεψη, η διαδικασία υποβολής αίτησης για ρωσικό βίζα μπορεί να φαίνεται απελπιστική. Ο οδηγός αυτός σκοπεύει να περιγράψει πώς να συμπληρώσετε την αίτηση για ρωσικό βίζα, παρέχοντας έναν ξεκάθαρο δρόμο μέσα από την απαραίτητη τεκμηρίωση.
Πριν ξεκινήσετε την διαδικασία υποβολής αίτησης για βίζα, είναι απαραίτητο να κατανοήσετε τους διαφορετικούς τύπους βίζας που υπάρχουν και να επιλέξετε αυτόν που ταιριάζει στις ανάγκες σας. Κάθε τύπος βίζας, είτε είναι τουριστική, φοιτητική ή εργασιακή, έχει συγκεκριμένες απαιτήσεις που καθορίζουν τις πληροφορίες που πρέπει να παρέχετε. Για να σας βοηθήσουμε να επιτύχετε, θα σας οδηγήσουμε σε κάθε βήμα της διαδικασίας, διασφαλίζοντας ότι είστε έτοιμοι να πληρούν τις τεχνικές απαιτήσεις χωρίς να ανησυχείτε για την παραλείψεις οποιουδήποτε σημαντικού στοιχείου.
Ενώ προετοιμάζεστε να αντιμετωπίσετε αυτήν την εργασία, σημειώστε ότι η ακρίβεια είναι ζωτικής σημασίας. Λάθη ή παραλείψεις μπορούν να οδηγήσουν σε καθυστερήσεις ή ακόμη και σε απόρριψη της αίτησής σας. Θα πρέπει να επιβεβαιώσετε την εγκυρότητα των εγγράφων σας, συμπεριλαμβανομένου του διαβατηρίου σας και οποιωνδήποτε υποστηρικτικών επιστολών από φίλους ή ιδρύματα. Βεβαιωθείτε ότι το διαβατήριό σας είναι έγκυρο για τουλάχιστον έξι μήνες πέρα από την προγραμματισμένη παραμονή σας και έχει αρκετές κενές σελίδες. Επιπλέον, θα ανακαλύψετε ότι υπηρεσίες μετάφρασης μπορεί να απαιτούνται για ορισμένα έγγραφα, οπότε είναι σοφό να προγραμματίσετε αυτό εκ των προτέρων.
Σε αυτόν τον οδηγό, θα σας εξηγήσουμε τη διαδικασία συμπλήρωσης της αίτησης, συμπεριλαμβανομένου του τρόπου με τον οποίο μπορείτε να επεξεργαστείτε και να επισκεφθείτε τις καταχωρήσεις σας αν χρειαστεί να κάνετε διορθώσεις. Θα βρείτε επίσης πληροφορίες για τη διαδικασία πληρωμής, την προγραμματισμό ραντεβού στο προξενείο και πού να στείλετε την ολοκληρωμένη αίτηση σας. Η ακολουθία αυτού του οδηγού θα κάνει τη διαδικασία πολύ πιο ομαλή, επιτρέποντάς σας να επικεντρωθείτε στην ενθουσιασμό της επερχόμενης περιπέτειας σας χωρίς να γίνετε θύμα σύγχυσης ή άγχους.
Κατανόηση των Απαιτήσεων για το Ηλεκτρονικό Βίζα
Η λήψη ηλεκτρονικού βίζα για τη Ρωσία απαιτεί την τήρηση ορισμένων συγκεκριμένων προϋποθέσεων που πρέπει να πληρούν οι αιτούντες για να εξασφαλίσουν μια ομαλή διαδικασία αίτησης. Πρώτα απ' όλα, οι αιτούντες πρέπει να ελέγξουν την εγκυρότητά τους με βάση την ιθαγένειά τους, καθώς το ηλεκτρονικό βίζα είναι διαθέσιμο μόνο σε πολίτες ορισμένων χωρών. Είναι απαραίτητο να ελέγξουν την επίσημη λίστα πριν προχωρήσουν στην αίτηση.

Όταν συμπληρώνετε την αίτηση, πρέπει να παρέχετε ένα έγκυρο διαβατήριο που είναι τουλάχιστον έξι μήνες έγκυρο από την ημερομηνία πρόθεσης άφιξης στη Ρωσία. Αυτό το διαβατήριο πρέπει να περιλαμβάνει τουλάχιστον μια κενή σελίδα για το βίζα. Υποστηρικτικά έγγραφα για να αποδείξετε τον σκοπό της διαμονής σας, όπως μια κράτηση ξενοδοχείου ή μια πρόσκληση από φίλους ή συγγενείς στη Ρωσία, μπορεί επίσης να απαιτούνται.
Οι υποψήφιοι πρέπει να προετοιμαστούν για την υποβολή μιας βιομετρικής φωτογραφίας. Αυτή η φωτογραφία πρέπει να πληροί συγκεκριμένες προδιαγραφές, συμπεριλαμβανομένης της να είναι πρωτότυπη και αυθεντική εικόνα που έχει ληφθεί εντός των τελευταίων έξι μηνών. Προσέξτε τις οδηγίες που παρέχονται στις οδηγίες της αίτησης.
Για τους υποψηφίους που χρειάζονται βοήθεια, υπηρεσίες όπως η υποστήριξη από διερμηνέα μπορεί να είναι χρήσιμες. Αυτό μπορεί να βοηθήσει να γίνει η διαδικασία πιο ομαλή, ειδικά αν υπάρχουν δυσκολίες στην κατανόηση του φόρμουλας αίτησης ή κατά τη διάρκεια της συνέντευξης με τον υπεύθυνο βίζας.
Είναι επίσης σημαντικό να παρέχετε αποδείξεις οικονομικής σταθερότητας, οι οποίες μπορούν να περιλαμβάνουν τραπεζικές καταστάσεις ή ένα γράμμα από έναν χορηγό. Αυτές οι αποδείξεις διασφαλίζουν ότι μπορείτε να υποστηρίξετε οικονομικά τον εαυτό σας κατά τη διάρκεια της παραμονής σας στη Ρωσία.
Κάθε αίτηση έχει συγκεκριμένες απαιτήσεις και είναι ζωτικής σημασίας να ακολουθήσετε προσεκτικά τις οδηγίες. Θυμηθείτε ότι όλα τα έγγραφα που υποβάλλονται πρέπει να είναι σαφή και διαβάζονται εύκολα, για να διατηρηθεί η αυθεντικότητα της αίτησής σας. Οποιαδήποτε διαφωνίες μπορεί να οδηγήσουν σε καθυστερήσεις ή αρνητικά αποτελέσματα σχετικά με το βίζο σας.
Μόλις συμπληρώσετε την αίτηση και συλλέξετε τα απαραίτητα έγγραφα, μπορείτε να υποβάλετε τα στοιχεία απευθείας μέσω της επίσημης ιστοσελίδας για ηλεκτρονική άδεια εισόδου. Μετά την υποβολή, οι αιτούντες μπορούν συχνά να ελέγξουν την κατάσταση της αίτησής τους και μπορεί να λάβουν email σχετικά με οποιεσδήποτε περαιτέρω ερωτήσεις ή την απόφαση που έχει ληφθεί από τις αρμόδιες αρχές.
Πριν αποφασίσετε να ταξιδέψετε, βεβαιωθείτε ότι είστε ενημερωμένοι για τις απαραίτητες συνθήκες που αφορούν συγγενείς ή φίλους που μπορεί να σας συνοδεύουν, καθώς οι απαιτήσεις βίζας τους μπορεί να διαφέρουν. Τέλος, βεβαιωθείτε πάντα ότι έχετε συμπληρώσει σωστά τη διεύθυνση και τα προσωπικά σας στοιχεία στην αίτηση, καθώς οποιαδήποτε λάθη μπορούν να περιπλέξουν ανόητα τη διαδικασία.
Κριτήρια Ελιγιβιλιτέ για το ρωσικό ηλεκτρονικό βίζα
Το ρωσικό ηλεκτρονικό βίζα προορίζεται για ταξιδιώτες από συγκεκριμένες χώρες που επιθυμούν να εισέλθουν στη Ρωσία για τουριστικούς, επαγγελματικούς ή ανθρωπιστικούς λόγους. Για να υποβάλουν αίτηση για ηλεκτρονικό βίζα, οι αιτούντες πρέπει να γνωρίζουν τα ακόλουθα κριτήρια ελιγιμότητας.
Πρώτα απ' όλα, η υπηκοότητα του αιτούντος είναι καθοριστική. Μόνο πολίτες ορισμένων χωρών έχουν το δικαίωμα να υποβάλουν αίτηση. Αν η υπηκοότητά σας περιλαμβάνεται στον κατάλογο των επιτρεπτών εθνικοτήτων, μπορείτε να προχωρήσετε στο επόμενο βήμα. Θα βρείτε αυτές τις πληροφορίες στον επίσημο ιστότοπο, ο οποίος αποτελεί αξιόπιστη πηγή για τους τωρινούς κανονισμούς.
Όταν συμπληρώνετε την αίτηση, είναι ζωτικής σημασίας να παρέχετε πλήρεις και ακριβείς πληροφορίες. Η παραπλάνηση οποιουδήποτε είδους, συμπεριλαμβανομένων λεπτομερειών σχετικά με την οικογένειά σας ή τα σχέδιά σας ταξιδίου, μπορεί να οδηγήσει στην απόρριψη της αίτησής σας. Η αίτηση πρέπει να περιλαμβάνει υποστηρικτικά έγγραφα που αποδεικνύουν την εγκυρότητα των πληροφοριών που παρέχονται. Αυτό μπορεί να περιλαμβάνει την ανάρτηση ψηφιακών αντιγράφων του διαβατηρίου σας και άλλων σχετικών εγγράφων.
Οι αίτησεις πρέπει να υποβληθούν τουλάχιστον τέσσερις ημέρες πριν από την ημερομηνία που προτίθεσθε να ταξιδέψετε. Αυτή η χρονική περίοδο επιτρέπει στις αρχές να διαθέσουν επαρκή χρόνο για την επεξεργασία της αίτησής σας. Η μέγιστη διάρκεια ισχύος του ηλεκτρονικού βίζα επιτρέπει πολλές εισόδους εντός ενός καθορισμένου χρονικού πλαισίου, συνήθως έως 60 ημέρες μετά την ημερομηνία έκδοσης. Ωστόσο, κάθε διαμονή δεν πρέπει να υπερβαίνει τις 16 ημέρες.
Οι υποψήφιοι δεν πρέπει να ανησυχούν για προβλήματα κατά τη διαδικασία υποβολής της αίτησης, παρά τη βολικότητά της. Υπάρχουν υπαλλήλοι της κυβέρνησης διαθέσιμοι για να παρέχουν οδηγίες σε οποιαδήποτε δυσκολία που μπορεί να αντιμετωπίσετε. Βεβαιωθείτε ότι όλες οι πληροφορίες είναι ακριβείς για να εξασφαλίσετε μια ομαλή διαδικασία υποβολής.
Οι ενδιαφερόμενοι ταξιδιώτες συνιστάται να ελέγξουν τις συγκεκριμένες απαιτήσεις που αφορούν τις δικές τους περιπτώσεις. Για παράδειγμα, όσοι επιθυμούν να εργαστούν ή να ασχοληθούν με απασχόληση κατά τη διάρκεια της παραμονής τους στη Ρωσία, θα πρέπει να εξετάσουν εναλλακτικές επιλογές βίζας, καθώς η ηλεκτρονική βίζα δεν προορίζεται για αυτούς τους σκοπούς.
Τελικά, είναι απαραίτητο να παρακολουθείτε οποιεσδήποτε αλλαγές σχετικά με τις πολιτικές βίζας ή τις προϋποθέσεις εισόδου, καθώς αυτές μπορούν να αλλάξουν για διάφορους λόγους, συμπεριλαμβανομένων των διεθνών σχέσεων. Πάντα αναφέρεστε στα επίσημα κυβερνητικά τμήματα για τις τελευταίες πληροφορίες πριν κάνετε οποιαδήποτε ταξιδιακές διατάξεις ή κρατήσεις αεροπορικών εισιτηρίων.
Απαιτούμενα Εγγράφα για την Αίτηση Ηλεκτρονικού Βίζα
Όταν υποβάλλετε αίτηση για ηλεκτρονικό βίζα (E-Visa) για ταξίδι στη Ρωσία, η συλλογή των απαιτούμενων εγγράφων είναι κρίσιμη για την ομαλή εξέλιξη της διαδικασίας. Τα συγκεκριμένα έγγραφα εξαρτώνται από διάφορες περιστάσεις, αλλά η παρακάτω λίστα περιλαμβάνει τα βασικά στοιχεία που συνήθως απαιτούνται:
| Εγγραφείτε για να λάβετε ενημερώσεις σχετικά με τις εκδηλώσεις μας, τις εκπτώσεις και τις νέες συλλογές. Επικοινωνήστε μαζί μας: Τηλέφωνο: +7 812 123-45-67 Email: info@company.com Διεύθυνση: 123 Main Street, Saint Petersburg, Russia Ώρες λειτουργίας: Δευτέρα - Παρασκευή: 10:00 - 18:00 Σάββατο: 11:00 - 17:00 Κυριακή: Κλειστό Επισκεφθείτε τον ιστότοπό μας για περισσότερες πληροφορίες: www.company.com Ακολουθήστε μας στα κοινωνικά δίκτυα: Facebook: @company Instagram: @company Twitter: @company Ευχαριστούμε για την προτίμησή σας! | Περιγραφή |
|---|---|
| Διαβατήριο | Ένα έγκυρο διαβατήριο με τουλάχιστον έξι μήνες ισχύος πέρα από την προγραμματισμένη παραμονή σας και κενές σελίδες για σφραγίδες. |
| Αίτηση | Προσεκτικά συμπληρωμένο ηλεκτρονικό αίτημα βίζας (E-Visa). Βεβαιωθείτε ότι όλα τα πεδία είναι ακριβώς συμπληρωμένα για να αποφευχθούν καθυστερήσεις. |
| Φωτογραφία | Ένα πρόσφατο φωτογραφικό τυποποιημένο (λευκό φόντο) που πληροί τις καθορισμένες προδιαγραφές. |
| Ταξιδιακό Πρόγραμμα | Λεπτομέρειες για τα σχέδιά σας ταξιδιού, συμπεριλαμβανομένων των ημερομηνιών, των τόπων που θα επισκεφθείτε και των πληροφοριών για τη διαμονή σας. |
| Invoice | Αποδεικτικό πληρωμής για το τέλος επεξεργασίας της αίτησης βίζας, το οποίο πρέπει να συμπεριλαμβάνεται μαζί με την υποβολή σας. |
| Βιομετρικά | Ορισμένοι αιτούντες μπορεί να χρειαστεί να παρέχουν βιομετρικά στοιχεία. Ελέγξτε την τελευταία πολιτική με βάση την εθνικότητά σας. |
| Here is the translation of your text into natural, native-quality Greek, adhering to the specified guidelines: --- Παραδείγματα: - "Saint Isaac's Cathedral" → "Καθεδρικός Ναός του Αγίου Ισαάκ" - "St Petersburg" / "Saint Petersburg" → "Άγιος Πέτρος" - "Moscow" → "Μόσχα" Παραδείγματα που δεν μεταφράζονται: - "Nike" (εμπορική ονομασία) - "123 Main Street" (οδική διεύθυνση) - "+1 (123) 456-7890" (τηλεφωνικό νούμερο) - "$100" (τιμή) --- Αποτέλεσμα: [Εδώ θα εισάγετε το κείμενο που θέλετε να μεταφραστεί, και θα το μεταφράσω σύμφωνα με τις οδηγίες.] | Μεταφράσεις οποιουδήποτε εγγράφου που δεν είναι στα Αγγλικά ή στα Ρωσικά, εξασφαλίζοντας ότι είναι αυθεντικές και ακριβείς. |
Είναι σημαντικό να θυμάστε ότι τα στοιχεία της αίτησής σας μπορεί να διαφέρουν, ανάλογα με την εθνικότητά σας και άλλους παράγοντες. Συνιστάται να επιβεβαιώσετε τις λεπτομέρειες με την πρεσβεία της Ρωσίας ή τις επίσημες υπηρεσίες βίζας πριν υποβάλετε την αίτησή σας. Η πλήρης αποκατάσταση και η προσεκτική επιλογή των εγγράφων που θα συμπεριλάβετε θα βοηθήσουν στην αποφυγή οποιωνδήποτε περιττών επιπλοκών κατά τη διαδικασία έκδοσης της βίζας.
Μόλις συγκεντρώσετε όλα τα απαραίτητα έγγραφα, εξετάστε τα προσεκτικά. Αυτή η διαδικασία θα βοηθήσει σημαντικά στην πρόοδο της αίτησης για βίζα σας και θα εξασφαλίσει ότι τα ταξίδια σας δεν θα διαταραχθούν.
Οι ειδικοί τύποι ηλεκτρονικών βίζα που διατίθενται
Η Ρωσία προσφέρει διάφορους τύπους ηλεκτρονικών βισών (e-visa) που έχουν σχεδιαστεί για να διευκολύνουν διαφορετικούς σκοπούς ταξιδιού. Ακολουθεί μια επισκόπηση των συγκεκριμένων τύπων ηλεκτρονικών βισών που διατίθενται:
- Τουριστικό Ηλεκτρονικό Βίζα: Αυτός ο τύπος βίζας επιτρέπει στους ταξιδιώτες να επισκεφθούν τη χώρα για τουριστικούς σκοπούς, συνήθως με ισχύ έως και 30 ημέρες. Οι αίτησεις μπορούν να υποβληθούν ηλεκτρονικά, και απαιτούνται υποστηρικτικά έγγραφα όπως ένα πρόγραμμα ταξιδιού και αποδεικτικά διαμονής.
- Επιχείρηση E-Visa: Ιδανικό για όσους συμμετέχουν σε συναντήσεις, συνέδρια ή δημιουργούν επαγγελματικές σχέσεις. Οι αιτούντες πρέπει να παρέχουν ένα γράμμα από την εταιρεία ή την οργάνωση που επισκέπτονται, αναφέροντας το σκοπό της ταξιδιωτικής τους αποστολής.
- Οικογενειακή Ηλεκτρονική Βίζα: Αυτή η βίζα απευθύνεται σε άτομα που επισκέπτονται συγγενείς που διαμένουν στη Ρωσία. Πρέπει να υποβληθούν ως εγγυητικά έγγραφα αποδείξεις της οικογενειακής σχέσης, όπως πιστοποιητικό γέννησης ή πιστοποιητικό γάμου.
- Εργασία E-Visa: Σκοπεύει σε ξένους πολίτες που επιθυμούν να εργαστούν στη Ρωσία. Απαιτεί συμβόλαιο εργασίας και επιβεβαίωση από τον εργοδότη, εξασφαλίζοντας ότι πληρούνται όλες οι νομικές απαιτήσεις για εργασία.
- Μεταβατική Ηλεκτρονική Βίζα: Αυτή επιτρέπει στους ταξιδιώτες να διέρχονται από τη Ρωσία προς μια άλλη προορισμό. Συνήθως ισχύει για την περίοδο της μεταβατικής διαδρομής, αυτή η βίζα μπορεί να ληφθεί χωρίς εκτεταμένη τεκμηρίωση, αν και η απόδειξη της συνεχιζόμενης ταξιδιωτικής διαδρομής είναι συχνά απαραίτητη.
Κάθε τύπος βίζας έχει συγκεκριμένες απαιτήσεις και μια διαδικασία υποβολής που πρέπει να ακολουθηθεί με προσοχή. Είναι σημαντικό να ελέγξετε τον επίσημο ιστότοπο του Υπουργείου Εξωτερικών της Ρωσίας για να βεβαιωθείτε ότι έχετε τις πιο πρόσφατες πληροφορίες. Επιπλέον, βεβαιωθείτε ότι όλα τα έγγραφα είναι έγκυρα και μεταφρασμένα σωστά, καθώς οποιαδήποτε ύποπτη υποβολή μπορεί να οδηγήσει σε καθυστερήσεις ή απόρριψη.
Οι αίτησεις μπορούν να παρακολουθούνται online, και συνιστάται να υποβάλετε αίτηση τουλάχιστον μερικούς μήνες πριν από την προγραμματισμένη ταξίδι σας. Έτσι, μπορείτε να αντιμετωπίσετε οποιαδήποτε προβλήματα που μπορεί να προκύψουν χωρίς την πίεση των προσεγγίζοντων προθεσμιών.
Όταν προετοιμάζετε την αίτησή σας, δώστε προσοχή στο πεδίο της διεύθυνσης και των προσωπικών σας στοιχείων, βεβαιωθείτε ότι όλες οι καταχωρήσεις είναι ακριβείς και πλήρεις. Είτε υποβάλλετε ατομικά είτε με ομάδα, οι αιτούντες πρέπει να βεβαιωθούν ότι οι εγγυητές ή οι προσκαλητές έχουν παρέχει τις απαραίτητες εγγυήσεις για τη διαμονή τους.
Συμπερασματικά, η κατανόηση των συγκεκριμένων τύπων ηλεκτρονικών βίζας που διατίθενται είναι απαραίτητη για μια επιτυχημένη διαδικασία αίτησης. Συλλέξτε όλα τα απαιτούμενα έγγραφα, ελέγξτε την εγκυρότητά τους και βεβαιωθείτε ότι συμμορφώνονται με τις προδιαγραφόμενες απαιτήσεις για τα καλύτερα αποτελέσματα.
Δημιουργία Λογαριασμού στη Συνδεδεμένη Πύλη
Για να προχωρήσετε με την αίτηση για ρωσικό βίζα, είναι απαραίτητο να δημιουργήσετε λογαριασμό στην επίσημη πύλη. Αυτή η διαδικασία είναι απαραίτητη για ταξιδιώτες, φοιτητές και εργαζόμενους που επιθυμούν να υποβάλουν αίτηση για διάφορους τύπους βίζας. Πολλοί πολίτες έχουν ερωτήματα σχετικά με τις απαιτήσεις και τις διαδικασίες, και η δημιουργία λογαριασμού επιτρέπει τη λήψη βοήθειας σε πραγματικό χρόνο και τη διαχείριση των εγγράφων.
Μόλις έχετε πρόσβαση στο πύλη, το πρώτο βήμα είναι να συμπληρώσετε με ακρίβεια το όνομά σας και τα υπόλοιπα προσωπικά στοιχεία. Αυτό είναι ζωτικής σημασίας, καθώς λανθασμένες πληροφορίες μπορούν να προκαλέσουν προβλήματα κατά τη διαδικασία υποβολής της αίτησης. Μετά την εισαγωγή των στοιχείων σας, θα σας ζητηθεί να επιλέξετε έναν κωδικό πρόσβασης. Είναι σημαντικό να επιλέξετε έναν ασφαλή κωδικό για να προστατέψετε τον λογαριασμό σας από μη εξουσιοδοτημένη πρόσβαση.
| Step | Περιγραφή |
|---|---|
| 1 | Επισκεφθείτε τον επίσημο ιστότοπο και βρείτε την ενότητα εγγραφής. |
| 2 | Παρακαλώ συμπληρώστε τα στοιχεία σας: Όνομα: _________________________ Email: _________________________ Διεύθυνση: _________________________ Τηλέφωνο: _________________________ Επιθυμώ να λάβω πληροφορίες σχετικά με τα προϊόντα και τις υπηρεσίες σας. |
| 3 | Επιλέξτε έναν ασφαλή κωδικό πρόσβασης για να προστατεύσετε τον λογαριασμό σας. |
| 4 | Συμφωνήστε με τους όρους και τις προϋποθέσεις και συμπληρώστε την εγγραφή. |
| 5 | Επιβεβαιώστε τον λογαριασμό σας μέσω του email επαλήθευσης που σας στάλθηκε. |
Μετά την επιτυχή δημιουργία του λογαριασμού σας, μπορείτε να συνδεθείτε για να απολαύσετε διάφορες λειτουργίες, όπως η προβολή των υποβληθέντων αίτησεων σας, η κρατήσεις ραντεβού στο προξενείο και η ενημέρωση για την κατάσταση των βίζας σας. Είναι σημαντικό να γνωρίζετε ότι μπορεί να απαιτηθούν και βιομετρικά στοιχεία, τα οποία περιλαμβάνουν την υποβολή των δακτυλικών αποτυπωμάτων σας κατά τη διαδικασία της βίζας.
Για όσους χρειάζονται πρόσθετη βοήθεια, το πύλη συνήθως παρέχει υποστήριξη πελατών για ερωτήσεις σχετικά με την τεκμηρίωση που απαιτείται για βίζες εργασίας ή μελέτης. Πάντα βεβαιωθείτε ότι οι τρέχουσες σας πληροφορίες είναι ενημερωμένες για να αποφύγετε οποιαδήποτε πιθανή καθυστέρηση στην επεξεργασία.
Εάν πιστεύετε ότι μπορεί να είστε θύμα λανθασμένων υποβολών ή χρειάζεστε συμβουλές για συγκεκριμένα ζητήματα, μην διστάζετε να ζητήσετε βοήθεια απευθείας μέσω του πορτάλ. Συχνά παρέχουν ολοκληρωμένες οδηγίες και προτάσεις για να κάνετε τη διαδικασία πιο ομαλή και ασφαλέστερη.
Η δημιουργία ενός λογαριασμού είναι ένα σημαντικό βήμα που εξασφαλίζει μια απρόσκοπτη εμπειρία εφαρμογής, επιτρέποντάς σας να επικεντρωθείτε στην προετοιμασία για τα ταξίδια σας και να απολαύσετε τον χρόνο σας έξω από τη χώρα σας. Μην ξεχάσετε να διατηρήσετε τα στοιχεία σύνδεσής σας ασφαλή για να αποφύγετε οποιαδήποτε μη εξουσιοδοτημένη πρόσβαση στον λογαριασμό και τα προσωπικά σας δεδομένα.
Βήματα για Εγγραφή στη Διαδικτυακή Πύλη Αίτησης Ηλεκτρονικού Βίζα
Για να ξεκινήσετε την αίτηση σας για ένα ηλεκτρονικό βίζα (e-Visa) της Ινδίας, πρέπει πρώτα να μεταβείτε στον επίσημο ιστότοπο αίτησης για το e-Visa. Βεβαιωθείτε ότι διαθέτετε σταθερή σύνδεση στο διαδίκτυο και ένα συμβατό συσκευή για να ολοκληρώσετε αυτή τη διαδικασία χωρίς προβλήματα. Εδώ είναι τα απαραίτητα βήματα:
Επισκεφθείτε την Επίσημη Ιστοσελίδα: Ξεκινήστε πηγαίνοντας στην τρέχουσα ιστοσελίδα αίτησης e-Visa για να εξοικειωθείτε με το σχέδιο και τις διαθέσιμες υπηρεσίες. Αυτό είναι ζωτικής σημασίας για μια σαφή κατανόηση του τι περιλαμβάνει η εγγραφή.
2. Επιλέξτε τον Τύπο Βίζας: Μόλις εισέλθετε στην ιστοσελίδα, επιλέξτε τον τύπο της ηλεκτρονικής βίζας που επιθυμείτε να υποβάλετε αίτηση, όπως για τουριστικούς, επαγγελματικούς ή ιατρικούς σκοπούς. Βεβαιωθείτε ότι η επιλογή σας αντικατοπτρίζει με ακρίβεια τις προθέσεις σας.
3. Δημιουργία Λογαριασμού: Θα πρέπει πιθανότατα να εγγραφείτε δημιουργώντας έναν ιδιωτικό λογαριασμό. Συμπληρώστε προσεκτικά τα απαιτούμενα πεδία, βεβαιωνόμενοι ότι όλες οι γραπτές πληροφορίες είναι ακριβείς και πλήρεις. Αυτό περιλαμβάνει συνήθως το όνομά σας, τη διεύθυνση email και τα στοιχεία επικοινωνίας σας.
4. Παρακαλούμε να συμπληρώσετε προσωπικά στοιχεία: Μετά την εγγραφή σας, θα σας ζητηθεί να παρέχετε λεπτομερή προσωπικά στοιχεία, όπως η εθνικότητά σας, η κατάσταση απασχόλησής σας και τα στοιχεία του διαβατηρίου σας. Ελέγξτε προσεκτικά κάθε εισαγωγή για να αποφύγετε οποιαδήποτε διαφωνίες που μπορεί να επηρεάσουν την αίτησή σας.
5. Αποστολή Απαιτούμενων Εγγράφων: Προετοιμάστε να αποστείλετε τα απαραίτητα έγγραφα, συμπεριλαμβανομένου του αρχικού σκαναρίσματος του διαβατηρίου, μιας πρόσφατης φωτογραφίας και οποιουδήποτε άλλου υποστηρικτικού εγγράφου που σχετίζεται με τον τύπο του βίζας σας. Τα έγγραφα αυτά πρέπει να είναι στο νομικό πρότυπο που καθορίζει η πρεσβεία.
6. Επιβεβαίωση και Αναθεώρηση: Πριν υποβάλετε την αίτησή σας, αφιερώστε χρόνο για να αναθεωρήσετε όλες τις πληροφορίες που εισήχθησαν. Βεβαιωθείτε ότι όλα είναι σωστά, καθώς οποιαδήποτε λάθη μπορεί να οδηγήσουν σε καθυστερήσεις ή απορρίψεις. Είναι καλή πρακτική να έχετε κάποιον άλλον να ελέγξει την αίτησή σας για οποιαδήποτε παραμελημένα λάθη.
7. Υποβάλετε την Αίτησή σας: Μετά την ολοκλήρωση και την αναθεώρηση της αίτησής σας, πατήστε το κουμπί υποβολής. Θα λάβετε ένα email επιβεβαίωσης που θα σας ενημερώνει για την υποβολή της αίτησής σας. Αυτό το email θα περιέχει πιθανότατα σημαντικές πληροφορίες σχετικά με τα επόμενα βήματα.
8. Διαδικασία Πληρωμής: Προχωρήστε στη διενέργεια της απαραίτητης χρηματικής πληρωμής σχετικά με την αίτησή σας. Βεβαιωθείτε ότι διατηρείτε ένα αρχείο αυτής της συναλλαγής, καθώς μπορεί να απαιτηθεί αργότερα για την παρακολούθηση της κατάστασης της αίτησής σας.
9. Περιμένετε Επιβεβαίωση: Οι αίτησεις επεξεργάζονται συνήθως εντός συγκεκριμένου χρονικού πλαισίου. Εκτός εάν επικοινωνήσετε από το προξενείο για πρόσθετη πληροφόρηση, μπορείτε συνήθως να παρακολουθείτε την κατάσταση της αίτησής σας online μέσω της ιστοσελίδας.
10. Λάβετε το Ηλεκτρονικό Βίζα: Μετά την έγκριση, θα λάβετε το ηλεκτρονικό βίζα μέσω email. Βεβαιωθείτε ότι εκτυπώσετε μια αντίγραφό του για τα αρχεία σας και να το διατηρήσετε προστατευμένο μαζί με τα ταξιδιωτικά σας έγγραφα, καθώς θα το χρειαστείτε κατά την είσοδό σας στην Ινδία.
Ακολουθώντας προσεκτικά αυτά τα βήματα, θα ξεκινήσετε την αίτηση για το ηλεκτρονικό σας βίζα με οργανωμένο τρόπο, μειώνοντας τις πιθανότητες εμφάνισης προβλημάτων κατά τη διαδικασία.
Επαλήθευση του Email και Ενεργοποίηση του Λογαριασμού
Όταν υποβάλλετε αίτηση για ρωσικό βίζα, είναι απαραίτητο να επιβεβαιώσετε το email σας και να ενεργοποιήσετε τον λογαριασμό σας για να εξασφαλίσετε μια ομαλή διαδικασία υποβολής. Αυτή η διαδικασία περιλαμβάνεται συχνά στα αρχικά στάδια της διαδικασίας αίτησης βίζα και είναι κρίσιμη για την επιτυχή υποβολή.
Εδώ είναι τα βήματα που πρέπει να ακολουθήσετε: 1. Επιλέξτε την κατάλληλη μεταφορά: Βεβαιωθείτε ότι χρησιμοποιείτε τις επίσημες ελληνικές ονομασίες για τοποθεσίες, μνημεία, μουσεία, καθεδρικούς, οδούς, πόλεις και χώρες. Για παράδειγμα, "Αγία Ισαάκια" → "Αγία Ισαάκια" (η ελληνική ονομασία), "Αγία Πετρούπολη" → "Αγία Πετρούπολη" (η ελληνική ονομασία), "Μόσχα" → "Μόσχα" (η ελληνική ονομασία). 2. Διατήρηση των εμπορικών ονομάτων και των εταιρειών: Αφήστε τα ονόματα των εταιρειών, των προϊόντων, των τηλεφώνων και των τιμών ακριβώς όπως είναι στο πρωτότυπο. 3. Διατήρηση των διευθύνσεων: Αφήστε τις διευθύνσεις (αριθμοί κτιρίων και ονομασίες οδών) ακριβώς όπως είναι στο πρωτότυπο. 4. Μη παραφράζετε: Μην αλλάζετε ή μην παραφράζετε συγκεκριμένα γεγονότα ή πληροφορίες. 5. Παραδώστε μόνο τη μετάφραση: Μη προσθέτετε προλογικά, εισαγωγικά ή οποιαδήποτε άλλη πληροφορία εκτός από τη μετάφραση.
- Ελέγξτε το email σας: Μετά την υποβολή της αρχικής αίτησής σας, παρακαλούμε ελέγξτε το ταχυδρομείο σας για ένα email επαλήθευσης. Βεβαιωθείτε ότι έχετε ελέγξει και το φάκελο spam ή ανεπιθύμητων μηνυμάτων, καθώς μπορεί να έχει φιλτράρει λανθασμένα.
- Το email θα περιέχει έναν σύνδεσμο ή οδηγίες για την ενεργοποίηση του λογαριασμού σας. Βεβαιωθείτε ότι ακολουθείτε αυτές τις οδηγίες με προσοχή. Αυτή είναι μια σημαντική φάση της διαδικασίας, και οποιαδήποτε αποτυχία να ολοκληρώσετε αυτό το βήμα μπορεί να προκαλέσει καθυστέρηση.
- Λήψη Λογαριασμού: Πατήστε τον παρεχόμενο σύνδεσμο για να ενεργοποιήσετε τον λογαριασμό σας. Μετά την επιτυχή ενεργοποίηση, θα πρέπει να λάβετε ένα μήνυμα επιβεβαίωσης που θα σας επιτρέπει να προχωρήσετε στα επόμενα βήματα της αίτησής σας.
- Επιβεβαιώστε τις Προσωπικές Σας Πληροφορίες: Μόλις ενεργοποιηθεί ο λογαριασμός σας, συνδεθείτε και ελέγξτε ότι όλες οι προσωπικές σας πληροφορίες, συμπεριλαμβανομένης της εθνικότητάς σας και των στοιχείων απασχόλησης, είναι σωστές. Κάθε λανθασμένη είσοδος μπορεί να οδηγήσει σε επιπλοκές αργότερα στη διαδικασία.
Είναι σημαντικό να κατανοήσετε ότι η ευθύνη για την επιβεβαίωση του email σας και την ενεργοποίηση του λογαριασμού σας είναι δική σας. Αν δεν λάβετε email επιβεβαίωσης ή αν αντιμετωπίσετε οποιοδήποτε ύποπτο πρόβλημα, παρακαλούμε επικοινωνήστε με το κατάλληλο κυβερνητικό γραφείο για βοήθεια.
Εάν η επαλήθευση καθυστερήσει, η αίτησή σας για βίζα και η ραντεβού για συνέντευξη μπορεί επίσης να επηρεαστεί. Συνιστάται, λοιπόν, να ολοκληρώσετε αυτή τη διαδικασία πριν κάνετε περαιτέρω προετοιμασίες για τη διαμονή σας στη Ρωσία.
Από το να ακολουθήσετε αυτά τα βήματα, αυξάνετε σημαντικά τις πιθανότητες για μια ομαλή διαδικασία αίτησης και μια επιτυχημένη έκβαση. Παρακαλούμε να είστε προληπτικοί και να βεβαιωθείτε ότι ο λογαριασμός σας έχει ενεργοποιηθεί για να αποφύγετε οποιαδήποτε πιθανή δυσκολία.
Να θυμάσαι ότι ένα έγκυρο email και μια ενεργοποιημένη λογαριασμική σου είναι συχνά τα πρώτα βήματα για μια επιτυχημένη αίτηση βίζας. Μένοντας ενημερωμένος και ακολουθώντας τις οδηγίες που αναφέρονται, μπορείς να βοηθήσεις ώστε η εμπειρία σου να είναι ομαλή.
Συμπληρώνοντας την Φόρμα Αίτησης
Όταν ξεκινάτε τη διαδικασία συμπλήρωσης του φόρμουλας αίτησης βίζας για τη Ρωσία, είναι απαραίτητο να προχωρήσετε με προσοχή για να βεβαιωθείτε ότι όλα είναι ακριβή και αυθεντικά. Το φόρμα μπορεί να εκδοθεί σε διάφορες τοποθεσίες, συμπεριλαμβανομένου του κεντρικού προξενείου στη χώρα σας, όπως στην Αυστραλία, ή μέσω ηλεκτρονικών υπηρεσιών.
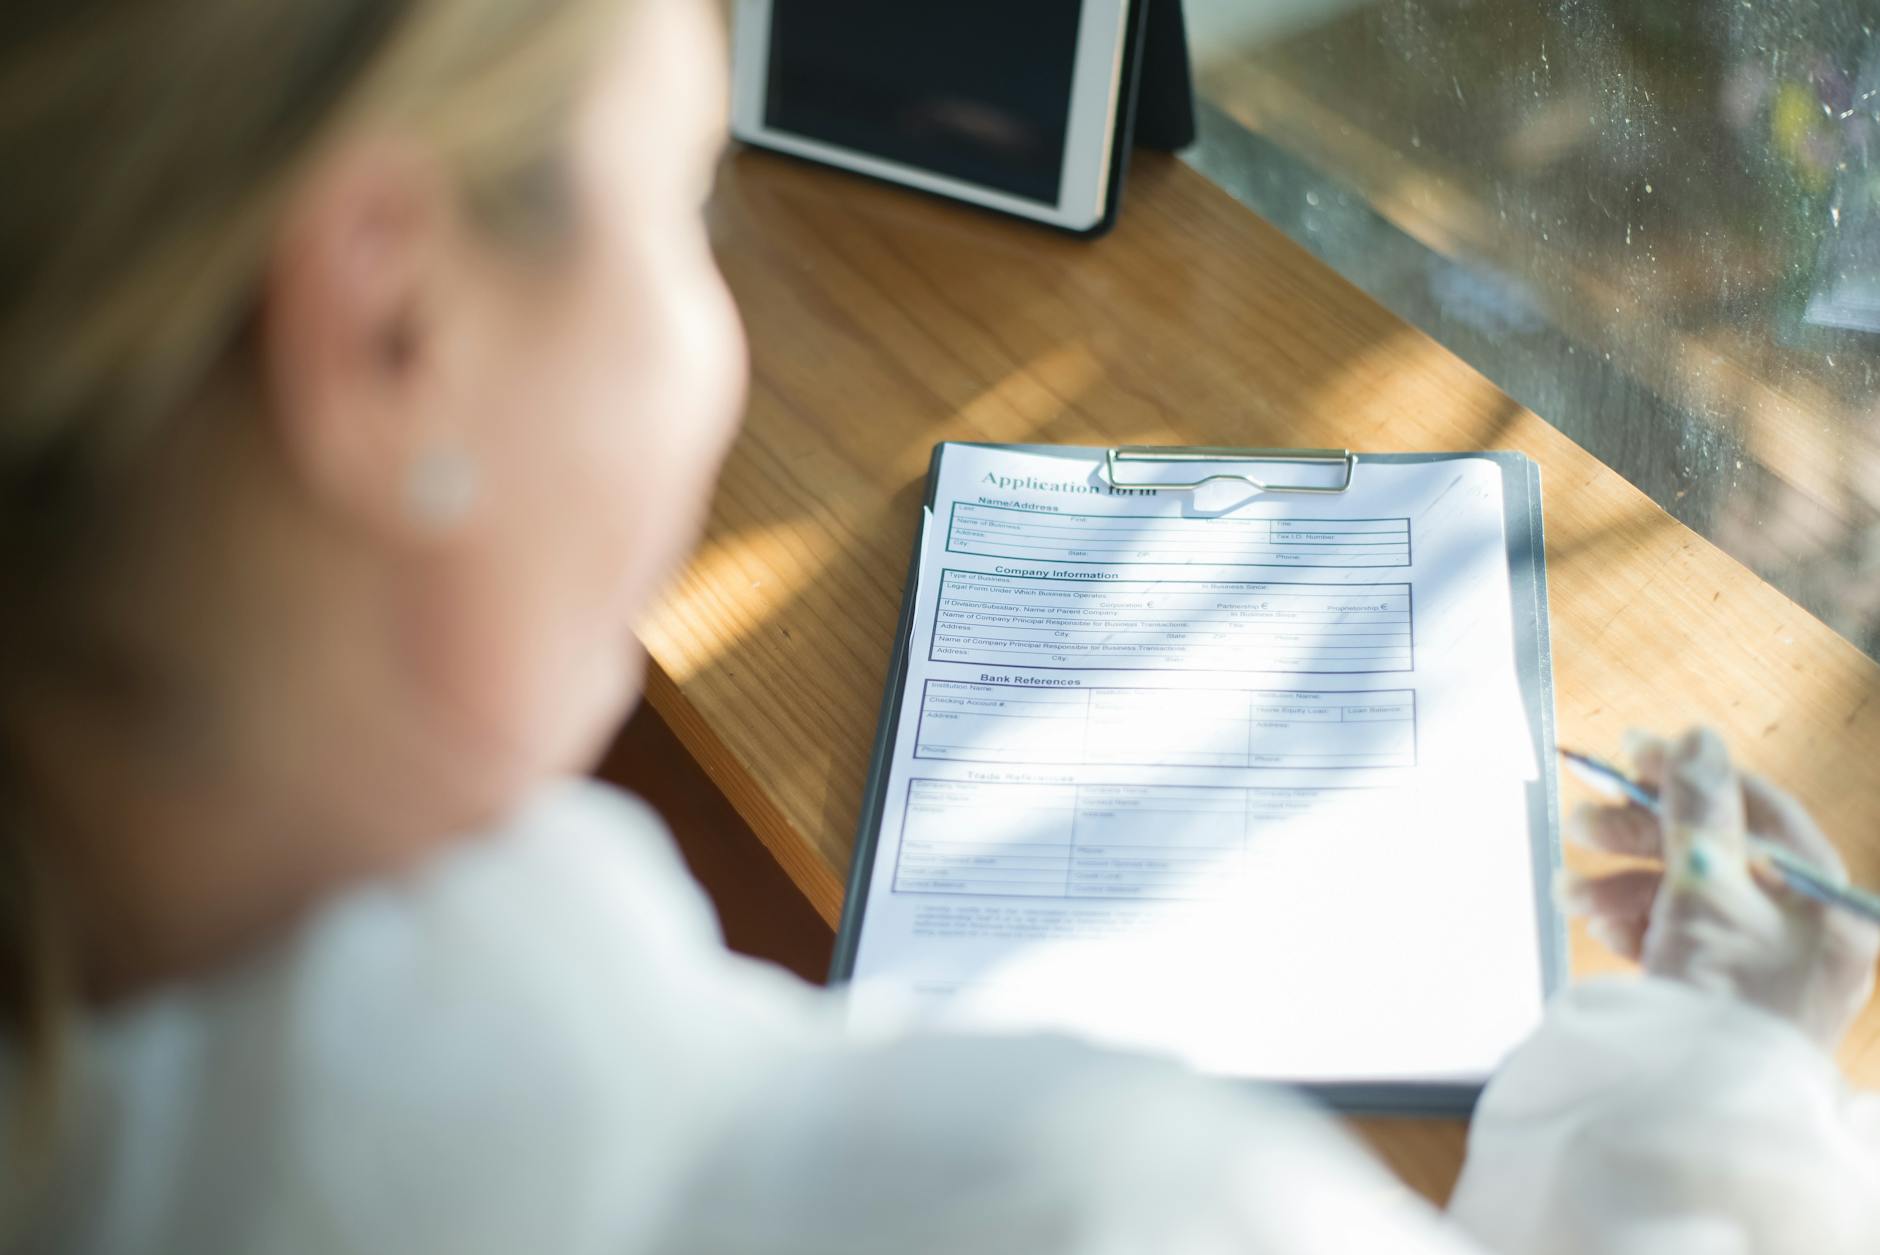
Αρχίστε εισάγοντας τα προσωπικά σας στοιχεία, συμπεριλαμβανομένου του ονόματος σας, της ημερομηνίας γέννησής σας και της διεύθυνσης σας. Τα στοιχεία αυτά πρέπει να ταιριάζουν με αυτά που αναφέρονται στα επίσημα σας έγγραφα. Κάθε διαφορά μπορεί να οδηγήσει σε καθυστερήσεις στην επεξεργασία της αίτησής σας ή ακόμη και να σας καταχωρήσει ως θύμα απάτης ταυτότητας.
Επιλέξτε μια πρόσφατη φωτογραφία που να συμμορφώνεται με τις προδιαγραφές μέγεθους και μορφής που απαιτεί η πρεσβεία. Βεβαιωθείτε ότι η φωτογραφία είναι σαφής και ληφθεί σε λευκό φόντο για να πληροί τις απαιτήσεις. Ανάλογα με τις περιστάσεις και εάν έχετε χορηγό στη Ρωσία, μπορεί να χρειαστεί να επεξεργαστείτε αυτό το μέρος της αίτησης σας.
Όταν σας ρωτήσουν για τις προτεινόμενες ημερομηνίες διαμονής σας, να είστε όσο το δυνατόν πιο συγκεκριμένοι. Οι ημερομηνίες πρέπει να αντικατοπτρίζουν με ακρίβεια τους σχεδιασμούς σας. Αν οι ημερομηνίες ταξιδιού σας έχουν αλλάξει από τότε που υποβάλετε την αίτησή σας, βεβαιωθείτε ότι τις ενημερώνετε κατάλληλα. Αυτή η διαδικασία είναι ζωτικής σημασίας για μια ομαλή διαδικασία μετανάστευσης όταν φτάσετε στη Ρωσία.
Επιπλέον, θα πρέπει να παρέχετε οικονομικές πληροφορίες για να αποδείξετε την ικανότητά σας να αυτοσυντηρήσετε κατά τη διάρκεια της παραμονής σας. Αυτό μπορεί να περιλαμβάνει μια αποδείξη εισοδήματος ή αποδείξεις οικονομικής κατάστασης. Σε ορισμένες περιπτώσεις, το προσωπικό μπορεί επίσης να σας ζητήσει να εξηγήσετε τους λόγους της επίσκεψής σας. Να είστε σαφείς σχετικά με τις προθέσεις σας, αν πρόκειται για τουρισμό, επαγγελματικούς λόγους ή επίσκεψη σε συγγενείς.
Τελικά, μετά την συμπλήρωση της φόρμας, ελέγξτε όλες τις εισαγωγές πριν την υποβολή. Οι τελευταίες διορθώσεις μπορούν να βοηθήσουν στην αποφυγή περιττών καθυστερήσεων. Όταν πιστεύετε ότι όλα είναι σε τάξη, κάνετε την απαιτούμενη πληρωμή για την αίτηση βίζας σας. Κρατήστε το αποδεικτικό της πληρωμής, καθώς μπορεί να χρειαστεί για την συνάντησή σας στην πρεσβεία ή το προξενείο.
Ακολουθώντας προσεκτικά αυτά τα βήματα θα βοηθήσει να επεξεργαστείται η αίτησή σας για ρωσικό βίζα χωρίς προβλήματα, επιτρέποντάς σας να επικεντρωθείτε στα ταξίδια σας στις όμορφες πόλεις της Ρωσίας.


