 10 der erstaunlichsten Felsformationen Russlands – Eine atemberaubende Fotogalerie">

Open during opening hours and shoot at dawn or blue hour to capture the best contrasts and comfortable times for your crew. This approach preserves texture and yields natural color without harsh shadows.
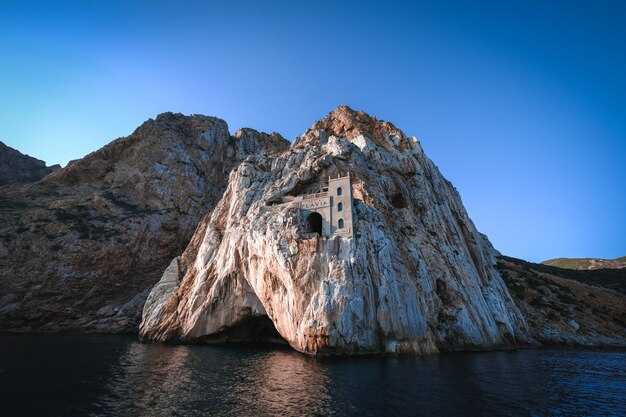
In this part, the Kutuzovskie ridge hosts dramatic lines and towering pillars that define the skyline. The grottoes and wind-worn arches serve as backdrops with scale that is bekannt to attract landscape photographers; the sites are befindet sich across several valleys, including the zubeydesheth pocket, which adds significant mystery to compositions. The surfaces offer fantastic texture, however, access can be seasonal and depends on local rules.
For practical planning, consult reddit threads and theluxvault guides. They provide field-tested tips on measuring distances, weather windows, and safety, helping you build a schedule of Highlights und significant viewpoints. The terrain remains bequem when you pace yourself and carry water.
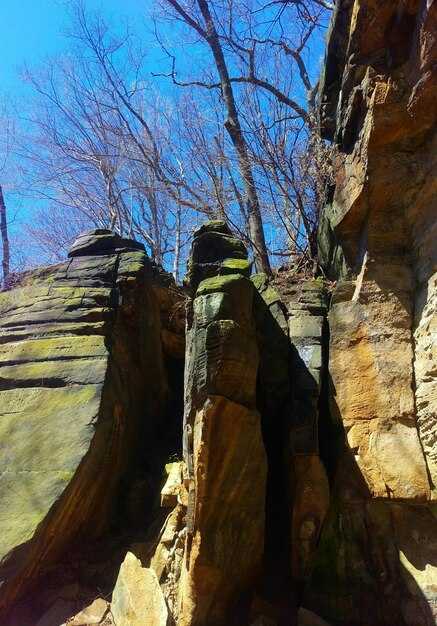
Each site offers multiple backdrops; a single trip can be a part of a broader sequence. Locations span varied elevations, with dramatic shifts in texture between stone columns and cliff shelves. The light opening of morning or late afternoon reveals contrasts that elevate the shots without over-processing, and careful framing keeps the day’s opening in focus.
Plan with respect for the places; coordinate the route and revisit options again if weather cooperates. Share progress with the community, tag the spots to help others discover them, and always comply with local rules to preserve the sites for future visits.
Practical guide to visiting and photographing Russia’s rock formations
Hire a local guide to arrange access and safety; reviews from trekkers help validate routes, then map a two-day loop around a handful of dramatic stone outcrops. Getting permits ahead saves time; plan to arrive well before dawn for the first light, then return in the afternoon when winds soften and shadows sweep across the cliffs.
Best seasons run from late spring to early autumn, relatively predictable weather, and longer days. Erosion has carved sweeping shapes over years, so each site offers a different character. Shade pockets under arches steady the camera and reduce glare, while elevated overlooks reveal the entire panorama and scale of the formations.
Getting around relies on local towns as bases; stay in family-run accommodations or join local tours to reach trailheads. Camps are common near protected spaces, while some communities keep small free campsites near the edge of forests. When you visit, show respect for peoples and their spaces; move slowly on trails to minimize impact and keep noise low for both wildlife and other visitors. National parks charge modest fees, and part of those funds support conservation efforts; budget accordingly to support the places you’re enjoying.
Equipment and technique matter as much as luck. Use a lightweight tripod, a wide-to-standard zoom, and a weather-sealed bag to protect gear from dust and spray. Shoot during the golden hours–dawn and late afternoon–to capture dramatic silhouettes, then bracket exposures to handle high-contrast skies. Bring a polarizer to tame glare on sunlit faces and to deepen the hue of distant ridges; in gusty afternoons, shield the camera and use a faster shutter to freeze wind-blown details.
Site etiquette and safety cannot be skipped. Winds on exposed ledges can change quickly; keep a safe distance from edge drops and erosion gullies. Respect shade lines and avoid loitering near fragile arches that look ready to crumble. If you’re new to these landscapes, try a two-stage approach: begin with a day in the national park area, then a second day to revisit the most photogenic angles when light changes. For added context, compare with Bandarban-like clusters you’ve seen elsewhere; the motley variety of shapes often tells the same story of nature’s stubborn, patient work over years.
- Getting there: base in a local town, join a short-led tour to nearby outcrops, then shuttle to trailheads.
- Best practice: arrive early, use a tripod, and shoot slowly to frame sweeping horizons and intimate textures.
- Camping and lodging: mix camp nights with nights in small inns; this helps you stay flexible for weather shifts and afternoon light.
- Conservation: stay on marked paths, pack out every crumb (including snacks like cheese), and avoid disturbing any features or wildlife.
- Day 1: arrive at first base, hike to a prominent pillar group, capture close-up textures in shade, then shoot long-range silhouettes at sunset.
- Day 2: dawn shoot from a higher vantage, return to a second cluster for dramatic sky lines, and end with a wide-angle sweep that includes the entire field.
Keep these parts of the experience in mind: the local culture, the weathered surfaces, and the quiet spaces that reward patient observation. With careful planning, you’ll document images that reflect the site’s true scale, its people, and the way erosion slowly etches drama into stone–then share those stories with fellow travelers through well-curated reviews and memories that last years.
Exact locations and access routes for each formation
Start at the official park gate and hire a local guide if you’re unfamiliar with rugged routes; use marked trails and request a current map at the kiosk, which often offers free options.
Spot A: Lena Pillars on the Lena River. Location: in the Sakha Republic, along the eastern bank of the Lena River, within a protected nature area that translates to a narrow corridor of towers and boulder rows. Access: fly into Yakutsk, then drive to the park entrance on the river and embark on a river or land route; several sections require a short boat leg during high water, while others are reachable by a straightforward hike from the gate. Morning light makes the weathering textures glow, and you’ll spot birds and small mammals in the surrounding ecosystems that slowly shift with the seasons. The main approach runs through a valley of stones and hills; stay on the wide, signed route and refer to the map for the spot you want to photograph. The upper viewpoints can be done in a day, with rooms in nearby settlements for overnight stays; beware that some sections are exposed and you may be in the shadow under taller pillars near the bridge over the lower stream. Photo opportunities are abundant, with several viewpoints available and no entry fee for the base routes.
Spot B: Stolby Rock Columns near Krasnoyarsk. Location: a cluster of classic spires within a protected urban reserve just outside Krasnoyarsk city limits, consisting of several named towers plus unnamed spires. Access: take a regional train or bus to the city, then a short municipal bus or taxi toward the Stolby parking zone; follow the blue trail markers to the main lookout, then pick among several looping routes that weave among the columns. The ascent belongs to a well-trodden route that has room for variation; wildlife in the area includes small birds and herbivores that avoid crowds if you move slowly. The scenery translates into a stark contrast of weathered stones against the city skyline; many visitors park buildings and cafés along the roadside, which is convenient for a morning warm-up. For a free, self-guided option, start from the lower trailhead and climb to the first overlook, then return via the bridge overlooks that cross small creeks.
Spot C: Kungur Stone City (Kungur Stone Town) in Perm Krai. Location: near Kungur town, within a karst plateau that consists of clustered limestone towers and arches. Access: drive from Perm along a regional road to Kungur, then walk or take a local guide-led hike to the rock field; many routes loop around the hilltops and through a network of hollows and caverns. The formation style is classical in its columnar arrangement and the caves nearby reveal ancient weathering patterns; on the morning path, you’ll hear rivers nearby and see birds overhead. Wildlife is common, and visitors often encounter deer in the surrounding forest margins; stay on designated paths to avoid disturbing habitat that hosts native ecosystems. Bring a compact photo setup for close-ups of the stone textures, and plan several short stops to admire the room-like alcoves between spires.
Spot D: Shoria Hills Outcrops in the South Ural foothills. Location: a belt of rocky hills lying to the west of the Urals, consisting of jagged ridges and rounded knolls with stone staircases of varying heights. Access: reach the nearest rail hub (Miass or Chebarkul) and transfer to a forest road that leads to the lower trailhead; from there follow a marked route through a pine forest until you reach the most dramatic towers. The area features wildlife typical of the taiga and several small streams that feed seasonal rivers; the morning air is crisp and the light highlights the sculpture-like forms of weathered stones. The route includes a few switchbacks that offer views over the valley, with several spots to pause and photograph the spires.
Spot E: Kamchatka Peninsula rock columns near the coastline. Location: a coastal range in the far east, consisting of volcanic and sedimentary outcrops that stand above the shore. Access: fly into Petropavlovsk-Kamchatsky, then hire a local guide who can arrange transport to the foothill trailheads; travel time may require a boat transfer to the head of some canyons. The landscape is rugged and slowly sculpted by weathering, with weather patterns that translate to dramatic morning mists and steamy creeks near the base. The site offers a mix of sea spray, wildlife sightings, and a sparse but beautiful backdrop of stony forms and hills; consider a second day to explore more distant towers, as routes can be several kilometers long. Bridge crossings over streams and small rivers are common, and some spots lie under overhanging shelves that create natural rooms for resting and sketching a photo sequence.
Spot F: Altai Range stone pinnacles in the borderlands of Russia and Mongolia. Location: a high plateau zone consisting of cervices, gullies, and spire-like rocks in the western Altai. Access: approach from Gorno-Altaysk or Barnaul, then connect to a marked trail into the foothills; permits may be required in certain protected zones, so refer to local park offices for current rules. The outcrops display a striking contrast of white and gray minerals set against a blue sky; slowly they rise from wooded slopes into open hills, creating a landscape that feels classical in its timeless geometry. Morning visits are best to catch the soft light on the stones and to observe the animals that inhabit the surrounding ecosystems.
Spot G: Baikal Basin arched rocks near the lake’s eastern shore. Location: in the Lake Baikal vicinity, where rock arches and towers sit along the moraine and shoreline. Access: reach Irkutsk or Ust-Barguzin and use local guides to access the trailheads along forest roads; several routes converge at lookout points that translate to dramatic photos of the arches with the lake in the background. The terrain consists of gravelly shorelines and fringing hills, with wildlife that includes waterfowl and riverine species; you’ll see slow weathering patterns that reveal the geology’s evolution and a room-like space beneath some arched spans that make for an atmospheric portrait.
Spot H: Karelia granite outcrops near the border with Finland. Location: a mosaic of cliffs and boulders tucked into forested hills just inland from the White Sea region. Access: drive to the regional capitals and take forest roads toward the designated park zones; several trailheads lead into intact pockets of granite towers. This area is known for its free-standing blocks and tabular caps, which provide ample room for exploring on foot and for capturing the light at dawn. Wildlife is present in the surrounding delta ecosystems, and keep an eye out for birds that roost among the ledges; harassed by crowds in peak hours, many visitors prefer the calmer morning window to earn the best shots.
Spot I: Ural Tabletop group near the Trans-Ural foothills. Location: a set of flat-topped monoliths scattered across a broad upland, with several buttresses and narrow gorges. Access: take a long-distance bus to the nearest town, then a local shuttle toward the trailhead; several routes offer different vantage points. The bars and columns provide a stark, stubborn beauty that translates to a classical composition; the rocks slowly weather into rounded edges that contrast with the straight lines of the surrounding hills and any old buildings in the nearby settlement. The area is typical for day trips, with wildlife and easy viewing of several outcrops that are ideal for a morning photo session.
Spot J: Khibiny Massif rock spires on the Kola Peninsula. Location: a northern arc that features rugged, dark stone towers amid tundra and lichens. Access: fly to Murmansk, then drive to the foothill zones and connect with a guided trek; several routes interlink the major towers, and one can observe the landscape from the crest of a ridge after a steady climb. The walk passes through a zone where wildlife is active at dawn, and you’ll often find spots with a room-like shelter under a shelf that provides shelter on windy days. The scenery is beautiful in a stark, northern light, with free trails available during the low season and private guides available for more challenging segments.
Best seasonal timings for lighting, weather, and crowds
Plan visits during late spring or early autumn for the best balance of light, weather, and crowds. This window, called shoulder season, is a thing that yields unique, directional light across hills and lakes, translating into warm tones on stone faces. Shots consisting of wide panoramas and close textures look dramatic as millions of photons pool on surfaces. Access at bases and trailheads improves here, and streets near towns stay calmer. Here they became iconic viewpoints for a visitor and locals alike. A few routes hide a hideout in a canyon near zubeydesheth. For planning, consult theluxvault for maps and itineraries. The offering of these months tends to be huge.
Lighting windows are best at dawn or dusk, with golden hour lasting about 60 minutes after sunrise and before sunset. Across russia, light changes rapidly, but the color translates into warm tones on stone walls, creating a unique mood for every shot. Photos taken in these windows often consist of broad skies and texture-rich surfaces, revealing details that vanish at noon.
Crowd management: midweek mornings tend to be calmer; plan to shoot between nine and eleven to minimize congestion, and avoid weekends and school holidays when visitor numbers spike. Last light sessions can attract larger groups as well, so aim for the earlier window when possible.
Access and logistics: begin from bases along the main routes. Verify permits and access rules for protected zones; keep to marked trails and follow signs. theluxvault offers quieter detours and safe hideouts such as caves near the center. For those with limited time, a one-day loop from a nearby town keeps streets manageable and transit between viewpoints short.
Gear and etiquette: wear athletic_shoe; pack layers; bring water; carry a compact tripod for long exposures; choose lenses for both wide vistas and tight textures; protect gear from dust and moisture; and keep a spare memory card for millions of frames of photos. Always commemorate the landscapes, and remember that this thing requires patience to make the nine-season rhythm of the locales pay off, especially at the last light when the sky exposes its true hues.
Kameraeinstellungen, Komposition und Ausrüstung für raue Landschaften
Montieren Sie Ihre Kamera immer auf einem stabilen Stativ und fotografieren Sie im RAW-Format im manuellen Modus; nutzen Sie das vorhandene Licht und achten Sie auf Bewegungen. Beginnen Sie bei ISO 100, belichten Sie für die Lichter und halten Sie die Verschlusszeit zwischen 1/125s und 1/320s für stabile Felsaufnahmen. Verwenden Sie eine Blende von etwa f/8 bis f/11, um die Schärfentiefe vom Vordergrund bis zu den fernen Gipfeln zu erhalten; für Details im Vordergrund gehen Sie auf f/5.6–f/8 und erhöhen Sie die ISO auf 200–400, wenn Wind oder Bewegung ein schnelleres Verschlusstempo erfordern.
Bei der Bildgestaltung kommt es auf einen starken Vordergrund, klare Tiefe und Maßstab an. Platziere eine Führungslinie in die mittlere oder ferne Distanz, vermeide es, den Horizont zu zentrieren, und teste sowohl Aufnahmen aus niedrigem Winkel als auch aus Bodennähe. Füge ein Referenzelement wie ein verwittertes Gebäude oder eine verlassene Struktur hinzu, um die Größe zu vermitteln; in einer Landschaft mit den Ruinen von Tschufut-Kale oder dem Felsen von Bandarban verleiht dies Dramatik und hilft, den Ort für die Betrachter, einschließlich Kinder, in Erinnerung zu behalten.
Zur Grundausstattung gehören ein wetterfestes Gehäuse, zwei Speicherkarten und ein Rucksack in Militärqualität. Ein Weitwinkelobjektiv (14–24 mm) deckt zerklüftete Szenen ab, während ein Telezoom (70–200 mm) für entfernte Details sorgt. Ergänzen Sie das Ganze mit einem Zirkularpolarisationsfilter, um den Himmel zu intensivieren, einem ND-Verlaufsfilter mit 2–3 Stufen für kontrastreiche Horizonte und einem stabilen Stativ mit umkehrbarer Mittelsäule. Lassen Sie die Objektivdeckel beim Wechsel zwischen den Standorten aufgesetzt und führen Sie ein kleines Reinigungsset mit sich; unter Feldbedingungen in der Nähe von Moskau oder anderen abgelegenen Orten sind Ausfallzeiten selten, also seien Sie bereit.
Erfasse Daten für jedes Bild in einem einfachen Protokoll: Ort, Datum, Wetter und Einstellungen; diese virtuelle Notiz hilft, die Stimmung später zu reproduzieren, und die Quellnotizen über den Ansatz verstärken das Lernen. Orte wie Tschufut-Kale und Bandarban bieten abwechslungsreiches Licht, das fast eine schnelle Anpassung erfordert, um die Stimmung und Geschichte jedes Ortes einzufangen.
| Aspekt | Empfehlung |
|---|---|
| Modus | Manuell, RAW |
| ISO | 100–200 bei Helligkeit; bis zu 400, wenn Schatten oder Bewegung dies erfordern |
| Aperture | f/8–f/11 für umfassende Schärfe; f/5,6–f/8 für ausgeprägten Vordergrund |
| Shutter | 1/125–1/320s; Belichtungsserie für HDR falls erforderlich |
| Objektive | Weitwinkel (14–24mm) für weitläufige Szenen; Standard (24–70mm) für Details; Tele (70–200mm) für Kompression |
| Filter | Polarisationsfilter zur Intensivierung des Himmels; ND-Verlaufsfilter 2–3 Stufen für helle Horizonte |
| Stabilität | Stativ; Fernauslöser oder Timer zur Reduzierung von Verwacklungen |
| Weißabgleich | Automatisch, bei Bedarf in der Postproduktion anpassen. |
Genehmigungen, Sicherheit und lokale Vorschriften, die Sie kennen sollten
Erkundigen Sie sich vor der Planung einer Trekkingtour nach den Genehmigungsanforderungen. Wenden Sie sich an die örtliche Parkverwaltung oder das zuständige Amt für Landverwaltung, um die erforderlichen Genehmigungen, Fristen, maximale Gruppengröße und Zugangszeiten zu erfragen.
Tragen Sie festes Schuhwerk, bleiben Sie auf den markierten Wegen und vermeiden Sie das Betreten von instabilen Felsvorsprüngen, wo Sandsteinoberflächen abplatzen können, sowie Bereiche mit losem Gestein. Das Wetter kann sich schnell ändern, daher sollten Sie die Vorhersagen beobachten und Abschnitte mit losem Gestein meiden.
Einige Stätten befinden sich in Schutzgebieten, deren Zugang auf geführte Gruppen beschränkt ist; jedoch gilt sowohl in Bandarban als auch in Chufut-Kale, dass man die markierten Wege nicht verlassen und sich bei einem lizenzierten Führer aufhalten muss; nur diese Regelung ermöglicht es, ihre natürlichen Strukturen zu erhalten und die Sandsteinstrukturen zu schützen, die die in diesen Regionen gelegenen Stätten kennzeichnen.
Für die Fotografie ein kompaktes Stativ mitbringen und die Ausrüstung unter Kontrolle halten; wo Holzoberflächen vorhanden sind, die Ausrüstung nicht auf feuchtes Holz stellen, um ein Verrutschen zu vermeiden; wenn ein Holzsteg vorhanden ist, diesen benutzen; unbeaufsichtigte Ausrüstung zieht Diebe an und kann empfindliche Oberflächen beschädigen; Schulungen im sicheren Wandern und im Umgang mit Ausrüstung sind hilfreich, insbesondere auf exponierten Felsvorsprüngen.
Anträge werden in der Regel über offizielle, moderne Portale oder bei den örtlichen Ranger-Stationen eingereicht; bitte planen Sie mindestens zwei Wochen Bearbeitungszeit ein; führen Sie eine gedruckte Genehmigung, eine Kopie Ihrer Route und die Kontaktdaten des Leiters mit sich; Gebühren, falls vorhanden, werden online oder bei der Abholung bezahlt; in einigen Zonen ist ein zugelassener Führer und nur eine Tagesgenehmigung erforderlich, um in sensible Gebiete zu gelangen. Diese Maßnahmen gewährleisten eine gute Kontrolle und müssen befolgt werden.
Vor Ort sind die ausgehängten Vorschriften zu beachten, das Klettern auf Bereiche mit losen Steinen oder instabilen Vorsprüngen zu vermeiden und das Gebiet durch Mitnahme aller Abfälle zu erhalten; Wasser nur aus ausgewiesenen Quellen verwenden; wenn Sie Ihre Gruppe kompakt halten, können Sie schnell reagieren, falls Gefahr entsteht; diese Landschaften zeigen in der Morgen- und Abenddämmerung wunderschöne goldene Farbtöne und bieten gute Ausblicke während Ihrer Wanderung, und Sie müssen die Orte respektieren, zu denen Sie Zugang erhalten.
Wenn Sie weitere Informationen benötigen, wenden Sie sich an die offiziellen Besucherzentren oder Parkverwaltungen; Fremdenführer können die örtlichen Vorschriften für die Lena-Region und Tschufut-Kale erläutern; überprüfen Sie vor Ihrer Abreise immer den aktuellen Stand, da sich die Vorschriften saisonbedingt ändern können; dieser Ansatz bietet ein hohes Maß an Sicherheit und bewahrt das Gebiet für zukünftige Besucher.
Smarte Routenplanung, um alle 10 Sehenswürdigkeiten abzudecken
Beginnen Sie mit Manpupuner für einen dreitägigen Block, um Sonnenaufgangsfotografie und Wanderrouten festzulegen, und rollen Sie dann in einer einzigen Schleife über den Gürtel der Formationen. Beauftragen Sie lokale Anbieter für Führer und Zugangsgenehmigungen, lesen Sie vorher Bewertungen und holen Sie Genehmigungen nach Möglichkeit vor Ort ein. Planen Sie die Morgen für das Sonnenaufgangslicht, vermeiden Sie überlaufene Pfade und widmen Sie abwechselnd Tage dem Wandern und Radfahren, um das Tempo konstant zu halten.
-
Manpupuner – geformte Steinsäulen, die sich aus der Ebene erheben; starten Sie im Morgengrauen, um weiches Licht und klare Silhouetten zu erhalten. Planen Sie zwei volle Tage ein, wenn Sie sowohl die Säulen als auch die umliegenden Geröllfelder fotografieren möchten; verwenden Sie eine kompakte Wanderausrüstung und tragen Sie eine wetterfeste Kameratasche. Der Zugang erfolgt am besten über eine geführte Route; buchen Sie frühzeitig über vertrauenswürdige Anbieter und bestätigen Sie die Sonnenaufgangszeiten.
-
Zentrale Ansammlung – Säulenartige Formen vor offenem Himmel; plane einen Tagesausflug mit spätem Vormittagsbeginn, um weicheres Licht auf den Oberflächen einzufangen. Das Gelände ist uneben, aber mit geeignetem Schuhwerk begehbar; eine kurze, malerische Wanderung ist ein ideales Aufwärmen für anspruchsvollere Abschnitte später.
-
Nördliche Felsvorsprünge – drei markante, von einem einzigen Aussichtspunkt sichtbare Felsspitzen; kommen Sie am späten Vormittag, um Schatten zu reduzieren, und bringen Sie ein Stativ für weitläufige Landschaftsaufnahmen mit. Der Zugang kann eine holprige Fahrt auf einer unbefestigten Straße, gefolgt von einer zügigen Wanderung erfordern; organisieren Sie Führer, um die Route zu erleichtern und das Zeitrisiko zu minimieren.
-
Gratwanderung – schmale Felsbänder mit dramatischen Profilen; ein zweistündiger Pfad verbindet den Ort mit einem höher gelegenen Aussichtspunkt, wo die Fotografie von der Hintergrundbeleuchtung profitiert. Halten Sie eine kompakte Ausrüstung bereit und ziehen Sie für den Anstieg eine Radfahroption in Betracht, wenn Sie die Genehmigung und die Unterstützung vor Ort haben.
-
Südliches Plateau – natürliche Bögen und kontrastreiche Steinfassaden; planen Sie ein spätes Nachmittagsziel, um warme Farbtöne einzufangen. Der Ort ist mit einem leichten Fahrzeug bis zu einem Ausgangspunkt für Wanderwege erreichbar, dann eine stetige, einstündige Wanderung zu den Hauptattraktionen.
-
Gratliniegruppe – mehrere Pfeiler in einem flachen Bogen ausgerichtet; nutzen Sie eine Morgensession, um lange Schatten einzufangen, und wechseln Sie dann zu Nahaufnahmen der Textur. Der Zugang ist am besten mit einer kurzen Wanderung möglich, die die empfindlichen Oberflächen respektiert.
-
Esker Valley Säulen – geformte Gebilde, die abrupt aus dem Talboden aufsteigen; ein ganztägiger Plan hier ermöglicht mehrere Aussichtspunkte und langsame, sorgfältige Fotografie. Packen Sie Wasser und Snacks ein, die für lange Belichtungszeiten geeignet sind; ziehen Sie ein zügiges Tempo für eine schnelle Erkundungsrunde in Betracht, wenn die Bedingungen es zulassen.
-
Küstenregal-Aufschlüsse – von Wind und Regen geformte Darstellungen entlang der Küste; Besuch bei Sonnenaufgang oder -untergang, um die Farbsättigung auf den Steinflächen zu maximieren. Der Zugang erfordert einen Küstenpfad, wobei sicheres Schuhwerk Priorität hat; ein leichtes Fahrrad kann die Anfahrt an guten Tagen verkürzen.
-
Innere Beckentürme – natürliche Säulen, die sich aus einem flacheren Becken erheben; planen Sie einen halben Tag ein, um sowohl die ferne Skyline als auch die feinen Texturen auf den Säulenflächen einzufangen. Händler an nahegelegenen Sammelpunkten können bei Wetterumschwüngen einen kurzen Boots- oder Landtransfer organisieren.
-
Endgültige Aussichtsregion – eine Ansammlung kleinerer Säulen, die intime, wiederholenswerte Perspektiven bieten; reservieren Sie einen halben Tag für letzte Überprüfungen und um eventuelle Lichtlücken zu füllen. Dieses abschließende Segment ist ideal für eine retrospektive Fotosession und verabschiedet sich von einem großartigen Bogen über die zehn Standorte.
Allgemeine Tipps: Peilen Sie pro Standort drei Zeitfenster mit optimalem Licht an – Sonnenaufgang, später Vormittag und die Goldene Stunde – und passen Sie diese dann an das Wetter an. Bringen Sie ein leichtes Stativ, mehrere Speicherkarten und Ersatzbatterien mit, da Millionen von Aufnahmen entlang der Schleife in Reichweite sind. Sorgen Sie im Hinblick auf die Logistik für gesicherte Zugänge mit geprüften Guides und überprüfen Sie vor jedem Transfer die Bewertungen; planen Sie Puffertage für Wetter- und Straßenverhältnisse ein. Wenn Sie es langsamer angehen möchten, reduzieren Sie die Anzahl der Standorte auf acht und dehnen Sie jeden Stopp auf einen ganzen Tag aus. Planen Sie dann nach dem Start in Manpupuner einen Ruhetag ein. Überprüfen Sie immer die aktuellen Zugangsbestimmungen und behalten Sie sich Flexibilität vor, um saisonale Straßenöffnungen und Anbieterzeiten zu berücksichtigen.
") Moscow’s Wacky Street Art – Where to Find It (PHOTOS)">
Moscow’s Wacky Street Art – Where to Find It (PHOTOS)">
 Die besten Foto-Spots in Moskau für atemberaubende Bilder im Jahr 2025">
 20 Moscow Hidden Gems and Best-Kept Secrets – An Offbeat Local Guide">
 Old-School Moscow Pub Crawl – Classic Bars, Hidden Gems & Nightlife">
 Moscow – A Resort City – Luxury Travel, Wellness, and Culture in the Russian Capital">
 Tallulah Falls Location Guide – So besuchen Sie die Tallulah-Schlucht: Zugangspunkte und die besten Aussichtspunkte">
 Europas schönste Fährfahrten – Malerische Küstenreisen">
 Der ultimative Rodelhügel-Ratgeber – Eine Zusammenstellung von Pisten in der 419">
 Mystical Moscow Multimedia – Immersive Arts, Culture, and Tech in Russia’s Capital">
 The Most Breathtaking Hidden Gem Churches Across Europe">