 10 Oroszország legelképesztőbb sziklaképződménye – Lenyűgöző képgaléria">

Open during opening hours and shoot at dawn or blue hour to capture the best contrasts and comfortable times for your crew. This approach preserves texture and yields natural color without harsh shadows.
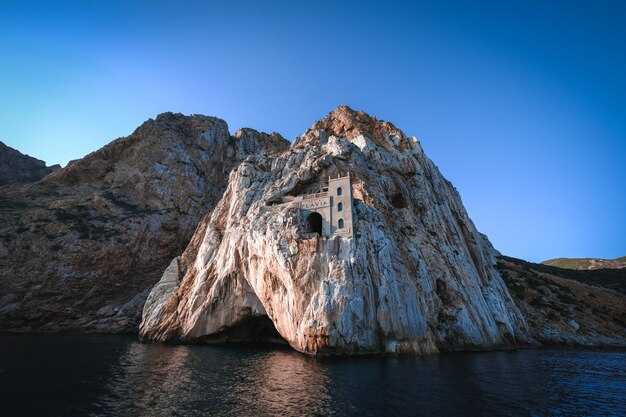
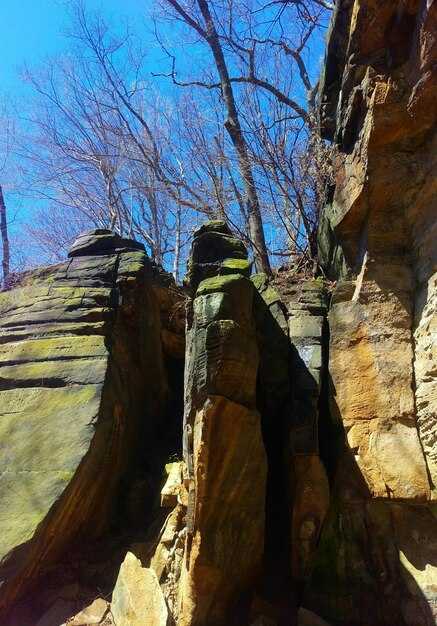
In this part, the Kutuzovskie ridge hosts dramatic lines and towering pillars that define the skyline. The grottoes and wind-worn arches serve as backdrops with scale that is ismert to attract landscape photographers; the sites are található across several valleys, including the zubeydesheth pocket, which adds jelentős mystery to compositions. The surfaces offer fantastic texture, however, access can be seasonal and depends on local rules.
For practical planning, consult reddit threads and theluxvault guides. They provide field-tested tips on measuring distances, weather windows, and safety, helping you build a schedule of highlights és jelentős viewpoints. The terrain remains comfortable when you pace yourself and carry water.
Each site offers multiple backdrops; a single trip can be a part of a broader sequence. Locations span varied elevations, with dramatic shifts in texture between stone columns and cliff shelves. The light opening of morning or late afternoon reveals contrasts that elevate the shots without over-processing, and careful framing keeps the day’s opening in focus.
Plan with respect for the places; coordinate the route and revisit options ismét if weather cooperates. Share progress with the community, tag the spots to help others discover them, and always comply with local rules to preserve the sites for future visits.
Practical guide to visiting and photographing Russia’s rock formations
Hire a local guide to arrange access and safety; reviews from trekkers help validate routes, then map a two-day loop around a handful of dramatic stone outcrops. Getting permits ahead saves time; plan to arrive well before dawn for the first light, then return in the afternoon when winds soften and shadows sweep across the cliffs.
Best seasons run from late spring to early autumn, relatively predictable weather, and longer days. Erosion has carved sweeping shapes over years, so each site offers a different character. Shade pockets under arches steady the camera and reduce glare, while elevated overlooks reveal the entire panorama and scale of the formations.
Getting around relies on local towns as bases; stay in family-run accommodations or join local tours to reach trailheads. Camps are common near protected spaces, while some communities keep small free campsites near the edge of forests. When you visit, show respect for peoples and their spaces; move slowly on trails to minimize impact and keep noise low for both wildlife and other visitors. National parks charge modest fees, and part of those funds support conservation efforts; budget accordingly to support the places you’re enjoying.
Equipment and technique matter as much as luck. Use a lightweight tripod, a wide-to-standard zoom, and a weather-sealed bag to protect gear from dust and spray. Shoot during the golden hours–dawn and late afternoon–to capture dramatic silhouettes, then bracket exposures to handle high-contrast skies. Bring a polarizer to tame glare on sunlit faces and to deepen the hue of distant ridges; in gusty afternoons, shield the camera and use a faster shutter to freeze wind-blown details.
Site etiquette and safety cannot be skipped. Winds on exposed ledges can change quickly; keep a safe distance from edge drops and erosion gullies. Respect shade lines and avoid loitering near fragile arches that look ready to crumble. If you’re new to these landscapes, try a two-stage approach: begin with a day in the national park area, then a second day to revisit the most photogenic angles when light changes. For added context, compare with Bandarban-like clusters you’ve seen elsewhere; the motley variety of shapes often tells the same story of nature’s stubborn, patient work over years.
- Getting there: base in a local town, join a short-led tour to nearby outcrops, then shuttle to trailheads.
- Best practice: arrive early, use a tripod, and shoot slowly to frame sweeping horizons and intimate textures.
- Camping and lodging: mix camp nights with nights in small inns; this helps you stay flexible for weather shifts and afternoon light.
- Conservation: stay on marked paths, pack out every crumb (including snacks like cheese), and avoid disturbing any features or wildlife.
- Day 1: arrive at first base, hike to a prominent pillar group, capture close-up textures in shade, then shoot long-range silhouettes at sunset.
- Day 2: dawn shoot from a higher vantage, return to a second cluster for dramatic sky lines, and end with a wide-angle sweep that includes the entire field.
Keep these parts of the experience in mind: the local culture, the weathered surfaces, and the quiet spaces that reward patient observation. With careful planning, you’ll document images that reflect the site’s true scale, its people, and the way erosion slowly etches drama into stone–then share those stories with fellow travelers through well-curated reviews and memories that last years.
Exact locations and access routes for each formation
Start at the official park gate and hire a local guide if you’re unfamiliar with rugged routes; use marked trails and request a current map at the kiosk, which often offers free options.
Spot A: Lena Pillars on the Lena River. Location: in the Sakha Republic, along the eastern bank of the Lena River, within a protected nature area that translates to a narrow corridor of towers and boulder rows. Access: fly into Yakutsk, then drive to the park entrance on the river and embark on a river or land route; several sections require a short boat leg during high water, while others are reachable by a straightforward hike from the gate. Morning light makes the weathering textures glow, and you’ll spot birds and small mammals in the surrounding ecosystems that slowly shift with the seasons. The main approach runs through a valley of stones and hills; stay on the wide, signed route and refer to the map for the spot you want to photograph. The upper viewpoints can be done in a day, with rooms in nearby settlements for overnight stays; beware that some sections are exposed and you may be in the shadow under taller pillars near the bridge over the lower stream. Photo opportunities are abundant, with several viewpoints available and no entry fee for the base routes.
Spot B: Stolby Rock Columns near Krasnoyarsk. Location: a cluster of classic spires within a protected urban reserve just outside Krasnoyarsk city limits, consisting of several named towers plus unnamed spires. Access: take a regional train or bus to the city, then a short municipal bus or taxi toward the Stolby parking zone; follow the blue trail markers to the main lookout, then pick among several looping routes that weave among the columns. The ascent belongs to a well-trodden route that has room for variation; wildlife in the area includes small birds and herbivores that avoid crowds if you move slowly. The scenery translates into a stark contrast of weathered stones against the city skyline; many visitors park buildings and cafés along the roadside, which is convenient for a morning warm-up. For a free, self-guided option, start from the lower trailhead and climb to the first overlook, then return via the bridge overlooks that cross small creeks.
Spot C: Kungur Stone City (Kungur Stone Town) in Perm Krai. Location: near Kungur town, within a karst plateau that consists of clustered limestone towers and arches. Access: drive from Perm along a regional road to Kungur, then walk or take a local guide-led hike to the rock field; many routes loop around the hilltops and through a network of hollows and caverns. The formation style is classical in its columnar arrangement and the caves nearby reveal ancient weathering patterns; on the morning path, you’ll hear rivers nearby and see birds overhead. Wildlife is common, and visitors often encounter deer in the surrounding forest margins; stay on designated paths to avoid disturbing habitat that hosts native ecosystems. Bring a compact photo setup for close-ups of the stone textures, and plan several short stops to admire the room-like alcoves between spires.
Spot D: Shoria Hills Outcrops in the South Ural foothills. Location: a belt of rocky hills lying to the west of the Urals, consisting of jagged ridges and rounded knolls with stone staircases of varying heights. Access: reach the nearest rail hub (Miass or Chebarkul) and transfer to a forest road that leads to the lower trailhead; from there follow a marked route through a pine forest until you reach the most dramatic towers. The area features wildlife typical of the taiga and several small streams that feed seasonal rivers; the morning air is crisp and the light highlights the sculpture-like forms of weathered stones. The route includes a few switchbacks that offer views over the valley, with several spots to pause and photograph the spires.
Spot E: Kamchatka Peninsula rock columns near the coastline. Location: a coastal range in the far east, consisting of volcanic and sedimentary outcrops that stand above the shore. Access: fly into Petropavlovsk-Kamchatsky, then hire a local guide who can arrange transport to the foothill trailheads; travel time may require a boat transfer to the head of some canyons. The landscape is rugged and slowly sculpted by weathering, with weather patterns that translate to dramatic morning mists and steamy creeks near the base. The site offers a mix of sea spray, wildlife sightings, and a sparse but beautiful backdrop of stony forms and hills; consider a second day to explore more distant towers, as routes can be several kilometers long. Bridge crossings over streams and small rivers are common, and some spots lie under overhanging shelves that create natural rooms for resting and sketching a photo sequence.
Spot F: Altai Range stone pinnacles in the borderlands of Russia and Mongolia. Location: a high plateau zone consisting of cervices, gullies, and spire-like rocks in the western Altai. Access: approach from Gorno-Altaysk or Barnaul, then connect to a marked trail into the foothills; permits may be required in certain protected zones, so refer to local park offices for current rules. The outcrops display a striking contrast of white and gray minerals set against a blue sky; slowly they rise from wooded slopes into open hills, creating a landscape that feels classical in its timeless geometry. Morning visits are best to catch the soft light on the stones and to observe the animals that inhabit the surrounding ecosystems.
Spot G: Baikal Basin arched rocks near the lake’s eastern shore. Location: in the Lake Baikal vicinity, where rock arches and towers sit along the moraine and shoreline. Access: reach Irkutsk or Ust-Barguzin and use local guides to access the trailheads along forest roads; several routes converge at lookout points that translate to dramatic photos of the arches with the lake in the background. The terrain consists of gravelly shorelines and fringing hills, with wildlife that includes waterfowl and riverine species; you’ll see slow weathering patterns that reveal the geology’s evolution and a room-like space beneath some arched spans that make for an atmospheric portrait.
Spot H: Karelia granite outcrops near the border with Finland. Location: a mosaic of cliffs and boulders tucked into forested hills just inland from the White Sea region. Access: drive to the regional capitals and take forest roads toward the designated park zones; several trailheads lead into intact pockets of granite towers. This area is known for its free-standing blocks and tabular caps, which provide ample room for exploring on foot and for capturing the light at dawn. Wildlife is present in the surrounding delta ecosystems, and keep an eye out for birds that roost among the ledges; harassed by crowds in peak hours, many visitors prefer the calmer morning window to earn the best shots.
Spot I: Ural Tabletop group near the Trans-Ural foothills. Location: a set of flat-topped monoliths scattered across a broad upland, with several buttresses and narrow gorges. Access: take a long-distance bus to the nearest town, then a local shuttle toward the trailhead; several routes offer different vantage points. The bars and columns provide a stark, stubborn beauty that translates to a classical composition; the rocks slowly weather into rounded edges that contrast with the straight lines of the surrounding hills and any old buildings in the nearby settlement. The area is typical for day trips, with wildlife and easy viewing of several outcrops that are ideal for a morning photo session.
Spot J: Khibiny Massif rock spires on the Kola Peninsula. Location: a northern arc that features rugged, dark stone towers amid tundra and lichens. Access: fly to Murmansk, then drive to the foothill zones and connect with a guided trek; several routes interlink the major towers, and one can observe the landscape from the crest of a ridge after a steady climb. The walk passes through a zone where wildlife is active at dawn, and you’ll often find spots with a room-like shelter under a shelf that provides shelter on windy days. The scenery is beautiful in a stark, northern light, with free trails available during the low season and private guides available for more challenging segments.
Best seasonal timings for lighting, weather, and crowds
Plan visits during late spring or early autumn for the best balance of light, weather, and crowds. This window, called shoulder season, is a thing that yields unique, directional light across hills and lakes, translating into warm tones on stone faces. Shots consisting of wide panoramas and close textures look dramatic as millions of photons pool on surfaces. Access at bases and trailheads improves here, and streets near towns stay calmer. Here they became iconic viewpoints for a visitor and locals alike. A few routes hide a hideout in a canyon near zubeydesheth. For planning, consult theluxvault for maps and itineraries. The offering of these months tends to be huge.
Lighting windows are best at dawn or dusk, with golden hour lasting about 60 minutes after sunrise and before sunset. Across russia, light changes rapidly, but the color translates into warm tones on stone walls, creating a unique mood for every shot. Photos taken in these windows often consist of broad skies and texture-rich surfaces, revealing details that vanish at noon.
Crowd management: midweek mornings tend to be calmer; plan to shoot between nine and eleven to minimize congestion, and avoid weekends and school holidays when visitor numbers spike. Last light sessions can attract larger groups as well, so aim for the earlier window when possible.
Access and logistics: begin from bases along the main routes. Verify permits and access rules for protected zones; keep to marked trails and follow signs. theluxvault offers quieter detours and safe hideouts such as caves near the center. For those with limited time, a one-day loop from a nearby town keeps streets manageable and transit between viewpoints short.
Gear and etiquette: wear athletic_shoe; pack layers; bring water; carry a compact tripod for long exposures; choose lenses for both wide vistas and tight textures; protect gear from dust and moisture; and keep a spare memory card for millions of frames of photos. Always commemorate the landscapes, and remember that this thing requires patience to make the nine-season rhythm of the locales pay off, especially at the last light when the sky exposes its true hues.
Beállítások, kompozíció és felszerelés zord tájakhoz
A fényképezőgépet mindig stabil állványra szerelje, és RAW formátumban, manuális módban fényképezzen; használja a rendelkezésre álló fényt, és figyeljen a mozgásra. Kezdje ISO 100-zal, a csúcsfényekre exponáljon, és tartsa a záridőt 1/125s és 1/320s között a stabil sziklaképekhez. Használjon f/8 és f/11 közötti rekeszt, hogy a mélység megmaradjon az előtértől a távoli csúcsokig; az előtér részleteihez állítsa f/5.6–f/8-ra, és emelje az ISO-t 200–400-ra, ha a szél vagy a mozgás gyorsabb záridőt igényel.
A kompozíció erős előtérrel, tiszta mélységgel és méretaránnyal függ össze. Helyezz el egy vezető vonalat a közép- vagy a távoli távolság felé, kerüld a horizont középre helyezését, és próbálj ki alacsony szögből és talajközeli beállításokat is. Foglalj bele egy referenciaelemet, például egy viharvert épületet vagy egy elhagyott szerkezetet a méret érzékeltetéséhez; a csuhut-kale romjainak vagy a bandarbani sziklának a tájképében ez drámaiságot ad, és segít emlékezetessé tenni a helyet a nézők számára, beleértve a gyerekeket is.
A nélkülözhetetlen felszerelés része a időjárásálló váz, két memóriakártya és egy katonai minőségű hátizsák. Egy nagylátószögű objektív (14–24 mm) a vad tájakhoz, egy tele zoom (70–200 mm) a távoli részletekhez. Adj hozzá egy cirkuláris polarizációs szűrőt az égbolt mélyítéséhez, egy 2–3 fokozatú ND átmenetes szűrőt a magas kontrasztú horizontokhoz, és egy erős állványt megfordítható középoszloppal. Tartsd az objektívsapkákat az objektíveken a helyszínek közötti mozgáskor, és vigyél magaddal egy kis tisztítókészletet; moszkvai vagy más távoli helyek közeli terepi körülmények között ritka a leállás, úgyhogy légy felkészülve.
Rögzítsünk adatokat minden képkockához egy egyszerű naplóban: helyszín, dátum, időjárás és beállítások; ez a virtuális jegyzetelés segít később visszaidézni a hangulatot, az alkalmazott megközelítésről készült jegyzetek pedig megerősítik a tanulást. Az olyan helyszínek, mint Csuft-Kale és Bandarban változatos fényviszonyokat kínálnak, szinte megkövetelve a gyors alkalmazkodást, hogy megragadjuk az egyes helyek hangulatát és történelmét.
| Aspektus | Ajánlás |
|---|---|
| Mód | Kézi, RAW |
| ISO | 100–200 világosban; akár 400 árnyékban vagy amikor mozgásra van szükség |
| Apertúra | f/8–f/11 a széles élességhez; f/5,6–f/8 a hangsúlyos előtérhez |
| Zár | 1/125–1/320 mp; szükség esetén bracket HDR-hez |
| Lencsék | Széles (14–24 mm) a nagyszabású jelenetekhez; közép (24–70 mm) a részletekhez; tele (70–200 mm) a tömörítéshez |
| Szűrők | Polarizációs szűrő az égbolt mélyítéséhez; ND grad szűrő 2–3 fényértékkel a világos horizontokhoz |
| Stabilitás | Állvány; távkioldó vagy időzítő a bemozdulás csökkentésére |
| Fehéregyensúly | Automatikusan, szükség esetén utólag igazítsa be |
Engedélyek, biztonság és helyi szabályozások, amikről tudnod kell
Mielőtt túrát terveznél, ellenőrizd az engedélyekre vonatkozó követelményeket; vedd fel a kapcsolatot a helyi parkfenntartó hatósággal vagy a területkezelő irodával, hogy megerősítsd a szükséges engedélyeket, határidőket, maximális csoportlétszámot és a hozzáférési időszakokat.
Viselj erős lábbelit, maradj a kijelölt ösvényeken, és kerüld a labilis párkányokon való járást, ahol a homokkő textúrája leválhat, valamint a laza kövekből álló területeket; az időjárás gyorsan változhat, ezért kísérd figyelemmel az előrejelzéseket, és kerüld a laza kövekkel rendelkező szakaszokat.
Egyes helyszínek védett területekre esnek, ahová a belépés csak csoportos vezetéssel engedélyezett; mind Bandarbanban, mind Csuft-Kaléban a szabályok szerint nem szabad letérni a kijelölt ösvényekről, és engedéllyel rendelkező idegenvezetővel kell maradni; csak ez a megoldás teszi lehetővé a természetes textúrák megőrzését, és védi a homokkő textúrákat, amelyek a régiókban található helyszíneket jellemzik.
Fényképezéshez hozz magaddal egy kompakt állványt, és tartsd ellenőrzés alatt a felszerelésed; ahol fafelületek vannak, kerüld a felszerelés nedves fára helyezését a csúszás elkerülése érdekében; ha pallóút van kiépítve, maradj rajta; a felügyelet nélkül hagyott felszerelés mágnesként vonzza a lopást, és károsíthatja az érzékeny felületeket; a biztonságos túrázás és a felszerelés kezelésének oktatása segít, különösen a kitett párkányokon.
A kérelmeket általában hivatalos, modern portálokon vagy helyi parkőr állomásokon lehet benyújtani; a feldolgozáshoz legalább két hét szükséges; vigyen magával nyomtatott engedélyt, az útitervének egy másolatát és a vezető elérhetőségét; a díjakat, ha vannak, online vagy átvételkor kell fizetni; egyes zónákban engedéllyel rendelkező vezető és csak napi engedély szükséges az érzékeny területekre való bejutáshoz. Ezek az intézkedések jó ellenőrzést biztosítanak, és be kell tartani őket.
A helyszínen kövesse a kihelyezett szabályokat, kerülje a mászást a laza kövekkel vagy instabil peremekkel rendelkező területeken, és óvja a területet azáltal, hogy minden szemetet elszállít; csak a kijelölt forrásokból használjon vizet; a csoport szorosan tartása segít gyorsan reagálni, ha veszélyhelyzet adódik; ezek a tájak gyönyörű aranyló árnyalatokat mutatnak hajnalban és alkonyatkor, jó kilátást kínálva sétálás közben, és tisztelnie kell azokat a helyeket, ahová belépést nyer.
Ha további információra van szüksége, vegye fel a kapcsolatot a hivatalos látogatóközpontokkal vagy parkigazgatóságokkal; az idegenvezetők elmagyarázhatják a helyi szabályokat a Léna régióra és a Csuft-Kaléra vonatkozóan; indulás előtt mindig ellenőrizze az aktuális állapotot, mivel a szabályozások évszakonként változhatnak; ez a megközelítés jó biztonságot nyújt, és megőrzi a területet a jövőbeli látogatók számára.
Okos útvonaltervezés a mind a 10 helyszín bejárásához
Kezdd a Manpupunerrel egy háromnapos blokkban, hogy lefoglald a napfelkelte fotózását és a túraútvonalakat, majd gurulj át a képződmények övén egyetlen hurokban. Fogadj fel helyi árusokat útbaigazításra és belépési engedélyekre, olvass véleményeket előre, és vedd fel az engedélyeket a helyszínen, ahol lehetséges. A reggeleket a napfelkelte fényére tervezd, kerüld az elcsépelt ösvényeket, és felváltva szentelj napokat a túrázásnak és a kerékpározásnak, hogy a tempó egyenletes maradjon.
-
Manpupuner – a síkságból kiemelkedő, formált kőoszlopok; indulj hajnalban a lágy fények és a tiszta sziluettek miatt. Két teljes napot szánj rá, ha le akarod fotózni mind az oszlopokat, mind a környező törmelékmezőket; használj kompakt túrafelszerelést, és vigyél magaddal időjárásálló fotóstáskát. A megközelítés a legjobb vezetett útvonalon; foglalj korán megbízható árusoknál, és ellenőrizd a napkelte időpontját.
-
Központi csoport – oszlopszerű formák kiállítása a nyílt égbolt előtt; tervezzen egynapos látogatást késő délelőtti kezdéssel, hogy elcsípje az arcokon a lágyabb fényt. A terep egyenetlen, de megfelelő lábbelivel járható; egy rövid, festői túra ideális bemelegítés a későbbiekben igényesebb szakaszokhoz.
-
Északi sziklaképződmények – három különböző torony látható egyetlen kilátópontról; érkezzen délelőtt, hogy csökkentse az árnyékokat, és vigyen magával állványt a széles tájképekhez. A megközelítéshez rögös úton történő vezetés, majd élénk túra szükséges; szervezzen vezetőket az útvonal simábbá tételéhez és az időzítési kockázat minimalizálásához.
-
Kilépő gerinc – keskeny párkányok drámai profilokkal; egy kétórás ösvény vezet egy magasabb kilátópontra, ahol a fényképezést a háttérvilágítás segíti. Tartson magánál egy kompakt felszerelést, és fontolja meg a kerékpáros megközelítést, ha van engedélye és helyi támogatása.
-
Déli fennsík – természetes boltívek és kontrasztos kőfalak; tervezzen késő délutáni időpontot a meleg színek megragadásához. A hely könnyű járművel elérhető egy ösvényfejig, majd egy egyenletes, egyórás túrával a fő látványosságokhoz.
-
Gerincléccsoport – sekély ívben elhelyezkedő több oszlop; reggeli időszakban rögzítsük a hosszú árnyékokat, majd váltsunk a textúra közeli felvételeire. A megközelítés a legmegfelelőbb egy rövid túrakörrel, amely tiszteletben tartja a törékeny felületeket.
-
Esker-völgyi pillérek – a völgytalpból hirtelen kiemelkedő alakzatok; egy teljes napos terv több megfigyelési pontot és lassú, alapos fényképezést tesz lehetővé. Csomagolj vizet és harapnivalót a hosszú expozíciós időkhöz; fontold meg a futótempót egy gyors felderítő körhöz, ha a körülmények engedik.
-
Tengerparti padkibúvások – szél és eső által a parton formált látványosságok; látogassa meg napkeltekor vagy napnyugtakor, hogy maximalizálja a színtelítettséget a kőfelületeken. A megközelítéshez tengerparti ösvény szükséges, ahol a biztonságos lábmunka elsődleges; egy könnyű kerékpár jó napokon lerövidítheti a megközelítést.
-
A belső medence tornyai – a laposabb medencéből kiemelkedő természetes oszlopok; szánjon rá egy fél napot, hogy megörökítse a távoli látképet és az oszlopok felületének bensőséges textúráit. A közeli gyülekezőhelyeken árusok gondoskodnak rövid hajó- vagy szárazföldi transzferről, ha az időjárás megváltozik.
-
Végső kilátópont – kisebb oszlopok csoportja, amelyek meghitt, ismétlésre érdemes szögeket kínálnak; foglaljon le egy fél napot az utolsó pillanatban esedékes átnézésekre és a fénytörések pótlására. Ez az összefoglaló szakasz ideális egy visszatekintő fotózáshoz, és búcsút int a tíz helyszínen átívelő nagyszerű ívnek.
Általános tanácsok: célonként három csúcsfényablakot célozz meg – napfelkeltét, késő délelőttöt és az aranyórát –, majd igazítsd az időjáráshoz. Vigyél könnyű állványt, több memóriakártyát és tartalék akkumulátorokat, mivel a körben millió felvétel elérhető. A logisztikához ellenőrzött idegenvezetőkkel biztosítsd a hozzáférést, és minden átszállás előtt nézd meg az értékeléseket; tervezz be puffer napokat az időjárás és az útviszonyok változásaira. Ha lassabb tempót szeretnél, csökkentsd nyolc helyszínre a számot, és nyújtsd ki az egyes megállókat egy teljes napra, majd a Manpupuner kezdés után iktass be egy pihenőnapot. Mindig ellenőrizd az aktuális hozzáférési szabályokat, és tartsd rugalmasan az elképzelésedet, hogy alkalmazkodni tudj a szezonális útmegnyitásokhoz és a kereskedők ütemtervéhez.
") Moszkva flúgos utcai művészete – Hol találod meg (FOTÓK)">
Moszkva flúgos utcai művészete – Hol találod meg (FOTÓK)">
 A legjobb moszkvai fotós helyek a lenyűgöző 2025-ös képekért">
 20 Rejtett gyöngyszem és titkos tipp Moszkvában – Egy nem szokványos helyi útmutató">
 Régi vágású moszkvai kocsmározás – Klasszikus bárok, rejtett gyöngyszemek és éjszakai élet">
 Moszkva – üdülőváros – Luxusutazás, wellness és kultúra az orosz fővárosban">
 Tallulah-vízesés Útikalauz – Hogyan látogassuk meg a Tallulah-szorost, megközelítési pontok és a legjobb kilátópontok">
 Európa legszebb kompútjai – Festői tengerparti utazások">
 A tökéletes szánkózódomb-útmutató – A 419-es körzet lejtőinek összefoglalója">
 Misztikus moszkvai multimédia – Lenyűgöző művészetek, kultúra és technológia Oroszország fővárosában">
 A leglélegzetelállítóbb rejtett gyöngyszem templomok Európa-szerte">