 러시아의 가장 놀라운 암석 지형 10곳 – 멋진 사진 갤러리">

Open during opening hours and shoot at dawn or blue hour to capture the best contrasts and comfortable times for your crew. This approach preserves texture and yields natural color without harsh shadows.
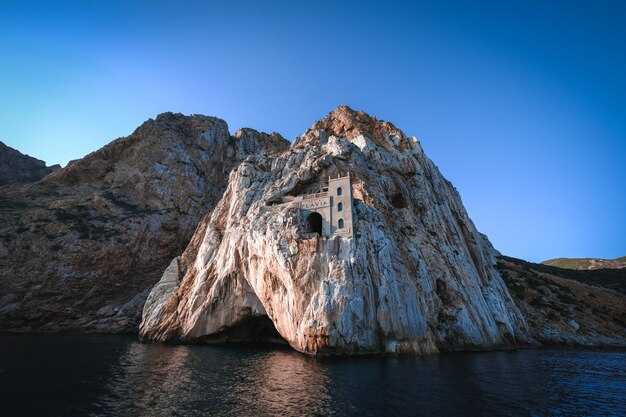
In this part, the Kutuzovskie ridge hosts dramatic lines and towering pillars that define the skyline. The grottoes and wind-worn arches serve as backdrops with scale that is 알려진 to attract landscape photographers; the sites are 위치한 across several valleys, including the zubeydesheth pocket, which adds significant mystery to compositions. The surfaces offer fantastic texture, however, access can be seasonal and depends on local rules.
For practical planning, consult reddit threads and theluxvault guides. They provide field-tested tips on measuring distances, weather windows, and safety, helping you build a schedule of highlights 그리고 significant viewpoints. The terrain remains comfortable when you pace yourself and carry water.
Each site offers multiple backdrops; a single trip can be a part of a broader sequence. Locations span varied elevations, with dramatic shifts in texture between stone columns and cliff shelves. The light opening of morning or late afternoon reveals contrasts that elevate the shots without over-processing, and careful framing keeps the day’s opening in focus.
Plan with respect for the places; coordinate the route and revisit options 다시 if weather cooperates. Share progress with the community, tag the spots to help others discover them, and always comply with local rules to preserve the sites for future visits.
Practical guide to visiting and photographing Russia’s rock formations
Hire a local guide to arrange access and safety; reviews from trekkers help validate routes, then map a two-day loop around a handful of dramatic stone outcrops. Getting permits ahead saves time; plan to arrive well before dawn for the first light, then return in the afternoon when winds soften and shadows sweep across the cliffs.
Best seasons run from late spring to early autumn, relatively predictable weather, and longer days. Erosion has carved sweeping shapes over years, so each site offers a different character. Shade pockets under arches steady the camera and reduce glare, while elevated overlooks reveal the entire panorama and scale of the formations.
Getting around relies on local towns as bases; stay in family-run accommodations or join local tours to reach trailheads. Camps are common near protected spaces, while some communities keep small free campsites near the edge of forests. When you visit, show respect for peoples and their spaces; move slowly on trails to minimize impact and keep noise low for both wildlife and other visitors. National parks charge modest fees, and part of those funds support conservation efforts; budget accordingly to support the places you’re enjoying.
Equipment and technique matter as much as luck. Use a lightweight tripod, a wide-to-standard zoom, and a weather-sealed bag to protect gear from dust and spray. Shoot during the golden hours–dawn and late afternoon–to capture dramatic silhouettes, then bracket exposures to handle high-contrast skies. Bring a polarizer to tame glare on sunlit faces and to deepen the hue of distant ridges; in gusty afternoons, shield the camera and use a faster shutter to freeze wind-blown details.
Site etiquette and safety cannot be skipped. Winds on exposed ledges can change quickly; keep a safe distance from edge drops and erosion gullies. Respect shade lines and avoid loitering near fragile arches that look ready to crumble. If you’re new to these landscapes, try a two-stage approach: begin with a day in the national park area, then a second day to revisit the most photogenic angles when light changes. For added context, compare with Bandarban-like clusters you’ve seen elsewhere; the motley variety of shapes often tells the same story of nature’s stubborn, patient work over years.
- Getting there: base in a local town, join a short-led tour to nearby outcrops, then shuttle to trailheads.
- Best practice: arrive early, use a tripod, and shoot slowly to frame sweeping horizons and intimate textures.
- Camping and lodging: mix camp nights with nights in small inns; this helps you stay flexible for weather shifts and afternoon light.
- Conservation: stay on marked paths, pack out every crumb (including snacks like cheese), and avoid disturbing any features or wildlife.
- Day 1: arrive at first base, hike to a prominent pillar group, capture close-up textures in shade, then shoot long-range silhouettes at sunset.
- Day 2: dawn shoot from a higher vantage, return to a second cluster for dramatic sky lines, and end with a wide-angle sweep that includes the entire field.
Keep these parts of the experience in mind: the local culture, the weathered surfaces, and the quiet spaces that reward patient observation. With careful planning, you’ll document images that reflect the site’s true scale, its people, and the way erosion slowly etches drama into stone–then share those stories with fellow travelers through well-curated reviews and memories that last years.
Exact locations and access routes for each formation
Start at the official park gate and hire a local guide if you’re unfamiliar with rugged routes; use marked trails and request a current map at the kiosk, which often offers free options.
Spot A: Lena Pillars on the Lena River. Location: in the Sakha Republic, along the eastern bank of the Lena River, within a protected nature area that translates to a narrow corridor of towers and boulder rows. Access: fly into Yakutsk, then drive to the park entrance on the river and embark on a river or land route; several sections require a short boat leg during high water, while others are reachable by a straightforward hike from the gate. Morning light makes the weathering textures glow, and you’ll spot birds and small mammals in the surrounding ecosystems that slowly shift with the seasons. The main approach runs through a valley of stones and hills; stay on the wide, signed route and refer to the map for the spot you want to photograph. The upper viewpoints can be done in a day, with rooms in nearby settlements for overnight stays; beware that some sections are exposed and you may be in the shadow under taller pillars near the bridge over the lower stream. Photo opportunities are abundant, with several viewpoints available and no entry fee for the base routes.
Spot B: Stolby Rock Columns near Krasnoyarsk. Location: a cluster of classic spires within a protected urban reserve just outside Krasnoyarsk city limits, consisting of several named towers plus unnamed spires. Access: take a regional train or bus to the city, then a short municipal bus or taxi toward the Stolby parking zone; follow the blue trail markers to the main lookout, then pick among several looping routes that weave among the columns. The ascent belongs to a well-trodden route that has room for variation; wildlife in the area includes small birds and herbivores that avoid crowds if you move slowly. The scenery translates into a stark contrast of weathered stones against the city skyline; many visitors park buildings and cafés along the roadside, which is convenient for a morning warm-up. For a free, self-guided option, start from the lower trailhead and climb to the first overlook, then return via the bridge overlooks that cross small creeks.
Spot C: Kungur Stone City (Kungur Stone Town) in Perm Krai. Location: near Kungur town, within a karst plateau that consists of clustered limestone towers and arches. Access: drive from Perm along a regional road to Kungur, then walk or take a local guide-led hike to the rock field; many routes loop around the hilltops and through a network of hollows and caverns. The formation style is classical in its columnar arrangement and the caves nearby reveal ancient weathering patterns; on the morning path, you’ll hear rivers nearby and see birds overhead. Wildlife is common, and visitors often encounter deer in the surrounding forest margins; stay on designated paths to avoid disturbing habitat that hosts native ecosystems. Bring a compact photo setup for close-ups of the stone textures, and plan several short stops to admire the room-like alcoves between spires.
Spot D: Shoria Hills Outcrops in the South Ural foothills. Location: a belt of rocky hills lying to the west of the Urals, consisting of jagged ridges and rounded knolls with stone staircases of varying heights. Access: reach the nearest rail hub (Miass or Chebarkul) and transfer to a forest road that leads to the lower trailhead; from there follow a marked route through a pine forest until you reach the most dramatic towers. The area features wildlife typical of the taiga and several small streams that feed seasonal rivers; the morning air is crisp and the light highlights the sculpture-like forms of weathered stones. The route includes a few switchbacks that offer views over the valley, with several spots to pause and photograph the spires.
Spot E: Kamchatka Peninsula rock columns near the coastline. Location: a coastal range in the far east, consisting of volcanic and sedimentary outcrops that stand above the shore. Access: fly into Petropavlovsk-Kamchatsky, then hire a local guide who can arrange transport to the foothill trailheads; travel time may require a boat transfer to the head of some canyons. The landscape is rugged and slowly sculpted by weathering, with weather patterns that translate to dramatic morning mists and steamy creeks near the base. The site offers a mix of sea spray, wildlife sightings, and a sparse but beautiful backdrop of stony forms and hills; consider a second day to explore more distant towers, as routes can be several kilometers long. Bridge crossings over streams and small rivers are common, and some spots lie under overhanging shelves that create natural rooms for resting and sketching a photo sequence.
Spot F: Altai Range stone pinnacles in the borderlands of Russia and Mongolia. Location: a high plateau zone consisting of cervices, gullies, and spire-like rocks in the western Altai. Access: approach from Gorno-Altaysk or Barnaul, then connect to a marked trail into the foothills; permits may be required in certain protected zones, so refer to local park offices for current rules. The outcrops display a striking contrast of white and gray minerals set against a blue sky; slowly they rise from wooded slopes into open hills, creating a landscape that feels classical in its timeless geometry. Morning visits are best to catch the soft light on the stones and to observe the animals that inhabit the surrounding ecosystems.
Spot G: Baikal Basin arched rocks near the lake’s eastern shore. Location: in the Lake Baikal vicinity, where rock arches and towers sit along the moraine and shoreline. Access: reach Irkutsk or Ust-Barguzin and use local guides to access the trailheads along forest roads; several routes converge at lookout points that translate to dramatic photos of the arches with the lake in the background. The terrain consists of gravelly shorelines and fringing hills, with wildlife that includes waterfowl and riverine species; you’ll see slow weathering patterns that reveal the geology’s evolution and a room-like space beneath some arched spans that make for an atmospheric portrait.
Spot H: Karelia granite outcrops near the border with Finland. Location: a mosaic of cliffs and boulders tucked into forested hills just inland from the White Sea region. Access: drive to the regional capitals and take forest roads toward the designated park zones; several trailheads lead into intact pockets of granite towers. This area is known for its free-standing blocks and tabular caps, which provide ample room for exploring on foot and for capturing the light at dawn. Wildlife is present in the surrounding delta ecosystems, and keep an eye out for birds that roost among the ledges; harassed by crowds in peak hours, many visitors prefer the calmer morning window to earn the best shots.
Spot I: Ural Tabletop group near the Trans-Ural foothills. Location: a set of flat-topped monoliths scattered across a broad upland, with several buttresses and narrow gorges. Access: take a long-distance bus to the nearest town, then a local shuttle toward the trailhead; several routes offer different vantage points. The bars and columns provide a stark, stubborn beauty that translates to a classical composition; the rocks slowly weather into rounded edges that contrast with the straight lines of the surrounding hills and any old buildings in the nearby settlement. The area is typical for day trips, with wildlife and easy viewing of several outcrops that are ideal for a morning photo session.
Spot J: Khibiny Massif rock spires on the Kola Peninsula. Location: a northern arc that features rugged, dark stone towers amid tundra and lichens. Access: fly to Murmansk, then drive to the foothill zones and connect with a guided trek; several routes interlink the major towers, and one can observe the landscape from the crest of a ridge after a steady climb. The walk passes through a zone where wildlife is active at dawn, and you’ll often find spots with a room-like shelter under a shelf that provides shelter on windy days. The scenery is beautiful in a stark, northern light, with free trails available during the low season and private guides available for more challenging segments.
Best seasonal timings for lighting, weather, and crowds
Plan visits during late spring or early autumn for the best balance of light, weather, and crowds. This window, called shoulder season, is a thing that yields unique, directional light across hills and lakes, translating into warm tones on stone faces. Shots consisting of wide panoramas and close textures look dramatic as millions of photons pool on surfaces. Access at bases and trailheads improves here, and streets near towns stay calmer. Here they became iconic viewpoints for a visitor and locals alike. A few routes hide a hideout in a canyon near zubeydesheth. For planning, consult theluxvault for maps and itineraries. The offering of these months tends to be huge.
Lighting windows are best at dawn or dusk, with golden hour lasting about 60 minutes after sunrise and before sunset. Across russia, light changes rapidly, but the color translates into warm tones on stone walls, creating a unique mood for every shot. Photos taken in these windows often consist of broad skies and texture-rich surfaces, revealing details that vanish at noon.
Crowd management: midweek mornings tend to be calmer; plan to shoot between nine and eleven to minimize congestion, and avoid weekends and school holidays when visitor numbers spike. Last light sessions can attract larger groups as well, so aim for the earlier window when possible.
Access and logistics: begin from bases along the main routes. Verify permits and access rules for protected zones; keep to marked trails and follow signs. theluxvault offers quieter detours and safe hideouts such as caves near the center. For those with limited time, a one-day loop from a nearby town keeps streets manageable and transit between viewpoints short.
Gear and etiquette: wear athletic_shoe; pack layers; bring water; carry a compact tripod for long exposures; choose lenses for both wide vistas and tight textures; protect gear from dust and moisture; and keep a spare memory card for millions of frames of photos. Always commemorate the landscapes, and remember that this thing requires patience to make the nine-season rhythm of the locales pay off, especially at the last light when the sky exposes its true hues.
거친 풍경 사진 촬영을 위한 카메라 설정, 구도 및 장비
항상 튼튼한 삼각대에 카메라를 장착하고 수동 모드에서 RAW로 촬영하십시오. 주변광을 사용하고 움직임에 유의하십시오. ISO 100부터 시작하여 하이라이트에 노출을 맞추고 안정적인 암벽 장면을 위해 셔터를 1/125초에서 1/320초 사이로 유지하십시오. 전경에서 먼 봉우리까지 심도를 유지하려면 조리개를 f/8에서 f/11 사이로 설정하십시오. 전경 디테일을 위해서는 f/5.6–f/8로 낮추고 바람이나 움직임으로 인해 더 빠른 셔터 속도가 필요한 경우 ISO를 200–400으로 높이십시오.
구도는 강렬한 전경, 명확한 깊이, 그리고 규모에 달려 있습니다. 중간 또는 먼 거리로 향하는 선을 배치하고, 수평선을 중앙에 두는 것을 피하며, 로우 앵글과 지면 가까이에서 프레임을 테스트하십시오. 풍화된 건물이나 버려진 구조물과 같은 참조 요소를 포함하여 크기를 전달하십시오. Chufut-Kale 유적이나 Bandarban 바위의 풍경에서 이는 드라마를 더하고 어린이들을 포함한 시청자들에게 장소를 기념하는 데 도움이 됩니다.
필수 장비로는 방수 바디, 메모리 카드 2개, 군용 등급 배낭이 있습니다. 광각 렌즈 (14-24mm)는 험준한 풍경을 담고, 망원 줌 (70-200mm)은 먼 디테일을 포착합니다. 원형 편광 필터를 추가하여 하늘을 더 깊게 만들고, 고대비 수평선을 위해 2-3 스톱 ND 그라데이션 필터를 사용하고, 가역식 센터 컬럼이 있는 튼튼한 삼각대를 준비하십시오. 장소 이동 중에는 렌즈 캡을 닫아두고 작은 청소 키트를 휴대하십시오. 모스크바 근처 또는 기타 외딴 지역의 현장에서는 다운타임이 드물므로 준비하십시오.
각 프레임에 대한 데이터를 간단한 로그로 기록하세요: 위치, 날짜, 날씨, 설정; 이러한 가상 노트 필기는 나중에 분위기를 재현하는 데 도움이 되고, 접근 방식에 대한 источник 노트는 학습을 강화합니다. chufut-kale 및 bandarban과 같은 장소는 다양한 빛을 제공하며, 각 장소의 분위기와 역사를 포착하기 위해 빠른 적응을 거의 요구합니다.
| 양상 | 권고 |
|---|---|
| Mode | 수동, RAW |
| ISO | 밝은 곳에서 100–200; 그늘 또는 움직임이 필요할 때 최대 400 |
| Aperture | f/8–f/11은 폭넓은 선명도를 위해, f/5.6–f/8은 뚜렷한 전경을 위해. |
| Shutter | 1/125–1/320초; 필요한 경우 HDR 촬영을 위해 브라케팅 |
| 렌즈 | 광각 (14-24mm): 웅장한 장면, 표준 (24-70mm): 디테일, 망원 (70-200mm): 압축 효과 |
| 필터 | 하늘을 더욱 깊게 만드는 편광 필터, 밝은 수평선을 위한 ND 그라데이션 필터 2-3 스탑 |
| 안정성 | 삼각대, 흔들림 방지를 위한 리모컨 셔터 또는 타이머 |
| White balance | 자동 조정, 필요시 사후 보정 |
알아야 할 허가, 안전 및 현지 규정
트레킹을 계획하기 전에 허가 요건을 확인하십시오. 필요한 허가, 마감일, 최대 그룹 규모 및 접근 가능 기간을 확인하려면 지역 공원 관리 당국이나 토지 관리 사무소에 문의하십시오.
튼튼한 신발을 착용하고, 지정된 탐방로를 유지하며, 사암 질감이 벗겨질 수 있는 불안정한 턱이나 느슨한 돌로 이루어진 지역을 걷는 것을 피하십시오. 날씨는 급변할 수 있으므로 예보를 확인하고 느슨한 돌이 있는 구간은 피하십시오.
일부 장소는 보호 구역 내에 위치하여 가이드 그룹만 접근이 제한됩니다. 그러나 반다르반과 추푸트칼레 모두에서 지정된 경로를 벗어나거나 면허를 소지한 가이드와 동행해야 한다는 규칙이 있습니다. 이러한 규정을 통해서만 자연 그대로의 질감을 보존하고 이 지역에 위치한 장소의 특징인 사암 질감을 보호할 수 있습니다.
사진 촬영 시 휴대용 삼각대를 가져가 장비를 잘 관리하십시오. 나무 표면이 있는 곳에서는 미끄러짐을 방지하기 위해 젖은 나무 위에 장비를 놓지 마십시오. 데크가 있는 경우 데크 위를 걷고, 방치된 장비는 도난의 표적이 되기 쉬우며 연약한 표면을 손상시킬 수 있습니다. 특히 노출된 턱에서는 안전한 하이킹과 장비 사용법 교육이 도움이 됩니다.
일반적으로 신청서는 공식적인 최신 포털이나 지역 관리소에서 제출하며, 처리하는 데 최소 2주가 소요됩니다. 인쇄된 허가증, 여정 사본, 리더의 연락처를 지참하십시오. 수수료가 있는 경우 온라인 또는 픽업 시 지불합니다. 일부 구역에서는 면허가 있는 가이드와 당일 허가만 필요하며, 민감한 지역으로 가는 길을 찾아야 합니다. 이러한 조치는 훌륭한 통제력을 제공하며 반드시 따라야 합니다.
현장에서는 게시된 규정을 준수하고, 느슨한 돌이나 불안정한 턱이 있는 곳은 오르지 않도록 하며, 모든 쓰레기를 되가져와 지역을 보존하십시오. 지정된 수원에서만 물을 사용하십시오. 그룹을 작게 유지하면 위험 발생 시 신속하게 대처하는 데 도움이 됩니다. 이러한 풍경은 새벽과 황혼에 아름다운 황금빛 색조를 드러내며, 산책하는 동안 멋진 경관을 제공합니다. 그리고 여러분이 접근하는 장소를 존중해야 합니다.
더 자세한 정보가 필요하면 공식 방문자 센터나 공원 사무소에 문의하십시오. 가이드가 레나 지역과 추푸트-칼레의 현지 규칙을 설명해 줄 수 있습니다. 규정은 계절에 따라 변경될 수 있으므로 항상 방문 전에 현재 상태를 확인하십시오. 이러한 접근 방식은 안전을 보장하고 미래 방문객을 위해 영토를 보존합니다.
10곳을 모두 둘러볼 수 있는 스마트한 여행 일정 계획
만푸푸네르에서 3일간 일출 사진 촬영 및 하이킹 코스 확보 후, 형성 지대 벨트를 따라 단일 루프로 이동합니다. 현지 업체에서 가이드와 접근 허가를 받고, 사전에 리뷰를 확인하며, 가능한 현장에서 허가를 받으십시오. 아침은 일출 조명에 맞추고 혼잡한 트레일은 피하며, 번갈아 가며 하이킹과 자전거를 타면서 꾸준한 속도를 유지하십시오.
-
만푸푸네르 – 평원에서 솟아오른 기둥 모양의 암석으로, 부드러운 빛과 깨끗한 실루엣을 위해 새벽에 출발하세요. 기둥과 주변 너덜지대를 모두 촬영하려면 이틀을 꼬박 할애하고, 휴대하기 편한 등반 장비와 방수 카메라 가방을 챙기세요. 가이드 동행이 가장 좋으며, 신뢰할 수 있는 업체를 통해 미리 예약하고 일출 시간을 확인하세요.
-
중앙 클러스터 – 열주 형태가 하늘을 배경으로 펼쳐집니다. 얼굴에 부드러운 빛이 감도는 늦은 오전 시간에 맞춰 당일 여행을 계획하세요. 지형은 고르지 않지만 적절한 신발을 착용하면 걸을 수 있습니다. 짧고 경치 좋은 하이킹은 나중에 더 힘든 구간을 위한 이상적인 준비 운동이 됩니다.
-
북쪽 노두 – 단일 전망대에서 보이는 뚜렷한 세 개의 첨탑; 그림자를 줄이려면 오전에 도착하고 넓은 풍경을 위해 삼각대를 가져가세요. 접근하려면 험한 길을 운전한 후 빠른 하이킹이 필요할 수 있습니다. 길을 순탄하게 하고 시간 위험을 최소화하려면 가이드를 예약하세요.
-
탈출 능선 – 아찔한 단면을 가진 좁은 턱; 두 시간 거리의 트랙은 사진 촬영 시 역광의 이점을 얻을 수 있는 더 높은 뷰포인트로 연결됩니다. 작은 장비를 챙기고 허가와 현지 지원이 있다면 접근 시 자전거를 이용하는 것을 고려하십시오.
-
남부 고원 – 자연 아치와 대비가 강렬한 석조 전면; 따뜻한 색조를 담아내기 위해 늦은 오후에 방문하는 것을 목표로 하십시오. 현장은 경차로 트레일헤드까지 접근 가능하며, 이후 주요 전시물까지 꾸준히 한 시간 동안 하이킹해야 합니다.
-
능선 그룹 – 얕은 호를 그리며 정렬된 여러 기둥; 긴 그림자를 포착하기 위해 오전 세션을 활용하고, 질감 클로즈업으로 전환한다. 접근은 깨지기 쉬운 표면을 존중하는 짧은 하이킹 코스를 통해 가능하다.
-
에스커 계곡 기둥 – 계곡 바닥에서 갑작스럽게 솟아오른 지형으로, 이곳에서 하루를 꼬박 보내면 다양한 시점을 확보하고 느리고 신중한 사진 촬영이 가능합니다. 장시간 노출 촬영에 적합한 물과 간식을 챙기고, 여건이 된다면 빠른 속도로 주변을 훑어보는 것도 고려해 보세요.
-
해안 단구 노두 – 해안을 따라 바람과 비에 깎여 생긴 지형으로, 돌 표면의 색채가 가장 짙어지는 해돋이나 해넘이 때 방문하는 것이 좋다. 접근하려면 해안 길을 이용해야 하며, 무엇보다 안전한 발판 확보가 중요하다. 날씨가 좋은 날에는 가벼운 자전거를 이용해 접근 시간을 단축할 수 있다.
-
내부 분지 탑 – 평평한 분지에서 솟아오른 자연 기둥; 반나절을 할애하여 먼 스카이라인과 기둥 표면의 섬세한 질감을 모두 담아보세요. 날씨가 변하면 인근 집결지의 상인들이 짧은 보트 또는 육로 이동을 준비해 드릴 수 있습니다.
-
마지막 전망 지점 – 친밀하고 반복할 가치가 있는 앵글을 제공하는 작은 기둥들의 집합체입니다. 막바지 검토와 빛의 간극을 메우기 위해 반나절을 비워두세요. 이 마무리 부분은 회고 사진 촬영에 이상적이며 10개 장소에 걸친 웅장한 여정에 작별을 고합니다.
일반적인 팁: 사이트당 빛이 가장 좋은 시간대를 세 번 노리십시오. 해돋이, 늦은 아침, 황금 시간대를 목표로 하고 날씨에 따라 조정하십시오. 가벼운 삼각대, 여러 개의 메모리 카드, 여분의 배터리를 챙기십시오. 루프 전체에서 수백만 개의 프레임을 촬영할 수 있습니다. 물류의 경우 검증된 가이드와 접근 권한을 확보하고 각 이동 전에 리뷰를 확인하십시오. 날씨 및 도로 상태 변화에 대비하여 여유일을 계획하십시오. 더 느린 속도를 선호하는 경우 사이트 수를 8개로 줄이고 각 정류장을 하루 종일로 늘린 다음 만푸푸네르 시작 후 휴식일을 넣으십시오. 항상 현재 접근 규칙을 확인하고 계절별 도로 개방 및 공급업체 일정에 맞게 아이디어를 유연하게 유지하십시오.
") 모스크바의 엉뚱한 거리 예술 – 어디에서 찾을 수 있을까 (사진)">
모스크바의 엉뚱한 거리 예술 – 어디에서 찾을 수 있을까 (사진)">
 2025년 최고의 모스크바 사진 명소">
 20가지 모스크바의 숨겨진 보석과 최고의 비밀 – 색다른 현지 가이드">
 올드 스쿨 모스크바 펍 크롤링 – 클래식 바, 숨겨진 보석 & 나이트라이프">
 모스크바 – 휴양 도시 – 러시아 수도에서 즐기는 럭셔리 여행, 웰빙, 그리고 문화">
 Tallulah Falls 여행 가이드 – Tallulah Gorge 방문 방법, 접근 지점, 최고의 전망 포인트">
 유럽에서 가장 아름다운 페리 여행 – 그림 같은 해안 여정">
 궁극의 썰매 언덕 가이드 – 419 지역 슬로프 종합 정보">
 신비로운 모스크바 멀티미디어 – 러시아 수도에서 즐기는 몰입형 예술, 문화, 기술">
 유럽 전역에서 가장 숨 막힐 듯 아름다운 숨겨진 보석 같은 교회들">