

Aberto durante o horário de funcionamento e fotografar ao amanhecer ou na hora azul para capturar os melhores contrastes e horários confortáveis para sua equipe. Essa abordagem preserva a textura e produz cores naturais sem sombras duras.
A planear a sua visita aos museus de Moscovo?
Sem filas — bilhetes e visitas guiadas aos museus de Moscovo.
Reservar um tour →Nesta parte, a crista de Kutuzovskie apresenta linhas dramáticas e pilares imponentes que definem o horizonte. As grutas e arcos desgastados pelo vento servem como cenários com escala conhecida por atrair fotógrafos de paisagens; os locais estão espalhados por vários vales, incluindo o vale de Zubeydesheth, que adiciona um mistério significativo às composições. As superfícies oferecem texturas fantásticas, porém o acesso pode ser sazonal e depende das regras locais.
Para planejamento prático, consulte threads do Reddit e os guias do theluxvault. Eles oferecem dicas testadas em campo sobre medição de distâncias, janelas de tempo e segurança, ajudando a construir um cronograma de destaques e pontos de vista significativos. O terreno permanece confortável quando você se paces e leva água.
Cada local oferece múltiplos fundos; uma única viagem pode fazer parte de uma sequência mais ampla. Os locais abrangem diferentes altitudes, com mudanças drásticas de textura entre colunas de pedra e prateleiras de rocha. A luz suave da manhã ou do final da tarde revela contrastes que elevam as fotos sem excesso de edição, e um enquadramento cuidadoso mantém o início do dia em foco.
Planeje com respeito pelos lugares; coordene o roteiro e revise as opções novamente se o tempo ajudar. Compartilhe o progresso com a comunidade, marque os locais para ajudar outras pessoas a descobri-los, e sempre cumpra as regras locais para preservar os sítios para visitas futuras.
Guia prático para visitar e fotografar as formações rochosas da Rússia
Contrate um guia local para organizar o acesso e a segurança; as avaliações de trilheiros ajudam a validar as rotas, depois mapeie um circuito de dois dias em torno de alguns afloramentos rochosos dramáticos. Obter os permissões com antecedência economiza tempo; planeje chegar bem antes do amanhecer para a primeira luz, depois retorne à tarde quando os ventos amainam e as sombras varrem os penhascos.
As melhores épocas vão do final da primavera ao início do outono, com clima relativamente previsível e dias mais longos. A erosão esculpiu formas amplas ao longo dos anos, então cada local oferece um caráter diferente. Bolsões de sombra sob arcos estabilizam a câmera e reduzem o brilho, enquanto miradouros elevados revelam toda a panorâmica e a escala das formações.
Deslocar-se depende de cidades locais como bases; fique em acomodações familiares ou junte-se a tours locais para chegar aos pontos de partida das trilhas. Acampamentos são comuns perto de áreas protegidas, enquanto algumas comunidades mantêm pequenos acampamentos gratuitos perto da borda das florestas. Quando visitar, demonstre respeito pelos povos e seus espaços; mova-se devagar nas trilhas para minimizar o impacto e mantenha o barulho baixo tanto para a vida selvagem quanto para outros visitantes. Parques nacionais cobram taxas modestas, e parte desses recursos apoia os esforços de conservação; orce de acordo para apoiar os lugares que está apreciando.
Equipamento e técnica importam tanto quanto a sorte. Use um tripé leve, uma lente zoom ampla-padrão e uma bolsa resistente a intempéries para proteger o equipamento de poeira e respingos. Tire fotos durante as horas douradas—ao amanhecer e no final da tarde—para capturar silhuetas dramáticas, depois faça exposições em série para lidar com céus de alto contraste. Leve um polarizador para reduzir o brilho em rostos iluminados pelo sol e intensificar a tonalidade de cristas distantes; em tardes ventosas, proteja a câmera e use um obturador mais rápido para congelar detalhes agitados pelo vento.
Site etiqueta e segurança não podem ser ignorados. Ventos em beirais expostos podem mudar rapidamente; mantenha uma distância segura de quedas e valas de erosão. Respeite as linhas de sombra e evite ficar perto de arcos frágeis que parecem prestes a desmoronar. Se você é novo nesses cenários, tente uma abordagem em duas etapas: comece com um dia na área do parque nacional e, no segundo dia, retorne aos ângulos mais fotogênicos quando a luz mudar. Para mais contexto, compare com aglomerados semelhantes a Bandarban que você já viu; a variedade de formas muitas vezes conta a mesma história do trabalho persistente e paciente da natureza ao longo dos anos.
- Chegando lá: baseie-se em uma cidade local, junte-se a um tour curto e guiado até afloramentos próximos, depois faça o translado até os pontos de partida das trilhas.
- Chegue cedo, use um tripé e tire fotos lentamente para capturar panoramas amplos e texturas íntimas.
- Acomodação e alojamento: misture noites de camping com noites em pequenas pousadas; isso ajuda a manter flexibilidade para mudanças climáticas e luz da tarde.
- Conservação: mantenha-se nas trilhas marcadas, leve embora cada migalha (incluindo lanches como queijo) e evite perturbar quaisquer características ou vida selvagem.
- Dia 1: chegar à primeira base, fazer uma trilha até um grupo de pilares proeminente, capturar texturas em close-up na sombra, depois fotografar silhuetas a longa distância no pôr do sol.
- Dia 2: sessão fotográfica ao amanhecer a partir de um ponto mais elevado, retorno a um segundo aglomerado para linhas de céu dramáticas e encerramento com uma varredura em grande angular que inclui todo o campo.
Mantenha esses aspectos da experiência em mente: a cultura local, as superfícies desgastadas pelo tempo e os espaços silenciosos que recompensam a observação paciente. Com planejamento cuidadoso, você documentará imagens que refletem a verdadeira escala do local, suas pessoas e a maneira como a erosão lentamente grava drama na pedra—então compartilhe essas histórias com outros viajantes por meio de avaliações bem-curadas e memórias que duram anos.
Locais exatos e rotas de acesso para cada formação
Comece no portão oficial do parque e contrate um guia local se não estiver familiarizado com rotas acidentadas; use trilhas sinalizadas e peça um mapa atualizado no quiosque, que geralmente oferece opções gratuitas.
Ponto A: Pilares de Lena no rio Lena. Localização: na República de Sakha, ao longo da margem oriental do rio Lena, dentro de uma área protegida que se traduz como um corredor estreito de torres e fileiras de rochas. Acesso: voe para Yakutsk, depois dirija-se até a entrada do parque no rio e embarque em uma rota fluvial ou terrestre; várias seções exigem um pequeno trecho de barco durante a cheia, enquanto outras são acessíveis por uma caminhada simples a partir do portão. A luz da manhã faz as texturas de erosão brilharem, e você avistará aves e pequenos mamíferos nos ecossistemas circundantes que mudam lentamente com as estações. A abordagem principal passa por um vale de pedras e colinas; mantenha-se na rota larga e sinalizada e consulte o mapa para o local que deseja fotografar. Os pontos de vista superiores podem ser feitos em um dia, com acomodações em povoados próximos para pernoites; atenção, pois algumas seções são expostas e você pode estar na sombra sob pilares mais altos perto da ponte sobre o riacho inferior. As oportunidades fotográficas são abundantes, com vários pontos de vista disponíveis e sem taxa de entrada para as rotas básicas.
Spot B: Colunas de Stolby perto de Krasnoyarsk. Localização: um aglomerado de agulhas clássicas dentro de uma reserva urbana protegida logo fora dos limites da cidade de Krasnoyarsk, composto por várias torres nomeadas e agulhas sem nome. Acesso: pegue um trem ou ônibus regional para a cidade, depois um ônibus municipal curto ou táxi em direção à zona de estacionamento de Stolby; siga as placas azuis do trilho até o mirante principal, depois escolha entre várias rotas em loop que serpenteiam entre as colunas. A subida pertence a uma rota bem trilhada que permite variações; a fauna da região inclui pequenos pássaros e herbívoros que evitam multidões se você se mover devagar. A paisagem se traduz em um contraste marcante entre pedras desgastadas e o horizonte da cidade; muitos visitantes deixam edifícios e cafés ao longo da beira da estrada, o que é conveniente para um aquecimento matinal. Para uma opção gratuita e autoguiada, comece no início da trilha inferior e suba até o primeiro mirante, depois retorne pelos mirantes da ponte que cruzam pequenos riachos.
Ponto C: Cidade de Pedra de Kungur (Cidade de Pedra de Kungur) no Krai de Perm. Localização: perto da cidade de Kungur, dentro de um planalto cármico composto por torres e arcos de calcário agrupados. Acesso: dirija de Perm por uma estrada regional até Kungur, depois caminhe ou faça uma trilha guiada local até o campo de rochas; muitas rotas contornam os topos das colinas e passam por uma rede de oco e cavernas. O estilo de formação é clássico em sua disposição em colunas e as cavernas próximas revelam padrões de erosão antigos; no caminho da manhã, você ouvirá rios próximos e verá pássaros acima. A vida selvagem é comum e os visitantes frequentemente encontram veados nas margens das florestas circundantes; permaneça nas trilhas designadas para não perturbar o habitat que abriga ecossistemas nativos. Traga um equipamento fotográfico compacto para close-ups das texturas das pedras e planeje várias paradas curtas para admirar as alcovas em forma de sala entre os picos.
Spot D: Afloramentos das Colinas de Shoria nos contrafortes do Sul dos Urais. Localização: uma faixa de colinas rochosas situadas a oeste dos Urais, composta por cristas irregulares e colinas arredondadas com escadarias de pedra de alturas variadas. Acesso: alcance o principal nó ferroviário (Miass ou Chebarkul) e transfira-se para uma estrada florestal que leva ao início da trilha inferior; a partir daí, siga uma rota marcada através de uma floresta de pinheiros até chegar às torres mais impressionantes. A área apresenta fauna típica da taiga e vários pequenos riachos que alimentam rios sazonais; o ar da manhã é fresco e a luz realça as formas esculturais das pedras desgastadas. A rota inclui algumas curvas em zigue-zague que oferecem vistas sobre o vale, com vários pontos para pausar e fotografar os picos.
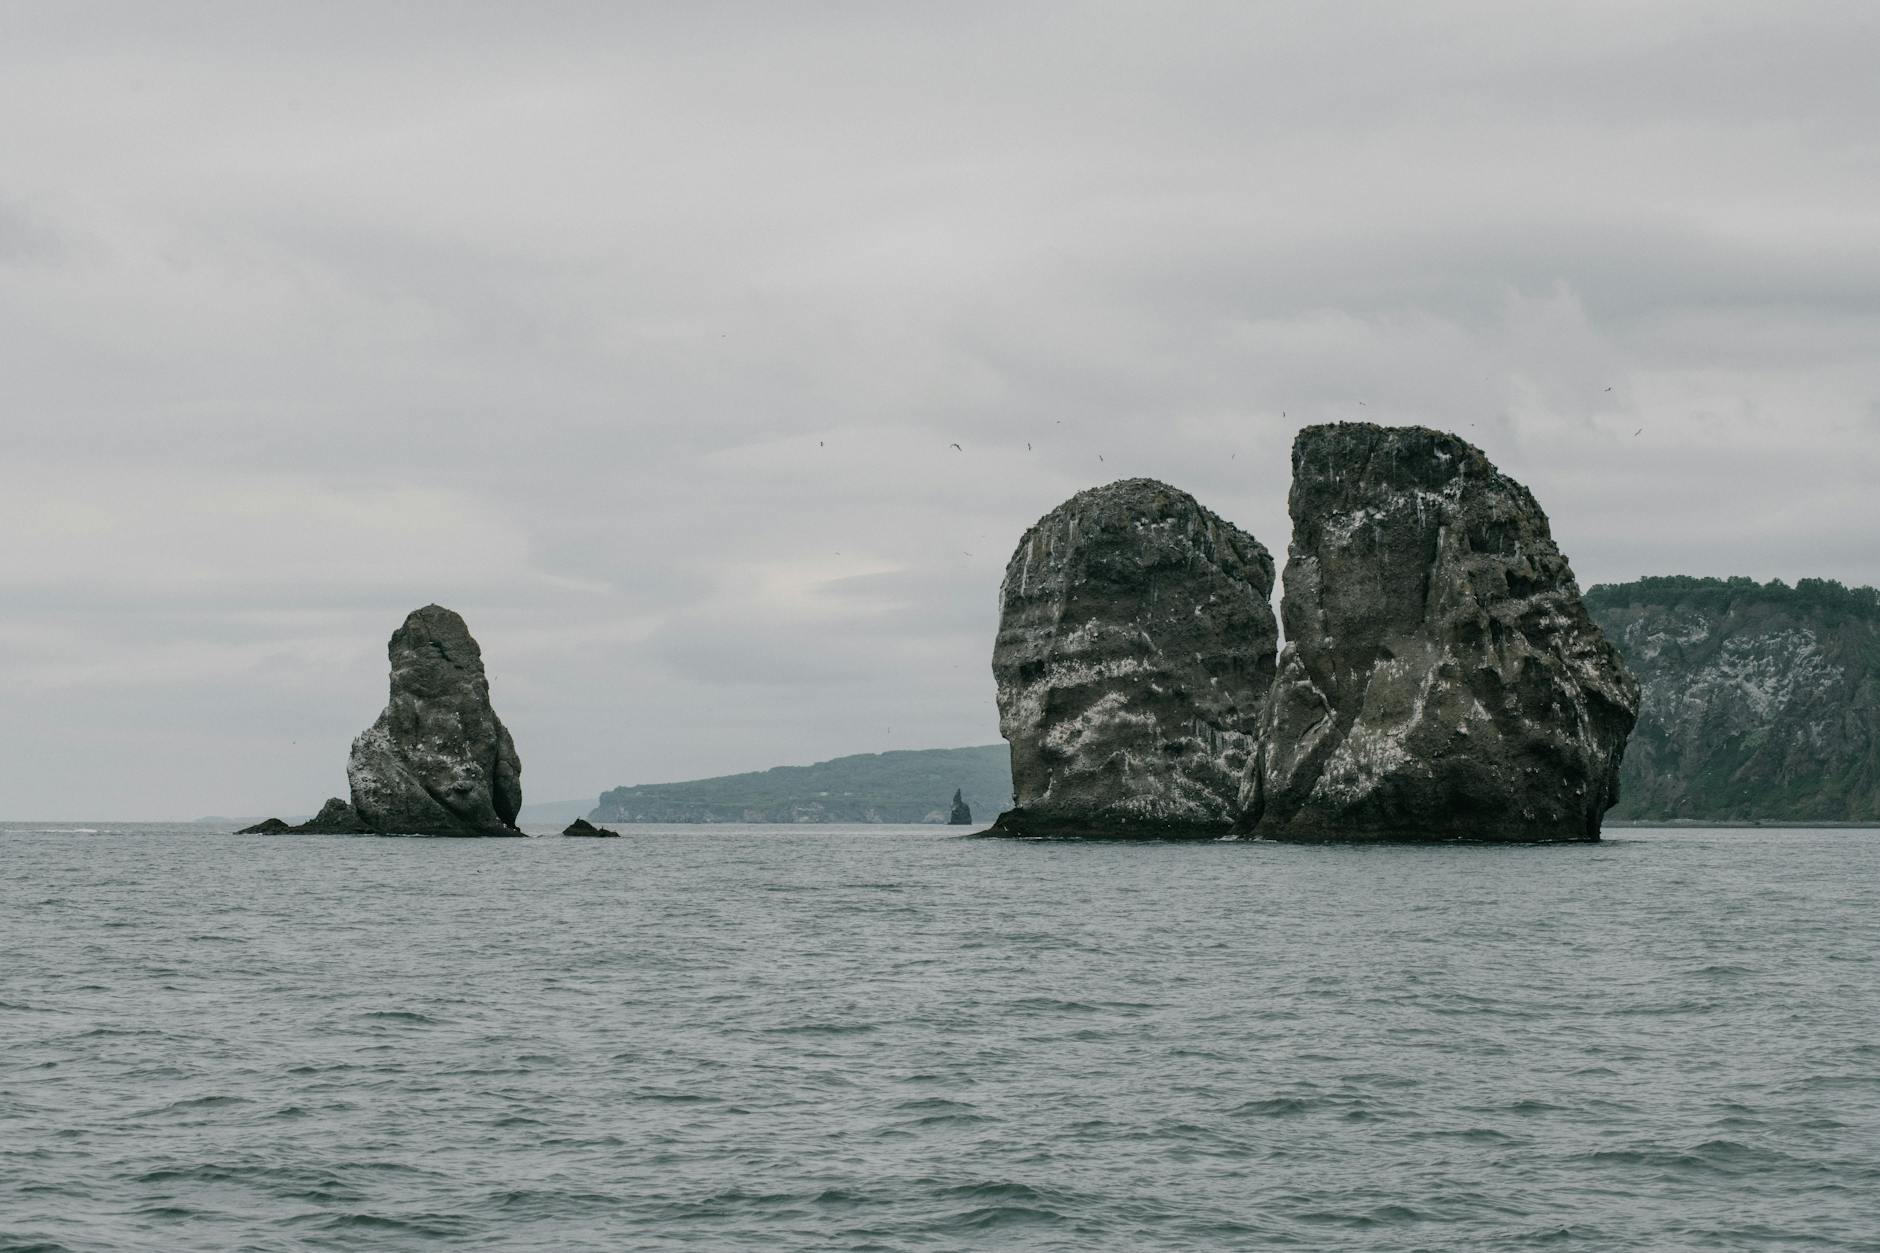
Spot E: Colunas rochosas da Península de Kamchatka perto da costa. Localização: uma faixa costeira no extremo leste, composta por afloramentos vulcânicos e sedimentares que se elevam acima da praia. Acesso: voe para Petropavlovsk-Kamchatsky e contrate um guia local que possa organizar o transporte até os pontos de partida dos trilhos nas encostas; o tempo de viagem pode exigir uma transferência de barco até a cabeceira de alguns cânions. A paisagem é acidentada e lentamente esculpida pela erosão, com padrões climáticos que resultam em nevoeiros dramáticos pela manhã e riachos fumegantes perto da base. O local oferece uma mistura de respingos do mar, avistamentos de vida selvagem e um cenário esparso, mas belo, de formas rochosas e colinas; considere um segundo dia para explorar torres mais distantes, já que as rotas podem ter vários quilômetros de extensão. Cruzamentos de pontes sobre riachos e pequenos rios são comuns, e alguns pontos ficam sob abrigos naturais que criam salas naturais para descansar e fazer uma sequência de fotos.
Picos de Pedra do F: Picos de pedra da cordilheira de Altai nas fronteiras da Rússia e Mongólia. Localização: uma zona de planalto elevado composta por fissuras, vales e rochas em forma de agulha no oeste do Altai. Acesso: acesse a partir de Gorno-Altaysk ou Barnaul, depois conecte-se a um trilho marcado em direção aos contrafortes; podem ser necessárias permissões em certas zonas protegidas, portanto consulte os escritórios locais de parques para as regras atuais. Os afloramentos exibem um contraste impressionante de minerais brancos e cinzentos contra um céu azul; lentamente, eles se elevam das encostas arborizadas para colinas abertas, criando uma paisagem que parece clássica em sua geometria atemporal. Visitas pela manhã são as melhores para capturar a luz suave nas pedras e observar os animais que habitam os ecossistemas circundantes.
Spot G: Rochas em arco da bacia do Baikal perto da costa leste do lago. Localização: nas proximidades do lago Baikal, onde arcos e torres de rocha se situam ao longo da morena e da linha costeira. Acesso: alcance Irkutsk ou Ust-Barguzin e use guias locais para acessar os pontos de partida das trilhas ao longo das estradas florestais; várias rotas convergem em pontos de observação que resultam em fotos dramáticas dos arcos com o lago ao fundo. O terreno consiste em costas de cascalho e colinas adjacentes, com fauna que inclui aves aquáticas e espécies ribeirinhas; você verá padrões de erosão lenta que revelam a evolução da geologia e um espaço semelhante a uma sala sob alguns arcos que criam um retrato atmosférico.
Spot H: afloramentos de granito da Carelia perto da fronteira com a Finlândia. Localização: um mosaico de penhascos e rochedos escondidos em colinas florestadas a poucos quilômetros do interior da região do Mar Branco. Acesso: dirija até as capitais regionais e siga estradas florestais em direção às zonas designadas do parque; várias trilhas levam a bolsões intocados de torres de granito. Esta área é conhecida por seus blocos isolados e chapéus tabulares, que oferecem espaço suficiente para explorar a pé e capturar a luz ao amanhecer. A vida selvagem está presente nos ecossistemas deltaicos circundantes, e fique atento aos pássaros que se abrigam entre as saliências; incomodados por multidões nos horários de pico, muitos visitantes preferem a janela mais tranquila da manhã para obter as melhores fotos.
Spot I: Grupo de Mesa Ural nas encostas pré-urais. Localização: um conjunto de monólitos de topo plano espalhados por uma vasta elevação, com vários contrafortes e gargantas estreitas. Acesso: pegue um ônibus de longa distância para a cidade mais próxima, depois um transporte local em direção ao início da trilha; várias rotas oferecem diferentes pontos de vista. As barras e colunas proporcionam uma beleza austera e teimosa que se traduz em uma composição clássica; as rochas desgastam-se lentamente em bordas arredondadas que contrastam com as linhas retas das colinas circundantes e de quaisquer construções antigas no assentamento próximo. A área é típica para passeios de um dia, com vida selvagem e fácil visualização de vários afloramentos ideais para uma sessão fotográfica matinal.
Pico J: Agulhas rochosas do Maciço Khibiny na Península de Kola. Localização: um arco setentrional que apresenta torres de pedra escura e áspera entre a tundra e líquens. Acesso: voe para Murmansk, depois dirija até as zonas de encostas e conecte-se a uma trilha guiada; várias rotas interligam as principais torres, e é possível observar a paisagem do topo de uma crista após uma subida constante. A caminhada passa por uma zona onde a vida selvagem está ativa ao amanhecer, e você frequentemente encontrará locais com abrigos em forma de sala sob uma saliência que oferece proteção nos dias ventosos. A paisagem é bela em uma luz norte clara e severa, com trilhas livres disponíveis na baixa temporada e guias particulares para segmentos mais desafiadores.
Melhores épocas do ano para iluminação, clima e multidões
Plane visitas no final da primavera ou no início do outono para o melhor equilíbrio entre luz, clima e multidões. Essa janela, chamada de temporada intermediária, é algo que produz uma luz única e direcional sobre colinas e lagos, traduzindo-se em tons quentes nas faces de pedra. Fotografias compostas por panoramas amplos e texturas próximas ficam dramáticas à medida que milhões de fótons se acumulam nas superfícies. O acesso a bases e pontos de partida melhora aqui, e as ruas próximas a cidades ficam mais tranquilas. Aqui, elas se tornaram pontos de vista icônicos tanto para visitantes quanto para moradores. Algumas rotas escondem um refúgio em um cânion perto de Zubeydesheth. Para planejamento, consulte theluxvault para mapas e itinerários. A oferta desses meses costuma ser enorme.
As janelas de luz são melhores ao amanhecer ou ao anoitecer, com a hora dourada durando cerca de 60 minutos após o nascer e antes do pôr do sol. Pela Rússia, a luz muda rapidamente, mas as cores se transformam em tons quentes nas paredes de pedra, criando um clima único para cada foto. As fotos tiradas nessas janelas geralmente apresentam céus amplos e superfícies ricas em textura, revelando detalhes que desaparecem ao meio-dia.
Gestão de multidões: as manhãs de meio de semana costumam ser mais tranquilas; planeje as filmagens entre nove e onze horas para minimizar o congestionamento, e evite fins de semana e feriados escolares, quando o número de visitantes aumenta. As sessões de luz final podem atrair grupos maiores, então prefira a janela mais cedo, quando possível.
Acesso e logística: comece a partir de bases ao longo das principais rotas. Verifique permissões e regras de acesso para zonas protegidas; mantenha-se nas trilhas marcadas e siga as placas. theluxvault oferece desvios mais tranquilos e esconderijos seguros, como cavernas perto do centro. Para quem tem pouco tempo, um circuito de um dia a partir de uma cidade próxima mantém as ruas gerenciáveis e o trânsito entre os pontos de vista curto.
Equipamento e etiqueta: use tênis esportivo; vista camadas de roupa; leve água; carregue um tripé compacto para exposições longas; escolha lentes para amplas paisagens e detalhes texturizados; proteja o equipamento de poeira e umidade; e mantenha um cartão de memória extra para milhões de fotos. Sempre celebre as paisagens, e lembre-se de que isso exige paciência para aproveitar o ritmo de nove estações dos locais, especialmente no último raio de luz, quando o céu revela suas verdadeiras cores.
Configurações da câmera, composição e equipamentos para paisagens ásperas
Monte sempre a sua câmera num tripé firme e tire em modo manual e RAW; utilize a luz disponível e tenha cuidado com o movimento. Comece com ISO 100, exponha para os destaques e mantenha o obturador entre 1/125s e 1/320s para cenas de rocha estáveis. Use uma abertura em torno de f/8 a f/11 para manter a profundidade do primeiro plano aos picos distantes; para detalhes no primeiro plano, reduza para f/5.6-f/8 e aumente o ISO para 200-400 se vento ou movimento exigirem um tempo de obturador mais rápido.
A composição depende de um primeiro plano forte, profundidade clara e escala. Coloque uma linha guia em direção ao meio ou fundo da distância, evite centralizar o horizonte e experimente enquadramentos em ângulo baixo e próximo ao chão. Inclua um elemento de referência, como um edifício desgastado ou uma estrutura abandonada, para transmitir tamanho; em uma paisagem de ruínas de Chufut-Kale ou rochas de Bandarban, isso adiciona drama e ajuda a eternizar o local para os espectadores, incluindo crianças.
Itens essenciais incluem um corpo resistente a intempéries, dois cartões de memória e uma mochila de grau militar. Uma lente grande angular (14-24mm) cobre cenas ásperas, com um telezoom (70-200mm) para detalhes distantes. Adicione um polarizador circular para aprofundar os céus, um filtro ND degradado de 2-3 paradas para horizontes de alto contraste e um tripé robusto com coluna central reversível. Mantenha as tampas das lentes quando se mover entre locais e leve um kit de limpeza pequeno; em condições de campo perto de Moscou ou outros locais remotos, o tempo ocioso é raro, então esteja preparado.
Registre os dados de cada frame em um simples log: local, data, clima e configurações; esse método de anotações virtuais ajuda a reproduzir o clima posteriormente, e as anotações sobre a abordagem reforçam o aprendizado. Locais como Chufut-Kale e Bandarban oferecem luzes variadas, quase exigindo uma rápida adaptação para capturar o clima e a história de cada lugar.
| Aspect | Recomendação |
|---|---|
| Mode | Aqui está a tradução: Manual, BRUTO |
| ISO | 100-200 em luz brilhante; até 400 quando a sombra ou o movimento exigir |
| Abertura | f/8-f/11 para nitidez ampla; f/5.6-f/8 para primeiro plano pronunciado |
| Shutter | 1/125-1/320s; usar colchetes para HDR se necessário |
| Lenses | Largo (14-24mm) para cenas grandiosas; médio (24-70mm) para detalhes; tele (70-200mm) para compressão |
| Filters | Polarizador para aprofundar céus; ND Grad 2-3 paragens para horizontes brilhantes |
| Estabilidade | Tripé; disparador remoto ou temporizador para reduzir o tremor |
| Branco de balanço | Entendido. Por favor, forneça o texto que deseja que eu traduza para o português, e seguirei todas as instruções especificadas. |
Permissões, segurança e regulamentos locais que você deve conhecer
Verifique os requisitos de autorização antes de planejar qualquer trilha; entre em contato com a autoridade local do parque ou o escritório de gestão de terras para confirmar as autorizações necessárias, prazos, tamanho máximo do grupo e janelas de acesso.
Use calçado resistente, mantenha-se em trilhas estabelecidas e evite caminhar em bordas instáveis onde a textura do arenito pode se desprender, áreas com pedras soltas; o tempo pode mudar rapidamente, então acompanhe as previsões e evite seções com pedras soltas.
Alguns sítios ficam dentro de territórios protegidos cujo acesso é limitado a grupos acompanhados por guias; no entanto, em Bandarban e Chufut-Kale, as regras dizem que não se pode sair das trilhas marcadas e é necessário permanecer com um guia licenciado; apenas esse arranjo permite preservar suas texturas naturais e proteger as texturas de arenito que caracterizam os sítios localizados nessas regiões.
Para fotografia, traga um tripé compacto e mantenha o equipamento controlado; onde existirem superfícies de madeira, evite colocar o equipamento em madeira úmida para evitar escorregões; se houver uma passarela, fique nela; equipamento deixado sem vigilância é um ímã para furtos e pode danificar superfícies delicadas; treinamento em caminhadas seguras e manuseio de equipamentos ajuda, especialmente em bordas expostas.
As candidaturas são geralmente submetidas através de portais oficiais e modernos ou em postos de guarda-florestal locais; reserve pelo menos duas semanas para processamento; leve um permissão impressa, uma cópia do itinerário e o contato do líder; as taxas, se aplicáveis, são pagas online ou na retirada; algumas zonas exigem um guia licenciado e um permissão apenas para o dia, para encontrar o caminho até áreas sensíveis. Essas medidas oferecem bom controle e devem ser seguidas.
No local, siga as regulamentações afixadas, evite subir em áreas com pedras soltas ou beiradas instáveis e preserve o território levando todo o lixo; use água apenas de fontes designadas; manter o grupo compacto ajuda a reagir rapidamente se surgir perigo; essas paisagens revelam belas tonalidades douradas ao amanhecer e ao entardecer, oferecendo boas vistas enquanto você caminha, e você deve respeitar os lugares aos quais está tendo acesso.
Se precisar de mais informações, entre em contato com os centros de visitantes ou escritórios oficiais do parque; os guias podem explicar as regras locais para a região de Lena e Chufut-Kale; sempre verifique os status atuais antes de ir, pois as regulamentações podem mudar conforme as estações; essa abordagem garante boa segurança e preserva o território para os visitantes futuros.
Planejamento inteligente de itinerário para cobrir todos os 10 locais
Comece com o Manpupuner para um bloco de três dias, garantindo a fotografia do nascer do sol e as rotas de trilha, depois siga em um único loop pelas formações. Contrate guias e permissão de acesso com fornecedores locais, leia avaliações antes e pegue as permissões no local, se possível. Planeje as manhãs para a luz do nascer do sol, evite trilhas movimentadas e dedique dias alternados para trilha e ciclismo para manter um ritmo constante.
- Manpupuner - pilares de pedra que se erguem da planície; comece ao amanhecer para luz suave e silhuetas limpas. Reserve dois dias completos se quiser fotografar tanto os pilares quanto os campos de talus ao redor; use um equipamento de caminhada compacto e leve uma bolsa para câmera à prova de intempéries. O acesso é melhor por meio de um roteiro guiado; reserve com antecedência por meio de fornecedores confiáveis e confirme os horários do nascer do sol.
- Cluster central - exposições de formas colunares contra o céu aberto; planeje uma visita de um dia com início no final da manhã para capturar a luz mais suave nos rostos. O terreno é irregular, mas transitável com calçado adequado; uma curta caminhada cênica forma um aquecimento ideal para seções mais exigentes depois.
- Picos setentrionais - três agulhas distintas visíveis de um único miradouro; chegue de manhã para reduzir as sombras e leve um tripé para paisagens amplas. O acesso pode exigir uma estrada irregular seguida de uma caminhada rápida; contrate guias para facilitar o percurso e minimizar o risco de tempo.
- Egress ridge - estreitas cristas com perfis dramáticos; uma trilha de duas horas conecta a um ponto de vista mais elevado, onde a fotografia se beneficia da luz de trás. Mantenha um kit compacto e considere a opção de bicicleta para a abordagem, se tiver permissão e apoio local.
- Planalto sul - arcos naturais e frontões rochosos de alto contraste; planeje um horário no final da tarde para capturar tons quentes. O local é acessível por veículo leve até um ponto de partida, seguido por uma caminhada de uma hora em ritmo constante até os principais pontos de interesse.
- Ridge line group - vários pilares alinhados em um arco raso; utilize uma sessão matinal para capturar sombras longas, depois mude para close-ups de textura. O acesso é melhor com um curto circuito de caminhada que respeite as superfícies frágeis.
- Vale das Colunas Esker - formações que se elevam abruptamente do solo do vale; um plano de um dia completo aqui permite múltiplos pontos de vista e fotografia lenta e cuidadosa. Leve água e lanches adequados para sessões de longa exposição; considere um ritmo de corrida para uma volta rápida de reconhecimento se as condições permitirem.
- Formações rochosas costeiras - exposições esculpidas pelo vento e pela chuva ao longo da costa; visite ao nascer ou ao pôr do sol para maximizar a saturação de cores nas faces das rochas. O acesso exige um caminho litorâneo, com prioridade para calçado seguro; uma bicicleta leve pode encurtar a aproximação em dias favoráveis.
- Torreões da bacia interna - colunas naturais que se elevam de uma bacia mais plana; reserve meio dia para capturar tanto o horizonte distante quanto as texturas íntimas nas faces das colunas. Vendedores em pontos de partida próximos podem organizar uma curta transferência de barco ou terra se o tempo mudar.
- Região final de observação - um conjunto de pilares menores que oferecem ângulos íntimos e dignos de repetição; reserve meio dia para revisões de última hora e para preencher quaisquer lacunas de luz. Este segmento de encerramento é ideal para uma sessão retrospectiva de fotografia e se despede de um grande arco pelos dez locais.
Dicas gerais: almeje três janelas de luz por local—nascer do sol, final da manhã e hora dourada—e ajuste conforme o clima. Leve um tripé leve, vários cartões de memória e baterias extras, pois milhões de quadros ao longo do loop estão ao alcance. Para a logística, garanta o acesso com guias verificados e confira as avaliações antes de cada transferência; planeje dias extras para variações climáticas e condições das estradas. Se preferir um ritmo mais lento, reduza para oito locais e estenda cada parada para um dia inteiro, inserindo um dia de descanso após o início do Manpupuner. Sempre verifique as regras de acesso atuais e mantenha seu plano flexível para acomodar aberturas sazonais de estradas e horários de fornecedores.


